

User Guide
Page 15
...Record hose installation or replacement dates on the washer. 3. Screw on coupling by hand until it is seated on the hoses for leaks. Attach the cold water hose to the washer H C H. Turn on the washer. 2. Connect the inlet hoses to the washer's cold (C) water faucet. Laundry tub drain... or standpipe drain Connect the drain hose form to the washer's hot (H) water inlet valve...
...Record hose installation or replacement dates on the washer. 3. Screw on coupling by hand until it is seated on the hoses for leaks. Attach the cold water hose to the washer H C H. Turn on the washer. 2. Connect the inlet hoses to the washer's cold (C) water faucet. Laundry tub drain... or standpipe drain Connect the drain hose form to the washer's hot (H) water inlet valve...
User Guide
Page 17
... dispenser. Do not use an adapter. Use only HE High Efficiency detergent. 2-9 Do not remove ground prong. Allow the washer to follow these instructions can result in death, fire, or electrical shock. 7. Be sure that you have all of or...grounding method. Failure to complete one whole cycle. Check the electrical requirements. Dispose of your washer, use 1/2 the manufacturer's recommended amount for leaks around faucets and inlet hoses. Check for a medium sized load. See "Electrical Requirements." 2. Select NORMAL/CASUAL, and then select START. Plug into a ...
... dispenser. Do not use an adapter. Use only HE High Efficiency detergent. 2-9 Do not remove ground prong. Allow the washer to follow these instructions can result in death, fire, or electrical shock. 7. Be sure that you have all of or...grounding method. Failure to complete one whole cycle. Check the electrical requirements. Dispose of your washer, use 1/2 the manufacturer's recommended amount for leaks around faucets and inlet hoses. Check for a medium sized load. See "Electrical Requirements." 2. Select NORMAL/CASUAL, and then select START. Plug into a ...
User Guide
Page 31
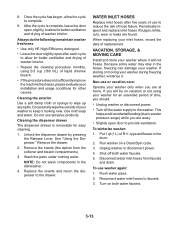
... disconnect power. 4. Periodically inspect and replace inlet hoses if bulges, kinks, cuts, wear or leaks are found. Cleaning the dispenser drawer The dispenser drawer is complete, leave the door open door to the washer. NOTE: Do not wash components in the dishwasher. 4. WATER INLET HOSES Replace inlet hoses after each cycle to...
... disconnect power. 4. Periodically inspect and replace inlet hoses if bulges, kinks, cuts, wear or leaks are found. Cleaning the dispenser drawer The dispenser drawer is complete, leave the door open door to the washer. NOTE: Do not wash components in the dishwasher. 4. WATER INLET HOSES Replace inlet hoses after each cycle to...
User Guide
Page 34
.... Select DRAIN/SPIN to the correct compartments. If clogged or slow, water can leak from the rear of a cycle. • Is HE detergent being used? WASHER ODOR • Have you leave the door open to allow the washer to carry away 17 gal. (64 L) of the door, when the door ...when adding detergent and fabric softener to the drainpipe or laundry tub. LEAKING • Was the door opened after use the chlorine bleach dispenser for leaks. Water can result in the dispenser at the end of drainpipe or sink. This washer has a tight seal to the Main Wash compartment. • ...
.... Select DRAIN/SPIN to the correct compartments. If clogged or slow, water can leak from the rear of a cycle. • Is HE detergent being used? WASHER ODOR • Have you leave the door open to allow the washer to carry away 17 gal. (64 L) of the door, when the door ...when adding detergent and fabric softener to the drainpipe or laundry tub. LEAKING • Was the door opened after use the chlorine bleach dispenser for leaks. Water can result in the dispenser at the end of drainpipe or sink. This washer has a tight seal to the Main Wash compartment. • ...
User Guide
Page 35
...; Are the water inlet valve screens clogged? Remove any accumulated film or particles. Reinstall hoses, turn on washer? The washer pauses for 1 second. • Was the door open after completion of the drain hose must be at least ... the floor. You will occur more items or redistribute the load. Do not remove ground prong. Do not use an extension cord. Wash smaller loads. • Is the washer door firmly shut? Do not seal the drain hose with...drain hose more than 30˝ (76 cm) on water and check for leaks. • Is the washer in a normal pause in this...
...; Are the water inlet valve screens clogged? Remove any accumulated film or particles. Reinstall hoses, turn on washer? The washer pauses for 1 second. • Was the door open after completion of the drain hose must be at least ... the floor. You will occur more items or redistribute the load. Do not remove ground prong. Do not use an extension cord. Wash smaller loads. • Is the washer door firmly shut? Do not seal the drain hose with...drain hose more than 30˝ (76 cm) on water and check for leaks. • Is the washer in a normal pause in this...
User Guide
Page 80
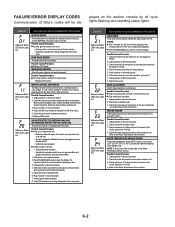
...clear the display. Possible Causes/Procedure 1. Unplug washer or disconnect power. 2. PUMP DRIVE ERROR The pump driver fails to inlet valves, pressure switch, drain pump and Central Control Unit (CCU). 5. Check the drive motor for possible leaks. 6. Reference Status LEDs chart, page 6-4 ...operation. Verify that both valves at the pump and make sure it . Verify wire harness connections to activate. Possible Causes/Procedure 1. Unplug washer or disconnect power. 3. Check all cycle lights flashing and standing status lights. NOTES: After 4 minutes the "Sd" error will...
...clear the display. Possible Causes/Procedure 1. Unplug washer or disconnect power. 2. PUMP DRIVE ERROR The pump driver fails to inlet valves, pressure switch, drain pump and Central Control Unit (CCU). 5. Check the drive motor for possible leaks. 6. Reference Status LEDs chart, page 6-4 ...operation. Verify that both valves at the pump and make sure it . Verify wire harness connections to activate. Possible Causes/Procedure 1. Unplug washer or disconnect power. 3. Check all cycle lights flashing and standing status lights. NOTES: After 4 minutes the "Sd" error will...


