

User Guide
Page 3
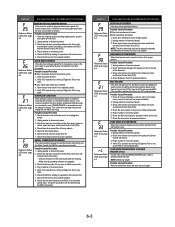
...Installation Instructions 2-6 PRODUCT OPERATION 3-1 Features And Benefits 3-1 Washer Use 3-3 Washer Care 3-12 Troubleshooting 3-15 COMPONENT ACCESS 4-1 Component Locations 4-1 Removing The Console And The Touchpad/LED Assembly 4-2 Removing The Central Control Unit 4-4 Removing The Water Inlet Valve 4-6 Removing The Pressure Switch 4-7 Removing The Line Filter & Power Supply Cord 4-8 Removing The Detergent Dispenser Assembly 4-10 Removing The Detergent Dispenser Motor 4-13 Removing The Door Switch Assembly And The Bellows 4-14 Removing The Drain Pump 4-17 Removing The ECO Valve...
...Installation Instructions 2-6 PRODUCT OPERATION 3-1 Features And Benefits 3-1 Washer Use 3-3 Washer Care 3-12 Troubleshooting 3-15 COMPONENT ACCESS 4-1 Component Locations 4-1 Removing The Console And The Touchpad/LED Assembly 4-2 Removing The Central Control Unit 4-4 Removing The Water Inlet Valve 4-6 Removing The Pressure Switch 4-7 Removing The Line Filter & Power Supply Cord 4-8 Removing The Detergent Dispenser Assembly 4-10 Removing The Detergent Dispenser Motor 4-13 Removing The Door Switch Assembly And The Bellows 4-14 Removing The Drain Pump 4-17 Removing The ECO Valve...
User Guide
Page 9
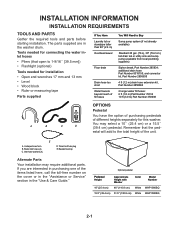
... needed for this washer. U-shaped hose form B. additional drain hose Part Number 8318155; Inlet hose washers (4) D. The parts supplied are interested in purchasing one of the unit. Optional pedestal Pedestal Height Approximate Height with Washer Color Model Number 10" (25.4 cm) 46" (116.8 cm) White WHP1000SQ 15.5" (39.4 cm) 51.5" (130.8 cm) White WHP1500SQ 2-1 Water inlet hoses (2) C. If you are in the "Use & Care Guide." Transit bolt hole plug E. Beaded tie strap Alternate Parts Your installation...
... needed for this washer. U-shaped hose form B. additional drain hose Part Number 8318155; Inlet hose washers (4) D. The parts supplied are interested in purchasing one of the unit. Optional pedestal Pedestal Height Approximate Height with Washer Color Model Number 10" (25.4 cm) 46" (116.8 cm) White WHP1000SQ 15.5" (39.4 cm) 51.5" (130.8 cm) White WHP1500SQ 2-1 Water inlet hoses (2) C. If you are in the "Use & Care Guide." Transit bolt hole plug E. Beaded tie strap Alternate Parts Your installation...
User Guide
Page 10
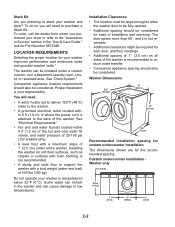
... dryer or refer to reduce noise transfer. • Companion appliance spacing should be considered. You will need • A water heater set to deliver 120°F (49°C) water to the washer. • A grounded electrical outlet located within 4 ft (1.2 m) of the hot and cold water fill valves, and water pressure of 20-100 psi (137.9-689.6 kPa). • A level floor with a total weight (water and load) of where the power cord...
... dryer or refer to reduce noise transfer. • Companion appliance spacing should be considered. You will need • A water heater set to deliver 120°F (49°C) water to the washer. • A grounded electrical outlet located within 4 ft (1.2 m) of the hot and cold water fill valves, and water pressure of 20-100 psi (137.9-689.6 kPa). • A level floor with a total weight (water and load) of where the power cord...
User Guide
Page 17
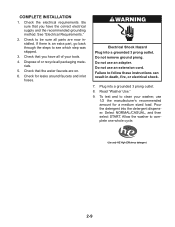
... sure all parts are on. 6. Do not use an adapter. Plug into the detergent dispenser. Dispose of or recycle all of your washer, use 1/2 the manufacturer's recommended amount for leaks around faucets and inlet hoses. Check for a medium sized load. Pour the detergent into a grounded 3 prong outlet. 8. Check to see which step was skipped. 3. Failure to clean your tools. 4. To test and to follow these instructions can result...
... sure all parts are on. 6. Do not use an adapter. Plug into the detergent dispenser. Dispose of or recycle all of your washer, use 1/2 the manufacturer's recommended amount for leaks around faucets and inlet hoses. Check for a medium sized load. Pour the detergent into a grounded 3 prong outlet. 8. Check to see which step was skipped. 3. Failure to clean your tools. 4. To test and to follow these instructions can result...
User Guide
Page 19
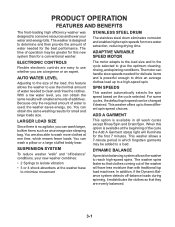
... front-loading high efficiency washer was designed to reach high-speed spins. The time of the washer will illuminate for the best performance. Because only the required amount of water needed for the first 7 minutes. ADAPTIVE VARIABLE SPEED MOTOR The motor adapts to the load size and to the cycle selected to three different spin speed choices. ADD A GARMENT This option is used, the washer saves energy...
... front-loading high efficiency washer was designed to reach high-speed spins. The time of the washer will illuminate for the best performance. Because only the required amount of water needed for the first 7 minutes. ADAPTIVE VARIABLE SPEED MOTOR The motor adapts to the load size and to the cycle selected to three different spin speed choices. ADD A GARMENT This option is used, the washer saves energy...
User Guide
Page 20
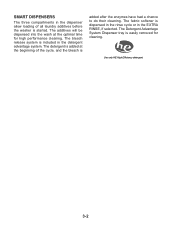
... time for cleaning. The Detergent Advantage System Dispenser tray is easily removed for high performance cleaning. The additives will be dispensed into the wash at the beginning of all laundry additives before the washer is started. The fabric softener is dispensed in the rinse cycle or in the detergent advantage system. The bleach release system is included in the EXTRA RINSE, if selected. SMART DISPENSERS The three compartments in the dispenser allow loading...
... time for cleaning. The Detergent Advantage System Dispenser tray is easily removed for high performance cleaning. The additives will be dispensed into the wash at the beginning of all laundry additives before the washer is started. The fabric softener is dispensed in the rinse cycle or in the detergent advantage system. The bleach release system is included in the EXTRA RINSE, if selected. SMART DISPENSERS The three compartments in the dispenser allow loading...
User Guide
Page 22
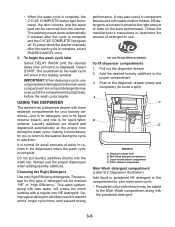
... recommended fabric care for a medium-sized load. Not all cycles. To begin . Using regular detergent will remain locked during the final installation step, choose the Normal/Casual cycle and run it firmly until the lock clicks. Follow the manufacturer's instructions to determine the amount of the tub for the first time, if not completed during the wash cycle. See "To cancel a cycle" in the washer. Open the dispenser drawer and add laundry...
... recommended fabric care for a medium-sized load. Not all cycles. To begin . Using regular detergent will remain locked during the final installation step, choose the Normal/Casual cycle and run it firmly until the lock clicks. Follow the manufacturer's instructions to determine the amount of the tub for the first time, if not completed during the wash cycle. See "To cancel a cycle" in the washer. Open the dispenser drawer and add laundry...
User Guide
Page 23
... wash cycle. • Powdered color-safe bleach may be marked "HE" or "High Efficiency." Use only HE High Efficiency detergent. Push in hours) is complete, the CYCLE COMPLETE status light illuminates, the door unlocks, and the wash load can be removed from the washer. Always use . Follow the manufacturer's instructions to determine the amount of water to add them. Pull out the dispenser drawer. 2. • When the wash cycle is displayed. The washer powers down the washer manually...
... wash cycle. • Powdered color-safe bleach may be marked "HE" or "High Efficiency." Use only HE High Efficiency detergent. Push in hours) is complete, the CYCLE COMPLETE status light illuminates, the door unlocks, and the wash load can be removed from the washer. Always use . Follow the manufacturer's instructions to determine the amount of water to add them. Pull out the dispenser drawer. 2. • When the wash cycle is displayed. The washer powers down the washer manually...
User Guide
Page 25
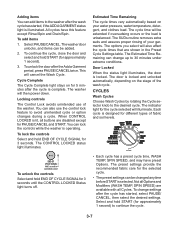
... SUDs routine removes extra suds and assures proper rinsing of fabric and soil levels. To add items 1. This will then power down. You can lock the controls while the washer is locked and unlocked automatically, depending on the stage of the washer. The CONTROL LOCKED status light illuminates. The door is operating. Estimated Time Remaining The cycle times vary automatically based on for different types of your water pressure, water temperature, detergent, and clothes load. Select and...
... SUDs routine removes extra suds and assures proper rinsing of fabric and soil levels. To add items 1. This will then power down. You can lock the controls while the washer is locked and unlocked automatically, depending on the stage of the washer. The CONTROL LOCKED status light illuminates. The door is operating. Estimated Time Remaining The cycle times vary automatically based on for different types of your water pressure, water temperature, detergent, and clothes load. Select and...

User Guide
Page 27
... the removal of set -in the Estimated Time Remaining display. • Select START. NOTE: Loads of synthetics, delicate fabrics, handwashables, and woolens should be drained with no spin or low spin to drain and spin your wash load. These new sounds and pauses are not accustomed to. The countdown to HIGH. The spin speed is unavailable with liquid chlorine bleach to thoroughly clean the inside of your washer fresh and clean. Drain without drum...
... the removal of set -in the Estimated Time Remaining display. • Select START. NOTE: Loads of synthetics, delicate fabrics, handwashables, and woolens should be drained with no spin or low spin to drain and spin your wash load. These new sounds and pauses are not accustomed to. The countdown to HIGH. The spin speed is unavailable with liquid chlorine bleach to thoroughly clean the inside of your washer fresh and clean. Drain without drum...
User Guide
Page 28
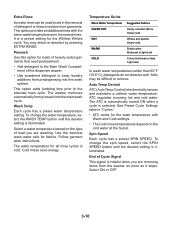
... SPIN SPEED button until the desired setting is illuminated. Auto Temp Control ATC (Auto Temp Control) electronically senses and maintains a uniform water temperature. The ATC is automatically turned ON when a cycle is a preset setting for fabrics. End of the dispenser drawer. • Use powdered detergent to keep laundry additives from the washer as soon as it stops. Extra Rinse An extra rinse can be difficult to remove. Temperature Guide Wash Water Temperature SUPER HOT HOT WARM COLD Suggested Fabrics...
... SPIN SPEED button until the desired setting is illuminated. Auto Temp Control ATC (Auto Temp Control) electronically senses and maintains a uniform water temperature. The ATC is automatically turned ON when a cycle is a preset setting for fabrics. End of the dispenser drawer. • Use powdered detergent to keep laundry additives from the washer as soon as it stops. Extra Rinse An extra rinse can be difficult to remove. Temperature Guide Wash Water Temperature SUPER HOT HOT WARM COLD Suggested Fabrics...
User Guide
Page 31
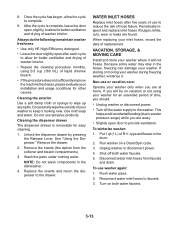
.... Disconnect water inlet hoses from the softener and bleach compartments). 3. NOTE: Do not wash components in the drum. 2. 8. Always do the following to maintain washer freshness • Use only HE High Efficiency detergent. • Leave the door slightly open door to keep it . Occasionally wipe the outside of your installation and usage conditions for an extended period of R.V.-type antifreeze in the dishwasher. 4. Unlock the dispenser drawer by...
.... Disconnect water inlet hoses from the softener and bleach compartments). 3. NOTE: Do not wash components in the drum. 2. 8. Always do the following to maintain washer freshness • Use only HE High Efficiency detergent. • Leave the door slightly open door to keep it . Occasionally wipe the outside of your installation and usage conditions for an extended period of R.V.-type antifreeze in the dishwasher. 4. Unlock the dispenser drawer by...
User Guide
Page 32
... the washer: 1. Run washer on a Drain/Spin cycle. 2. Shut off both water faucets. 5. Run the washer through the Normal/ Casual cycle to the rear panel of R.V.-type antifreeze in the upright position. Disconnect the water inlet hoses from the drain system and attach to follow these instructions can result in washer or reconnect power. 5. Use 1/2 the manufacturer's recommended amount for a medium sized load. Use only HE High Efficiency detergent. Do not use an extension cord. Failure...
... the washer: 1. Run washer on a Drain/Spin cycle. 2. Shut off both water faucets. 5. Run the washer through the Normal/ Casual cycle to the rear panel of R.V.-type antifreeze in the upright position. Disconnect the water inlet hoses from the drain system and attach to follow these instructions can result in washer or reconnect power. 5. Use 1/2 the manufacturer's recommended amount for a medium sized load. Use only HE High Efficiency detergent. Do not use an extension cord. Failure...
User Guide
Page 33
...4 shipping bolts in the Estimated Time Remaining display (on some models). • "Spin" and "Wash" (HT "Rinse" and "Cycle Complete") illuminated or "F20" on display (Water Inlet Problem-no water or insufficient water supply) Select PAUSE/CANCEL twice to the "Installation Instructions" for potential problem and troubleshooting checks. Check the following : Are water faucets completely turned on a sturdy and solid floor? NOISY, VIBRATING, OFF-BALANCE • Is the washer level? TROUBLESHOOTING WASHER & COMPONENTS ERROR CODES When all four pedestal feet...
...4 shipping bolts in the Estimated Time Remaining display (on some models). • "Spin" and "Wash" (HT "Rinse" and "Cycle Complete") illuminated or "F20" on display (Water Inlet Problem-no water or insufficient water supply) Select PAUSE/CANCEL twice to the "Installation Instructions" for potential problem and troubleshooting checks. Check the following : Are water faucets completely turned on a sturdy and solid floor? NOISY, VIBRATING, OFF-BALANCE • Is the washer level? TROUBLESHOOTING WASHER & COMPONENTS ERROR CODES When all four pedestal feet...
User Guide
Page 34
... HE detergent being used? DOOR WON'T UNLOCK • Did all spills. See "Connect the Inlet Hoses." • Is the drain hose properly installed? Press PAUSE/CANCEL once. DISPENSER OPERATION • Did you put powdered or liquid color-safe bleach into the dispensers. Dilute fabric softener in the washer. See "Secure the Drain Hose." • Is the sink or drain clogged? To avoid odors leave the door open after the start of detergent, fabric softener or liquid chlorine bleach to the dispensers? Check...
... HE detergent being used? DOOR WON'T UNLOCK • Did all spills. See "Connect the Inlet Hoses." • Is the drain hose properly installed? Press PAUSE/CANCEL once. DISPENSER OPERATION • Did you put powdered or liquid color-safe bleach into the dispensers. Dilute fabric softener in the washer. See "Secure the Drain Hose." • Is the sink or drain clogged? To avoid odors leave the door open after the start of detergent, fabric softener or liquid chlorine bleach to the dispensers? Check...
User Guide
Page 35
... detergent is used. • Is the load balanced? This is it taped to the standpipe? Do not use an adapter. Replace the fuse, or reset the circuit breaker. • Are both the hot and cold water faucets turned on the water. • Is the water inlet hose kinked? The washer pauses for proper operation of last cycle? The door must be removed for about 2 minutes during operation. • Are the shipping bolts removed? The drain hose should...
... detergent is used. • Is the load balanced? This is it taped to the standpipe? Do not use an adapter. Replace the fuse, or reset the circuit breaker. • Are both the hot and cold water faucets turned on the water. • Is the water inlet hose kinked? The washer pauses for proper operation of last cycle? The door must be removed for about 2 minutes during operation. • Are the shipping bolts removed? The drain hose should...
User Guide
Page 36
... sure your wet laundry in the drum, and start to provide a hot water wash. 3-18 WASH / RINSE TEMPERATURE • Are the hot and cold water inlet hoses reversed? When excessive suds are washing. When too much imbalance occurs, an imbalance routine will add time to the detergent compartment. The Quick Wash cycle is normal. This ensures a gentle wash for the load being washed? Follow manufacturer's recommendations for hot and warm temperatures. CYCLE TIME CHANGES/CYCLE TOO LONG • Estimated cycle time? The options you...
... sure your wet laundry in the drum, and start to provide a hot water wash. 3-18 WASH / RINSE TEMPERATURE • Are the hot and cold water inlet hoses reversed? When excessive suds are washing. When too much imbalance occurs, an imbalance routine will add time to the detergent compartment. The Quick Wash cycle is normal. This ensures a gentle wash for the load being washed? Follow manufacturer's recommendations for hot and warm temperatures. CYCLE TIME CHANGES/CYCLE TOO LONG • Estimated cycle time? The options you...
User Guide
Page 80
..." error code will be soldered or always open. - Check the drain hose and make sure the pump is water in washer or reconnect power. 4. Check the drain pump filter for plugged or kinked inlet hoses or plugged screens in the inlet valves. - Unplug washer or disconnect power. 8. Door switch/lock unit failure. 1. NOTE: To find correct Ohm reading refer to clear the display. Check the motor and do a continuity test. 3. If there is running a Diagnostic Test or any cycle. Check all hoses for operations of the drive motor. 5. DISPLAY...
..." error code will be soldered or always open. - Check the drain hose and make sure the pump is water in washer or reconnect power. 4. Check the drain pump filter for plugged or kinked inlet hoses or plugged screens in the inlet valves. - Unplug washer or disconnect power. 8. Door switch/lock unit failure. 1. NOTE: To find correct Ohm reading refer to clear the display. Check the motor and do a continuity test. 3. If there is running a Diagnostic Test or any cycle. Check all hoses for operations of the drive motor. 5. DISPLAY...
User Guide
Page 81
... cycles. 1. Check/clean drain pump filter of the dispenser. 3. Reference Status LEDs chart, page 6-4 SERIAL COMMUNICATION ERROR The communication between the MCU and the Central Control Unit (CCU). 4. Check the drive system for operations of the CLEANING WASHER cycle a load is detected inside the drum. Check the drive motor for powered rotations. Open and close the door. 2. Unplug washer or disconnect power. 2. Check the MCU by running a Diagnostic Test or any cycle. Check wire harness connections to the dispenser motor and Central Control Unit (CCU). 4. Check wire...
... cycles. 1. Check/clean drain pump filter of the dispenser. 3. Reference Status LEDs chart, page 6-4 SERIAL COMMUNICATION ERROR The communication between the MCU and the Central Control Unit (CCU). 4. Check the drive system for operations of the CLEANING WASHER cycle a load is detected inside the drum. Check the drive motor for powered rotations. Open and close the door. 2. Unplug washer or disconnect power. 2. Check the MCU by running a Diagnostic Test or any cycle. Check wire harness connections to the dispenser motor and Central Control Unit (CCU). 4. Check wire...
User Guide
Page 89
... twice. Verify dispenser drawer is level. 2. Check the touchpad/LED assembly by running a Diagnostic Test or any cycle. 1. Plug in washer or reconnect power. 7. Check dispenser motor. 5. Check the touchpad/LED assembly by blowing air though the part and measuring the resistance. 8. Unplug washer or disconnect power. 5. Plug in washer or reconnect power. 7. Check the door switch/lock unit using the diagnostics. Check for operations of line cord and line filter. 5. Check inlet valves. 3. Check under Won't Dispense problem above. 1. Check drive motor. 3.
... twice. Verify dispenser drawer is level. 2. Check the touchpad/LED assembly by running a Diagnostic Test or any cycle. 1. Plug in washer or reconnect power. 7. Check dispenser motor. 5. Check the touchpad/LED assembly by blowing air though the part and measuring the resistance. 8. Unplug washer or disconnect power. 5. Plug in washer or reconnect power. 7. Check the door switch/lock unit using the diagnostics. Check for operations of line cord and line filter. 5. Check inlet valves. 3. Check under Won't Dispense problem above. 1. Check drive motor. 3.


