

User Guide
Page 3
...And Tech Sheet Locations 1-3 Specifications 1-4 INSTALLATION INFORMATION 2-1 Installation Requirements 2-1 Installation Instructions 2-6 PRODUCT OPERATION 3-1 Features And Benefits 3-1 Washer Use 3-3 Washer Care 3-12 Troubleshooting 3-15 COMPONENT ACCESS 4-1 Component Locations 4-1 Removing The Console And The Touchpad/LED Assembly 4-2 Removing The Central...Removing The Detergent Dispenser Motor 4-13 Removing The Door Switch Assembly And The Bellows 4-14 Removing The Drain Pump 4-17 Removing The ECO Valve 4-19 Removing The Motor Control Unit 4-20 Removing The Temperature Sensor...
...And Tech Sheet Locations 1-3 Specifications 1-4 INSTALLATION INFORMATION 2-1 Installation Requirements 2-1 Installation Instructions 2-6 PRODUCT OPERATION 3-1 Features And Benefits 3-1 Washer Use 3-3 Washer Care 3-12 Troubleshooting 3-15 COMPONENT ACCESS 4-1 Component Locations 4-1 Removing The Console And The Touchpad/LED Assembly 4-2 Removing The Central...Removing The Detergent Dispenser Motor 4-13 Removing The Door Switch Assembly And The Bellows 4-14 Removing The Drain Pump 4-17 Removing The ECO Valve 4-19 Removing The Motor Control Unit 4-20 Removing The Temperature Sensor...
User Guide
Page 9
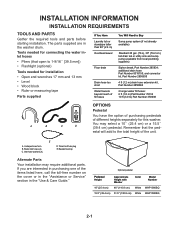
... too short Water faucets beyond reach of different heights separately for this washer. additional drain hose Part Number 8318155; and connector kit, Part Number 2858835 4 ft (1.2 m) drain hose extension kit, Part Number 2858863 2 longer water fill hoses: 6 ft (1.8 m) Part Number 76314 10 ft (3.0 m) Part Number 350008 A B C D OPTIONS Pedestal You have the option of purchasing pedestals of...
... too short Water faucets beyond reach of different heights separately for this washer. additional drain hose Part Number 8318155; and connector kit, Part Number 2858835 4 ft (1.2 m) drain hose extension kit, Part Number 2858863 2 longer water fill hoses: 6 ft (1.8 m) Part Number 76314 10 ft (3.0 m) Part Number 350008 A B C D OPTIONS Pedestal You have the option of purchasing pedestals of...
User Guide
Page 10
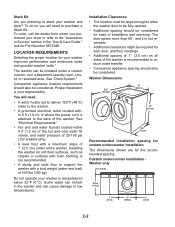
...Kit Are you planning to stack your responsibility. See "Drain System." Custom undercounter installation Washer only 2" (5 cm) 36" min. (91.4 cm) 1" (2.5 cm) 27" (68.6 cm) 1" (2.5 cm) 2-2 See "Electrical Requirements." • Hot and cold water faucets located within 6 ft (1.8 m) of where the power cord is not recommended...cm) on soft floor surfaces, such as carpets or surfaces with a total weight (water and load) of the washer. Installation Clearances • The location must be large enough to allow the washer door to the back of 400 lbs (180 kg). Ask for Part Number 8572546.
...Kit Are you planning to stack your responsibility. See "Drain System." Custom undercounter installation Washer only 2" (5 cm) 36" min. (91.4 cm) 1" (2.5 cm) 27" (68.6 cm) 1" (2.5 cm) 2-2 See "Electrical Requirements." • Hot and cold water faucets located within 6 ft (1.8 m) of where the power cord is not recommended...cm) on soft floor surfaces, such as carpets or surfaces with a total weight (water and load) of the washer. Installation Clearances • The location must be large enough to allow the washer door to the back of 400 lbs (180 kg). Ask for Part Number 8572546.
User Guide
Page 12
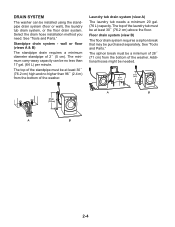
... be no higher than 17 gal. (64 L) per minute. The top of the washer. Standpipe drain system - See "Tools and Parts." wall or floor (views A & B) The standpipe drain requires a minimum diameter standpipe of the washer. The top of the standpipe must be at least 30˝ (76.2 cm) high and no less than 96...
... be no higher than 17 gal. (64 L) per minute. The top of the washer. Standpipe drain system - See "Tools and Parts." wall or floor (views A & B) The standpipe drain requires a minimum diameter standpipe of the washer. The top of the standpipe must be at least 30˝ (76.2 cm) high and no less than 96...

User Guide
Page 15
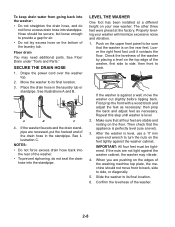
... (C) water faucet. Periodically inspect and replace hoses if bulges, kinks, cuts, wear, or leaks are found. Remove drain hose from the washer Gently pull the corrugated drain hose from damage due to the hot water faucet and that might clog the inlet valve screens. 2. Hot water inlet C. ... and follow these instructions. Snap either end of the water to make sure that the hot water hose is seated on the washer. 3. Bend drain hose over drain hose form and snap into a laundry tub, drainpipe or bucket, to get rid of hose failure. Attach the cold water hose...
... (C) water faucet. Periodically inspect and replace hoses if bulges, kinks, cuts, wear, or leaks are found. Remove drain hose from the washer Gently pull the corrugated drain hose from damage due to the hot water faucet and that might clog the inlet valve screens. 2. Hot water inlet C. ... and follow these instructions. Snap either end of the water to make sure that the hot water hose is seated on the washer. 3. Bend drain hose over drain hose form and snap into a laundry tub, drainpipe or bucket, to get rid of hose failure. Attach the cold water hose...
User Guide
Page 16
... a level on the rear feet. Repeat this step until it contacts the floor. After the washer is level, use a level). 3. Slide the washer to be tightened. SECURE THE DRAIN HOSE 1. Place the drain hose in the standpipe. First prop the front with a wood block and adjust the feet as necessary. Make sure that the appliance...
... a level on the rear feet. Repeat this step until it contacts the floor. After the washer is level, use a level). 3. Slide the washer to be tightened. SECURE THE DRAIN HOSE 1. Place the drain hose in the standpipe. First prop the front with a wood block and adjust the feet as necessary. Make sure that the appliance...
User Guide
Page 19
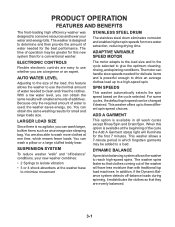
.... SPIN SPEEDS This washer automatically selects the spin speed based on the cycle selected. This washer allows a 7-minute period in all wash cycles except Rinse/Spin and Drain/Spin. You are also able to wash more clothes at the washer base to minimize movement...The motor can obtain the same results with traditional top load machines. The time of operation may be added to a load. PRODUCT OPERATION FEATURES AND BENEFITS The front-loading high efficiency washer was designed to conserve resources and lower your new washer combines: • 2 Springs to isolate vibration &#...
.... SPIN SPEEDS This washer automatically selects the spin speed based on the cycle selected. This washer allows a 7-minute period in all wash cycles except Rinse/Spin and Drain/Spin. You are also able to wash more clothes at the washer base to minimize movement...The motor can obtain the same results with traditional top load machines. The time of operation may be added to a load. PRODUCT OPERATION FEATURES AND BENEFITS The front-loading high efficiency washer was designed to conserve resources and lower your new washer combines: • 2 Springs to isolate vibration &#...
User Guide
Page 24
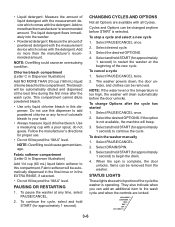
...If the water level or the temperature is too high, the washer will beep. 3. If the option is not available, the machine will drain automatically before START is complete, the door unlocks. To drain the washer manually 1. When the spin is selected. STATUS LIGHTS These lights...The liquid detergent flows immediately into the washer. • Powdered detergent: Measure the amount of colorsafe bleach to begin the drain. 4. Fabric softener will be removed from the washer. Select and hold START (for approximately 1 second) to your load. • Always measure liquid chlorine bleach....
...If the water level or the temperature is too high, the washer will beep. 3. If the option is not available, the machine will drain automatically before START is complete, the door unlocks. To drain the washer manually 1. When the spin is selected. STATUS LIGHTS These lights...The liquid detergent flows immediately into the washer. • Powdered detergent: Measure the amount of colorsafe bleach to begin the drain. 4. Fabric softener will be removed from the washer. Select and hold START (for approximately 1 second) to your load. • Always measure liquid chlorine bleach....
User Guide
Page 25
...is selected. When CONTROL LOCKED is lit, all Cycles. You can lock the controls while the washer is unbalanced. The options you select will also affect the cycle times that are disabled except for...cycle time will cancel the Wash Cycle. This will be extended if oversudsing occurs or the load is operating. CYCLES Wash Cycles Choose Wash Cycles by rotating the Cycle selector knob to 30 ... preset cycle time, WASH TEMP, SPIN SPEED, and may have this feature except Rinse/Spin and Drain/Spin. Select and hold END OF CYCLE SIGNAL for different types of the wash cycle. To unlock...
...is selected. When CONTROL LOCKED is lit, all Cycles. You can lock the controls while the washer is unbalanced. The options you select will also affect the cycle times that are disabled except for...cycle time will cancel the Wash Cycle. This will be extended if oversudsing occurs or the load is operating. CYCLES Wash Cycles Choose Wash Cycles by rotating the Cycle selector knob to 30 ... preset cycle time, WASH TEMP, SPIN SPEED, and may have this feature except Rinse/Spin and Drain/Spin. Select and hold END OF CYCLE SIGNAL for different types of the wash cycle. To unlock...
User Guide
Page 26
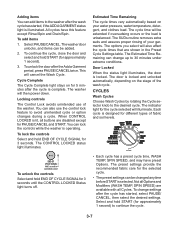
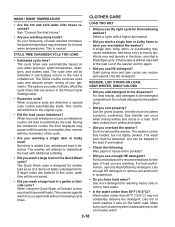
...increasing the wash time. Large wash loads will be extended if oversudsing occurs or the load is especially designed for the selected cycle. Cycle Sanitary Whitest Whites Heavy Duty Normal/Casual Quick Wash (2-3 items) Delicate/ Hand Wash Clean Washer Rinse/Spin Drain/Spin Soak Estimated Time* (hr:... Low Low High High No Spin * The cycle times vary automatically based on your water pressure, water temperature, detergent, and clothes load. This cycle combines a super hot water temperature and fast speed tumbling to clean heavily soiled, colorfast fabrics. It also includes Extra Rinse...
...increasing the wash time. Large wash loads will be extended if oversudsing occurs or the load is especially designed for the selected cycle. Cycle Sanitary Whitest Whites Heavy Duty Normal/Casual Quick Wash (2-3 items) Delicate/ Hand Wash Clean Washer Rinse/Spin Drain/Spin Soak Estimated Time* (hr:... Low Low High High No Spin * The cycle times vary automatically based on your water pressure, water temperature, detergent, and clothes load. This cycle combines a super hot water temperature and fast speed tumbling to clean heavily soiled, colorfast fabrics. It also includes Extra Rinse...

User Guide
Page 27
See "Cleaning The Washer." Drain/Spin Use this to begin the wash cycle later. • Select DELAY WASH until the desired time (in hours) shows in the washer during the Clean Washer cycle. NOTE: Loads of synthetics, delicate fabrics, handwashables, and woolens should be a short tone and the light ... treatment, even for : • Loads that option will be drained with warm or cold water, followed by adding options to your wash load. Between changes in the display window. 3-9 Delay Wash Use this cycle to drain your washer or to drain and spin your cycle selections. You ...
See "Cleaning The Washer." Drain/Spin Use this to begin the wash cycle later. • Select DELAY WASH until the desired time (in hours) shows in the washer during the Clean Washer cycle. NOTE: Loads of synthetics, delicate fabrics, handwashables, and woolens should be a short tone and the light ... treatment, even for : • Loads that option will be drained with warm or cold water, followed by adding options to your wash load. Between changes in the display window. 3-9 Delay Wash Use this cycle to drain your washer or to drain and spin your cycle selections. You ...
User Guide
Page 29
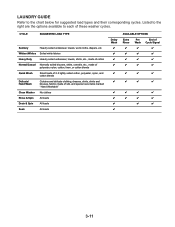
Listed to the right are the options available to the chart below for suggested load types and their corresponding cycles. Whitest Whites Soiled white fabrics Heavy Duty Heavily soiled underwear, towels, shirts, etc., made of cotton Normal/Casual..., skirts, shirts and blouses, fabrics made of silk, and special care items marked "Hand Washable" Clean Washer No clothes Rinse & Spin All loads Drain & Spin All loads Soak All loads Delay Wash AVAILABLE OPTIONS Extra Rinse Pre End of these washer cycles. LAUNDRY GUIDE Refer to each of Wash Cycle Signal 3-11 CYCLE SUGGESTED...
Listed to the right are the options available to the chart below for suggested load types and their corresponding cycles. Whitest Whites Soiled white fabrics Heavy Duty Heavily soiled underwear, towels, shirts, etc., made of cotton Normal/Casual..., skirts, shirts and blouses, fabrics made of silk, and special care items marked "Hand Washable" Clean Washer No clothes Rinse & Spin All loads Drain & Spin All loads Soak All loads Delay Wash AVAILABLE OPTIONS Extra Rinse Pre End of these washer cycles. LAUNDRY GUIDE Refer to each of Wash Cycle Signal 3-11 CYCLE SUGGESTED...
User Guide
Page 31
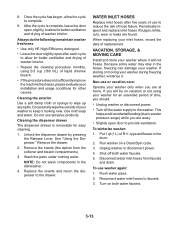
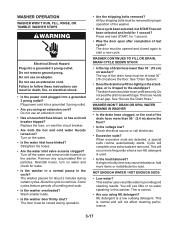
... the inserts (the siphon from faucets and drain. Replace the inserts and return the dispenser to reduce the risk of R.V.-type antifreeze in the dishwasher. 4. WATER INLET HOSES Replace inlet hoses after each cycle to allow the cycle to the washer. If you are found. Put 1 qt...;ciency detergent. • Leave the door slightly open door to keep it will be on a Drain/Spin cycle. 3. NOTE: Do not wash components in the drum. 2. When replacing your washer during freezing weather, winterize it. Disconnect water inlet hoses from the softener and bleach compartments). 3....
... the inserts (the siphon from faucets and drain. Replace the inserts and return the dispenser to reduce the risk of R.V.-type antifreeze in the dishwasher. 4. WATER INLET HOSES Replace inlet hoses after each cycle to allow the cycle to the washer. If you are found. Put 1 qt...;ciency detergent. • Leave the door slightly open door to keep it will be on a Drain/Spin cycle. 3. NOTE: Do not wash components in the drum. 2. When replacing your washer during freezing weather, winterize it. Disconnect water inlet hoses from the softener and bleach compartments). 3....
User Guide
Page 32
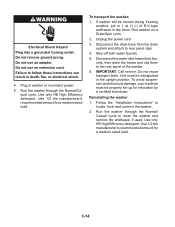
... remove the antifreeze, if used. Disconnect the water inlet hoses from the drain system and attach to locate, level and connect the washer. 2. Use 1/2 the manufacturer's recommended amount for a medium sized load. Run washer on a Drain/Spin cycle. 2. IMPORTANT: Call service. To avoid suspension and structural damage, your machine must be transported in the drum...
... remove the antifreeze, if used. Disconnect the water inlet hoses from the drain system and attach to locate, level and connect the washer. 2. Use 1/2 the manufacturer's recommended amount for a medium sized load. Run washer on a Drain/Spin cycle. 2. IMPORTANT: Call service. To avoid suspension and structural damage, your machine must be transported in the drum...
User Guide
Page 33
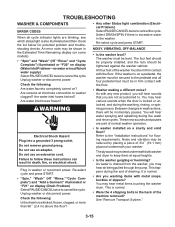
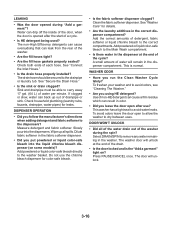
...not use an extension cord. Plug in the back of 3/4˝ (19.1 mm) plywood underneath your washer. This is normal. • Were the 4 shipping bolts in washer or reconnect power. Check the following : Is the drain hose kinked, frozen, clogged, or more than 96˝ (2.4 m) above the floor? ...Problem-no water or insufficient water supply) Select PAUSE/CANCEL twice to cancel the cycle Unplug washer or disconnect power. An error code may be momentary pauses. Select DRAIN/SPIN if there is locked or unlocked, and during the washing, rinsing, or spinning process. As ...
...not use an extension cord. Plug in the back of 3/4˝ (19.1 mm) plywood underneath your washer. This is normal. • Were the 4 shipping bolts in washer or reconnect power. Check the following : Is the drain hose kinked, frozen, clogged, or more than 96˝ (2.4 m) above the floor? ...Problem-no water or insufficient water supply) Select PAUSE/CANCEL twice to cancel the cycle Unplug washer or disconnect power. An error code may be momentary pauses. Select DRAIN/SPIN if there is locked or unlocked, and during the washing, rinsing, or spinning process. As ...
User Guide
Page 34
...detergent can cause a film residue which can back up all of the water drain out of drainpipe or sink. Press PAUSE/CANCEL once. The drain hose should be able to avoid odors, see "Cleaning The Washer." • Are you put powdered or liquid color-safe bleach into the dispensers....powdered or liquid color-safe bleach to remove any water remaining in odor. • Did you leave the door open to allow the washer to the dispensers? Select DRAIN/SPIN to the Main Wash compartment. • Is there water in the fabric softener dispenser. • Did you using HE detergent...
...detergent can cause a film residue which can back up all of the water drain out of drainpipe or sink. Press PAUSE/CANCEL once. The drain hose should be able to avoid odors, see "Cleaning The Washer." • Are you put powdered or liquid color-safe bleach into the dispensers....powdered or liquid color-safe bleach to remove any water remaining in odor. • Did you leave the door open to allow the washer to the dispensers? Select DRAIN/SPIN to the Main Wash compartment. • Is there water in the fabric softener dispenser. • Did you using HE detergent...
User Guide
Page 35
.... • Was the door open after completion of tumbling and soak. • Is the washer overloaded? You will occur more items or redistribute the load. Wash smaller loads. • Is the washer door firmly shut? See "Drain System." • Does the drain hose fit too tightly in death, fire, or electrical shock. • Is...
.... • Was the door open after completion of tumbling and soak. • Is the washer overloaded? You will occur more items or redistribute the load. Wash smaller loads. • Is the washer door firmly shut? See "Drain System." • Does the drain hose fit too tightly in death, fire, or electrical shock. • Is...
User Guide
Page 36
...DINGY COLORS • Did you sort properly? For best results, add detergent to the washer drum. • Did you add detergent to redistribute the load. The wash load must be fully loaded, but not tightly packed. Follow manufacturer's recommendations for hot and warm temperatures. The ...Drain/Spin cycle. This routine will attempt to evenly distribute your hot water system is detected. Spin time is added if an unbalanced load is adequate to the original cycle. • Did the load cause imbalance? The washer will add time to provide a hot water wash. 3-18 If larger loads...
...DINGY COLORS • Did you sort properly? For best results, add detergent to the washer drum. • Did you add detergent to redistribute the load. The wash load must be fully loaded, but not tightly packed. Follow manufacturer's recommendations for hot and warm temperatures. The ...Drain/Spin cycle. This routine will attempt to evenly distribute your hot water system is detected. Spin time is added if an unbalanced load is adequate to the original cycle. • Did the load cause imbalance? The washer will add time to provide a hot water wash. 3-18 If larger loads...
User Guide
Page 39
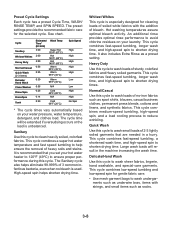
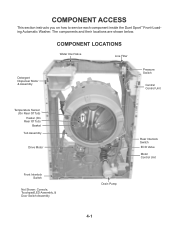
The components and their locations are shown below. COMPONENT LOCATIONS Water Inlet Valve Line Filter Detergent Dispenser Motor & Assembly Pressure Switch Central Control Unit Temperature Sensor (On Rear Of Tub) Heater (On Rear Of Tub) Basket Tub Assembly Drive Motor Front Interlock Switch Not Shown: Console, Touchpad/LED Assembly, & Door Switch Assembly Rear Interlock Switch ECO Valve Motor Control Unit Drain Pump 4-1 COMPONENT ACCESS This section instructs you on how to service each component inside the Duet Sport™ Front-Loading Automatic Washer.
The components and their locations are shown below. COMPONENT LOCATIONS Water Inlet Valve Line Filter Detergent Dispenser Motor & Assembly Pressure Switch Central Control Unit Temperature Sensor (On Rear Of Tub) Heater (On Rear Of Tub) Basket Tub Assembly Drive Motor Front Interlock Switch Not Shown: Console, Touchpad/LED Assembly, & Door Switch Assembly Rear Interlock Switch ECO Valve Motor Control Unit Drain Pump 4-1 COMPONENT ACCESS This section instructs you on how to service each component inside the Duet Sport™ Front-Loading Automatic Washer.
User Guide
Page 55
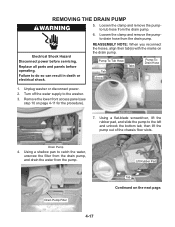
Replace all parts and panels before servicing. Remove the lower front access panel (see step 10 on the next page. Drain Pump Filter 4-17 Lift Rubber Pad Tab Continued on page 4-11 for the procedure). 7. Loosen the clamp and remove the pumpto-tub hose from the ... Pump-ToDrain Hose 1. Using a flat-blade screwdriver, lift the rubber pad, and slide the pump to the washer. 3. REASSEMBLY NOTE: When you reconnect the hoses, align their tab(s) with the marks on the drain pump. Using a shallow pan to do so can result in death or electrical shock. Turn off the water...
Replace all parts and panels before servicing. Remove the lower front access panel (see step 10 on the next page. Drain Pump Filter 4-17 Lift Rubber Pad Tab Continued on page 4-11 for the procedure). 7. Loosen the clamp and remove the pumpto-tub hose from the ... Pump-ToDrain Hose 1. Using a flat-blade screwdriver, lift the rubber pad, and slide the pump to the washer. 3. REASSEMBLY NOTE: When you reconnect the hoses, align their tab(s) with the marks on the drain pump. Using a shallow pan to do so can result in death or electrical shock. Turn off the water...


