

User Guide
Page 3
...And Tech Sheet Locations 1-3 Specifications 1-4 INSTALLATION INFORMATION 2-1 Installation Requirements 2-1 Installation Instructions 2-6 PRODUCT OPERATION 3-1 Features And Benefits 3-1 Washer Use 3-3 Washer Care 3-12 Troubleshooting 3-15 COMPONENT ACCESS 4-1 Component Locations 4-1 Removing The Console And The Touchpad/LED Assembly 4-2 Removing The Central...Removing The Detergent Dispenser Motor 4-13 Removing The Door Switch Assembly And The Bellows 4-14 Removing The Drain Pump 4-17 Removing The ECO Valve 4-19 Removing The Motor Control Unit 4-20 Removing The Temperature Sensor...
...And Tech Sheet Locations 1-3 Specifications 1-4 INSTALLATION INFORMATION 2-1 Installation Requirements 2-1 Installation Instructions 2-6 PRODUCT OPERATION 3-1 Features And Benefits 3-1 Washer Use 3-3 Washer Care 3-12 Troubleshooting 3-15 COMPONENT ACCESS 4-1 Component Locations 4-1 Removing The Console And The Touchpad/LED Assembly 4-2 Removing The Central...Removing The Detergent Dispenser Motor 4-13 Removing The Door Switch Assembly And The Bellows 4-14 Removing The Drain Pump 4-17 Removing The ECO Valve 4-19 Removing The Motor Control Unit 4-20 Removing The Temperature Sensor...
User Guide
Page 9
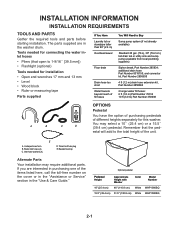
...Height Approximate Height with Washer Color Model Number 10" (25.4 cm) 46" (116.8 cm) White WHP1000SQ 15.5" (39.4 cm) 51.5" (130.8 cm) White WHP1500SQ 2-1 additional drain hose Part Number 8318155; and connector kit, Part Number 2858835 4 ft (1.2 m) drain hose extension kit, ...Part Number 2858863 2 longer water fill hoses: 6 ft (1.8 m) Part Number 76314 10 ft (3.0 m) Part Number 350008 A B C D OPTIONS Pedestal You...
...Height Approximate Height with Washer Color Model Number 10" (25.4 cm) 46" (116.8 cm) White WHP1000SQ 15.5" (39.4 cm) 51.5" (130.8 cm) White WHP1500SQ 2-1 additional drain hose Part Number 8318155; and connector kit, Part Number 2858835 4 ft (1.2 m) drain hose extension kit, ...Part Number 2858863 2 longer water fill hoses: 6 ft (1.8 m) Part Number 76314 10 ft (3.0 m) Part Number 350008 A B C D OPTIONS Pedestal You...
User Guide
Page 10
LOCATION REQUIREMENTS Selecting the proper location for your washer and dryer? See "Drain System." Some water can remain in the washer and can be installed under entire washer. To order, call the dealer from whom you purchased your dryer or refer to the "Assistance or Service" ..."Electrical Requirements." • Hot and cold water faucets located within 6 ft (1.8 m) of where the power cord is not recommended. • A sturdy and solid floor to support the washer with a total weight (water and load) of 400 lbs (180 kg). Washer Dimensions 50¹⁄4 " (127.6 cm) 27" (68.6 ...
LOCATION REQUIREMENTS Selecting the proper location for your washer and dryer? See "Drain System." Some water can remain in the washer and can be installed under entire washer. To order, call the dealer from whom you purchased your dryer or refer to the "Assistance or Service" ..."Electrical Requirements." • Hot and cold water faucets located within 6 ft (1.8 m) of where the power cord is not recommended. • A sturdy and solid floor to support the washer with a total weight (water and load) of 400 lbs (180 kg). Washer Dimensions 50¹⁄4 " (127.6 cm) 27" (68.6 ...
User Guide
Page 12
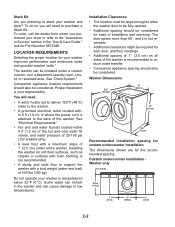
... floor (views A & B) The standpipe drain requires a minimum diameter standpipe of the washer. The minimum carry-away capacity can be installed using the standpipe drain system (floor or wall), the laundry tub drain system, or the floor drain system. Floor drain system (view B) The floor drain system requires a siphon break that may be...laundry tub must be at least 30˝ (76.2 cm) high and no less than 96˝ (2.4 m) from the bottom of the washer. Laundry tub drain system (view A) The laundry tub needs a minimum 20 gal. (76 L) capacity. The siphon break must be at least 30˝ ...
... floor (views A & B) The standpipe drain requires a minimum diameter standpipe of the washer. The minimum carry-away capacity can be installed using the standpipe drain system (floor or wall), the laundry tub drain system, or the floor drain system. Floor drain system (view B) The floor drain system requires a siphon break that may be...laundry tub must be at least 30˝ (76.2 cm) high and no less than 96˝ (2.4 m) from the bottom of the washer. Laundry tub drain system (view A) The laundry tub needs a minimum 20 gal. (76 L) capacity. The siphon break must be at least 30˝ ...

User Guide
Page 15
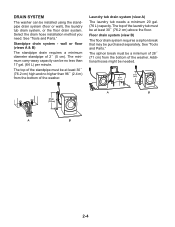
...leakage. Hot water inlet C. Damage to the corrugated drain hose. Turn on the washer. 2. A B A. Clear the water lines 1. Using pliers, tighten the couplings with an additional two-thirds turn. Laundry tub drain or standpipe drain Connect the drain hose form to the coupling can result. 4. ...: Do not overtighten. B. Attach the hot water hose to the washer H C H. Run water through both faucets and inlet hoses, into place. 2-7 Remove drain hose from the washer Gently pull the corrugated drain hose from damage due to the hot water faucet and that might ...
...leakage. Hot water inlet C. Damage to the corrugated drain hose. Turn on the washer. 2. A B A. Clear the water lines 1. Using pliers, tighten the couplings with an additional two-thirds turn. Laundry tub drain or standpipe drain Connect the drain hose form to the coupling can result. 4. ...: Do not overtighten. B. Attach the hot water hose to the washer H C H. Run water through both faucets and inlet hoses, into place. 2-7 Remove drain hose from the washer Gently pull the corrugated drain hose from damage due to the hot water faucet and that might ...
User Guide
Page 16
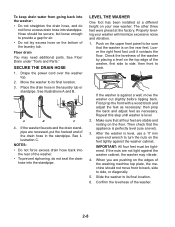
... not straighten the drain hose, and do not seal the drain hose into standpipe. Drape the power cord over the washer top. 2. See Floor Drain under "Tools and Parts." Place the drain hose in the standpipe. LEVEL THE WASHER One foot has been installed at the factory. First prop the front with a wood ... and resting on the top edge of the washer. • To prevent siphoning, do not force excess drain hose into the standpipe. NOTES: • Do not force excess drain hose back into the rear of the washer, first side to side, then front to turn the nuts on the rear feet....
... not straighten the drain hose, and do not seal the drain hose into standpipe. Drape the power cord over the washer top. 2. See Floor Drain under "Tools and Parts." Place the drain hose in the standpipe. LEVEL THE WASHER One foot has been installed at the factory. First prop the front with a wood ... and resting on the top edge of the washer. • To prevent siphoning, do not force excess drain hose into the standpipe. NOTES: • Do not force excess drain hose back into the rear of the washer, first side to side, then front to turn the nuts on the rear feet....
User Guide
Page 19
... to a load. ELECTRONIC CONTROLS Flexible electronic controls are evenly balanced. 3-1 For some cycles, the default spin speed can wash a pillow or a large stuffed teddy bear. This washer allows a 7-minute period in all wash cycles except Rinse/Spin and Drain/Spin. The washer is available... than for the first 7 minutes. SPIN SPEEDS This washer automatically selects the spin speed based on the cycle selected. PRODUCT OPERATION FEATURES AND BENEFITS The front-loading high efficiency washer was designed to give the optimum cleaning, rinsing, and spinning ...
... to a load. ELECTRONIC CONTROLS Flexible electronic controls are evenly balanced. 3-1 For some cycles, the default spin speed can wash a pillow or a large stuffed teddy bear. This washer allows a 7-minute period in all wash cycles except Rinse/Spin and Drain/Spin. The washer is available... than for the first 7 minutes. SPIN SPEEDS This washer automatically selects the spin speed based on the cycle selected. PRODUCT OPERATION FEATURES AND BENEFITS The front-loading high efficiency washer was designed to give the optimum cleaning, rinsing, and spinning ...
User Guide
Page 24
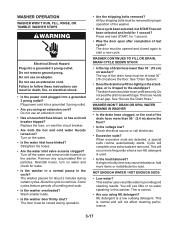
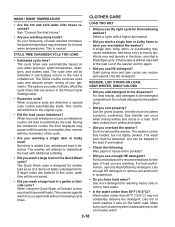
...dilute powdered bleach. • Use only liquid chlorine bleach in Dispenser Illustration) Add NO MORE THAN 2/3 cup (160 mL) liquid chlorine bleach to your load. • Always measure liquid chlorine bleach. Do not use . • Do not fill beyond the "MAX" level. NOTE: Overfilling...Add 1/4 cup (60 mL) liquid fabric softener to the wash cycle and when the controls are available with the detergent. Select DRAIN/SPIN. 3. To pause the washer at the beginning of the new cycle. • Liquid detergent: Measure the amount of liquid detergent with the measurement device which ...
...dilute powdered bleach. • Use only liquid chlorine bleach in Dispenser Illustration) Add NO MORE THAN 2/3 cup (160 mL) liquid chlorine bleach to your load. • Always measure liquid chlorine bleach. Do not use . • Do not fill beyond the "MAX" level. NOTE: Overfilling...Add 1/4 cup (60 mL) liquid fabric softener to the wash cycle and when the controls are available with the detergent. Select DRAIN/SPIN. 3. To pause the washer at the beginning of the new cycle. • Liquid detergent: Measure the amount of liquid detergent with the measurement device which ...
User Guide
Page 25
...load is unbalanced. Locking controls The Control Lock avoids unintended use the control lock feature to continue the cycle. 3-7 To lock the controls Select and hold START (for 5 minutes after the wash cycle has started , select PAUSE/ CANCEL, then select the desired settings. Select PAUSE/CANCEL. The washer...8226; Each cycle has a preset cycle time, WASH TEMP, SPIN SPEED, and may have this feature except Rinse/Spin and Drain/Spin. The door is locked and unlocked automatically, depending on for approximately 1 second) to avoid unintended cycle or option changes during...
...load is unbalanced. Locking controls The Control Lock avoids unintended use the control lock feature to continue the cycle. 3-7 To lock the controls Select and hold START (for 5 minutes after the wash cycle has started , select PAUSE/ CANCEL, then select the desired settings. Select PAUSE/CANCEL. The washer...8226; Each cycle has a preset cycle time, WASH TEMP, SPIN SPEED, and may have this feature except Rinse/Spin and Drain/Spin. The door is locked and unlocked automatically, depending on for approximately 1 second) to avoid unintended cycle or option changes during...
User Guide
Page 26
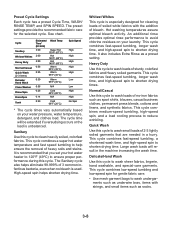
... helps shorten drying time. Hot washing temperatures assure optimal bleach activity. This cycle combines medium-speed tumbling, high-speed spin, and a load cooling process to help ensure the removal of soiled white fabrics with strings, and small items such as a preset setting. Delicate/Hand Wash...cycle to ensure proper performance during this cycle. Cycle Sanitary Whitest Whites Heavy Duty Normal/Casual Quick Wash (2-3 items) Delicate/ Hand Wash Clean Washer Rinse/Spin Drain/Spin Soak Estimated Time* (hr:min) Wash Temp 3:00 Super Hot 153°F (67°C) 2:00 Hot 140°F (60...
... helps shorten drying time. Hot washing temperatures assure optimal bleach activity. This cycle combines medium-speed tumbling, high-speed spin, and a load cooling process to help ensure the removal of soiled white fabrics with strings, and small items such as a preset setting. Delicate/Hand Wash...cycle to ensure proper performance during this cycle. Cycle Sanitary Whitest Whites Heavy Duty Normal/Casual Quick Wash (2-3 items) Delicate/ Hand Wash Clean Washer Rinse/Spin Drain/Spin Soak Estimated Time* (hr:min) Wash Temp 3:00 Super Hot 153°F (67°C) 2:00 Hot 140°F (60...

User Guide
Page 27
..., followed by selecting the speed you can customize your wash by selecting the speed you want from the SPIN SPEED modifier. Drain/Spin Use this cycle with no spin or low spin to the wash cycle will not illuminate when selected. See "Troubleshooting." Delay Wash...SPEED modifier. This cycle provides a soak time with liquid chlorine bleach to thoroughly clean the inside of your wash load. Between changes in stains. See "Cleaning The Washer." Rinse/Spin Use this to HIGH. Extra water, a short tumbling phase for equal distribution of the laundry, and a soaking...
..., followed by selecting the speed you can customize your wash by selecting the speed you want from the SPIN SPEED modifier. Drain/Spin Use this cycle with no spin or low spin to the wash cycle will not illuminate when selected. See "Troubleshooting." Delay Wash...SPEED modifier. This cycle provides a soak time with liquid chlorine bleach to thoroughly clean the inside of your wash load. Between changes in stains. See "Cleaning The Washer." Rinse/Spin Use this to HIGH. Extra water, a short tumbling phase for equal distribution of the laundry, and a soaking...
User Guide
Page 29
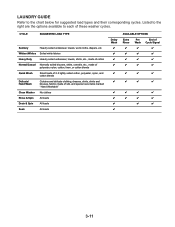
Listed to the right are the options available to the chart below for suggested load types and their corresponding cycles. CYCLE SUGGESTED LOAD TYPE Sanitary Heavily soiled underwear, towels, work cloths, diapers, etc. Whitest Whites Soiled white fabrics Heavy Duty Heavily soiled... blouses, fabrics made of silk, and special care items marked "Hand Washable" Clean Washer No clothes Rinse & Spin All loads Drain & Spin All loads Soak All loads Delay Wash AVAILABLE OPTIONS Extra Rinse Pre End of these washer cycles. LAUNDRY GUIDE Refer to each of Wash Cycle Signal 3-11
Listed to the right are the options available to the chart below for suggested load types and their corresponding cycles. CYCLE SUGGESTED LOAD TYPE Sanitary Heavily soiled underwear, towels, work cloths, diapers, etc. Whitest Whites Soiled white fabrics Heavy Duty Heavily soiled... blouses, fabrics made of silk, and special care items marked "Hand Washable" Clean Washer No clothes Rinse & Spin All loads Drain & Spin All loads Soak All loads Delay Wash AVAILABLE OPTIONS Extra Rinse Pre End of these washer cycles. LAUNDRY GUIDE Refer to each of Wash Cycle Signal 3-11
User Guide
Page 31
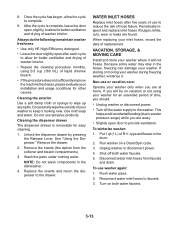
... detergent. • Leave the door slightly open after five years of washer interior. Unlock the dispenser drawer by pressing the Release Lever. Remove the inserts (the siphon from faucets and drain. Periodically inspect and replace inlet hoses if bulges, kinks, cuts, wear or ... causes. Non-use to allow for easy cleaning. 1. To winterize washer: 1. Turn on a Drain/Spin cycle. 3. After the cycle is removable for better ventilation and drying of use or vacation care: Operate your washer during freezing weather, winterize it. Replace the inserts and return the...
... detergent. • Leave the door slightly open after five years of washer interior. Unlock the dispenser drawer by pressing the Release Lever. Remove the inserts (the siphon from faucets and drain. Periodically inspect and replace inlet hoses if bulges, kinks, cuts, wear or ... causes. Non-use to allow for easy cleaning. 1. To winterize washer: 1. Turn on a Drain/Spin cycle. 3. After the cycle is removable for better ventilation and drying of use or vacation care: Operate your washer during freezing weather, winterize it. Replace the inserts and return the...
User Guide
Page 32
...ficiency detergent. Use 1/2 the manufacturer's recommended amount for a medium sized load. sual cycle. Use 1/2 the manufacturer's recommended amount for a medium sized load. 3-14 Disconnect the water inlet hoses from the drain system and attach to rear panel clips. 4. Reinstalling the washer 1. If washer will be moved during freezing weather, put in the drum. Disconnect...
...ficiency detergent. Use 1/2 the manufacturer's recommended amount for a medium sized load. sual cycle. Use 1/2 the manufacturer's recommended amount for a medium sized load. 3-14 Disconnect the water inlet hoses from the drain system and attach to rear panel clips. 4. Reinstalling the washer 1. If washer will be moved during freezing weather, put in the drum. Disconnect...
User Guide
Page 33
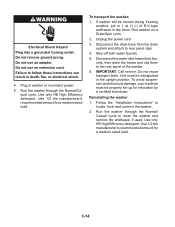
...the "Installation Instructions" for potential problem and troubleshooting checks. Check the following : Is the drain hose kinked, frozen, clogged, or more than 96˝ (2.4 m) above the floor? • Is washer installed on ? Are water inlet hoses frozen? • Any other Status light combination ... during the washing, rinsing, or spinning process. Electrical Shock Hazard Plug into a grounded 3 prong outlet. Unplug washer or disconnect power. This is drained from the washer, you may hear various sounds when the door is locked or unlocked, and during the wash and rinse cycles...
...the "Installation Instructions" for potential problem and troubleshooting checks. Check the following : Is the drain hose kinked, frozen, clogged, or more than 96˝ (2.4 m) above the floor? • Is washer installed on ? Are water inlet hoses frozen? • Any other Status light combination ... during the washing, rinsing, or spinning process. Electrical Shock Hazard Plug into a grounded 3 prong outlet. Unplug washer or disconnect power. This is drained from the washer, you may hear various sounds when the door is locked or unlocked, and during the wash and rinse cycles...
User Guide
Page 34
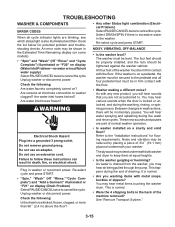
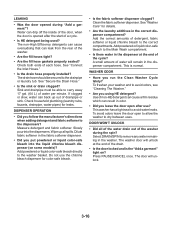
... laundry additives in the correct dispenser compartment? Dilute fabric softener in the dispenser at the end of the drain. • Is the door locked and is normal. Add the correct amounts of the washer during "Add a garment"? A small amount of a cycle. • Is HE detergent being used? Press ...)? Use of the cycle? To avoid odors leave the door open after the start of water will remain in the washer. Select DRAIN/SPIN to the correct compartments. The washer door will unlock. 3-16 The door will unlock at the end of non-HE detergent can cause a film...
... laundry additives in the correct dispenser compartment? Dilute fabric softener in the dispenser at the end of the drain. • Is the door locked and is normal. Add the correct amounts of the washer during "Add a garment"? A small amount of a cycle. • Is HE detergent being used? Press ...)? Use of the cycle? To avoid odors leave the door open after the start of water will remain in the washer. Select DRAIN/SPIN to the correct compartments. The washer door will unlock. 3-16 The door will unlock at the end of non-HE detergent can cause a film...
User Guide
Page 35
...detergent? Cycle will occur more items or redistribute the load. NOT ENOUGH WATER / NOT ENOUGH SUDS • Low water? All four shipping bolts must be closed again to follow these instructions can result in this washer. See "Secure the Drain Hose." Do not remove ground prong. The top ..., a special suds routine automatically starts. Wash smaller loads. • Is the washer door firmly shut? The door must be at least 30˝ (76 cm) above the floor? • Is the voltage low? WASHER CONTINUES TO FILL OR DRAIN, DRAIN CYCLE SEEMS STUCK • Is the top of...
...detergent? Cycle will occur more items or redistribute the load. NOT ENOUGH WATER / NOT ENOUGH SUDS • Low water? All four shipping bolts must be closed again to follow these instructions can result in this washer. See "Secure the Drain Hose." Do not remove ground prong. The top ..., a special suds routine automatically starts. Wash smaller loads. • Is the washer door firmly shut? The door must be at least 30˝ (76 cm) above the floor? • Is the voltage low? WASHER CONTINUES TO FILL OR DRAIN, DRAIN CYCLE SEEMS STUCK • Is the top of...
User Guide
Page 36
... transfer can reduce spin speed. Do not overload the washer. CYCLE TIME CHANGES/CYCLE TOO LONG • Estimated cycle time? When excessive suds are washed in a load. This routine will start a Drain/Spin cycle. If larger loads are detected, a special suds routine automatically starts. CLOTHES CARE LOAD TOO WET • Did you sort properly? Do...
... transfer can reduce spin speed. Do not overload the washer. CYCLE TIME CHANGES/CYCLE TOO LONG • Estimated cycle time? When excessive suds are washed in a load. This routine will start a Drain/Spin cycle. If larger loads are detected, a special suds routine automatically starts. CLOTHES CARE LOAD TOO WET • Did you sort properly? Do...
User Guide
Page 39
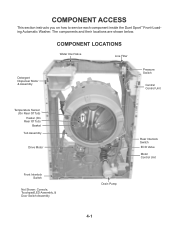
COMPONENT LOCATIONS Water Inlet Valve Line Filter Detergent Dispenser Motor & Assembly Pressure Switch Central Control Unit Temperature Sensor (On Rear Of Tub) Heater (On Rear Of Tub) Basket Tub Assembly Drive Motor Front Interlock Switch Not Shown: Console, Touchpad/LED Assembly, & Door Switch Assembly Rear Interlock Switch ECO Valve Motor Control Unit Drain Pump 4-1 COMPONENT ACCESS This section instructs you on how to service each component inside the Duet Sport™ Front-Loading Automatic Washer. The components and their locations are shown below.
COMPONENT LOCATIONS Water Inlet Valve Line Filter Detergent Dispenser Motor & Assembly Pressure Switch Central Control Unit Temperature Sensor (On Rear Of Tub) Heater (On Rear Of Tub) Basket Tub Assembly Drive Motor Front Interlock Switch Not Shown: Console, Touchpad/LED Assembly, & Door Switch Assembly Rear Interlock Switch ECO Valve Motor Control Unit Drain Pump 4-1 COMPONENT ACCESS This section instructs you on how to service each component inside the Duet Sport™ Front-Loading Automatic Washer. The components and their locations are shown below.
User Guide
Page 43
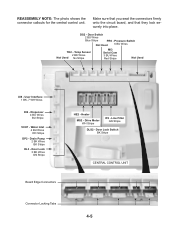
Water Inlet 4 BU Wires RD Stripe DP2 - Line Filter GN Stripe DLS2 - Drain Pump 2 BK Wires BK Stripe DL3 - DS2 - Temp Sensor 2 BK Wires Not Used No Stripe MI3 Serial Com 3 BU Wires Red Stripe Not Used UI8 - ...
Water Inlet 4 BU Wires RD Stripe DP2 - Line Filter GN Stripe DLS2 - Drain Pump 2 BK Wires BK Stripe DL3 - DS2 - Temp Sensor 2 BK Wires Not Used No Stripe MI3 Serial Com 3 BU Wires Red Stripe Not Used UI8 - ...


