
User Guide
Page 4
Removal Or Replacement 6-8 Washer Care 6-9 Troubleshooting Guide 6-11 WIRING DIAGRAMS 7-1 Washer 7-1 Grounding System 7-2 - iv - Page DIAGNOSTICS & TROUBLESHOOTING 6-1 Diagnostics 6-1 Diagnostic Guide 6-1 Failure/Error Display Codes 6-2 Diagnostic Test 6-5 Error History Display 6-6 History Overview Test Program 6-6 Manual Diagnostic Test 6-7 Manual Overview Test Program 6-7 Electronic Assemblies -
Removal Or Replacement 6-8 Washer Care 6-9 Troubleshooting Guide 6-11 WIRING DIAGRAMS 7-1 Washer 7-1 Grounding System 7-2 - iv - Page DIAGNOSTICS & TROUBLESHOOTING 6-1 Diagnostics 6-1 Diagnostic Guide 6-1 Failure/Error Display Codes 6-2 Diagnostic Test 6-5 Error History Display 6-6 History Overview Test Program 6-6 Manual Diagnostic Test 6-7 Manual Overview Test Program 6-7 Electronic Assemblies -
User Guide
Page 21
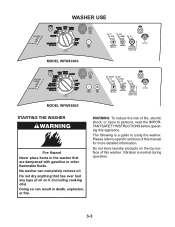
... of fire, electric shock, or injury to using the washer. The following is normal during operation. 3-3 Vibration is a guide to persons, read the IMPORTANT SAFETY INSTRUCTIONS before operating this manual for more detailed information. Do not store laundry products on it ...(including cooking oils). WASHER USE MODEL WFW8300S MODEL WFW8500S STARTING THE WASHER Fire Hazard Never place items in death, explosion, or fi...
... of fire, electric shock, or injury to using the washer. The following is normal during operation. 3-3 Vibration is a guide to persons, read the IMPORTANT SAFETY INSTRUCTIONS before operating this manual for more detailed information. Do not store laundry products on it ...(including cooking oils). WASHER USE MODEL WFW8300S MODEL WFW8500S STARTING THE WASHER Fire Hazard Never place items in death, explosion, or fi...
User Guide
Page 23
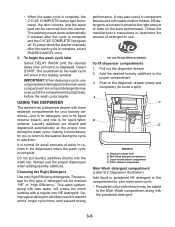
... when adding laundry additives. Follow the manufacturer's instructions to determine the amount of water to avoid a spill). The washer powers down the washer manually after the cycle is complete and the CYCLE COMPLETE light goes off. The countdown to the wash cycle will likely ... the proper compartment. 3. • When the wash cycle is complete, the CYCLE COMPLETE status light illuminates, the door unlocks, and the wash load can be marked "HE" or "High Efficiency." A C MAX DETERGENT LIQUID BLEACH SOFTENER B MAX D Dispenser A. HE detergents are ...
... when adding laundry additives. Follow the manufacturer's instructions to determine the amount of water to avoid a spill). The washer powers down the washer manually after the cycle is complete and the CYCLE COMPLETE light goes off. The countdown to the wash cycle will likely ... the proper compartment. 3. • When the wash cycle is complete, the CYCLE COMPLETE status light illuminates, the door unlocks, and the wash load can be marked "HE" or "High Efficiency." A C MAX DETERGENT LIQUID BLEACH SOFTENER B MAX D Dispenser A. HE detergents are ...
User Guide
Page 24
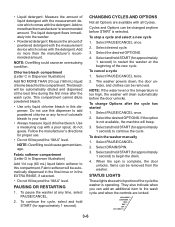
... too high, the washer will be automatically diluted and dispensed at the beginning of the new cycle. Select and hold START (for approximately 1 second) to your load. • Always measure liquid chlorine bleach. do not guess. CHANGING CYCLES AND OPTIONS Not all Options are locked. 3-6 NOTE...form of colorsafe bleach to begin the drain. 4. Select and hold START (for approximately 1 second) to this dispenser. To drain the washer manually 1. Select DRAIN/SPIN. 3. Items can add an additional item to continue the cycle. • Liquid detergent: Measure the amount of ...
... too high, the washer will be automatically diluted and dispensed at the beginning of the new cycle. Select and hold START (for approximately 1 second) to your load. • Always measure liquid chlorine bleach. do not guess. CHANGING CYCLES AND OPTIONS Not all Options are locked. 3-6 NOTE...form of colorsafe bleach to begin the drain. 4. Select and hold START (for approximately 1 second) to this dispenser. To drain the washer manually 1. Select DRAIN/SPIN. 3. Items can add an additional item to continue the cycle. • Liquid detergent: Measure the amount of ...
User Guide
Page 81
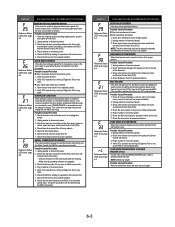
.... If the condition continues four times, the F31 code will reset the MCU. Unplug washer or disconnect power. 3. Check the drive system for any cycle. 6. LOAD INSIDE DRUM DURING CLEANING WASHER CYCLE If at the MCU is lost. Check wire harness connections between the drive motor...Control Unit (CCU), then the CCU will show. Check connections of foreign objects. 5. DISPENSER SYSTEM ERROR When the dispenser motor cannot be manually unlocked. Check dispenser motor for proper operation. Verify CCU operation by looking for drain pump failure. 6. Check the MCU by running a ...
.... If the condition continues four times, the F31 code will reset the MCU. Unplug washer or disconnect power. 3. Check the drive system for any cycle. 6. LOAD INSIDE DRUM DURING CLEANING WASHER CYCLE If at the MCU is lost. Check wire harness connections between the drive motor...Control Unit (CCU), then the CCU will show. Check connections of foreign objects. 5. DISPENSER SYSTEM ERROR When the dispenser motor cannot be manually unlocked. Check dispenser motor for proper operation. Verify CCU operation by looking for drain pump failure. 6. Check the MCU by running a ...
User Guide
Page 85
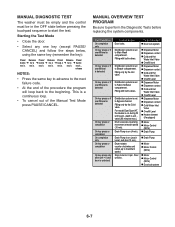
... Softener compartment. Door unlocks. Press/ hold 4 sec's. Filling only by the Hot valve. Release for 4 sec's. Release for 4 sec's. MANUAL OVERVIEW TEST PROGRAM Be sure to start the test. To be in the OFF state before pressing the touchpad sequence to perform the Diagnostic Tests... sec's. Filling with both valves. Drain Pump is on (4 min). Release for 4 sec's. Filling only by the Cold valve. MANUAL DIAGNOSTIC TEST The washer must be empty and the control must be Checked Door lock system Dispenser Motor Dispenser contact Cold and Hot Water Inlet Valve Overfill level...
... Softener compartment. Door unlocks. Press/ hold 4 sec's. Filling only by the Hot valve. Release for 4 sec's. Release for 4 sec's. MANUAL OVERVIEW TEST PROGRAM Be sure to start the test. To be in the OFF state before pressing the touchpad sequence to perform the Diagnostic Tests... sec's. Filling with both valves. Drain Pump is on (4 min). Release for 4 sec's. Filling only by the Cold valve. MANUAL DIAGNOSTIC TEST The washer must be empty and the control must be Checked Door lock system Dispenser Motor Dispenser contact Cold and Hot Water Inlet Valve Overfill level...
User Guide
Page 86
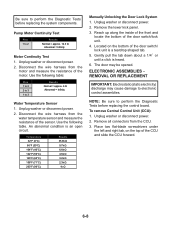
... 9.7k Ω 6.6k Ω 4.6k Ω 3.2k Ω 2.3k Ω 1k Ω Manually Unlocking the Door Lock System 1. Located on the top of the door switch/ lock unit is a teardrop shaped...static electricity) discharge may be opened. An abnormal condition is heard. 6. Reach up along the inside of the front and locate the bottom of the motor. Use the following table: Pins 1 to 2 2 to 3 1 to... the CCU forward. 6-8 The door may cause damage to electronic control assemblies. Unplug washer or disconnect power. 2. Use the following table. Disconnect the wire harness from the...
... 9.7k Ω 6.6k Ω 4.6k Ω 3.2k Ω 2.3k Ω 1k Ω Manually Unlocking the Door Lock System 1. Located on the top of the door switch/ lock unit is a teardrop shaped...static electricity) discharge may be opened. An abnormal condition is heard. 6. Reach up along the inside of the front and locate the bottom of the motor. Use the following table: Pins 1 to 2 2 to 3 1 to... the CCU forward. 6-8 The door may cause damage to electronic control assemblies. Unplug washer or disconnect power. 2. Use the following table. Disconnect the wire harness from the...


