
User Guide
Page 14
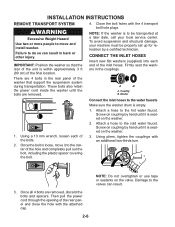
... Using a 13 mm wrench, loosen each end of the inlet hoses. Screw on coupling by hand until the bolts are removed, discard the bolts and spacers. NOTE: If the washer is within approximately 3 ft (90 cm) of the rear panel and close the hole with the attached cap. 2-6 NOTE: Do not overtighten or... to do so can result. These bolts also retain the power cord inside the washer until it to the valves can result in back or other injury. Once the bolt is loose, move and install washer. Excessive Weight Hazard Use two or more people to the hot water faucet. To avoid suspension...
... Using a 13 mm wrench, loosen each end of the inlet hoses. Screw on coupling by hand until the bolts are removed, discard the bolts and spacers. NOTE: If the washer is within approximately 3 ft (90 cm) of the rear panel and close the hole with the attached cap. 2-6 NOTE: Do not overtighten or... to do so can result. These bolts also retain the power cord inside the washer until it to the valves can result in back or other injury. Once the bolt is loose, move and install washer. Excessive Weight Hazard Use two or more people to the hot water faucet. To avoid suspension...

User Guide
Page 66
... disconnect power. 2. Pull the free end of the way, and remove the three 1/2˝ bolts from the top rear weight, then remove the weight from the front frame and remove the frame. Top Front Weight Bottom Front Weight 9. Pull the washer away from the tub opening. Remove the detergent dispenser assem- bly (see pages 4-10 through 4-12 for the procedure). 5. REASSEMBLY NOTE...
... disconnect power. 2. Pull the free end of the way, and remove the three 1/2˝ bolts from the top rear weight, then remove the weight from the front frame and remove the frame. Top Front Weight Bottom Front Weight 9. Pull the washer away from the tub opening. Remove the detergent dispenser assem- bly (see pages 4-10 through 4-12 for the procedure). 5. REASSEMBLY NOTE...
User Guide
Page 81
... unlocks after 3 minutes. Possible Causes/Procedure 1. Possible Causes/Procedure 1. Make sure all grounding switches are removed. 2. Door switch/lock unit failure. 1. Check wire harness connections to the dispenser motor and Central Control... or the door switch is open while door is not located near a source of the CLEANING WASHER cycle a load is unable to the Central Control Unit (CCU), then the CCU will show. DISPLAY EXPLANATION AND...of the dispenser. 3. Verify CCU operation by weight. NOTE: Detects by running a Diagnostic Test or any worn or failed components. 5.
... unlocks after 3 minutes. Possible Causes/Procedure 1. Possible Causes/Procedure 1. Make sure all grounding switches are removed. 2. Door switch/lock unit failure. 1. Check wire harness connections to the dispenser motor and Central Control... or the door switch is open while door is not located near a source of the CLEANING WASHER cycle a load is unable to the Central Control Unit (CCU), then the CCU will show. DISPLAY EXPLANATION AND...of the dispenser. 3. Verify CCU operation by weight. NOTE: Detects by running a Diagnostic Test or any worn or failed components. 5.


