
User Guide
Page 1
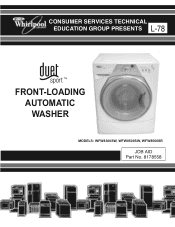
CONSUMER SERVICES TECHNICAL EDUCATION GROUP PRESENTS L-78 FRONT-LOADING AUTOMATIC WASHER MODELS: WFW8300SW, WFW8500SW, WFW8500SR JOB AID Part No. 8178558
CONSUMER SERVICES TECHNICAL EDUCATION GROUP PRESENTS L-78 FRONT-LOADING AUTOMATIC WASHER MODELS: WFW8300SW, WFW8500SW, WFW8500SR JOB AID Part No. 8178558
User Guide
Page 2
...to provide information that will enable the service technician to properly diagnose malfunctions and repair the Duet Sport™ Front-Loading Automatic Washer. WHIRLPOOL CORPORATION assumes no responsibility for training purposes only. The Wiring Diagram used in this Job Aid is ...being serviced, refer to its proper operational status. The objectives of the Duet Sport™ Front-Loading Automatic Washer. FORWARD This Whirlpool Job Aid, "Duet Sport™ Front-Loading Automatic Washer" (Part No. 8178558), provides the technician with the product when servicing the unit. Always...
...to provide information that will enable the service technician to properly diagnose malfunctions and repair the Duet Sport™ Front-Loading Automatic Washer. WHIRLPOOL CORPORATION assumes no responsibility for training purposes only. The Wiring Diagram used in this Job Aid is ...being serviced, refer to its proper operational status. The objectives of the Duet Sport™ Front-Loading Automatic Washer. FORWARD This Whirlpool Job Aid, "Duet Sport™ Front-Loading Automatic Washer" (Part No. 8178558), provides the technician with the product when servicing the unit. Always...

User Guide
Page 3
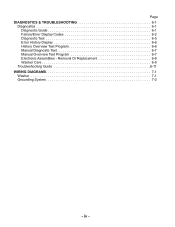
... 1-1 Model & Serial Number Designations 1-2 Model & Serial Number Label And Tech Sheet Locations 1-3 Specifications 1-4 INSTALLATION INFORMATION 2-1 Installation Requirements 2-1 Installation Instructions 2-6 PRODUCT OPERATION 3-1 Features And Benefits 3-1 Washer Use 3-3 Washer Care 3-12 Troubleshooting 3-15 COMPONENT ACCESS 4-1 Component Locations 4-1 Removing The Console And The Touchpad/LED Assembly 4-2 Removing The Central Control Unit 4-4 Removing The Water Inlet...
... 1-1 Model & Serial Number Designations 1-2 Model & Serial Number Label And Tech Sheet Locations 1-3 Specifications 1-4 INSTALLATION INFORMATION 2-1 Installation Requirements 2-1 Installation Instructions 2-6 PRODUCT OPERATION 3-1 Features And Benefits 3-1 Washer Use 3-3 Washer Care 3-12 Troubleshooting 3-15 COMPONENT ACCESS 4-1 Component Locations 4-1 Removing The Console And The Touchpad/LED Assembly 4-2 Removing The Central Control Unit 4-4 Removing The Water Inlet...
User Guide
Page 4
Removal Or Replacement 6-8 Washer Care 6-9 Troubleshooting Guide 6-11 WIRING DIAGRAMS 7-1 Washer 7-1 Grounding System 7-2 - iv - Page DIAGNOSTICS & TROUBLESHOOTING 6-1 Diagnostics 6-1 Diagnostic Guide 6-1 Failure/Error Display Codes 6-2 Diagnostic Test 6-5 Error History Display 6-6 History Overview Test Program 6-6 Manual Diagnostic Test 6-7 Manual Overview Test Program 6-7 Electronic Assemblies -
Removal Or Replacement 6-8 Washer Care 6-9 Troubleshooting Guide 6-11 WIRING DIAGRAMS 7-1 Washer 7-1 Grounding System 7-2 - iv - Page DIAGNOSTICS & TROUBLESHOOTING 6-1 Diagnostics 6-1 Diagnostic Guide 6-1 Failure/Error Display Codes 6-2 Diagnostic Test 6-5 Error History Display 6-6 History Overview Test Program 6-6 Manual Diagnostic Test 6-7 Manual Overview Test Program 6-7 Electronic Assemblies -
User Guide
Page 5
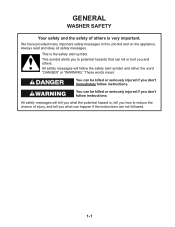
This symbol alerts you to reduce the chance of others . You can happen if the instructions are not followed. 1-1 GENERAL WASHER SAFETY Your safety and the safety of injury, and tell you don't immediately follow the safety alert symbol and either the word "DANGER" or "WARNING." ...
This symbol alerts you to reduce the chance of others . You can happen if the instructions are not followed. 1-1 GENERAL WASHER SAFETY Your safety and the safety of injury, and tell you don't immediately follow the safety alert symbol and either the word "DANGER" or "WARNING." ...
User Guide
Page 6
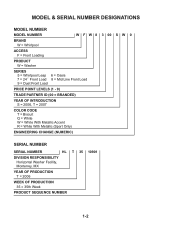
MODEL & SERIAL NUMBER DESIGNATIONS MODEL NUMBER MODEL NUMBER W F W 8 3 00 S W 0 BRAND W = Whirlpool ACCESS F = Front Loading PRODUCT W = Washer SERIES 5 = Whirlpool Leap 7 = 24˝ Front Load 9 = Duet Front Load 6 = Oasis 8 = Mid Line Front Load PRICE POINT LEVELS (1 - 9) TRADE PARTNER ID (00 = BRANDED) YEAR OF INTRODUCTION S = 2006, T = 2007 COLOR CODE T = Biscuit Q = White W = White With Metallic Accent R = White With Metallic (Sport ...
MODEL & SERIAL NUMBER DESIGNATIONS MODEL NUMBER MODEL NUMBER W F W 8 3 00 S W 0 BRAND W = Whirlpool ACCESS F = Front Loading PRODUCT W = Washer SERIES 5 = Whirlpool Leap 7 = 24˝ Front Load 9 = Duet Front Load 6 = Oasis 8 = Mid Line Front Load PRICE POINT LEVELS (1 - 9) TRADE PARTNER ID (00 = BRANDED) YEAR OF INTRODUCTION S = 2006, T = 2007 COLOR CODE T = Biscuit Q = White W = White With Metallic Accent R = White With Metallic (Sport ...
User Guide
Page 8
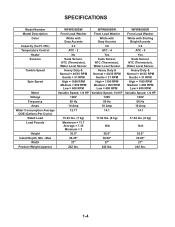
Max Width Product Weight (approx) WFW8300SW WFW8500SW WFW8500SR Front Load Washer Front Load Washer Front Load Washer White with Gray Accents White with Gray Accents White with Sterling Bright Accents 3.3 3.6 3.6 ATC - 2 ATC - 4 ATC - 4 No Yes Yes Suds Sensor, NTC (Thermistor), Water Level ...00" 27" 242 lbs. 1-4 IEC) Temperature Control Heater Sensors Tumble Speed Spin Speed Motor Voltage Frequency Amps Water Consumption Average DOE (Gallons-Per-Cycle) Rated Load Load Pounds Height Install Depth: Min - SPECIFICATIONS Model Number Model Description Color Capacity (Cu.Ft.
Max Width Product Weight (approx) WFW8300SW WFW8500SW WFW8500SR Front Load Washer Front Load Washer Front Load Washer White with Gray Accents White with Gray Accents White with Sterling Bright Accents 3.3 3.6 3.6 ATC - 2 ATC - 4 ATC - 4 No Yes Yes Suds Sensor, NTC (Thermistor), Water Level ...00" 27" 242 lbs. 1-4 IEC) Temperature Control Heater Sensors Tumble Speed Spin Speed Motor Voltage Frequency Amps Water Consumption Average DOE (Gallons-Per-Cycle) Rated Load Load Pounds Height Install Depth: Min - SPECIFICATIONS Model Number Model Description Color Capacity (Cu.Ft.
User Guide
Page 9
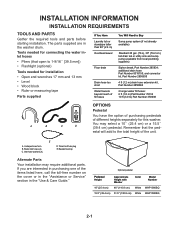
... cm) 46" (116.8 cm) White WHP1000SQ 15.5" (39.4 cm) 51.5" (130.8 cm) White WHP1500SQ 2-1 Tools needed for this washer. additional drain hose Part Number 8318155; Remember that open to 1-9/16˝ [39.5 mm]) • Flashlight (optional) Tools needed for ...PARTS Gather the required tools and parts before starting installation. Inlet hose washers (4) D. and connector kit, Part Number 2858835 4 ft (1.2 m) drain hose extension kit, Part Number 2858863 2 longer water fill hoses: 6 ft (1.8 m) Part Number 76314 10 ft (3.0 m) Part Number 350008 A B C D OPTIONS Pedestal You have...
... cm) 46" (116.8 cm) White WHP1000SQ 15.5" (39.4 cm) 51.5" (130.8 cm) White WHP1500SQ 2-1 Tools needed for this washer. additional drain hose Part Number 8318155; Remember that open to 1-9/16˝ [39.5 mm]) • Flashlight (optional) Tools needed for ...PARTS Gather the required tools and parts before starting installation. Inlet hose washers (4) D. and connector kit, Part Number 2858835 4 ft (1.2 m) drain hose extension kit, Part Number 2858863 2 longer water fill hoses: 6 ft (1.8 m) Part Number 76314 10 ft (3.0 m) Part Number 350008 A B C D OPTIONS Pedestal You have...
User Guide
Page 10
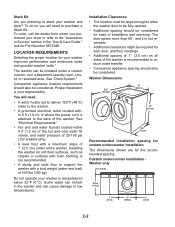
...installation and servicing. You will need • A water heater set to deliver 120°F (49°C) water to the washer. • A grounded electrical outlet located within 4 ft (1.2 m) of the hot and cold water fill valves, and water pressure of 20-100 psi (137.9-689.6 kPa). &#...(water and load) of 1˝(2.5 cm) under a custom counter, or in the "Use & Care Guide." See "Electrical Requirements." • Hot and cold water faucets located within 6 ft (1.8 m) of where the power cord is attached to the back of the washer is recommended to purchase a Stack Kit. Washer Dimensions 50&#...
...installation and servicing. You will need • A water heater set to deliver 120°F (49°C) water to the washer. • A grounded electrical outlet located within 4 ft (1.2 m) of the hot and cold water fill valves, and water pressure of 20-100 psi (137.9-689.6 kPa). &#...(water and load) of 1˝(2.5 cm) under a custom counter, or in the "Use & Care Guide." See "Electrical Requirements." • Hot and cold water faucets located within 6 ft (1.8 m) of where the power cord is attached to the back of the washer is recommended to purchase a Stack Kit. Washer Dimensions 50&#...
User Guide
Page 11
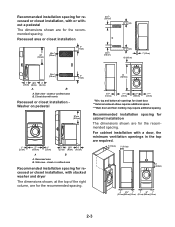
... (2.5 cm) (80 cm) (10.2 cm) A B A. top and bottom air openings for the recommended spacing. Closet door with stacked washer and dryer The dimensions shown, at the top of the right column, are for the recommended spacing. Recommended installation spacing for cabinet installation The ...cm) 1"*** (2.5 cm) *Min. closet or confined area Recommended installation spacing for recessed or closet installation, with vents Recessed or closet installation Washer on pedestal 3" (7.6 cm) 38" min. (96.5 cm) 1" (2.5 cm) 27" (68.6 cm) 1" (2.5 cm) 1" 29¹⁄4" 4" (2.5 cm) (80 cm)...
... (2.5 cm) (80 cm) (10.2 cm) A B A. top and bottom air openings for the recommended spacing. Closet door with stacked washer and dryer The dimensions shown, at the top of the right column, are for the recommended spacing. Recommended installation spacing for cabinet installation The ...cm) 1"*** (2.5 cm) *Min. closet or confined area Recommended installation spacing for recessed or closet installation, with vents Recessed or closet installation Washer on pedestal 3" (7.6 cm) 38" min. (96.5 cm) 1" (2.5 cm) 27" (68.6 cm) 1" (2.5 cm) 1" 29¹⁄4" 4" (2.5 cm) (80 cm)...
User Guide
Page 12
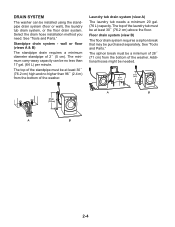
wall or floor (views A & B) The standpipe drain requires a minimum diameter standpipe of the washer. The top of the washer. Additional hoses might be at least 30˝ (76.2 cm) high and no less than 96˝ (2.4 m) from the bottom of the laundry tub must ...." The siphon break must be at least 30˝ (76.2 cm) above the floor. Select the drain hose installation method you need. DRAIN SYSTEM The washer can be no higher than 17 gal. (64 L) per minute. See "Tools and Parts." The minimum carry-away capacity can be purchased separately. Floor drain...
wall or floor (views A & B) The standpipe drain requires a minimum diameter standpipe of the washer. The top of the washer. Additional hoses might be at least 30˝ (76.2 cm) high and no less than 96˝ (2.4 m) from the bottom of the laundry tub must ...." The siphon break must be at least 30˝ (76.2 cm) above the floor. Select the drain hose installation method you need. DRAIN SYSTEM The washer can be no higher than 17 gal. (64 L) per minute. See "Tools and Parts." The minimum carry-away capacity can be purchased separately. Floor drain...
User Guide
Page 13
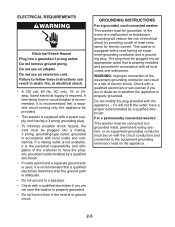
... result in death, fire, or electrical shock. • A 120 volt, 60 Hz., AC only, 15- For a permanently connected washer: This washer must be connected to a grounded metal, permanent wiring system, or an equipment-grounding conductor must be run with the circuit conductors and connected... equipped with a power supply cord having an equipment-grounding conductor and a grounding plug. GROUNDING INSTRUCTIONS For a grounded, cord-connected washer: This washer must be grounded. If a mating outlet is not available, it is the personal responsibility and obligation of the customer to have ...
... result in death, fire, or electrical shock. • A 120 volt, 60 Hz., AC only, 15- For a permanently connected washer: This washer must be connected to a grounded metal, permanent wiring system, or an equipment-grounding conductor must be run with the circuit conductors and connected... equipped with a power supply cord having an equipment-grounding conductor and a grounding plug. GROUNDING INSTRUCTIONS For a grounded, cord-connected washer: This washer must be grounded. If a mating outlet is not available, it is the personal responsibility and obligation of the customer to have ...
User Guide
Page 14
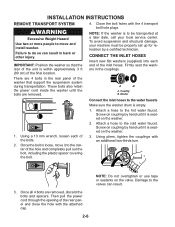
... hole and completely pull out the bolt, including the plastic spacer covering the bolt. 2. There are removed. A B A. Washer Connect the inlet hoses to the water faucets Make sure the washer drum is within approximately 3 ft (90 cm) of the unit is empty. 1. Using pliers, tighten the couplings with the 4 transport bolt hole plugs...
... hole and completely pull out the bolt, including the plastic spacer covering the bolt. 2. There are removed. A B A. Washer Connect the inlet hoses to the water faucets Make sure the washer drum is within approximately 3 ft (90 cm) of the unit is empty. 1. Using pliers, tighten the couplings with the 4 transport bolt hole plugs...

User Guide
Page 15
... found. Using pliers, tighten the couplings with an additional two-thirds turn. Laundry tub drain or standpipe drain Connect the drain hose form to the washer's hot (H) water inlet valve. Read and follow these instructions. Hot water inlet C. A B A. B. Connect the inlet hoses to get rid ...faucets and inlet hoses, into place. 2-7 Bend drain hose over drain hose form and snap into a laundry tub, drainpipe or bucket, to the washer H C H. Attach the cold water hose to the cold water faucet. Check the temperature of the drain hose form to the coupling can result...
... found. Using pliers, tighten the couplings with an additional two-thirds turn. Laundry tub drain or standpipe drain Connect the drain hose form to the washer's hot (H) water inlet valve. Read and follow these instructions. Hot water inlet C. A B A. B. Connect the inlet hoses to get rid ...faucets and inlet hoses, into place. 2-7 Bend drain hose over drain hose form and snap into a laundry tub, drainpipe or bucket, to the washer H C H. Attach the cold water hose to the cold water faucet. Check the temperature of the drain hose form to the coupling can result...
User Guide
Page 16
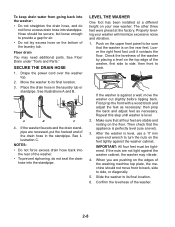
...force excess drain hose into the standpipe. The other three feet were preset at a different height on the upper front panel to back. Push on your washer will minimize excessive noise and vibration. 1. then prop the back and adjust feet as necessary; Repeat this step... vibrate. 4. Properly leveling your new washer. When you are not tight against the washer cabinet, the washer may need additional parts. Hose should not move the washer out slightly before tipping back. Move the washer to its final location. 3. First prop the front with a wood block and adjust the...
...force excess drain hose into the standpipe. The other three feet were preset at a different height on the upper front panel to back. Push on your washer will minimize excessive noise and vibration. 1. then prop the back and adjust feet as necessary; Repeat this step... vibrate. 4. Properly leveling your new washer. When you are not tight against the washer cabinet, the washer may need additional parts. Hose should not move the washer out slightly before tipping back. Move the washer to its final location. 3. First prop the front with a wood block and adjust the...
User Guide
Page 17
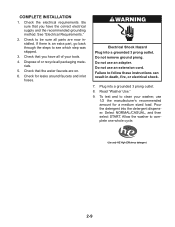
...can result in death, fire, or electrical shock. 7. Do not use an extension cord. Read "Washer Use." 9. Pour the detergent into the detergent dispenser. Be sure that you have all of or ...recycle all parts are on. 6. Do not remove ground prong. Allow the washer to see which step was skipped. 3. Use only HE High Efficiency detergent. 2-9 If there ...is an extra part, go back through the steps to complete one whole cycle. Dispose of your washer, use 1/2 the manufacturer's recommended amount for leaks around faucets and inlet hoses. Do not use an ...
...can result in death, fire, or electrical shock. 7. Do not use an extension cord. Read "Washer Use." 9. Pour the detergent into the detergent dispenser. Be sure that you have all of or ...recycle all parts are on. 6. Do not remove ground prong. Allow the washer to see which step was skipped. 3. Use only HE High Efficiency detergent. 2-9 If there ...is an extra part, go back through the steps to complete one whole cycle. Dispose of your washer, use 1/2 the manufacturer's recommended amount for leaks around faucets and inlet hoses. Do not use an ...
User Guide
Page 19
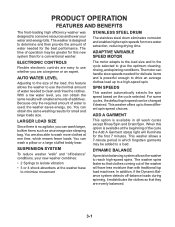
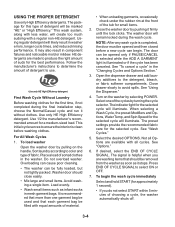
...clean and rinse the clothes. ADAPTIVE VARIABLE SPEED MOTOR The motor adapts to the load size and to the cycle selected to a load. When this new system than with smaller amounts of additives. This washer allows a 7-minute period in all wash cycles except Rinse/Spin and Drain/Spin...if the Dynamic Balance system detects off -balance" conditions, your water and energy bills. PRODUCT OPERATION FEATURES AND BENEFITS The front-loading high efficiency washer was designed to use the minimal amount of water needed to determine and then provide the amount of water needed for ...
...clean and rinse the clothes. ADAPTIVE VARIABLE SPEED MOTOR The motor adapts to the load size and to the cycle selected to a load. When this new system than with smaller amounts of additives. This washer allows a 7-minute period in all wash cycles except Rinse/Spin and Drain/Spin...if the Dynamic Balance system detects off -balance" conditions, your water and energy bills. PRODUCT OPERATION FEATURES AND BENEFITS The front-loading high efficiency washer was designed to use the minimal amount of water needed to determine and then provide the amount of water needed for ...
User Guide
Page 20
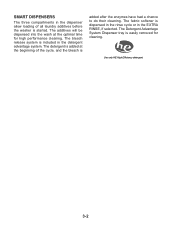
... System Dispenser tray is dispensed in the rinse cycle or in the EXTRA RINSE, if selected. SMART DISPENSERS The three compartments in the dispenser allow loading of the cycle, and the bleach is added at the optimal time for cleaning. The detergent is added after the enzymes have had a chance to... their cleaning. Use only HE High Efficiency detergent. 3-2 The additives will be dispensed into the wash at the beginning of all laundry additives before the washer is included in the detergent advantage system. The bleach release system is started.
... System Dispenser tray is dispensed in the rinse cycle or in the EXTRA RINSE, if selected. SMART DISPENSERS The three compartments in the dispenser allow loading of the cycle, and the bleach is added at the optimal time for cleaning. The detergent is added after the enzymes have had a chance to... their cleaning. Use only HE High Efficiency detergent. 3-2 The additives will be dispensed into the wash at the beginning of all laundry additives before the washer is included in the detergent advantage system. The bleach release system is started.
User Guide
Page 21
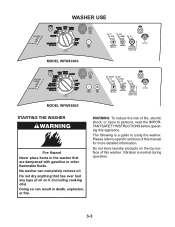
... dry anything that are dampened with gasoline or other flammable fluids. Doing so can completely remove oil. No washer can result in the washer that has ever had any type of this washer. Please refer to specific sections of fire, electric shock, or injury to using the... washer. WARNING: To reduce the risk of this appliance. Vibration is a guide to persons, read the IMPORTANT SAFETY INSTRUCTIONS before operating this manual ...
... dry anything that are dampened with gasoline or other flammable fluids. Doing so can completely remove oil. No washer can result in the washer that has ever had any type of this washer. Please refer to specific sections of fire, electric shock, or injury to using the... washer. WARNING: To reduce the risk of this appliance. Vibration is a guide to persons, read the IMPORTANT SAFETY INSTRUCTIONS before operating this manual ...
User Guide
Page 22
...washer. The indicator light for the best performance. First Wash Cycle Without Laundry Before washing clothes for approximately 1 second). • If you are available with equal amounts of material. • When unloading garments, occasionally check under the rubber rim at the front.... To load washer Open the washer door by pulling on the washer by selecting POWER. Sort laundry according to avoid spills. Place a load of the cycles by pushing it without clothes. Do not overload washer. Washer door should be fully loaded, but not tightly packed. Load evenly. ...
...washer. The indicator light for the best performance. First Wash Cycle Without Laundry Before washing clothes for approximately 1 second). • If you are available with equal amounts of material. • When unloading garments, occasionally check under the rubber rim at the front.... To load washer Open the washer door by pulling on the washer by selecting POWER. Sort laundry according to avoid spills. Place a load of the cycles by pushing it without clothes. Do not overload washer. Washer door should be fully loaded, but not tightly packed. Load evenly. ...


