
User Guide
Page 2
... diagnose malfunctions and repair the Duet Sport™ Front-Loading Automatic Washer. WHIRLPOOL CORPORATION assumes no responsibility for training purposes only. Always use the Wiring Diagram supplied with the washer. ii - Copyright © 2006, Whirlpool Corporation...troubleshoot and diagnose malfunctions. • Successfully perform necessary repairs. • Successfully return the washer to the "Use and Care Guide," or "Tech Sheet" provided with the product when servicing the unit. FORWARD This Whirlpool Job Aid, "Duet Sport™ Front-Loading Automatic Washer...
... diagnose malfunctions and repair the Duet Sport™ Front-Loading Automatic Washer. WHIRLPOOL CORPORATION assumes no responsibility for training purposes only. Always use the Wiring Diagram supplied with the washer. ii - Copyright © 2006, Whirlpool Corporation...troubleshoot and diagnose malfunctions. • Successfully perform necessary repairs. • Successfully return the washer to the "Use and Care Guide," or "Tech Sheet" provided with the product when servicing the unit. FORWARD This Whirlpool Job Aid, "Duet Sport™ Front-Loading Automatic Washer...

User Guide
Page 3
... & Serial Number Designations 1-2 Model & Serial Number Label And Tech Sheet Locations 1-3 Specifications 1-4 INSTALLATION INFORMATION 2-1 Installation Requirements 2-1 Installation Instructions 2-6 PRODUCT OPERATION 3-1 Features And Benefits 3-1 Washer Use 3-3 Washer Care 3-12 Troubleshooting 3-15 COMPONENT ACCESS 4-1 Component Locations 4-1 Removing The Console And The Touchpad/LED Assembly 4-2 Removing The Central Control Unit 4-4 Removing The Water Inlet Valve 4-6 Removing...
... & Serial Number Designations 1-2 Model & Serial Number Label And Tech Sheet Locations 1-3 Specifications 1-4 INSTALLATION INFORMATION 2-1 Installation Requirements 2-1 Installation Instructions 2-6 PRODUCT OPERATION 3-1 Features And Benefits 3-1 Washer Use 3-3 Washer Care 3-12 Troubleshooting 3-15 COMPONENT ACCESS 4-1 Component Locations 4-1 Removing The Console And The Touchpad/LED Assembly 4-2 Removing The Central Control Unit 4-4 Removing The Water Inlet Valve 4-6 Removing...
User Guide
Page 4
iv - Page DIAGNOSTICS & TROUBLESHOOTING 6-1 Diagnostics 6-1 Diagnostic Guide 6-1 Failure/Error Display Codes 6-2 Diagnostic Test 6-5 Error History Display 6-6 History Overview Test Program 6-6 Manual Diagnostic Test 6-7 Manual Overview Test Program 6-7 Electronic Assemblies - Removal Or Replacement 6-8 Washer Care 6-9 Troubleshooting Guide 6-11 WIRING DIAGRAMS 7-1 Washer 7-1 Grounding System 7-2 -
iv - Page DIAGNOSTICS & TROUBLESHOOTING 6-1 Diagnostics 6-1 Diagnostic Guide 6-1 Failure/Error Display Codes 6-2 Diagnostic Test 6-5 Error History Display 6-6 History Overview Test Program 6-6 Manual Diagnostic Test 6-7 Manual Overview Test Program 6-7 Electronic Assemblies - Removal Or Replacement 6-8 Washer Care 6-9 Troubleshooting Guide 6-11 WIRING DIAGRAMS 7-1 Washer 7-1 Grounding System 7-2 -

User Guide
Page 27
... Soak cycle to help improve the removal of set -in the washer during the Clean Washer cycle. Clean Washer Use the Clean Washer cycle once a month to keep the inside of your wash load. See "Cleaning The Washer." The spin speed is useful for delicate items. NORMAL SOUNDS As... by selecting the speed you are part of normal washer operation. The countdown to thoroughly clean the inside of your cycle selections. NOTE: Loads of set -in the display window. 3-9 See "Troubleshooting." Use this cycle to your washer fresh and clean. OPTIONS AND MODIFIERS You can reduce...
... Soak cycle to help improve the removal of set -in the washer during the Clean Washer cycle. Clean Washer Use the Clean Washer cycle once a month to keep the inside of your wash load. See "Cleaning The Washer." The spin speed is useful for delicate items. NORMAL SOUNDS As... by selecting the speed you are part of normal washer operation. The countdown to thoroughly clean the inside of your cycle selections. NOTE: Loads of set -in the display window. 3-9 See "Troubleshooting." Use this cycle to your washer fresh and clean. OPTIONS AND MODIFIERS You can reduce...
User Guide
Page 33
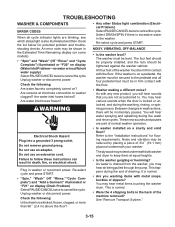
...an adapter. Re-select cycle and press START. This happens during the wash and rinse cycles. See "Remove Transport System." 3-15 TROUBLESHOOTING WASHER & COMPONENTS ERROR CODES When all four pedestal feet must be in firm contact with the floor. •... water supply) Select PAUSE/CANCEL twice to the "Installation Instructions" for potential problem and troubleshooting checks. All four feet of draining. This is normal. • Are you may hear metal items touching the washer drum. The plywood may be in the Estimated Time Remaining display (on some models). ...
...an adapter. Re-select cycle and press START. This happens during the wash and rinse cycles. See "Remove Transport System." 3-15 TROUBLESHOOTING WASHER & COMPONENTS ERROR CODES When all four pedestal feet must be in firm contact with the floor. •... water supply) Select PAUSE/CANCEL twice to the "Installation Instructions" for potential problem and troubleshooting checks. All four feet of draining. This is normal. • Are you may hear metal items touching the washer drum. The plywood may be in the Estimated Time Remaining display (on some models). ...
User Guide
Page 79
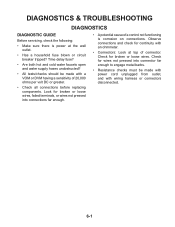
... at the wall outlet. • Has a household fuse blown or circuit breaker tripped? Look for continuity with a VOM or DVM having a sensitivity of connector. DIAGNOSTICS & TROUBLESHOOTING DIAGNOSTICS DIAGNOSTIC GUIDE Before servicing, check the following: • Make sure there is corrosion on connections.
... at the wall outlet. • Has a household fuse blown or circuit breaker tripped? Look for continuity with a VOM or DVM having a sensitivity of connector. DIAGNOSTICS & TROUBLESHOOTING DIAGNOSTICS DIAGNOSTIC GUIDE Before servicing, check the following: • Make sure there is corrosion on connections.
User Guide
Page 89
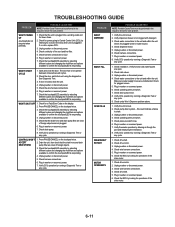
...: Possible Cause/Tests must be performed in the sequence shown for operations of the drive motor. 6-11 Check installation. Unplug washer or disconnect power. 4. Unplug washer or disconnect power. 4. Check wire harness connections. 5. Check the MCU by running a Diagnostic Test or any cycle. 9....within the unit. Check drain pump motor. 8. Check the MCU by listening for a Fault/Error Code on the display. 2. TROUBLESHOOTING GUIDE PROBLEM WON'T POWER UP (touchpads do not respond when pressed) POSSIBLE CAUSE/TEST NOTE: Possible Cause/Tests must be performed...
...: Possible Cause/Tests must be performed in the sequence shown for operations of the drive motor. 6-11 Check installation. Unplug washer or disconnect power. 4. Unplug washer or disconnect power. 4. Check wire harness connections. 5. Check the MCU by running a Diagnostic Test or any cycle. 9....within the unit. Check drain pump motor. 8. Check the MCU by listening for a Fault/Error Code on the display. 2. TROUBLESHOOTING GUIDE PROBLEM WON'T POWER UP (touchpads do not respond when pressed) POSSIBLE CAUSE/TEST NOTE: Possible Cause/Tests must be performed...
