
User Guide
Page 40
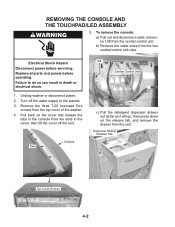
... Disconnect power before operating. Failure to the washer. 3. Replace all parts and panels before servicing. Remove the three T-20 hex-head Torx screws from the central control unit. Tabs Console UI8 Central Control Unit Clips c) Pull the detergent dispenser drawer... 1. To remove the console: a) Pull out and disconnect cable connector UI8 from the top cover of the washer. 4. Turn off the water supply to do so can result in the cover, then lift the cover off...on the release tab, and remove the drawer from the two central control unit clips. Unplug washer or disconnect power. 2.
... Disconnect power before operating. Failure to the washer. 3. Replace all parts and panels before servicing. Remove the three T-20 hex-head Torx screws from the central control unit. Tabs Console UI8 Central Control Unit Clips c) Pull the detergent dispenser drawer... 1. To remove the console: a) Pull out and disconnect cable connector UI8 from the top cover of the washer. 4. Turn off the water supply to do so can result in the cover, then lift the cover off...on the release tab, and remove the drawer from the two central control unit clips. Unplug washer or disconnect power. 2.
User Guide
Page 42
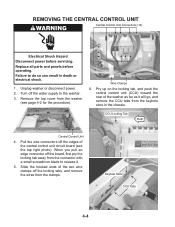
...the connector with a small screwdriver blade to release it will go, and remove the CCU tabs from the washer (see the top right photo). REMOVING THE CENTRAL CONTROL UNIT Central Control Unit Connectors (12) Electrical Shock Hazard Disconnect power before operating. Keyhole Slots CCU Tabs 4-4 Wire Clamps ...6. Pry up on the locking tab, and push the central control unit (CCU) toward the rear of the central control unit circuit board (see page 4-2 for the procedure). Replace all parts and panels before servicing. Remove the top cover from the keyhole slots in death ...
...the connector with a small screwdriver blade to release it will go, and remove the CCU tabs from the washer (see the top right photo). REMOVING THE CENTRAL CONTROL UNIT Central Control Unit Connectors (12) Electrical Shock Hazard Disconnect power before operating. Keyhole Slots CCU Tabs 4-4 Wire Clamps ...6. Pry up on the locking tab, and push the central control unit (CCU) toward the rear of the central control unit circuit board (see page 4-2 for the procedure). Replace all parts and panels before servicing. Remove the top cover from the keyhole slots in death ...
User Guide
Page 58
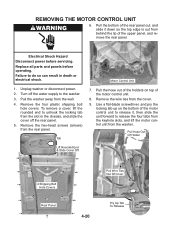
Turn off the rear panel. 5. Tab Motor Control Unit 7. REMOVING THE MOTOR CONTROL UNIT 6. Failure to do so can result in the chassis, and slide the cover off the water supply to the washer. 3. Remove the wire ties from the rear panel. Remove the hex-head screws (arrows) from the cover. 9. Pull the hose out... of the holders on the bottom of the motor control unit to release it down so the top edge is ...
Turn off the rear panel. 5. Tab Motor Control Unit 7. REMOVING THE MOTOR CONTROL UNIT 6. Failure to do so can result in the chassis, and slide the cover off the water supply to the washer. 3. Remove the wire ties from the rear panel. Remove the hex-head screws (arrows) from the cover. 9. Pull the hose out... of the holders on the bottom of the motor control unit to release it down so the top edge is ...
User Guide
Page 71
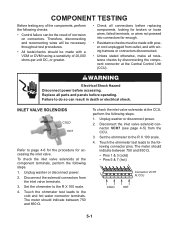
... of corrosion on connectors. Disconnect the solenoid connectors from the CCU. 3. Unplug washer or disconnect power. 2. COMPONENT TESTING Before testing any of the components, perform the following checks: • Control failure can result in death or electrical shock. INLET VALVE SOLENOIDS COLD HOT Refer... to the following connector pins. The meter should be made with a VOM or DVM having a sensitivity of 20,000 ohms-per-volt DC, or greater. • Check all parts and panels ...
... of corrosion on connectors. Disconnect the solenoid connectors from the CCU. 3. Unplug washer or disconnect power. 2. COMPONENT TESTING Before testing any of the components, perform the following checks: • Control failure can result in death or electrical shock. INLET VALVE SOLENOIDS COLD HOT Refer... to the following connector pins. The meter should be made with a VOM or DVM having a sensitivity of 20,000 ohms-per-volt DC, or greater. • Check all parts and panels ...
User Guide
Page 86
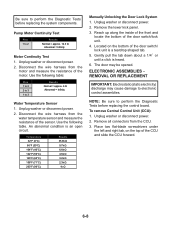
...of the CCU and slide the CCU forward. 6-8 Unplug washer or disconnect power. 2. Use the following table. To remove Central Control Unit (CCU): 1. Unplug washer or disconnect power. 2. Reach up along the inside of the front and locate the bottom of the sensor. Place two &#...the wire harness from the CCU. 3. The door may cause damage to electronic control assemblies. ELECTRONIC ASSEMBLIES REMOVAL OR REPLACEMENT IMPORTANT: Electrostatic (static electricity) discharge may be opened. Remove the lower kick panel. 3. Gently pull the tab down about a 1/4˝ or until a ...
...of the CCU and slide the CCU forward. 6-8 Unplug washer or disconnect power. 2. Use the following table. To remove Central Control Unit (CCU): 1. Unplug washer or disconnect power. 2. Reach up along the inside of the front and locate the bottom of the sensor. Place two &#...the wire harness from the CCU. 3. The door may cause damage to electronic control assemblies. ELECTRONIC ASSEMBLIES REMOVAL OR REPLACEMENT IMPORTANT: Electrostatic (static electricity) discharge may be opened. Remove the lower kick panel. 3. Gently pull the tab down about a 1/4˝ or until a ...


