
Kenmore HE2t Support Question
Kenmore HE2t Support Question
Find answers below for this question about Kenmore HE2t - 3.7 cu. Ft. Front Load Washer.Need a Kenmore HE2t manual? We have 1 online manual for this item!
Question posted by krisc63 on January 11th, 2014
Water Pouring Out Of Detergent Dispensed
how do i fix the water coming out of the detergent dispensed?
Current Answers
Answer #1: Posted by BusterDoogen on January 11th, 2014 1:44 PM
BusterDoogen

Member since:
October 30th, 2011 Points: 28,565,427

Member since:
October 30th, 2011 Points: 28,565,427
Usually if the vent tube leaks, it's due to a clog in the system, or and article stuck in the tub, usually something small andit's in the front tub area. So check that first.
Here are the instructions for accessing the dispenser assembly, and what to check for as far as hoses and tubes being clogged/kinked.
If you want, you can disconnect the hoses from the dispenser, you may want to soak it in a solution of very hot water and distilled white vinegar to remove any deposits that may have built up on/in the assembly.
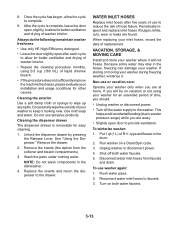
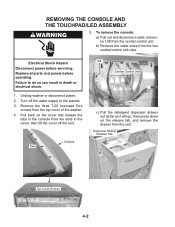
Removing the Washer Top Three screws secure the washer top at the back of the washer. Remove the three screws and lift the top from the washer. Removing the Console from the Cabinet Disconnect the Touch Pad/LED Assembly ribbon connector from the left side of the Central Control Unit and release it from the wiring harness brackets on the right side of the washer top. Remove the detergent dispenser drawer by pressing down on the release tab at the back of the drawer The Detergent Dispenser Assembly is located under the washer top. Begin by removing the washer top, console and front panel. Separate the water inlet and window washer tube from the boot.
Pull the water inlet tube from the outlet connector
of the detergent dispenser.
Check the inlet hose for clogs or debris. NOTE: When reinstalling the water inlet tube, wet the water inlet gasket on the detergent dispenser with water only. Do not use any other lubricant. Align the locator nib on the water inlet tube with the indentation on the dispenser connector and slide the tube onto the detergent dispenser assembly.
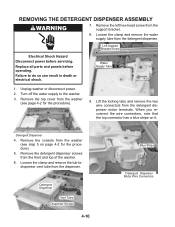
Remove the screw securing the front of the detergent dispenser assembly to the top front frame member
Disconnect the vent tube from the detergent dispenser
assembly. Remove the screw securing the detergent dispenser
assembly to the top left frame member.
Slide the assembly back slightly and lift the assembly out.
Here are the instructions for accessing the dispenser assembly, and what to check for as far as hoses and tubes being clogged/kinked.
If you want, you can disconnect the hoses from the dispenser, you may want to soak it in a solution of very hot water and distilled white vinegar to remove any deposits that may have built up on/in the assembly.
Removing the Washer Top Three screws secure the washer top at the back of the washer. Remove the three screws and lift the top from the washer. Removing the Console from the Cabinet Disconnect the Touch Pad/LED Assembly ribbon connector from the left side of the Central Control Unit and release it from the wiring harness brackets on the right side of the washer top. Remove the detergent dispenser drawer by pressing down on the release tab at the back of the drawer The Detergent Dispenser Assembly is located under the washer top. Begin by removing the washer top, console and front panel. Separate the water inlet and window washer tube from the boot.
Pull the water inlet tube from the outlet connector
of the detergent dispenser.
Check the inlet hose for clogs or debris. NOTE: When reinstalling the water inlet tube, wet the water inlet gasket on the detergent dispenser with water only. Do not use any other lubricant. Align the locator nib on the water inlet tube with the indentation on the dispenser connector and slide the tube onto the detergent dispenser assembly.
Remove the screw securing the front of the detergent dispenser assembly to the top front frame member
Disconnect the vent tube from the detergent dispenser
assembly. Remove the screw securing the detergent dispenser
assembly to the top left frame member.
Slide the assembly back slightly and lift the assembly out.
I hope this is helpful to you!
Please respond to my effort to provide you with the best possible solution by using the "Acceptable Solution" and/or the "Helpful" buttons when the answer has proven to be helpful. Please feel free to submit further info for your question, if a solution was not provided. I appreciate the opportunity to serve you!
Related Kenmore HE2t Manual Pages
User Guide - Page 3

... Washer Use 3-3 Washer Care 3-12 Troubleshooting 3-15
COMPONENT ACCESS 4-1 Component Locations 4-1 Removing The Console And The Touchpad/LED Assembly 4-2 Removing The Central Control Unit 4-4 Removing The Water Inlet Valve 4-6 Removing The Pressure Switch 4-7 Removing The Line Filter & Power Supply Cord 4-8 Removing The Detergent Dispenser Assembly 4-10 Removing The Detergent Dispenser...
User Guide - Page 8
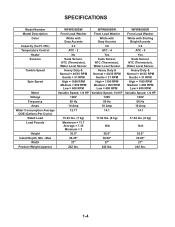
... Number Model Description
Color
Capacity (Cu.Ft. IEC) Temperature Control
Heater Sensors
Tumble Speed
Spin Speed
Motor Voltage Frequency Amps Water Consumption Average DOE (Gallons-Per-Cycle) Rated Load Load Pounds
Height Install Depth: Min - Max
Width Product Weight (approx)
WFW8300SW
WFW8500SW
WFW8500SR
Front Load Washer
Front Load Washer
Front Load Washer
White with Gray Accents
White...
User Guide - Page 17
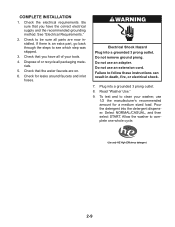
...inlet hoses. Do not use an adapter. Plug into the detergent dispenser. Pour the detergent into a grounded 3 prong outlet. 8. Allow the washer to see which step was skipped.
3. Check the electrical...parts are on.
6. Check for a medium sized load. Failure to be sure all packaging materials.
5. Use only HE High Efficiency detergent.
2-9 Check to follow these instructions can result in...
User Guide - Page 22
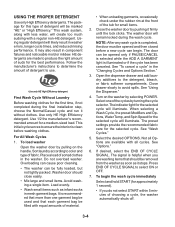
... filled with a regular non-HE detergent. Open the dispenser drawer and add laundry additives to color and type of fabric. See "Using the Dispenser."
4. See "Wash Cycles."
5. The package...Wash Cycles
1. Sort laundry according to the detergent, bleach, or fabric softener compartments. Overloading can cause poor cleaning.
• The washer can be fully loaded, but not tightly ...
User Guide - Page 23
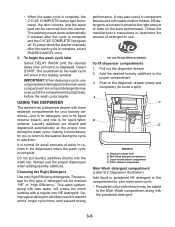
... a cycle, use only powdered detergents in Dispenser Illustration)
Add liquid or powdered HE detergent to this type of detergent will be added to produce the right amount of water to use the proper dispensers when adding laundry additives.
It may also result in hours) is displayed.
Use only HE High Efficiency detergent.
Push in washer errors, longer cycle times...
User Guide - Page 24
... 1 second) to begin the drain.
4.
The liquid detergent flows immediately into the washer.
• Powdered detergent: Measure the amount of powdered detergent with the measurement device which comes with a pour spout; PAUSING OR RESTARTING
1. Cycles and Options can be automatically dispensed in the final rinse or in this dispenser to the wash cycle and when the...
User Guide - Page 25
...care for the selected cycle.
• The preset settings can be added.
2. The washer door unlocks, and items can be changed anytime before START is unbalanced.
The door is...and unlocked automatically, depending on the stage of your water pressure, water temperature, detergent, and clothes load. You can lock the controls while the washer is complete. To continue the cycle, close the ...
User Guide - Page 28
...senses and maintains a uniform water temperature. Spin Speed
Each cycle has a preset SPIN SPEED. To change the water temperature, select the WASH ...dispenser drawer.
• Use powdered detergent to keep laundry additives from the washer as soon as in "Cycles."
• ATC works for the wash temperature with Warm and Cold settings.
• The Cold rinse temperatures depend on the type of load...
User Guide - Page 30
...dispenser drawer and immediately add 2/3 cup (160 mL) of the washer. If stained areas are detected in the washer... the seal/bellow, using the procedure that uses higher water volumes in the washer.
• Wear rubber gloves when cleaning for prolonged... washer.
2.
Select the CLEAN WASHER cycle.
6. Open the washer door and remove any detergent to the bleach compartment. c) Let...
User Guide - Page 31
...water. Unlock the dispenser drawer by pressing the Release Lever.
If you will not freeze. Run washer on both water faucets.
5. Reconnect water inlet hoses to complete.
9.
See "Using the Dispenser...Install and store your washer to provide ventilation.
Always do the following to maintain washer freshness
• Use only HE High Efficiency detergent.
• Leave ...
User Guide - Page 34
... when adding detergent and fabric softener to avoid water leaks. See "Washer Care" for details.
• Are the laundry additives in the fabric softener dispenser.
• Did you run the Clean Washer Cycle lately? WASHER ODOR
• Have you put powdered or liquid color-safe bleach into the dispensers. This washer has a tight seal to the dispensers? The washer door will...
User Guide - Page 36
... cycle is still wet, take half of the load out of load you select will be increased.
• Did you overload the washer? CLOTHES CARE
LOAD TOO WET
• Did you use enough HE detergent? If the laundry is designed for smaller load sizes (2-3 items) of loads washed increases, the water temperature may pause until this cycle, wash time...
User Guide - Page 39
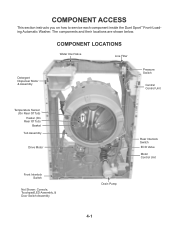
... locations are shown below. COMPONENT ACCESS
This section instructs you on how to service each component inside the Duet Sport™ Front-Loading Automatic Washer. COMPONENT LOCATIONS
Water Inlet Valve
Line Filter
Detergent Dispenser Motor & Assembly
Pressure Switch
Central Control Unit
Temperature Sensor (On Rear Of Tub) Heater (On Rear Of Tub) Basket Tub Assembly...
User Guide - Page 40
... lift the cover off the water supply to do so can result in the console from the central control unit. Unplug washer or disconnect power. 2. Turn off the unit. REMOVING THE CONSOLE AND THE TOUCHPAD/LED ASSEMBLY
5. Tabs
Console
UI8
Central Control Unit
Clips
c) Pull the detergent dispenser drawer out as far as it...
User Guide - Page 48
..., note that the top connector has a blue stripe on page 4-2 for the procedure).
9. Remove the detergent dispenser screws from the dispenser. Loosen the clamp and remove the water supply tube from the washer (see page 4-2 for the procedure).
5. Unplug washer or disconnect power. 2. Left Support Bracket Screw
Electrical Shock Hazard
Disconnect power before operating. Failure to...
User Guide - Page 50

... with the line on the left side of the washer. Loosen the clamp from the main water feed tube and remove the tube from the cabinet side panel slot, then lift the dispenser out of the detergent dispenser from the detergent dispenser. 17.
Side Panel Slot
Tube To Dispenser Line Arrow Water Feed Tube
Tube To Tub
Detergent Dispenser Tab Detergent Dispenser
4-12
User Guide - Page 51
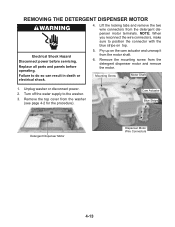
... to the washer. 3. Mounting Screw
Motor Shaft
1. Remove the top cover from the detergent dispenser motor and remove the motor. NOTE: When you reconnect the wire connectors, make sure to position the connector with the blue stripe on the cam actuator and unsnap it from the detergent dispenser motor terminals. Turn off the water supply to...
User Guide - Page 66

... the 1/2˝ bolts (3 each) from the front top and bottom tub weights, and remove the weights from the detergent dispenser. 6. Unplug washer or disconnect power. 2. Turn off the water supply to do so can result in death or electrical shock.
1. Pull the free end of the way, and remove the three 1/2˝ bolts from...
User Guide - Page 74

Unplug washer or disconnect power. 2. Disconnect the two wire connectors from the CCU. 3. Touch the ohmmeter test leads to the R X 1 scale. 4. Disconnect the detergent dispenser
connector DI6 (see page 4-5) from
the motor and switch terminals. 3. The meter should indicate as follows: Motor Terminals = 1400 Ω Switch Terminals = 0 Ω
To check ...
User Guide - Page 84
...Washer Delicate
Clean Washer
Distribution system is ON. Fill by turning on all lights for 5 seconds.
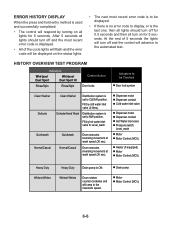
ERROR HISTORY DISPLAY
When the press and hold entry method is used and successfully completed:
• The control will respond by cold water... Door locks.
Dispenser motor Dispenser contact Cold water inlet valve
Dispenser motor Dispenser contact Hot Water inlet valve Pressure...
Similar Questions

No Cold Water
I have a Kenmore 2982 - 800 4.0 cu. Ft. Capacity top-load Washer bought in 2009. All of a sudden, it...
I have a Kenmore 2982 - 800 4.0 cu. Ft. Capacity top-load Washer bought in 2009. All of a sudden, it...
(Posted by jethalhuber 9 months ago)

Kenmore He2 Model 110.47561600 F20 Error Code.
6 minutes into any cycle the washer stops filling and shows the F20 error code. After researching th...
6 minutes into any cycle the washer stops filling and shows the F20 error code. After researching th...
(Posted by riskoj 6 years ago)


How Can I Clean My Kennmore Washer Machine?
(Posted by Mariavargas1102 9 years ago)

He2t
On the detergent dispenser...Do I fill it up and the machine allocates how much detergent gets dispe...
On the detergent dispenser...Do I fill it up and the machine allocates how much detergent gets dispe...
(Posted by Rwmwindham 10 years ago)