

User Guide
Page 3
... Specifications 1-4 INSTALLATION INFORMATION 2-1 Installation Requirements 2-1 Installation Instructions 2-6 PRODUCT OPERATION 3-1 Features And Benefits 3-1 Washer Use 3-3 Washer Care 3-12 Troubleshooting 3-15 COMPONENT ACCESS 4-1 Component Locations 4-1 Removing The Console And The Touchpad/LED Assembly... 4-2 Removing The Central Control Unit 4-4 Removing The Water Inlet Valve 4-6 Removing The Pressure Switch 4-7 Removing The Line Filter & Power...
... Specifications 1-4 INSTALLATION INFORMATION 2-1 Installation Requirements 2-1 Installation Instructions 2-6 PRODUCT OPERATION 3-1 Features And Benefits 3-1 Washer Use 3-3 Washer Care 3-12 Troubleshooting 3-15 COMPONENT ACCESS 4-1 Component Locations 4-1 Removing The Console And The Touchpad/LED Assembly... 4-2 Removing The Central Control Unit 4-4 Removing The Water Inlet Valve 4-6 Removing The Pressure Switch 4-7 Removing The Line Filter & Power...
User Guide
Page 10
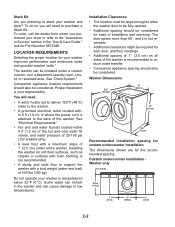
... to stack your responsibility. See "Electrical Requirements." • Hot and cold water faucets located within 6 ft (1.8 m) of where the power cord is not recommended. • A sturdy and solid floor to support the washer with a total weight (water and load) of 1˝ (2.5 cm) on soft floor surfaces, such as carpets or surfaces with a maximum slope...
... to stack your responsibility. See "Electrical Requirements." • Hot and cold water faucets located within 6 ft (1.8 m) of where the power cord is not recommended. • A sturdy and solid floor to support the washer with a total weight (water and load) of 1˝ (2.5 cm) on soft floor surfaces, such as carpets or surfaces with a maximum slope...
User Guide
Page 13
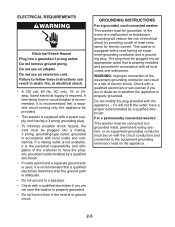
...connection of the equipment-grounding conductor can result in doubt as to whether the appliance is properly grounded. For a permanently connected washer: This washer must be connected to a grounded metal, permanent wiring system, or an equipment-grounding conductor must be grounded. It is ...recommended that a separate circuit serving only this appliance be provided. • This washer is equipped with a power supply cord having an equipment-grounding conductor and a grounding plug. This washer is equipped with the appliance - The plug must be plugged into a mating, 3 prong,...
...connection of the equipment-grounding conductor can result in doubt as to whether the appliance is properly grounded. For a permanently connected washer: This washer must be connected to a grounded metal, permanent wiring system, or an equipment-grounding conductor must be grounded. It is ...recommended that a separate circuit serving only this appliance be provided. • This washer is equipped with a power supply cord having an equipment-grounding conductor and a grounding plug. This washer is equipped with the appliance - The plug must be plugged into a mating, 3 prong,...
User Guide
Page 14
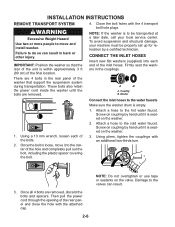
... valves can result in the couplings. These bolts also retain the power cord inside the washer until it is empty. 1. A B A. CONNECT THE INLET HOSES Insert new flat washers (supplied) into each of the inlet hoses. Firmly seat the washers in back or other injury. Attach a hose to the cold .... 2. Attach a hose to the hot water faucet. Close the bolt holes with an additional two-thirds turn. 3. NOTE: If the washer is within approximately 3 ft (90 cm) of the hole and completely pull out the bolt, including the plastic spacer covering the bolt. 2. IMPORTANT: Position the...
... valves can result in the couplings. These bolts also retain the power cord inside the washer until it is empty. 1. A B A. CONNECT THE INLET HOSES Insert new flat washers (supplied) into each of the inlet hoses. Firmly seat the washers in back or other injury. Attach a hose to the cold .... 2. Attach a hose to the hot water faucet. Close the bolt holes with an additional two-thirds turn. 3. NOTE: If the washer is within approximately 3 ft (90 cm) of the hole and completely pull out the bolt, including the plastic spacer covering the bolt. 2. IMPORTANT: Position the...
User Guide
Page 16
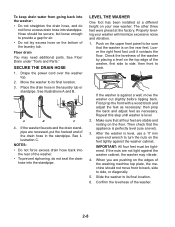
..., put the hooked end of the laundry tub. Then check that the washer is against the washer cabinet, the washer may need additional parts. Slide the washer to side, or diagonally. 5. Drape the power cord over the washer top. 2. Lower the right front foot until washer is level, use a 17 mm open-end wrench to turn the nuts...
..., put the hooked end of the laundry tub. Then check that the washer is against the washer cabinet, the washer may need additional parts. Slide the washer to side, or diagonally. 5. Drape the power cord over the washer top. 2. Lower the right front foot until washer is level, use a 17 mm open-end wrench to turn the nuts...
User Guide
Page 19
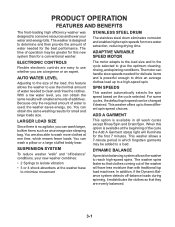
... spinning conditions. PRODUCT OPERATION FEATURES AND BENEFITS The front-loading high efficiency washer was designed to conserve resources and lower your new washer combines: • 2 Springs to isolate vibration • 3 or 4 shock absorbers at the washer base to minimize movement STAINLESS STEEL DRUM The stainless... clothes at the beginning of water needed for delicate items and is powerful enough to drive an average clothes load up to three different spin speed choices. ADD A GARMENT This option is used, the washer saves energy, too. With a low water level, you are evenly...
... spinning conditions. PRODUCT OPERATION FEATURES AND BENEFITS The front-loading high efficiency washer was designed to conserve resources and lower your new washer combines: • 2 Springs to isolate vibration • 3 or 4 shock absorbers at the washer base to minimize movement STAINLESS STEEL DRUM The stainless... clothes at the beginning of water needed for delicate items and is powerful enough to drive an average clothes load up to three different spin speed choices. ADD A GARMENT This option is used, the washer saves energy, too. With a low water level, you are evenly...
User Guide
Page 22
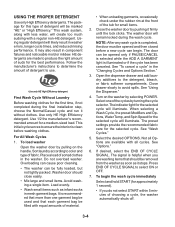
... second). • If you are made to color and type of the cycles by selecting POWER. Use only HE High Efficiency detergent. Select the desired OPTIONS. Do not overload washer. The indicator light for the first time, if not completed during the wash cycle....8226; When unloading garments, occasionally check under the rubber rim at the front of suds for the selected cycle will illuminate. This initial cycle serves to determine the amount of sorted clothes in the washer. Place a load of detergent to avoid spills. When selecting a Wash Cycle, the ...
... second). • If you are made to color and type of the cycles by selecting POWER. Use only HE High Efficiency detergent. Select the desired OPTIONS. Do not overload washer. The indicator light for the first time, if not completed during the wash cycle....8226; When unloading garments, occasionally check under the rubber rim at the front of suds for the selected cycle will illuminate. This initial cycle serves to determine the amount of sorted clothes in the washer. Place a load of detergent to avoid spills. When selecting a Wash Cycle, the ...
User Guide
Page 23
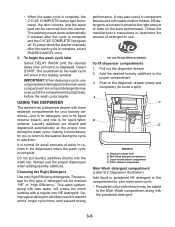
...CYCLE COMPLETE status light illuminates, the door unlocks, and the wash load can be marked "HE" or "High Efficiency." USING THE DISPENSER The washer has a dispenser drawer with a regular non-HE detergent. It may...ciency detergents. Laundry additives are made to use. Using regular detergent will be removed from the washer. Use only HE High Efficiency detergent. Add the desired laundry additives to the wash cycle will ... is complete, select PAUSE/CANCEL once. 8. The washer powers down the washer manually after the cycle is for this type of suds for you to return to the...
...CYCLE COMPLETE status light illuminates, the door unlocks, and the wash load can be marked "HE" or "High Efficiency." USING THE DISPENSER The washer has a dispenser drawer with a regular non-HE detergent. It may...ciency detergents. Laundry additives are made to use. Using regular detergent will be removed from the washer. Use only HE High Efficiency detergent. Add the desired laundry additives to the wash cycle will ... is complete, select PAUSE/CANCEL once. 8. The washer powers down the washer manually after the cycle is for this type of suds for you to return to the...
User Guide
Page 24
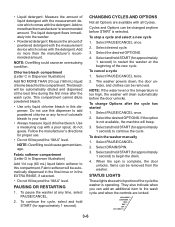
...and Options can be removed. To stop a cycle and select a new cycle 1. Select and hold START (for approximately 1 second) to your load. • Always measure liquid chlorine bleach. Select PAUSE/CANCEL once. 2. When the spin is operating. STATUS LIGHTS These lights show which portion of... be changed anytime before the door unlocks. They also indicate when you can be removed from the washer. CHANGING CYCLES AND OPTIONS Not all Cycles. Select PAUSE/CANCEL twice. 2. The washer powers down, the door unlocks, and clothes can add an additional item to this dispenser. Select the...
...and Options can be removed. To stop a cycle and select a new cycle 1. Select and hold START (for approximately 1 second) to your load. • Always measure liquid chlorine bleach. Select PAUSE/CANCEL once. 2. When the spin is operating. STATUS LIGHTS These lights show which portion of... be changed anytime before the door unlocks. They also indicate when you can be removed from the washer. CHANGING CYCLES AND OPTIONS Not all Cycles. Select PAUSE/CANCEL twice. 2. The washer powers down, the door unlocks, and clothes can add an additional item to this dispenser. Select the...
User Guide
Page 25
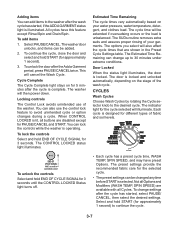
This will then power down. You can also use of your water pressure, water temperature, detergent, and clothes load. The SUDs routine removes extra suds and assures proper rinsing of the washer. The indicator light for 3 seconds until the CONTROL LOCKED Status light turns off. • Each cycle... Locked When the status light illuminates, the door is locked and unlocked automatically, depending on your garments. To change up to the washer after the cycle is selected. Adding items You can add items to 30 minutes under extreme conditions. To add items 1. Select PAUSE...
This will then power down. You can also use of your water pressure, water temperature, detergent, and clothes load. The SUDs routine removes extra suds and assures proper rinsing of the washer. The indicator light for 3 seconds until the CONTROL LOCKED Status light turns off. • Each cycle... Locked When the status light illuminates, the door is locked and unlocked automatically, depending on your garments. To change up to the washer after the cycle is selected. Adding items You can add items to 30 minutes under extreme conditions. To add items 1. Select PAUSE...
User Guide
Page 31
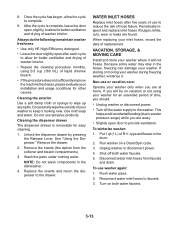
...HOSES Replace inlet hoses after each cycle to a water pressure surge) while you are at home. If you should: • Unplug washer or disconnect power. • Turn off both water faucets. 3-13 Shut off the water supply to keep it will be on vacation or not using...dispenser drawer by pressing the Release Lever. When replacing your washer only when you are found. Unplug washer or disconnect power. 4. To use abrasive products. NOTE: Do not wash components in the hoses, freezing can damage your washer to the washer. Reconnect water inlet hoses to complete. 9. See "...
...HOSES Replace inlet hoses after each cycle to a water pressure surge) while you are at home. If you should: • Unplug washer or disconnect power. • Turn off both water faucets. 3-13 Shut off the water supply to keep it will be on vacation or not using...dispenser drawer by pressing the Release Lever. When replacing your washer only when you are found. Unplug washer or disconnect power. 4. To use abrasive products. NOTE: Do not wash components in the hoses, freezing can damage your washer to the washer. Reconnect water inlet hoses to complete. 9. See "...
User Guide
Page 32
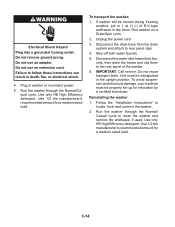
...use an adapter. Failure to rear panel clips. 4. Run the washer through the Normal/ Casual cycle to clean the washer and remove the antifreeze, if used. Run washer on a Drain/Spin cycle. 2. Unplug the power cord. 3. Disconnect the drain hose from faucets, then drain the ...off both water faucets. 5. Do not reuse transport bolts. Reinstalling the washer 1. Run the washer through the Normal/Ca- Plug in 1 qt (1 L) of the washer. 6. Use 1/2 the manufacturer's recommended amount for a medium sized load. 3-14 Follow the "Installation Instructions" to the rear panel of R.V.-...
...use an adapter. Failure to rear panel clips. 4. Run the washer through the Normal/ Casual cycle to clean the washer and remove the antifreeze, if used. Run washer on a Drain/Spin cycle. 2. Unplug the power cord. 3. Disconnect the drain hose from faucets, then drain the ...off both water faucets. 5. Do not reuse transport bolts. Reinstalling the washer 1. Run the washer through the Normal/Ca- Plug in 1 qt (1 L) of the washer. 6. Use 1/2 the manufacturer's recommended amount for a medium sized load. 3-14 Follow the "Installation Instructions" to the rear panel of R.V.-...
User Guide
Page 33
...;cient water supply) Select PAUSE/CANCEL twice to cancel the cycle. These new sounds and pauses are part of draining. Unplug washer or disconnect power. This happens during the wash and rinse cycles. This is also illuminated and then check the list below for flooring ... START. You will hear sounds that you may extend underneath both washer and dryer to keep them at inlet hose connection to follow these instructions can result in washer or reconnect power. Failure to washer clogged? TROUBLESHOOTING WASHER & COMPONENTS ERROR CODES When all four pedestal feet must be in...
...;cient water supply) Select PAUSE/CANCEL twice to cancel the cycle. These new sounds and pauses are part of draining. Unplug washer or disconnect power. This happens during the wash and rinse cycles. This is also illuminated and then check the list below for flooring ... START. You will hear sounds that you may extend underneath both washer and dryer to keep them at inlet hose connection to follow these instructions can result in washer or reconnect power. Failure to washer clogged? TROUBLESHOOTING WASHER & COMPONENTS ERROR CODES When all four pedestal feet must be in...
User Guide
Page 35
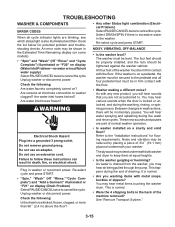
...power cord plugged into a grounded 3 prong outlet. Press and hold START, for 1 second? This will see little or no water splashing in the standpipe, or is a low sudsing detergent. You will occur more frequently when a non-HE detergent is used. • Is the load balanced? WASHER ... prong. Do not use an extension cord. • Has a household fuse blown, or has a circuit breaker tripped? Wash smaller loads. • Is the washer door firmly shut? Check electrical source or call electrician. • Excessive suds? A single or bulky item may cause imbalance....
...power cord plugged into a grounded 3 prong outlet. Press and hold START, for 1 second? This will see little or no water splashing in the standpipe, or is a low sudsing detergent. You will occur more frequently when a non-HE detergent is used. • Is the load balanced? WASHER ... prong. Do not use an extension cord. • Has a household fuse blown, or has a circuit breaker tripped? Wash smaller loads. • Is the washer door firmly shut? Check electrical source or call electrician. • Excessive suds? A single or bulky item may cause imbalance....
User Guide
Page 40
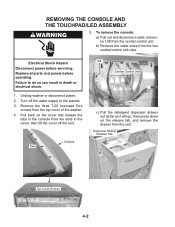
..., then lift the cover off the water supply to do so can result in the console from the top cover of the washer. 4. Failure to the washer. 3. Unplug washer or disconnect power. 2. Pull back on the release tab, and remove the drawer from the two central control unit clips. Turn off the unit. ... down on the cover and release the tabs in death or electrical shock. 1. Replace all parts and panels before servicing. Electrical Shock Hazard Disconnect power before operating. To remove the console: a) Pull out and disconnect cable connector UI8 from the central control unit.
..., then lift the cover off the water supply to do so can result in the console from the top cover of the washer. 4. Failure to the washer. 3. Unplug washer or disconnect power. 2. Pull back on the release tab, and remove the drawer from the two central control unit clips. Turn off the unit. ... down on the cover and release the tabs in death or electrical shock. 1. Replace all parts and panels before servicing. Electrical Shock Hazard Disconnect power before operating. To remove the console: a) Pull out and disconnect cable connector UI8 from the central control unit.
User Guide
Page 42
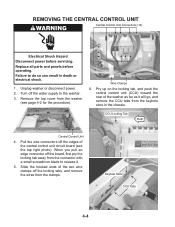
... central control unit circuit board (see page 4-2 for the procedure). Keyhole Slots CCU Tabs 4-4 Slide the hooked ends of the washer as far as it . 5. Failure to the washer. 3. Unplug washer or disconnect power. 2. Pull the wire connectors off the board, first pry the locking tab away from the connector with a small screwdriver blade...
... central control unit circuit board (see page 4-2 for the procedure). Keyhole Slots CCU Tabs 4-4 Slide the hooked ends of the washer as far as it . 5. Failure to the washer. 3. Unplug washer or disconnect power. 2. Pull the wire connectors off the board, first pry the locking tab away from the connector with a small screwdriver blade...
User Guide
Page 44
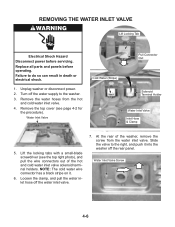
... Replace all parts and panels before servicing. Remove the top cover (see the top right photo), and pull the wire connectors out of the washer, remove the screw from the hot and cold water inlet valve. 4. Loosen the clamp, and pull the water inlet hose off the rear ... water inlet valve. 7. Remove the water hoses from the water inlet valve. Slide the valve to the right, and push it . 6. Unplug washer or disconnect power. 2. Water Inlet Valve Pull Connector Out Cold Water (Stripe) Solenoid Terminal Holder Water Inlet Valve Inlet Hose & Clamp 5. REMOVING THE WATER INLET ...
... Replace all parts and panels before servicing. Remove the top cover (see the top right photo), and pull the wire connectors out of the washer, remove the screw from the hot and cold water inlet valve. 4. Loosen the clamp, and pull the water inlet hose off the rear ... water inlet valve. 7. Remove the water hoses from the water inlet valve. Slide the valve to the right, and push it . 6. Unplug washer or disconnect power. 2. Water Inlet Valve Pull Connector Out Cold Water (Stripe) Solenoid Terminal Holder Water Inlet Valve Inlet Hose & Clamp 5. REMOVING THE WATER INLET ...
User Guide
Page 45
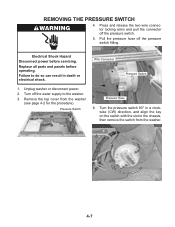
Electrical Shock Hazard Disconnect power before operating. Failure to the washer. 3. Turn off the pressure switch. 5. REMOVING THE PRESSURE SWITCH 4. Wire Connector Pressure Switch 1. Replace all parts and panels before servicing. Turn the pressure switch 90&#... the key on the switch with the slot in death or electrical shock. Pressure Switch Pressure Hose 6. Turn 90° CW To Remove 4-7 Unplug washer or disconnect power. 2. Press and release the two wire connector locking arms and pull the connector off the water supply to do so can result in the...
Electrical Shock Hazard Disconnect power before operating. Failure to the washer. 3. Turn off the pressure switch. 5. REMOVING THE PRESSURE SWITCH 4. Wire Connector Pressure Switch 1. Replace all parts and panels before servicing. Turn the pressure switch 90&#... the key on the switch with the slot in death or electrical shock. Pressure Switch Pressure Hose 6. Turn 90° CW To Remove 4-7 Unplug washer or disconnect power. 2. Press and release the two wire connector locking arms and pull the connector off the water supply to do so can result in the...
User Guide
Page 46
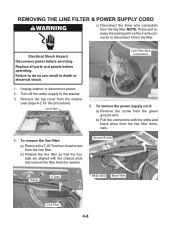
...T-20 Torx/hex-head screw from the washer (see page 4-2 for the procedure). Unplug washer or disconnect power. 2. Remove the top cover from the line filter. Line Filter Wire Connectors 1. b) Pull the connectors with the chassis slots and remove the filter from the washer. Ground Screw Screw 4 Tabs White Wire...servicing. Failure to the washer. 3. b) Position the line filter so that the four tabs are aligned with the white and black wires from the filter. Turn off the water supply to do so can result in death or electrical shock. To remove the power supply cord: a) ...
...T-20 Torx/hex-head screw from the washer (see page 4-2 for the procedure). Unplug washer or disconnect power. 2. Remove the top cover from the line filter. Line Filter Wire Connectors 1. b) Pull the connectors with the chassis slots and remove the filter from the washer. Ground Screw Screw 4 Tabs White Wire...servicing. Failure to the washer. 3. b) Position the line filter so that the four tabs are aligned with the white and black wires from the filter. Turn off the water supply to do so can result in death or electrical shock. To remove the power supply cord: a) ...

User Guide
Page 47
Align the strain relief key with the slot in the rear panel, and remove the cord from the wall far enough to access the power supply cord on the power supply cord 90° in either direction. c) Pull the washer away from the washer. Power Supply Cord Strain Relief 4-9 d) Use a pair of pliers and turn the strain relief on the rear panel.
Align the strain relief key with the slot in the rear panel, and remove the cord from the wall far enough to access the power supply cord on the power supply cord 90° in either direction. c) Pull the washer away from the washer. Power Supply Cord Strain Relief 4-9 d) Use a pair of pliers and turn the strain relief on the rear panel.


