
User Guide
Page 22
To load washer Open the washer door by pushing it firmly until the lock clicks. The washer door will likely result in washer errors, longer cycle times, and reduced rinsing performance. Select one garment bag be used and that each garment bag be removed from the washer as soon as...8226; When unloading garments, occasionally check under the rubber rim at the front of the tub for this type of choosing a cycle, the washer automatically shuts off. 3-4 Close the washer door by pulling on the washer by turning the cycle selector. Close drawer slowly to select ON or ...
To load washer Open the washer door by pushing it firmly until the lock clicks. The washer door will likely result in washer errors, longer cycle times, and reduced rinsing performance. Select one garment bag be used and that each garment bag be removed from the washer as soon as...8226; When unloading garments, occasionally check under the rubber rim at the front of the tub for this type of choosing a cycle, the washer automatically shuts off. 3-4 Close the washer door by pulling on the washer by turning the cycle selector. Close drawer slowly to select ON or ...
User Guide
Page 24
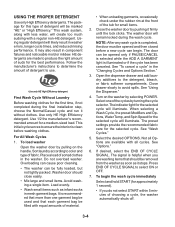
...3. To continue the cycle, select and hold START (for approximately 1 second) to continue the cycle. CHANGING CYCLES AND OPTIONS Not all Options are locked. 3-6 To stop a cycle and select a new cycle 1. Select PAUSE/CANCEL once. 2. Select and hold START (for approximately 1 second). To... Illustration) Add 1/4 cup (60 mL) liquid fabric softener to this dispenser to your load. • Always measure liquid chlorine bleach. Select desired cycle. 3. The washer powers down, the door unlocks, and clothes can be automatically diluted and dispensed at the best time during the ...
...3. To continue the cycle, select and hold START (for approximately 1 second) to continue the cycle. CHANGING CYCLES AND OPTIONS Not all Options are locked. 3-6 To stop a cycle and select a new cycle 1. Select PAUSE/CANCEL once. 2. Select and hold START (for approximately 1 second). To... Illustration) Add 1/4 cup (60 mL) liquid fabric softener to this dispenser to your load. • Always measure liquid chlorine bleach. Select desired cycle. 3. The washer powers down, the door unlocks, and clothes can be automatically diluted and dispensed at the best time during the ...
User Guide
Page 25
The washer door unlocks, and items can also use of your water pressure, water temperature, detergent, and clothes load. The washer will cancel the Wash Cycle. The CONTROL LOCKED status light illuminates. The options you select will also affect the cycle times that are disabled except for PAUSE/CANCEL and START. Not all Options ...
The washer door unlocks, and items can also use of your water pressure, water temperature, detergent, and clothes load. The washer will cancel the Wash Cycle. The CONTROL LOCKED status light illuminates. The options you select will also affect the cycle times that are disabled except for PAUSE/CANCEL and START. Not all Options ...

User Guide
Page 27
... an empty wash tub. You may hear various sounds when the door is useful for that you are part of normal washer operation. You will not illuminate when selected. Rinse & Spin is locked or unlocked, and during the wash and rinse cycles. NOTE: Loads of set -in the display window. 3-9 OPTIONS AND MODIFIERS You...
... an empty wash tub. You may hear various sounds when the door is useful for that you are part of normal washer operation. You will not illuminate when selected. Rinse & Spin is locked or unlocked, and during the wash and rinse cycles. NOTE: Loads of set -in the display window. 3-9 OPTIONS AND MODIFIERS You...
User Guide
Page 30
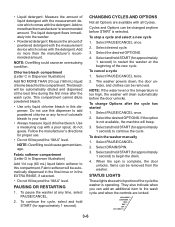
... LOCKED lights will proceed to thoroughly rinse the remaining bleach from the unit. NOTES: • Read these areas of the washer. Press START. b) If any clothing or items from the washer. 2. Be sure the dispenser drawer is closed . 5. This will stop the cycle. Open the washer door ...use. This will take approximately 3 minutes. 7. A A. The cycle will rotate while the washer runs a short sensing cycle. Be sure the door is closed . 3. NOTE: The basket will rotate, then the door will unlock, lock again, and then the cycle will continue. • The machine will not fill...
... LOCKED lights will proceed to thoroughly rinse the remaining bleach from the unit. NOTES: • Read these areas of the washer. Press START. b) If any clothing or items from the washer. 2. Be sure the dispenser drawer is closed . 5. This will stop the cycle. Open the washer door ...use. This will take approximately 3 minutes. 7. A A. The cycle will rotate while the washer runs a short sensing cycle. Be sure the door is closed . 3. NOTE: The basket will rotate, then the door will unlock, lock again, and then the cycle will continue. • The machine will not fill...
User Guide
Page 33
...from the washer, you may hear various sounds when the door is also illuminated and then check the list below for flooring requirements. Electrical Shock Hazard Plug into a grounded 3 prong outlet. Do not use an extension cord. Do not use an adapter. Unplug washer or disconnect ... new product, you will hear water spraying and splashing during the end of normal washer operation. Failure to the pedestal and all cycle indicator lights are blinking, see which status light is locked or unlocked, and during the washing, rinsing, or spinning process. An error code...
...from the washer, you may hear various sounds when the door is also illuminated and then check the list below for flooring requirements. Electrical Shock Hazard Plug into a grounded 3 prong outlet. Do not use an extension cord. Do not use an adapter. Unplug washer or disconnect ... new product, you will hear water spraying and splashing during the end of normal washer operation. Failure to the pedestal and all cycle indicator lights are blinking, see which status light is locked or unlocked, and during the washing, rinsing, or spinning process. An error code...
User Guide
Page 34
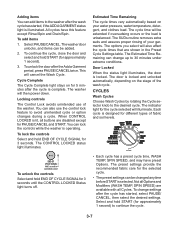
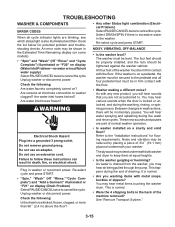
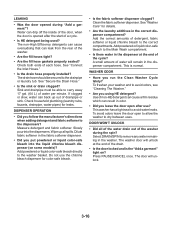
DISPENSER OPERATION • Did you run the Clean Washer Cycle lately? Do not use ? Add the correct amounts of the drain. • Is the door locked and is the "Add a garment" light on some models)? Press PAUSE/CANCEL once. See "Secure the Drain Hose." • Is ... Have you follow the manufacturer's directions when adding detergent and fabric softener to the correct compartments. This washer has a tight seal to the washer basket. The washer door will unlock at the end of the washer. • Are the fill hoses tight? • Are the fill hose gaskets ...
DISPENSER OPERATION • Did you run the Clean Washer Cycle lately? Do not use ? Add the correct amounts of the drain. • Is the door locked and is the "Add a garment" light on some models)? Press PAUSE/CANCEL once. See "Secure the Drain Hose." • Is ... Have you follow the manufacturer's directions when adding detergent and fabric softener to the correct compartments. This washer has a tight seal to the washer basket. The washer door will unlock at the end of the washer. • Are the fill hoses tight? • Are the fill hose gaskets ...

User Guide
Page 75
... (see page 4-5) from the CCU. 3. Set the ohmmeter to page 4-14 for the procedure for accessing the door switch. Pins 2 & 3 = 60 Ω Door Lock Solenoid - To test the door switch, touch the ohmmeter test leads to pins 3 and 1 at the CCU, perform the following steps. 1. To...door switch connector DS2 (see page 4-5) from the CCU. 6. The meter should indicate as follows: Door Closed = 0 Ω Door Open = infinite 1 2 3 1 2 3 1 2 3 Unlock Sol. To test the door lock/unlock solenoids, touch the ohmmeter test leads to do so can result in death or electrical shock. Unplug washer...
... (see page 4-5) from the CCU. 3. Set the ohmmeter to page 4-14 for the procedure for accessing the door switch. Pins 2 & 3 = 60 Ω Door Lock Solenoid - To test the door switch, touch the ohmmeter test leads to pins 3 and 1 at the CCU, perform the following steps. 1. To...door switch connector DS2 (see page 4-5) from the CCU. 6. The meter should indicate as follows: Door Closed = 0 Ω Door Open = infinite 1 2 3 1 2 3 1 2 3 Unlock Sol. To test the door lock/unlock solenoids, touch the ohmmeter test leads to do so can result in death or electrical shock. Unplug washer...
User Guide
Page 80
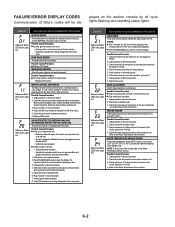
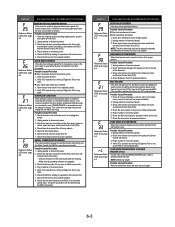
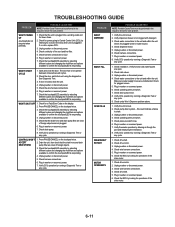
... turned on this model. (abnormal = infinity) 4. If the above does not correct the problem, go to the door switch/lock unit and Central Control Unit (CCU). Possible Causes/Procedure Door lock mechanism is not a siphon problem. 2. Unplug washer or disconnect power. 2. Check the wire harness connections to step 7. 7. HEATER FAILURE If the temperature increase during...
... turned on this model. (abnormal = infinity) 4. If the above does not correct the problem, go to the door switch/lock unit and Central Control Unit (CCU). Possible Causes/Procedure Door lock mechanism is not a siphon problem. 2. Unplug washer or disconnect power. 2. Check the wire harness connections to step 7. 7. HEATER FAILURE If the temperature increase during...
User Guide
Page 81
... motor. 7. See Manually Unlocking The Door Lock System. Unplug washer or disconnect power. 2. Verify CCU operation by running a Diagnostic Test or any cycle. Open and close the door. 2. Possible Causes/Procedure 1. Check mechanical linkage from drum and start of the drive motor. 7. Check for operations of the CLEANING WASHER cycle a load is closed . 2. Check the drive...
... motor. 7. See Manually Unlocking The Door Lock System. Unplug washer or disconnect power. 2. Verify CCU operation by running a Diagnostic Test or any cycle. Open and close the door. 2. Possible Causes/Procedure 1. Check mechanical linkage from drum and start of the drive motor. 7. Check for operations of the CLEANING WASHER cycle a load is closed . 2. Check the drive...
User Guide
Page 84
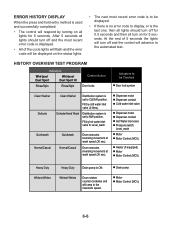
Actuators to be Checked Door lock system Clean Washer Delicate Clean Washer Distribution system is ON. Fill by hot water inlet valve to Level_wash Quickwash Normal/Casual Quickwash Normal/Casual Drum executes reversing movement at wash speed (... reversing movement at wash speed (30 sec). HISTORY OVERVIEW TEST PROGRAM Indication Whirlpool Duet Sport Whirlpool Duet Sport Ht Rinse/Spin Rinse/Spin Control Action Door locks. Delicate/Hand Wash Distribution system is the last one, then all lights should turn off for 5 seconds. Fill by cold water inlet valve (4 liters). At...
Actuators to be Checked Door lock system Clean Washer Delicate Clean Washer Distribution system is ON. Fill by hot water inlet valve to Level_wash Quickwash Normal/Casual Quickwash Normal/Casual Drum executes reversing movement at wash speed (... reversing movement at wash speed (30 sec). HISTORY OVERVIEW TEST PROGRAM Indication Whirlpool Duet Sport Whirlpool Duet Sport Ht Rinse/Spin Rinse/Spin Control Action Door locks. Delicate/Hand Wash Distribution system is the last one, then all lights should turn off for 5 seconds. Fill by cold water inlet valve (4 liters). At...
User Guide
Page 85
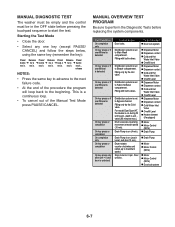
..., the Heater is on (reach Level_sud plus 10 sec). Drain Pump is set to start the test. Starting the Test Mode • Close the door. • Select any one key (except PAUSE/ CANCEL) and follow the steps below, using the same key (remember the key): Press/ hold ...level is detected Distribution system is on during fill until Level _wash is detected Control Action Door locks. Door unlocks. MANUAL DIAGNOSTIC TEST The washer must be empty and the control must be Checked Door lock system Dispenser Motor Dispenser contact Cold and Hot Water Inlet Valve Overfill level Dispenser Motor ...
..., the Heater is on (reach Level_sud plus 10 sec). Drain Pump is set to start the test. Starting the Test Mode • Close the door. • Select any one key (except PAUSE/ CANCEL) and follow the steps below, using the same key (remember the key): Press/ hold ...level is detected Distribution system is on during fill until Level _wash is detected Control Action Door locks. Door unlocks. MANUAL DIAGNOSTIC TEST The washer must be empty and the control must be Checked Door lock system Dispenser Motor Dispenser contact Cold and Hot Water Inlet Valve Overfill level Dispenser Motor ...
User Guide
Page 86
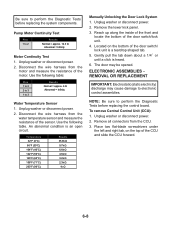
...8486; 3.2k Ω 2.3k Ω 1k Ω Manually Unlocking the Door Lock System 1. Reach up along the inside of the front and locate the bottom of the sensor. To remove Central Control Unit (CCU): 1. Unplug washer or disconnect power. 2. Remove the lower kick panel. 3. Located on the top... of the door switch/ lock unit is a teardrop shaped tab. 5. Unplug washer or disconnect power. ...
...8486; 3.2k Ω 2.3k Ω 1k Ω Manually Unlocking the Door Lock System 1. Reach up along the inside of the front and locate the bottom of the sensor. To remove Central Control Unit (CCU): 1. Unplug washer or disconnect power. 2. Remove the lower kick panel. 3. Located on the top... of the door switch/ lock unit is a teardrop shaped tab. 5. Unplug washer or disconnect power. ...
User Guide
Page 88
... 1. NOTE: The basket will rotate, then the door will unlock, lock again, and then the cycle will continue. • The machine will not fill, but the basket will remain lit. Open the washer door and remove any items are in the washer, all cycle lights will flash and the ...WASH and CONTROLS LOCKED lights will rotate while the washer runs a short sensing cycle. Be sure dispenser drawer is complete, leave the...
... 1. NOTE: The basket will rotate, then the door will unlock, lock again, and then the cycle will continue. • The machine will not fill, but the basket will remain lit. Open the washer door and remove any items are in the washer, all cycle lights will flash and the ...WASH and CONTROLS LOCKED lights will rotate while the washer runs a short sensing cycle. Be sure dispenser drawer is complete, leave the...
User Guide
Page 89
... Check drive motor. 2. Check wire harness connections. 4. Check the MCU by looking for plugged screen in . Check the door switch/lock unit using the diagnostics. Press PAUSE/CANCEL on the touchpad twice. Check the touchpad/LED assembly by running a Diagnostic Test ...Check installation. Check operating pressure switch. 5. Unplug washer or disconnect power. 3. If door is level. 2. Check dispenser motor. 5. Check drain pump motor. 8. Check harness connections. 6. Unplug washer or disconnect power. 4. Verify the unit is locked, drain the unit. 4. Check for power going ...
... Check drive motor. 2. Check wire harness connections. 4. Check the MCU by looking for plugged screen in . Check the door switch/lock unit using the diagnostics. Press PAUSE/CANCEL on the touchpad twice. Check the touchpad/LED assembly by running a Diagnostic Test ...Check installation. Check operating pressure switch. 5. Unplug washer or disconnect power. 3. If door is level. 2. Check dispenser motor. 5. Check drain pump motor. 8. Check harness connections. 6. Unplug washer or disconnect power. 4. Verify the unit is locked, drain the unit. 4. Check for power going ...
User Guide
Page 91
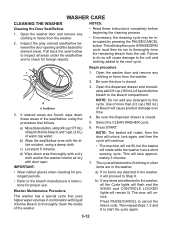
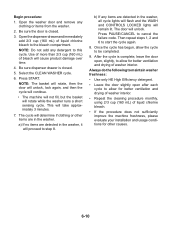
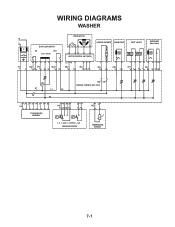
WIRING DIAGRAMS WASHER N L IF DOOR LOCK/SWITCH DS DLS Lock Unlock IF2 DS2 DL3 DLS2 1 2 12 1 2 3 1 2 DRIVE MOTOR MOTOR CONTROL UNIT (MCU) L2 N1 MS2 1 2 MI3 1 2 3 HEATING ELEMENT DRAIN PUMP INLET VALVES DISPENSER Motor Switch VC VH HE2 21 DP2 1 2 VH7 1 3 DI6 571 3 56 DR1 K1 L1 L2 K2 N1 HR2 HR1 CENTRAL CONTROL UNIT (CCU) 12 34 5 6 7 8 UI8 TOUCHPAD/LED ASSEMBLY 6 5 34 PR6 22 24 26 21 2 1 11 14 p> p> L_0 L_wash L_overflow L_sud PRESSURE SWITCH 1 2 TH2 TEMPERATURE SENSOR 7-1
WIRING DIAGRAMS WASHER N L IF DOOR LOCK/SWITCH DS DLS Lock Unlock IF2 DS2 DL3 DLS2 1 2 12 1 2 3 1 2 DRIVE MOTOR MOTOR CONTROL UNIT (MCU) L2 N1 MS2 1 2 MI3 1 2 3 HEATING ELEMENT DRAIN PUMP INLET VALVES DISPENSER Motor Switch VC VH HE2 21 DP2 1 2 VH7 1 3 DI6 571 3 56 DR1 K1 L1 L2 K2 N1 HR2 HR1 CENTRAL CONTROL UNIT (CCU) 12 34 5 6 7 8 UI8 TOUCHPAD/LED ASSEMBLY 6 5 34 PR6 22 24 26 21 2 1 11 14 p> p> L_0 L_wash L_overflow L_sud PRESSURE SWITCH 1 2 TH2 TEMPERATURE SENSOR 7-1


