

User Guide
Page 3
...And Tech Sheet Locations 1-3 Specifications 1-4 INSTALLATION INFORMATION 2-1 Installation Requirements 2-1 Installation Instructions 2-6 PRODUCT OPERATION 3-1 Features And Benefits 3-1 Washer Use 3-3 Washer Care 3-12 Troubleshooting 3-15 COMPONENT ACCESS 4-1 Component Locations 4-1 Removing The Console And The Touchpad/LED Assembly 4-2 Removing The ... Detergent Dispenser Assembly 4-10 Removing The Detergent Dispenser Motor 4-13 Removing The Door Switch Assembly And The Bellows 4-14 Removing The Drain Pump 4-17 Removing The ECO Valve 4-19 Removing The Motor Control Unit 4-...
...And Tech Sheet Locations 1-3 Specifications 1-4 INSTALLATION INFORMATION 2-1 Installation Requirements 2-1 Installation Instructions 2-6 PRODUCT OPERATION 3-1 Features And Benefits 3-1 Washer Use 3-3 Washer Care 3-12 Troubleshooting 3-15 COMPONENT ACCESS 4-1 Component Locations 4-1 Removing The Console And The Touchpad/LED Assembly 4-2 Removing The ... Detergent Dispenser Assembly 4-10 Removing The Detergent Dispenser Motor 4-13 Removing The Door Switch Assembly And The Bellows 4-14 Removing The Drain Pump 4-17 Removing The ECO Valve 4-19 Removing The Motor Control Unit 4-...
User Guide
Page 30
... will proceed to check for proper use. b) If any detergent to start the cycle again. 3-12 WASHER CARE CLEANING THE WASHER Cleaning the Door Seal/Bellow 1. Seal/Bellow 3. a) Mix a dilute solution, using 3/4 cup (177 mL) of liquid chlorine bleach, and 1 gal. (3.8 L) of liquid chlorine bleach to ...Wear rubber gloves when cleaning for stained areas. IMPORTANT: NOTE: Do not add any items are detected in the washer, all areas under the seal/bellow and to Step 8. Select the CLEAN WASHER cycle. 6. The cycle will remain lit. Then repeat steps 1, 2 and 6 to this cycle. NOTE: ...
... will proceed to check for proper use. b) If any detergent to start the cycle again. 3-12 WASHER CARE CLEANING THE WASHER Cleaning the Door Seal/Bellow 1. Seal/Bellow 3. a) Mix a dilute solution, using 3/4 cup (177 mL) of liquid chlorine bleach, and 1 gal. (3.8 L) of liquid chlorine bleach to ...Wear rubber gloves when cleaning for stained areas. IMPORTANT: NOTE: Do not add any items are detected in the washer, all areas under the seal/bellow and to Step 8. Select the CLEAN WASHER cycle. 6. The cycle will remain lit. Then repeat steps 1, 2 and 6 to this cycle. NOTE: ...
User Guide
Page 49
... tension spring on the next page. Open the washer door. Door Switch Assembly Screws Bellows Retaining Wire Door Switch Assembly Pull Bellows Off Lip Of Panel 15. Lower Front Access Panel 13. Screws 11. Close the washer door. 16. Top Screws Retaining Wire Tension Spring 4-11 Front Panel Bottom Screws Continued on the retaining wire out...
... tension spring on the next page. Open the washer door. Door Switch Assembly Screws Bellows Retaining Wire Door Switch Assembly Pull Bellows Off Lip Of Panel 15. Lower Front Access Panel 13. Screws 11. Close the washer door. 16. Top Screws Retaining Wire Tension Spring 4-11 Front Panel Bottom Screws Continued on the retaining wire out...
User Guide
Page 52
...). 4. Retaining Wire Tension Spring 7. To remove the door switch assembly: a) Pull the bellows off the water supply to the washer. 3. b) Remove the two T-20 Torx screws from around the front of the front panel beside the door switch assembly just enough to do so can result in death or ...electrical shock. 1. REMOVING THE DOOR SWITCH ASSEMBLY AND THE BELLOWS 6. Unplug washer or disconnect power. 2. Failure to access the switch assembly....
...). 4. Retaining Wire Tension Spring 7. To remove the door switch assembly: a) Pull the bellows off the water supply to the washer. 3. b) Remove the two T-20 Torx screws from around the front of the front panel beside the door switch assembly just enough to do so can result in death or ...electrical shock. 1. REMOVING THE DOOR SWITCH ASSEMBLY AND THE BELLOWS 6. Unplug washer or disconnect power. 2. Failure to access the switch assembly....
User Guide
Page 53
... remove it over so that you can access the connectors. b) Remove the front panel from the washer (see the photo in step 7b). Remove Bellows Retaining Clamp Continued on page 4-11 for the procedure). d) Remove the bellows retaining clamp from around the bellows (see the top right photo). c) Pull the door switch assembly out and...
... remove it over so that you can access the connectors. b) Remove the front panel from the washer (see the photo in step 7b). Remove Bellows Retaining Clamp Continued on page 4-11 for the procedure). d) Remove the bellows retaining clamp from around the bellows (see the top right photo). c) Pull the door switch assembly out and...

User Guide
Page 54
REASSEMBLY NOTE: When you reinstall the bellows, be sure to position the "weep holes" at the bottom, as shown below. e) Pull the bellows off the front of the tub. Remove Bellows Bellows Weep Holes 4-16
REASSEMBLY NOTE: When you reinstall the bellows, be sure to position the "weep holes" at the bottom, as shown below. e) Pull the bellows off the front of the tub. Remove Bellows Bellows Weep Holes 4-16
User Guide
Page 67
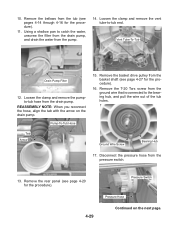
... wire that is connected to the bearing hub, and pull the wire out of the tub holes. Using a shallow pan to -tub end. Remove the bellows from the pump. 14. 10. Loosen the clamp and remove the pumpto-tub hose from the basket shaft (see pages 4-14 through 4-16 for the...
... wire that is connected to the bearing hub, and pull the wire out of the tub holes. Using a shallow pan to -tub end. Remove the bellows from the pump. 14. 10. Loosen the clamp and remove the pumpto-tub hose from the basket shaft (see pages 4-14 through 4-16 for the...