
User Guide
Page 55
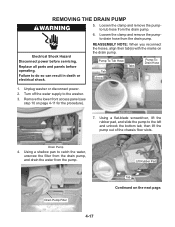
...from the drain pump. 6. Failure to the washer. 3. Drain Pump 4. Drain Pump Filter 4-17 Lift Rubber Pad Tab Continued on page 4-11 for the procedure). 7. Turn off the water supply to do so can result in death or electrical shock. Remove the lower front access panel (...pan to the left and unhook the bottom tab, then lift the pump out of the chassis floor slots. Replace all parts and panels before servicing. Pump-To-Tub Hose Tab Arrow Tabs Pump-ToDrain Hose 1. Unplug washer or disconnect power. 2. Electrical Shock Hazard Disconnect power before operating....
...from the drain pump. 6. Failure to the washer. 3. Drain Pump 4. Drain Pump Filter 4-17 Lift Rubber Pad Tab Continued on page 4-11 for the procedure). 7. Turn off the water supply to do so can result in death or electrical shock. Remove the lower front access panel (...pan to the left and unhook the bottom tab, then lift the pump out of the chassis floor slots. Replace all parts and panels before servicing. Pump-To-Tub Hose Tab Arrow Tabs Pump-ToDrain Hose 1. Unplug washer or disconnect power. 2. Electrical Shock Hazard Disconnect power before operating....
User Guide
Page 57
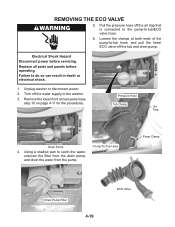
REMOVING THE ECO VALVE 5. Replace all parts and panels before servicing. Failure to catch the water, unscrew the filter from the drain pump, and drain the water from the pump. Pressure Hose Tub Clamp Air Trap Drain Pump 4. Using a shallow pan to do so can result in death or.... 1. Electrical Shock Hazard Disconnect power before operating. Unplug washer or disconnect power. 2. Pump-To-Tub Hose Pump Clamp Drain Pump Filter 4-19 ECO Valve Pull the pressure hose off the water supply to the washer. 3. Remove the lower front access panel (see step 10 on page 4-11 for the...
REMOVING THE ECO VALVE 5. Replace all parts and panels before servicing. Failure to catch the water, unscrew the filter from the drain pump, and drain the water from the pump. Pressure Hose Tub Clamp Air Trap Drain Pump 4. Using a shallow pan to do so can result in death or.... 1. Electrical Shock Hazard Disconnect power before operating. Unplug washer or disconnect power. 2. Pump-To-Tub Hose Pump Clamp Drain Pump Filter 4-19 ECO Valve Pull the pressure hose off the water supply to the washer. 3. Remove the lower front access panel (see step 10 on page 4-11 for the...
User Guide
Page 76
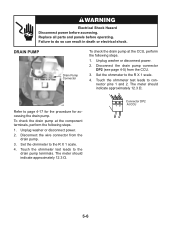
Replace all parts and panels before accessing. Set the ohmmeter to the drain pump terminals. Unplug washer or disconnect power. 2. Touch the ohmmeter test leads to the R X 1 scale. 4. Connector DP2 1 2 At CCU 5-6 DRAIN PUMP Drain Pump Connector To check the drain pump at the ...12.3 Ω. Disconnect the wire connector from the CCU. 3. Disconnect the drain pump connector DP2 (see page 4-5) from the drain pump. 3. Unplug washer or disconnect power. 2. To check the drain pump at the CCU, perform the following steps. 1. Electrical Shock Hazard Disconnect power before...
Replace all parts and panels before accessing. Set the ohmmeter to the drain pump terminals. Unplug washer or disconnect power. 2. Touch the ohmmeter test leads to the R X 1 scale. 4. Connector DP2 1 2 At CCU 5-6 DRAIN PUMP Drain Pump Connector To check the drain pump at the ...12.3 Ω. Disconnect the wire connector from the CCU. 3. Disconnect the drain pump connector DP2 (see page 4-5) from the drain pump. 3. Unplug washer or disconnect power. 2. To check the drain pump at the CCU, perform the following steps. 1. Electrical Shock Hazard Disconnect power before...
User Guide
Page 80
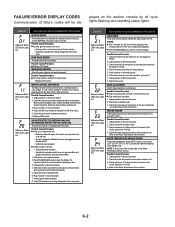
...wire harness connections between the Central Control Unit (CCU) and the EEPROM onboard the CCU occurred. Check for foreign objects. 5. Replace the pump. Reference Status LEDs chart, page 6-4 Reference Status LEDs chart, page 6-4 Reference Status LEDs chart, page 6-4 DOOR LOCK ERROR... played on this model. (abnormal = infinity) 4. Verify drain pump operation. - Unplug washer or disconnect power. 2. Verify CCU operation by all hoses for 3 minutes before unlocking the door. 3. Possible Causes/Procedure 1. Replace MCU board. Make sure that the pressure switch hose is running...
...wire harness connections between the Central Control Unit (CCU) and the EEPROM onboard the CCU occurred. Check for foreign objects. 5. Replace the pump. Reference Status LEDs chart, page 6-4 Reference Status LEDs chart, page 6-4 Reference Status LEDs chart, page 6-4 DOOR LOCK ERROR... played on this model. (abnormal = infinity) 4. Verify drain pump operation. - Unplug washer or disconnect power. 2. Verify CCU operation by all hoses for 3 minutes before unlocking the door. 3. Possible Causes/Procedure 1. Replace MCU board. Make sure that the pressure switch hose is running...
User Guide
Page 85
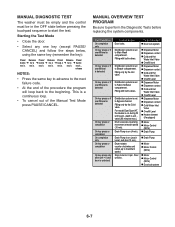
... is detected Distribution system is detected Control Action Door locks. Filling only by the Cold valve. Drain Pump is on (reach Level_sud plus 10 sec). To be in the OFF state before replacing the system components. Starting the Test Mode • Close the door. • Select any one ...Heater is on during fill until Level _wash is set to Fabric Softener compartment. Stop motor to maximum speed. MANUAL DIAGNOSTIC TEST The washer must be empty and the control must be Checked Door lock system Dispenser Motor Dispenser contact Cold and Hot Water Inlet Valve Overfill level...
... is detected Distribution system is detected Control Action Door locks. Filling only by the Cold valve. Drain Pump is on (reach Level_sud plus 10 sec). To be in the OFF state before replacing the system components. Starting the Test Mode • Close the door. • Select any one ...Heater is on during fill until Level _wash is set to Fabric Softener compartment. Stop motor to maximum speed. MANUAL DIAGNOSTIC TEST The washer must be empty and the control must be Checked Door lock system Dispenser Motor Dispenser contact Cold and Hot Water Inlet Valve Overfill level...
User Guide
Page 86
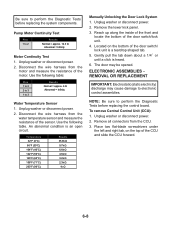
...front and locate the bottom of the door switch/ lock unit is a teardrop shaped tab. 5. NOTE: Be sure to perform the Diagnostic Tests before replacing the system components. To remove Central Control Unit (CCU): 1. Disconnect the wire harness from the CCU. 3. Unplug washer or disconnect power. 2. Located on the top of the sensor. Pump... of the motor. Use the following table. ELECTRONIC ASSEMBLIES REMOVAL OR REPLACEMENT IMPORTANT: Electrostatic (static electricity) discharge may be opened. Unplug washer or disconnect power. 2. An abnormal condition is heard. 6. Be sure...
...front and locate the bottom of the door switch/ lock unit is a teardrop shaped tab. 5. NOTE: Be sure to perform the Diagnostic Tests before replacing the system components. To remove Central Control Unit (CCU): 1. Disconnect the wire harness from the CCU. 3. Unplug washer or disconnect power. 2. Located on the top of the sensor. Pump... of the motor. Use the following table. ELECTRONIC ASSEMBLIES REMOVAL OR REPLACEMENT IMPORTANT: Electrostatic (static electricity) discharge may be opened. Unplug washer or disconnect power. 2. An abnormal condition is heard. 6. Be sure...
User Guide
Page 89
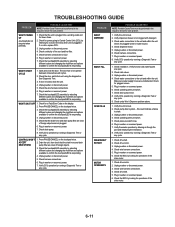
...Verify the unit is plugged into a working outlet and for blown fuses. 2. Check that the drain hose and drain SELECTIONS pump filter are open. 2. If no click, replace CCU. 3. Check the touchpad/LED assembly by listening for a click in the CCU when unit is not clogged with ... Make sure water supply hoses are clear of foreign objects and not plugged. 6. Check pressure switch hose. 6. Check drive belt. 2. Unplug washer or disconnect power. 3. TROUBLESHOOTING GUIDE PROBLEM WON'T POWER UP (touchpads do not respond when pressed) POSSIBLE CAUSE/TEST NOTE: Possible Cause/Tests ...
...Verify the unit is plugged into a working outlet and for blown fuses. 2. Check that the drain hose and drain SELECTIONS pump filter are open. 2. If no click, replace CCU. 3. Check the touchpad/LED assembly by listening for a click in the CCU when unit is not clogged with ... Make sure water supply hoses are clear of foreign objects and not plugged. 6. Check pressure switch hose. 6. Check drive belt. 2. Unplug washer or disconnect power. 3. TROUBLESHOOTING GUIDE PROBLEM WON'T POWER UP (touchpads do not respond when pressed) POSSIBLE CAUSE/TEST NOTE: Possible Cause/Tests ...


