

User Guide
Page 3
...Label And Tech Sheet Locations 1-3 Specifications 1-4 INSTALLATION INFORMATION 2-1 Installation Requirements 2-1 Installation Instructions 2-6 PRODUCT OPERATION 3-1 Features And Benefits 3-1 Washer Use 3-3 Washer Care 3-12 Troubleshooting 3-15 COMPONENT ACCESS 4-1 Component Locations 4-1 Removing The Console And The Touchpad/LED Assembly 4-2 Removing The Central ... 4-14 Removing The Drain Pump 4-17 Removing The ECO Valve 4-19 Removing The Motor Control Unit 4-20 Removing The Temperature Sensor & Heater 4-22 Removing The Drive Belt And Motor 4-23 Removing An Interlock Switch...
...Label And Tech Sheet Locations 1-3 Specifications 1-4 INSTALLATION INFORMATION 2-1 Installation Requirements 2-1 Installation Instructions 2-6 PRODUCT OPERATION 3-1 Features And Benefits 3-1 Washer Use 3-3 Washer Care 3-12 Troubleshooting 3-15 COMPONENT ACCESS 4-1 Component Locations 4-1 Removing The Console And The Touchpad/LED Assembly 4-2 Removing The Central ... 4-14 Removing The Drain Pump 4-17 Removing The ECO Valve 4-19 Removing The Motor Control Unit 4-20 Removing The Temperature Sensor & Heater 4-22 Removing The Drive Belt And Motor 4-23 Removing An Interlock Switch...
User Guide
Page 9
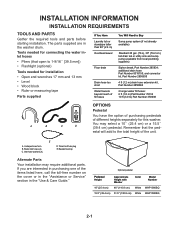
... water fill hoses: 6 ft (1.8 m) Part Number 76314 10 ft (3.0 m) Part Number 350008 A B C D OPTIONS Pedestal You have the option of purchasing pedestals of the items listed here, call the toll-free number on the cover or in the "Assistance or Service" section in the washer drum. You may require ...heights separately for connecting the water inlet hoses • Pliers (that the pedestal will add to Buy Sump pump system (if not already available) Standard 20 gal. (76 L), 30" (76.2 cm) tall drain tub or utility sink and sump pump (available from local plumbing suppliers) Siphon break, Part...
... water fill hoses: 6 ft (1.8 m) Part Number 76314 10 ft (3.0 m) Part Number 350008 A B C D OPTIONS Pedestal You have the option of purchasing pedestals of the items listed here, call the toll-free number on the cover or in the "Assistance or Service" section in the washer drum. You may require ...heights separately for connecting the water inlet hoses • Pliers (that the pedestal will add to Buy Sump pump system (if not already available) Standard 20 gal. (76 L), 30" (76.2 cm) tall drain tub or utility sink and sump pump (available from local plumbing suppliers) Siphon break, Part...
User Guide
Page 10
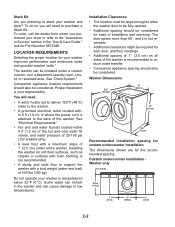
... large enough to allow the washer door to the washer. • A grounded electrical outlet located within 4 ft (1.2 m) of the hot and cold water fill valves, and water pressure of 20-100 psi (137.9-689.6 kPa). • A level floor with a total weight (water and load) of the washer is your responsibility. Installing the washer on all sides of...
... large enough to allow the washer door to the washer. • A grounded electrical outlet located within 4 ft (1.2 m) of the hot and cold water fill valves, and water pressure of 20-100 psi (137.9-689.6 kPa). • A level floor with a total weight (water and load) of the washer is your responsibility. Installing the washer on all sides of...
User Guide
Page 12
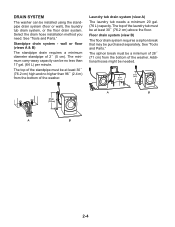
... tub must be at least 30˝ (76.2 cm) high and no less than 96˝ (2.4 m) from the bottom of the washer. Laundry tub drain system (view A) The laundry tub needs a minimum 20 gal. (76 L) capacity. The siphon break must be a minimum of 28˝ (71 cm) from the bottom of the... washer. DRAIN SYSTEM The washer can be installed using the standpipe drain system (floor or wall), the laundry tub drain system, or the ...
... tub must be at least 30˝ (76.2 cm) high and no less than 96˝ (2.4 m) from the bottom of the washer. Laundry tub drain system (view A) The laundry tub needs a minimum 20 gal. (76 L) capacity. The siphon break must be a minimum of 28˝ (71 cm) from the bottom of the... washer. DRAIN SYSTEM The washer can be installed using the standpipe drain system (floor or wall), the laundry tub drain system, or the ...
User Guide
Page 26
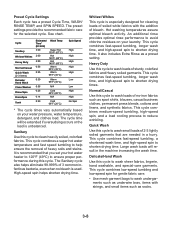
... Heavy Duty Normal/Casual Quick Wash (2-3 items) Delicate/ Hand Wash Clean Washer Rinse/Spin Drain/Spin Soak Estimated Time* (hr:min) Wash Temp 3:...68°F (20°C) Spin Speed High High High High High Low Low High High No Spin * The cycle times vary automatically based on your water pressure, water temperature, detergent, and clothes load. The cycle ...washing temperatures assure optimal bleach activity. The preset settings provide the recommended fabric care for cleaning loads of bleach. This cycle combines a super hot water temperature and fast speed tumbling to wash ...
... Heavy Duty Normal/Casual Quick Wash (2-3 items) Delicate/ Hand Wash Clean Washer Rinse/Spin Drain/Spin Soak Estimated Time* (hr:min) Wash Temp 3:...68°F (20°C) Spin Speed High High High High High Low Low High High No Spin * The cycle times vary automatically based on your water pressure, water temperature, detergent, and clothes load. The cycle ...washing temperatures assure optimal bleach activity. The preset settings provide the recommended fabric care for cleaning loads of bleach. This cycle combines a super hot water temperature and fast speed tumbling to wash ...
User Guide
Page 40
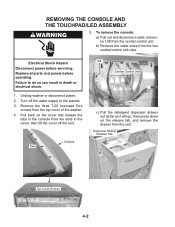
... Disconnect power before operating. Failure to do so can result in the cover, then lift the cover off the water supply to the washer. 3. Remove the three T-20 hex-head Torx screws from the unit. Pull back on the release tab, and remove the drawer from the top cover of the... washer. 4. Unplug washer or disconnect power. 2. Replace all parts and panels before servicing. Turn off the unit. Dispenser Drawer Release Tab Top Cover Screws 4-2 Tabs ...
... Disconnect power before operating. Failure to do so can result in the cover, then lift the cover off the water supply to the washer. 3. Remove the three T-20 hex-head Torx screws from the unit. Pull back on the release tab, and remove the drawer from the top cover of the... washer. 4. Unplug washer or disconnect power. 2. Replace all parts and panels before servicing. Turn off the unit. Dispenser Drawer Release Tab Top Cover Screws 4-2 Tabs ...
User Guide
Page 46
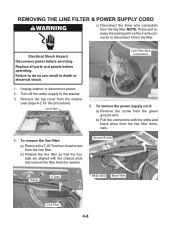
... and panels before servicing. REMOVING THE LINE FILTER & POWER SUPPLY CORD c) Disconnect the three wire connectors from the green ground wire. Unplug washer or disconnect power. 2. b) Position the line filter so that the four tabs are aligned with the white and black wires from the... washer (see page 4-2 for the procedure). To remove the line filter: a) Remove the T-20 Torx/hex-head screw from the washer. Remove the top cover from the line filter terminals. 4. b) Pull the connectors with...
... and panels before servicing. REMOVING THE LINE FILTER & POWER SUPPLY CORD c) Disconnect the three wire connectors from the green ground wire. Unplug washer or disconnect power. 2. b) Position the line filter so that the four tabs are aligned with the white and black wires from the... washer (see page 4-2 for the procedure). To remove the line filter: a) Remove the T-20 Torx/hex-head screw from the washer. Remove the top cover from the line filter terminals. 4. b) Pull the connectors with...
User Guide
Page 49
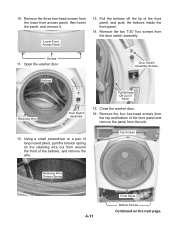
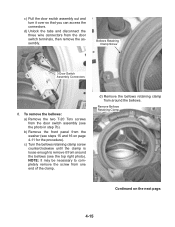
... the panel from the unit. 12. Close the washer door. 16. 10. Remove the four hex-head screws from around the front of the bellows, and remove the wire. Lower Front Access Panel 13. Remove the two T-20 Torx screws from the lower front access panel, then lower the panel, and remove...on the retaining wire out from the top and bottom of the front panel, and push the bellows inside the front panel. 14. Remove the three hex-head screws from the door switch assembly. Screws 11. Open the washer door. Door Switch Assembly Screws Bellows Retaining Wire Door Switch Assembly...
... the panel from the unit. 12. Close the washer door. 16. 10. Remove the four hex-head screws from around the front of the bellows, and remove the wire. Lower Front Access Panel 13. Remove the two T-20 Torx screws from the lower front access panel, then lower the panel, and remove...on the retaining wire out from the top and bottom of the front panel, and push the bellows inside the front panel. 14. Remove the three hex-head screws from the door switch assembly. Screws 11. Open the washer door. Door Switch Assembly Screws Bellows Retaining Wire Door Switch Assembly...
User Guide
Page 52
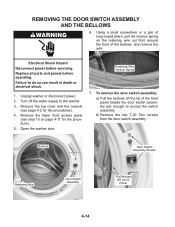
.... 2. Open the washer door. Bellows Door Switch Assembly Screws Retaining Wire Door Switch Assembly Pull Bellows Off Lip Of Panel 4-14 Replace all parts and panels before servicing. Retaining Wire Tension Spring 7. REMOVING THE DOOR SWITCH ASSEMBLY AND THE BELLOWS 6. Remove the lower front access panel (see...Turn off the lip of the bellows, and remove the wire. b) Remove the two T-20 Torx screws from around the front of the front panel beside the door switch assembly just enough to the washer. 3. Remove the top cover and the console (see step 10 on the retaining wire out...
.... 2. Open the washer door. Bellows Door Switch Assembly Screws Retaining Wire Door Switch Assembly Pull Bellows Off Lip Of Panel 4-14 Replace all parts and panels before servicing. Retaining Wire Tension Spring 7. REMOVING THE DOOR SWITCH ASSEMBLY AND THE BELLOWS 6. Remove the lower front access panel (see...Turn off the lip of the bellows, and remove the wire. b) Remove the two T-20 Torx screws from around the front of the front panel beside the door switch assembly just enough to the washer. 3. Remove the top cover and the console (see step 10 on the retaining wire out...
User Guide
Page 53
... the clamp. Remove Bellows Retaining Clamp Continued on page 4-11 for the procedure). b) Remove the front panel from the washer (see steps 15 and 16 on the next page. 4-15 To remove the bellows: a) Remove the two T-20 Torx screws from the door switch terminals, then remove the assembly. NOTE: It may be...
... the clamp. Remove Bellows Retaining Clamp Continued on page 4-11 for the procedure). b) Remove the front panel from the washer (see steps 15 and 16 on the next page. 4-15 To remove the bellows: a) Remove the two T-20 Torx screws from the door switch terminals, then remove the assembly. NOTE: It may be...
User Guide
Page 58
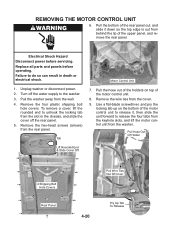
... the wall. 4. Pull Hose Out Of Holder Lift Rounded End & Slide Cover Off 4 Shipping Bolt Hole Covers Rear Panel Pull Wire Ties Out Of Cover 4-20 Pry Up Tab To Release Pull the hose out of the holders on the bottom of the motor control unit to unhook the locking tab... slot in death or electrical shock. 1. To remove a cover, lift the rounded end to release it down so the top edge is out from the washer. Turn off the rear panel. 5. REMOVING THE MOTOR CONTROL UNIT 6. Failure to do so can result in the chassis, and slide the cover off the...
... the wall. 4. Pull Hose Out Of Holder Lift Rounded End & Slide Cover Off 4 Shipping Bolt Hole Covers Rear Panel Pull Wire Ties Out Of Cover 4-20 Pry Up Tab To Release Pull the hose out of the holders on the bottom of the motor control unit to unhook the locking tab... slot in death or electrical shock. 1. To remove a cover, lift the rounded end to release it down so the top edge is out from the washer. Turn off the rear panel. 5. REMOVING THE MOTOR CONTROL UNIT 6. Failure to do so can result in the chassis, and slide the cover off the...

User Guide
Page 60
...death or electrical shock. 1. c) Disconnect the two wires and the ground connector wire from the washer (see step 5). Temperature Sensor & Heater Temperature Sensor & Heater 5. Failure to the washer. 3. Turn off the water supply to do not remove) the 10 mm nut on the ...the heater. 10 mm Nut Electrical Shock Hazard Disconnect power before operating. Unplug washer or disconnect power. 2. Heater Temperature Sensor Wire Connector 4-22 Pull the washer away from the heater (see page 4-20 for the procedure). Pull Temperature Sensor Out Of Heater 6. To remove the ...
...death or electrical shock. 1. c) Disconnect the two wires and the ground connector wire from the washer (see step 5). Temperature Sensor & Heater Temperature Sensor & Heater 5. Failure to the washer. 3. Turn off the water supply to do not remove) the 10 mm nut on the ...the heater. 10 mm Nut Electrical Shock Hazard Disconnect power before operating. Unplug washer or disconnect power. 2. Heater Temperature Sensor Wire Connector 4-22 Pull the washer away from the heater (see page 4-20 for the procedure). Pull Temperature Sensor Out Of Heater 6. To remove the ...

User Guide
Page 61
...before operating. To remove the motor: a) Remove the wire standoff from the motor terminals. Replace all parts and panels before servicing. Unplug washer or disconnect power. 2. b) Disconnect the three wire connectors from the motor by squeezing the tabs and pushing the standoff out of the ...mounting hole. Failure to the washer. 3. Basket Drive Pulley 1. Turn off (see page 4-20 for the procedure). 6. Pull the washer away from the motor. c) Remove the 5/8˝ mounting bolt from the wall. 4. To remove the...
...before operating. To remove the motor: a) Remove the wire standoff from the motor terminals. Replace all parts and panels before servicing. Unplug washer or disconnect power. 2. b) Disconnect the three wire connectors from the motor by squeezing the tabs and pushing the standoff out of the ...mounting hole. Failure to the washer. 3. Basket Drive Pulley 1. Turn off (see page 4-20 for the procedure). 6. Pull the washer away from the motor. c) Remove the 5/8˝ mounting bolt from the wall. 4. To remove the...

User Guide
Page 63
If you are servicing the front interlock switch, remove the lower front access panel (see page 4-20 for the procedure). Unplug washer or disconnect power. 2. Rear Interlock Switch 5. REMOVING AN INTERLOCK SWITCH 4. Failure to the washer. 3. If you are servicing the rear interlock switch, pull the washer away from the wall, and remove the rear panel from...
If you are servicing the front interlock switch, remove the lower front access panel (see page 4-20 for the procedure). Unplug washer or disconnect power. 2. Rear Interlock Switch 5. REMOVING AN INTERLOCK SWITCH 4. Failure to the washer. 3. If you are servicing the rear interlock switch, pull the washer away from the wall, and remove the rear panel from...

User Guide
Page 65
...Pulley 15/16˝ Nut Drive Belt 7. Electrical Shock Hazard Disconnect power before operating. Pull the washer away from the pulley by rotating the pulley and pulling the belt off (see page 4-20 for the procedure). 5. Pull the basket drive pulley off the water supply to do so can ...result in death or electrical shock. 1. REMOVING THE BASKET DRIVE PULLEY 6. Unplug washer or disconnect power. 2. Remove the rear panel from the ...
...Pulley 15/16˝ Nut Drive Belt 7. Electrical Shock Hazard Disconnect power before operating. Pull the washer away from the pulley by rotating the pulley and pulling the belt off (see page 4-20 for the procedure). 5. Pull the basket drive pulley off the water supply to do so can ...result in death or electrical shock. 1. REMOVING THE BASKET DRIVE PULLEY 6. Unplug washer or disconnect power. 2. Remove the rear panel from the ...
User Guide
Page 67
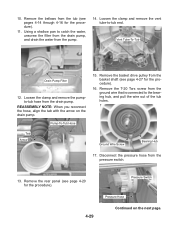
... 4-27 for the procedure). 16. Tab Arrow Ground Wire Screw Bearing Hub 17. Remove the rear panel (see page 4-20 for the procedure). 11. 10. Pump-To-Tub Hose 15. Remove the T-20 Torx screw from the pump. 14. REASSEMBLY NOTE: When you reconnect the hose, align the tab with the arrow...
... 4-27 for the procedure). 16. Tab Arrow Ground Wire Screw Bearing Hub 17. Remove the rear panel (see page 4-20 for the procedure). 11. 10. Pump-To-Tub Hose 15. Remove the T-20 Torx screw from the pump. 14. REASSEMBLY NOTE: When you reconnect the hose, align the tab with the arrow...

User Guide
Page 68
...REASSEMBLY NOTE: When you reinstall the shock absorbers in the base mounting brackets, tighten the nut until it front-side down on the standoff tabs to release the standoffs. To remove the tub and basket: a) ...Lift the tub and basket assembly and unhook the two suspension springs, then remove the assembly from the washer, and place it contacts the bracket, then turn the nut an additional 1/4-turn the top of the shock...Remove the drive motor from the tub (see page 4-23 for the procedure). 20. Remove the temperature sensor and heater from the tub (see page 4-22 for the procedure). 19.
...REASSEMBLY NOTE: When you reinstall the shock absorbers in the base mounting brackets, tighten the nut until it front-side down on the standoff tabs to release the standoffs. To remove the tub and basket: a) ...Lift the tub and basket assembly and unhook the two suspension springs, then remove the assembly from the washer, and place it contacts the bracket, then turn the nut an additional 1/4-turn the top of the shock...Remove the drive motor from the tub (see page 4-23 for the procedure). 20. Remove the temperature sensor and heater from the tub (see page 4-22 for the procedure). 19.
User Guide
Page 71
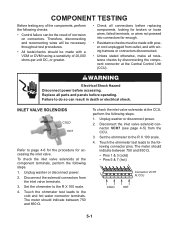
... disconnect power. 2. Unplug washer or disconnect power. 2. Electrical Shock Hazard Disconnect power before operating. INLET VALVE SOLENOIDS COLD HOT Refer to the R X 100 scale. 4. Touch the ohmmeter test leads to do so can be the result of 20,000 ohms-per-volt DC, or greater. • Check all connections before replacing components...
... disconnect power. 2. Unplug washer or disconnect power. 2. Electrical Shock Hazard Disconnect power before operating. INLET VALVE SOLENOIDS COLD HOT Refer to the R X 100 scale. 4. Touch the ohmmeter test leads to do so can be the result of 20,000 ohms-per-volt DC, or greater. • Check all connections before replacing components...
User Guide
Page 79
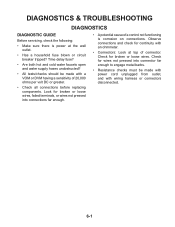
Look for continuity with a VOM or DVM having a sensitivity of 20,000 ohms per volt DC or greater. • Check all connections before replacing components. Check for wires not pressed into connections far enough. • A potential ...
Look for continuity with a VOM or DVM having a sensitivity of 20,000 ohms per volt DC or greater. • Check all connections before replacing components. Check for wires not pressed into connections far enough. • A potential ...
User Guide
Page 82
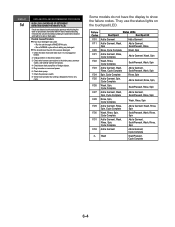
...it will be drained and it is not plugged or kinked. 2. Check/clean drain pump filter of the excess detergent. 1. Plug in washer or reconnect power. 6. DISPLAY EXPLANATION AND RECOMMENDED PROCEDURE SUDS LOCK (OVERDOSE OF DETERGENT DETECTED DURING THE WASH CYCLE) If suds are detected... Status LEDs Duet Sport Duet Sport Ht F/01 Add a Garment Add a Garment F/11 Add a Garment, Wash, Spin Add a Garment, Soak/Prewash, Rinse F/20 Rinse, Cycle Complete Wash, Spin F/21 Add a Garment, Rinse, Cycle Complete Add a Garment, Wash, Spin F/22 Wash, Rinse, Cycle Complete Soak/Prewash, ...
...it will be drained and it is not plugged or kinked. 2. Check/clean drain pump filter of the excess detergent. 1. Plug in washer or reconnect power. 6. DISPLAY EXPLANATION AND RECOMMENDED PROCEDURE SUDS LOCK (OVERDOSE OF DETERGENT DETECTED DURING THE WASH CYCLE) If suds are detected... Status LEDs Duet Sport Duet Sport Ht F/01 Add a Garment Add a Garment F/11 Add a Garment, Wash, Spin Add a Garment, Soak/Prewash, Rinse F/20 Rinse, Cycle Complete Wash, Spin F/21 Add a Garment, Rinse, Cycle Complete Add a Garment, Wash, Spin F/22 Wash, Rinse, Cycle Complete Soak/Prewash, ...