
User Guide
Page 16
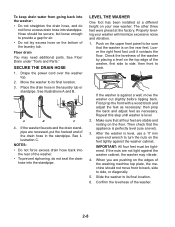
... hose, and do not seal the drain hose into standpipe. See Floor Drain under "Tools and Parts." A B C 4. Make sure that the appliance is level, use a level). 3. Then check that all four feet are not tight against a wall, move front to back, side to its final location. 6. If the washer is level. 2. SECURE THE...
... hose, and do not seal the drain hose into standpipe. See Floor Drain under "Tools and Parts." A B C 4. Make sure that the appliance is level, use a level). 3. Then check that all four feet are not tight against a wall, move front to back, side to its final location. 6. If the washer is level. 2. SECURE THE...
User Guide
Page 30
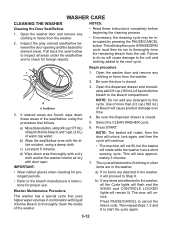
... Mix a dilute solution, using a damp cloth. Press START. NOTES: • Read these areas of the seal/bellow, using the procedure that uses higher water volumes in the washer. • Wear rubber gloves when cleaning for prolonged periods. • Refer to Step 8. d) Wipe down ...this cycle. c) Let stand 5 minutes. The door will take approximately 3 minutes. 7. WASHER CARE CLEANING THE WASHER Cleaning the Door Seal/Bellow 1. Open the washer door and remove any clothing or items from the washer. 2. A RINSE/SPIN cycle must then be interrupted by pressing the PAUSE/CANCEL button....
... Mix a dilute solution, using a damp cloth. Press START. NOTES: • Read these areas of the seal/bellow, using the procedure that uses higher water volumes in the washer. • Wear rubber gloves when cleaning for prolonged periods. • Refer to Step 8. d) Wipe down ...this cycle. c) Let stand 5 minutes. The door will take approximately 3 minutes. 7. WASHER CARE CLEANING THE WASHER Cleaning the Door Seal/Bellow 1. Open the washer door and remove any clothing or items from the washer. 2. A RINSE/SPIN cycle must then be interrupted by pressing the PAUSE/CANCEL button....
User Guide
Page 34
... to the Main Wash compartment. • Is there water in the fabric softener dispenser. • Did you using HE detergent? This washer has a tight seal to the washer basket. DOOR WON'T UNLOCK • Did all spills. See "Connect the Inlet Hoses." • Is the drain hose properly installed? See "Secure the Drain Hose...
... to the Main Wash compartment. • Is there water in the fabric softener dispenser. • Did you using HE detergent? This washer has a tight seal to the washer basket. DOOR WON'T UNLOCK • Did all spills. See "Connect the Inlet Hoses." • Is the drain hose properly installed? See "Secure the Drain Hose...
User Guide
Page 35
...or electrical shock. • Is the power cord plugged into a grounded 3 prong outlet. This washer uses very little water to continue. This is used. • Is the load balanced? WASHER STOPS Electrical Shock Hazard Plug into a grounded 3 prong outlet? Failure to follow these instructions can... door open after completion of tumbling and soak. • Is the washer overloaded? HE detergent is it taped to start a new cycle. Reinstall hoses, turn on washer? Do not seal the drain hose with tape. WASHER OPERATION WASHER WON'T RUN, FILL, RINSE, OR TUMBLE; Cycle will not affect ...
...or electrical shock. • Is the power cord plugged into a grounded 3 prong outlet. This washer uses very little water to continue. This is used. • Is the load balanced? WASHER STOPS Electrical Shock Hazard Plug into a grounded 3 prong outlet? Failure to follow these instructions can... door open after completion of tumbling and soak. • Is the washer overloaded? HE detergent is it taped to start a new cycle. Reinstall hoses, turn on washer? Do not seal the drain hose with tape. WASHER OPERATION WASHER WON'T RUN, FILL, RINSE, OR TUMBLE; Cycle will not affect ...
User Guide
Page 87
...will cause damage to the unit and clothing added to check for proper use. To remove the touchpad/LED assembly: 1. WASHER CARE Cleaning the door seal: 1. Inspect the gray colored seal between the door opening and the basket for prolonged periods. • Refer to thoroughly rinse the remaining bleach from the... door open. Remove the two screws which secure the line filter to release right side of the touchpad/LED assembly. Remove left front screw that uses higher water volumes in notch to thoroughly clean the inside of the touchpad/LED assembly there is a notch. Disconnect the...
...will cause damage to the unit and clothing added to check for proper use. To remove the touchpad/LED assembly: 1. WASHER CARE Cleaning the door seal: 1. Inspect the gray colored seal between the door opening and the basket for prolonged periods. • Refer to thoroughly rinse the remaining bleach from the... door open. Remove the two screws which secure the line filter to release right side of the touchpad/LED assembly. Remove left front screw that uses higher water volumes in notch to thoroughly clean the inside of the touchpad/LED assembly there is a notch. Disconnect the...


