
User Guide
Page 1
CONSUMER SERVICES TECHNICAL EDUCATION GROUP PRESENTS L-78 FRONT-LOADING AUTOMATIC WASHER MODELS: WFW8300SW, WFW8500SW, WFW8500SR JOB AID Part No. 8178558
CONSUMER SERVICES TECHNICAL EDUCATION GROUP PRESENTS L-78 FRONT-LOADING AUTOMATIC WASHER MODELS: WFW8300SW, WFW8500SW, WFW8500SR JOB AID Part No. 8178558
User Guide
Page 2
FORWARD This Whirlpool Job Aid, "Duet Sport™ Front-Loading Automatic Washer" (Part No. 8178558), provides the technician with information on the installation, operation, and service of this Job Aid is typical and should be used in this ... "Use and Care Guide," or "Tech Sheet" provided with the product when servicing the unit. GOALS AND OBJECTIVES The goal of the Duet Sport™ Front-Loading Automatic Washer. Copyright © 2006, Whirlpool Corporation, Benton Harbor, MI 49022 - The Wiring Diagram used for any repairs made on the model being serviced, refer to...
FORWARD This Whirlpool Job Aid, "Duet Sport™ Front-Loading Automatic Washer" (Part No. 8178558), provides the technician with information on the installation, operation, and service of this Job Aid is typical and should be used in this ... "Use and Care Guide," or "Tech Sheet" provided with the product when servicing the unit. GOALS AND OBJECTIVES The goal of the Duet Sport™ Front-Loading Automatic Washer. Copyright © 2006, Whirlpool Corporation, Benton Harbor, MI 49022 - The Wiring Diagram used for any repairs made on the model being serviced, refer to...
User Guide
Page 9
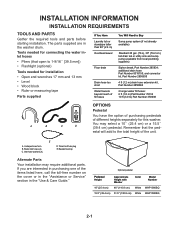
... Will Need to 1-9/16˝ [39.5 mm]) • Flashlight (optional) Tools needed for this washer. Transit bolt hole plug E. and connector kit, Part Number 2858835 4 ft (1.2 m) drain hose extension kit, Part Number 2858863 2 longer water fill hoses: 6 ft (1.8 m) Part Number 76314 10 ft (3.0 m) Part Number 350008 A B C D OPTIONS Pedestal You have the option of purchasing pedestals of the items...
... Will Need to 1-9/16˝ [39.5 mm]) • Flashlight (optional) Tools needed for this washer. Transit bolt hole plug E. and connector kit, Part Number 2858835 4 ft (1.2 m) drain hose extension kit, Part Number 2858863 2 longer water fill hoses: 6 ft (1.8 m) Part Number 76314 10 ft (3.0 m) Part Number 350008 A B C D OPTIONS Pedestal You have the option of purchasing pedestals of the items...
User Guide
Page 10
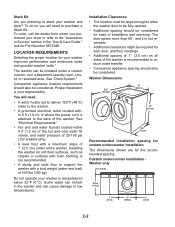
...surfaces, such as carpets or surfaces with a total weight (water and load) of installation and servicing. The washer can cause damage in temperatures below 32°F (0°C). You will...heater set to deliver 120°F (49°C) water to the washer. • A grounded electrical outlet located within 4 ft (1.2 m) of the hot and cold water fill valves, and ...8260;4 " (74.3 cm) Recommended installation spacing for custom undercounter installation The dimensions shown are for Part Number 8572546. Custom undercounter installation Washer only 2" (5 cm) 36" min. (91.4 cm) 1" (2.5 cm) 27" (68...
...surfaces, such as carpets or surfaces with a total weight (water and load) of installation and servicing. The washer can cause damage in temperatures below 32°F (0°C). You will...heater set to deliver 120°F (49°C) water to the washer. • A grounded electrical outlet located within 4 ft (1.2 m) of the hot and cold water fill valves, and ...8260;4 " (74.3 cm) Recommended installation spacing for custom undercounter installation The dimensions shown are for Part Number 8572546. Custom undercounter installation Washer only 2" (5 cm) 36" min. (91.4 cm) 1" (2.5 cm) 27" (68...
User Guide
Page 12
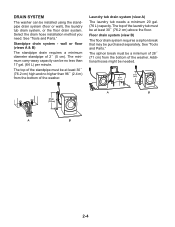
...tub must be at least 30˝ (76.2 cm) high and no less than 96˝ (2.4 m) from the bottom of the washer. The minimum carry-away capacity can be installed using the standpipe drain system (floor or wall), the laundry tub drain system, or the floor...B A B 2-4 Laundry tub drain system (view A) The laundry tub needs a minimum 20 gal. (76 L) capacity. Additional hoses might be purchased separately. See "Tools and Parts." DRAIN SYSTEM The washer can be no higher than 17 gal. (64 L) per minute. Select the drain hose installation method you need. Standpipe drain system -
...tub must be at least 30˝ (76.2 cm) high and no less than 96˝ (2.4 m) from the bottom of the washer. The minimum carry-away capacity can be installed using the standpipe drain system (floor or wall), the laundry tub drain system, or the floor...B A B 2-4 Laundry tub drain system (view A) The laundry tub needs a minimum 20 gal. (76 L) capacity. Additional hoses might be purchased separately. See "Tools and Parts." DRAIN SYSTEM The washer can be no higher than 17 gal. (64 L) per minute. Select the drain hose installation method you need. Standpipe drain system -
User Guide
Page 16
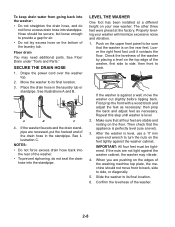
...use a level). 3. Confirm the levelness of the washer by placing a level on your washer will minimize excessive noise and vibration. 1. SECURE THE DRAIN HOSE 1. A B C 4. Lower the right front foot until washer is against the washer cabinet, the washer may need additional parts. If the nuts are pushing on the floor. ... the machine should be tightened. See Floor Drain under "Tools and Parts." First prop the front with a wood block and adjust the feet as necessary. To keep drain water from going back into the washer: • Do not straighten the drain hose, and do not ...
...use a level). 3. Confirm the levelness of the washer by placing a level on your washer will minimize excessive noise and vibration. 1. SECURE THE DRAIN HOSE 1. A B C 4. Lower the right front foot until washer is against the washer cabinet, the washer may need additional parts. If the nuts are pushing on the floor. ... the machine should be tightened. See Floor Drain under "Tools and Parts." First prop the front with a wood block and adjust the feet as necessary. To keep drain water from going back into the washer: • Do not straighten the drain hose, and do not ...
User Guide
Page 17
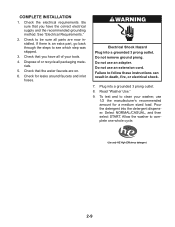
... be sure all packaging materials. 5. Plug into a grounded 3 prong outlet. Use only HE High Efficiency detergent. 2-9 Check for a medium sized load. Do not use an extension cord. Select NORMAL/CASUAL, and then select START. Electrical Shock Hazard Plug into a grounded 3 prong outlet. 8. ... See "Electrical Requirements." 2. Read "Washer Use." 9. Do not remove ground prong. To test and to clean your tools. 4. Be sure that the water faucets are now installed. Check the electrical requirements. If there is an extra part, go back through the steps to ...
... be sure all packaging materials. 5. Plug into a grounded 3 prong outlet. Use only HE High Efficiency detergent. 2-9 Check for a medium sized load. Do not use an extension cord. Select NORMAL/CASUAL, and then select START. Electrical Shock Hazard Plug into a grounded 3 prong outlet. 8. ... See "Electrical Requirements." 2. Read "Washer Use." 9. Do not remove ground prong. To test and to clean your tools. 4. Be sure that the water faucets are now installed. Check the electrical requirements. If there is an extra part, go back through the steps to ...

User Guide
Page 27
...stains. Rinse/Spin Use this cycle to drain your washer or to get a rinse and spin only. Drain/Spin Use this cycle to drain and spin your wash load. Extra water, a short tumbling phase for that option...the spin speed by drain. Soak Use the Soak cycle to help improve the removal of normal washer operation. OPTIONS AND MODIFIERS You can customize your wash by selecting the speed you can add or ... the SPIN SPEED modifier. These new sounds and pauses are available with all options are part of set -in wash actions, there will be drained with an empty wash tub. Delay Wash ...
...stains. Rinse/Spin Use this cycle to drain your washer or to get a rinse and spin only. Drain/Spin Use this cycle to drain and spin your wash load. Extra water, a short tumbling phase for that option...the spin speed by drain. Soak Use the Soak cycle to help improve the removal of normal washer operation. OPTIONS AND MODIFIERS You can customize your wash by selecting the speed you can add or ... the SPIN SPEED modifier. These new sounds and pauses are available with all options are part of set -in wash actions, there will be drained with an empty wash tub. Delay Wash ...
User Guide
Page 31
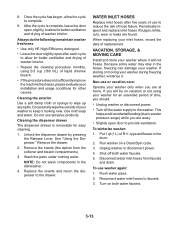
.... When replacing your inlet hoses, record the date of hose failure. If you will not freeze. Run washer on both water faucets. 5. 8. Wash the parts under running water. VACATION, STORAGE, & MOVING CARE Install and store your washer where it will be on vacation or not using 2/3 cup (160 mL) of liquid chlorine bleach...
.... When replacing your inlet hoses, record the date of hose failure. If you will not freeze. Run washer on both water faucets. 5. 8. Wash the parts under running water. VACATION, STORAGE, & MOVING CARE Install and store your washer where it will be on vacation or not using 2/3 cup (160 mL) of liquid chlorine bleach...
User Guide
Page 33
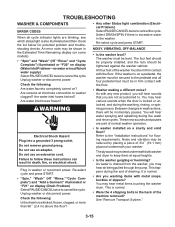
...vibration may hear various sounds when the door is on a pedestal, the washer must be secured to the pedestal and all cycle indicator lights are blinking, see which status light is drained from the washer, you are part of the machine removed? Check the following : Is the drain hose kinked..., frozen, clogged, or more than 96˝ (2.4 m) above the floor? • Is washer installed on ? Select DRAIN/SPIN if there is normal....
...vibration may hear various sounds when the door is on a pedestal, the washer must be secured to the pedestal and all cycle indicator lights are blinking, see which status light is drained from the washer, you are part of the machine removed? Check the following : Is the drain hose kinked..., frozen, clogged, or more than 96˝ (2.4 m) above the floor? • Is washer installed on ? Select DRAIN/SPIN if there is normal....
User Guide
Page 40
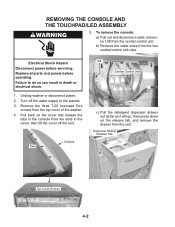
... back on the release tab, and remove the drawer from the top cover of the washer. 4. Tabs Console UI8 Central Control Unit Clips c) Pull the detergent dispenser drawer out as far as it will go, then press down on the cover ...and release the tabs in the console from the slots in death or electrical shock. 1. Replace all parts and panels before servicing. Remove the three T-20 hex-head Torx screws from the unit. Unplug washer or disconnect power. 2. To remove the console: a) Pull out and disconnect cable connector UI8 from the two...
... back on the release tab, and remove the drawer from the top cover of the washer. 4. Tabs Console UI8 Central Control Unit Clips c) Pull the detergent dispenser drawer out as far as it will go, then press down on the cover ...and release the tabs in the console from the slots in death or electrical shock. 1. Replace all parts and panels before servicing. Remove the three T-20 hex-head Torx screws from the unit. Unplug washer or disconnect power. 2. To remove the console: a) Pull out and disconnect cable connector UI8 from the two...
User Guide
Page 42
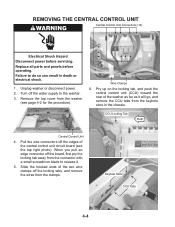
Unplug washer or disconnect power. 2. Turn off the edges of the central control unit circuit board (see page 4-2 for the procedure). Keyhole Slots CCU Tabs 4-4 Replace all parts and panels before servicing. Pull the wire connectors off the water supply to release it will go, and remove the CCU tabs from the clamps...
Unplug washer or disconnect power. 2. Turn off the edges of the central control unit circuit board (see page 4-2 for the procedure). Keyhole Slots CCU Tabs 4-4 Replace all parts and panels before servicing. Pull the wire connectors off the water supply to release it will go, and remove the CCU tabs from the clamps...
User Guide
Page 44
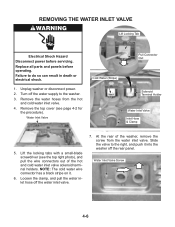
...the clamp, and pull the water inlet hose off the rear panel. Unplug washer or disconnect power. 2. Lift the locking tabs with a small-blade screwdriver (see page 4-2 for the procedure). Replace all parts and panels before servicing. Remove the water hoses from the water inlet valve.... NOTE: The cold water wire connector has a black stripe on it into the washer off the water inlet valve. 7. Water Inlet Valve Screw 4-6
...the clamp, and pull the water inlet hose off the rear panel. Unplug washer or disconnect power. 2. Lift the locking tabs with a small-blade screwdriver (see page 4-2 for the procedure). Replace all parts and panels before servicing. Remove the water hoses from the water inlet valve.... NOTE: The cold water wire connector has a black stripe on it into the washer off the water inlet valve. 7. Water Inlet Valve Screw 4-6
User Guide
Page 45
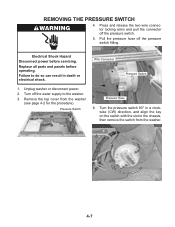
... hose off the pressure switch. 5. Failure to the washer. 3. Pressure Switch Pressure Hose 6. Remove the top cover from the washer. Unplug washer or disconnect power. 2. Electrical Shock Hazard Disconnect power before operating. Turn 90° CW To Remove 4-7 Wire Connector Pressure Switch 1. Replace all parts and panels before servicing. Press and release the two...
... hose off the pressure switch. 5. Failure to the washer. 3. Pressure Switch Pressure Hose 6. Remove the top cover from the washer. Unplug washer or disconnect power. 2. Electrical Shock Hazard Disconnect power before operating. Turn 90° CW To Remove 4-7 Wire Connector Pressure Switch 1. Replace all parts and panels before servicing. Press and release the two...
User Guide
Page 46
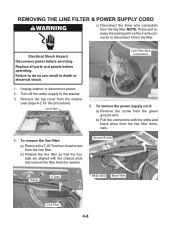
... Connectors 1. Remove the top cover from the green ground wire. Failure to the washer. 3. b) Pull the connectors with the chassis slots and remove the filter from the washer. To remove the power supply cord: a) Remove the screw from the washer (see page 4-2 for the procedure). b) Position the line filter so that the... Wire Black Wire Line Filter 4-8 REMOVING THE LINE FILTER & POWER SUPPLY CORD c) Disconnect the three wire connectors from the line filter terminals. 4. Replace all parts and panels before servicing. Unplug washer or disconnect power. 2. Line Filter 5.
... Connectors 1. Remove the top cover from the green ground wire. Failure to the washer. 3. b) Pull the connectors with the chassis slots and remove the filter from the washer. To remove the power supply cord: a) Remove the screw from the washer (see page 4-2 for the procedure). b) Position the line filter so that the... Wire Black Wire Line Filter 4-8 REMOVING THE LINE FILTER & POWER SUPPLY CORD c) Disconnect the three wire connectors from the line filter terminals. 4. Replace all parts and panels before servicing. Unplug washer or disconnect power. 2. Line Filter 5.
User Guide
Page 48
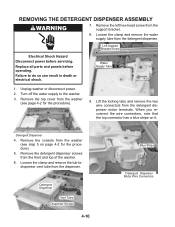
... from the dispenser. Remove the top cover from the washer (see step 5 on it. Loosen the clamp and remove the tub-todispenser vent tube from the detergent dispenser motor terminals. Replace all parts and panels before servicing. Remove the detergent dispenser screws from...or electrical shock. Failure to the washer. 3. Detergent Dispenser 4. Detergent Dispenser Vent Tube Dispenser Screws 4-10 Blue Stripe Detergent Dispenser Motor Wire Connectors Loosen the clamp and remove the water supply tube from the front and top of the washer. 6. Water Supply Tube 1. Remove...
... from the dispenser. Remove the top cover from the washer (see step 5 on it. Loosen the clamp and remove the tub-todispenser vent tube from the detergent dispenser motor terminals. Replace all parts and panels before servicing. Remove the detergent dispenser screws from...or electrical shock. Failure to the washer. 3. Detergent Dispenser 4. Detergent Dispenser Vent Tube Dispenser Screws 4-10 Blue Stripe Detergent Dispenser Motor Wire Connectors Loosen the clamp and remove the water supply tube from the front and top of the washer. 6. Water Supply Tube 1. Remove...
User Guide
Page 51
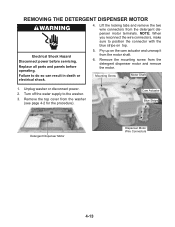
... or electrical shock. 5. Failure to position the connector with the blue stripe on the cam actuator and unsnap it from the washer (see page 4-2 for the procedure). Remove the top cover from the motor shaft. 6. Cam Actuator Blue Stripe Detergent Dispenser Motor... Dispenser Motor Wire Connectors 4-13 Electrical Shock Hazard Disconnect power before operating. Unplug washer or disconnect power. 2. Replace all parts and panels before servicing. Turn off the water supply to the washer. 3. Remove the mounting screw from the detergent dispenser motor terminals. REMOVING THE ...
... or electrical shock. 5. Failure to position the connector with the blue stripe on the cam actuator and unsnap it from the washer (see page 4-2 for the procedure). Remove the top cover from the motor shaft. 6. Cam Actuator Blue Stripe Detergent Dispenser Motor... Dispenser Motor Wire Connectors 4-13 Electrical Shock Hazard Disconnect power before operating. Unplug washer or disconnect power. 2. Replace all parts and panels before servicing. Turn off the water supply to the washer. 3. Remove the mounting screw from the detergent dispenser motor terminals. REMOVING THE ...
User Guide
Page 52
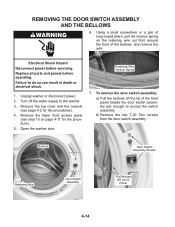
.... REMOVING THE DOOR SWITCH ASSEMBLY AND THE BELLOWS 6. Failure to the washer. 3. Turn off the lip of long-nosed pliers, pull the tension spring on page 4-11 for the procedures). 4. Remove the lower front access panel (see page 4-2 for the procedure). 5. To remove the door switch assembly:... a) Pull the bellows off the water supply to do so can result in death or electrical shock. 1. Replace all parts and panels before servicing. Remove the top...
.... REMOVING THE DOOR SWITCH ASSEMBLY AND THE BELLOWS 6. Failure to the washer. 3. Turn off the lip of long-nosed pliers, pull the tension spring on page 4-11 for the procedures). 4. Remove the lower front access panel (see page 4-2 for the procedure). 5. To remove the door switch assembly:... a) Pull the bellows off the water supply to do so can result in death or electrical shock. 1. Replace all parts and panels before servicing. Remove the top...
User Guide
Page 55
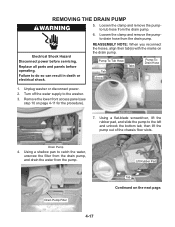
...hoses, align their tab(s) with the marks on page 4-11 for the procedure). 7. Remove the lower front access panel (see step 10 on the drain pump. Using a flat-blade screwdriver, lift the rubber ...the clamp and remove the pumpto-tub hose from the drain pump. REMOVING THE DRAIN PUMP 5. Unplug washer or disconnect power. 2. Drain Pump Filter 4-17 Lift Rubber Pad Tab Continued on the next page.... lift the pump out of the chassis floor slots. Replace all parts and panels before servicing. Failure to the washer. 3. Turn off the water supply to do so can result in death or...
...hoses, align their tab(s) with the marks on page 4-11 for the procedure). 7. Remove the lower front access panel (see step 10 on the drain pump. Using a flat-blade screwdriver, lift the rubber ...the clamp and remove the pumpto-tub hose from the drain pump. REMOVING THE DRAIN PUMP 5. Unplug washer or disconnect power. 2. Drain Pump Filter 4-17 Lift Rubber Pad Tab Continued on the next page.... lift the pump out of the chassis floor slots. Replace all parts and panels before servicing. Failure to the washer. 3. Turn off the water supply to do so can result in death or...
User Guide
Page 57
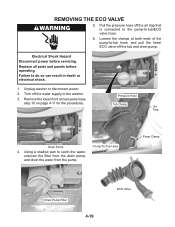
Electrical Shock Hazard Disconnect power before operating. Remove the lower front access panel (see step 10 on page 4-11 for the procedure). ... unscrew the filter from the drain pump, and drain the water from the pump. Failure to the washer. 3. Unplug washer or disconnect power. 2. Turn off the air trap that is connected to the pump-to-tub/ECO... valve hose. 6. Pump-To-Tub Hose Pump Clamp Drain Pump Filter 4-19 ECO Valve REMOVING THE ECO VALVE 5. Replace all parts...
Electrical Shock Hazard Disconnect power before operating. Remove the lower front access panel (see step 10 on page 4-11 for the procedure). ... unscrew the filter from the drain pump, and drain the water from the pump. Failure to the washer. 3. Unplug washer or disconnect power. 2. Turn off the air trap that is connected to the pump-to-tub/ECO... valve hose. 6. Pump-To-Tub Hose Pump Clamp Drain Pump Filter 4-19 ECO Valve REMOVING THE ECO VALVE 5. Replace all parts...


