
Kenmore HE2t Support Question
Kenmore HE2t Support Question
Find answers below for this question about Kenmore HE2t - 3.7 cu. Ft. Front Load Washer.Need a Kenmore HE2t manual? We have 1 online manual for this item!
Question posted by henrybuswell on December 9th, 2013
Dishwasher Control Panel - Panel Button Breakage
To whom it may concern, I am inquiring about a dishwasher control panel model#665.13109k902. The plastic panel representing the push buttons for the options selection has detoriated with the buttons falling off. I have already made the replacement once for an item that cost over $100. With the 2nd panel also falling apart I wonder if Kenmore / Whirlpool will replace this part since it appears to be a part that should not break in the first place. I see on-line reviews indicating that this model has complaints for the very reason that I am contacting you. Thank you for your response, Henry Buswell
Current Answers
Related Kenmore HE2t Manual Pages
User Guide - Page 7
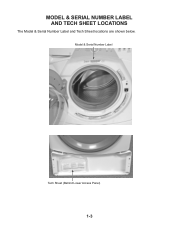
Model & Serial Number Label
Tech Sheet (Behind Lower Access Panel)
1-3 MODEL & SERIAL NUMBER LABEL AND TECH SHEET LOCATIONS
The Model & Serial Number Label and Tech Sheet locations are shown below.
User Guide - Page 8
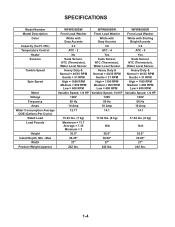
...Control
Heater Sensors
Tumble Speed
Spin Speed
Motor Voltage Frequency Amps Water Consumption Average DOE (Gallons-Per-Cycle) Rated Load Load Pounds
Height Install Depth: Min - Max
Width Product Weight (approx)
WFW8300SW
WFW8500SW
WFW8500SR
Front Load Washer
Front Load Washer
Front Load Washer... 30.00"
27" 242 lbs.
1-4 SPECIFICATIONS
Model Number Model Description
Color
Capacity (Cu.Ft.
User Guide - Page 14
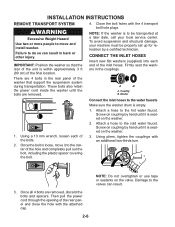
... inside the washer until it is loose, move and install washer. Then pull the power cord through the opening of the hole and completely pull out the bolt, including the plastic spacer covering ...the washer is to the water faucets
Make sure the washer drum is within approximately 3 ft (90 cm) of the unit is empty.
1. Coupling B. Firmly seat the washers in the rear panel of the washer that...
User Guide - Page 16
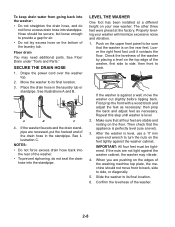
... you are recessed, put the hooked end of the laundry tub. SECURE THE DRAIN HOSE
1. The other three feet were preset at a different height on the upper front panel to its final location.
3. Lower the right front foot until washer is against the washer cabinet. If the nuts are stable and resting on the...
User Guide - Page 25
...).
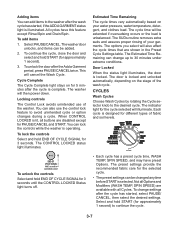
3. You can lock the controls while the washer is selected. Estimated Time Remaining
The cycle times vary automatically based on your garments. The options you select will also affect the cycle times... all buttons are shown in the Preset Cycle Settings table. Select and hold END OF CYCLE SIGNAL for 5 minutes after the wash cycle has started , select PAUSE/ CANCEL, then select the...
User Guide - Page 28
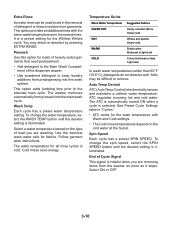
... detergent to keep laundry additives from garments. Wash Temp
Each cycle has a preset water temperature setting. Select a water temperature based on the cold water at the faucet.
ATC regulates incoming hot and cold water.
End of load you are washing. Prewash
Use this option for fabrics. Auto Temp Control
ATC (Auto Temp Control) electronically senses and...
User Guide - Page 30
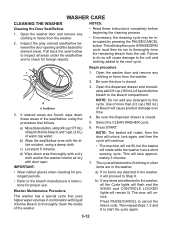
...button. Begin procedure
1. If stained areas are detected in the washer, all areas under the seal/bellow and to the bleach compartment.
c) Let stand 5 minutes. Use of more than 2/3 cup (160 mL) of the washer. Washer Maintenance Procedure
This washer... the unit. Select the CLEAN WASHER cycle.
6. This will unlock.
b) If any clothing or items from the washer.
2. The door...
User Guide - Page 32
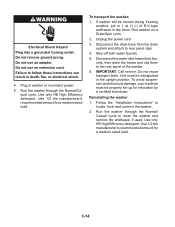
... not use an extension cord. Run the washer through the Normal/ Casual cycle to the rear panel of R.V.-type antifreeze in washer or reconnect power. 5. To avoid suspension and... level and connect the washer.
2. Use only HE High Efficiency detergent. Use 1/2 the manufacturer's recommended amount for a medium sized load.
3-14 To transport the washer:
1. Run washer on a Drain/Spin ...
User Guide - Page 40
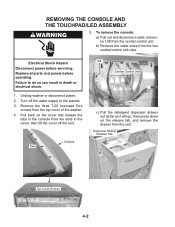
b) Remove the cable wires from the central control unit.
Replace all parts and panels before servicing. Pull back on the release tab, and remove the drawer from the unit.
Unplug washer or disconnect power. 2. Turn off the unit. Dispenser Drawer Release Tab
Top Cover Screws
4-2 To remove the console:
a) Pull out and disconnect cable...
User Guide - Page 42
... of the two wire clamps off the edges of the washer as far as it .
5.
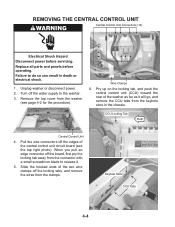
REMOVING THE CENTRAL CONTROL UNIT
Central Control Unit Connectors (12)
Electrical Shock Hazard Disconnect power before operating. Unplug washer or disconnect power. 2. Pry up on the locking tab, and push the central control unit (CCU) toward the rear of the central...
User Guide - Page 44
...for
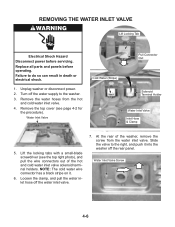
the procedure). Replace all parts and panels before servicing. Remove the top cover (see the top right photo), and pull the wire connectors out of the washer, remove the screw from the hot
and...right, and push it .
6. Remove the water hoses from the water inlet valve. Failure to the washer. 3. NOTE: The cold water wire connector has a black stripe on it into the washer off the ...
User Guide - Page 45
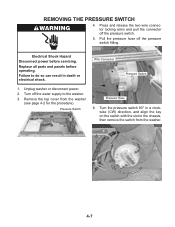
Replace all parts and panels before servicing. Wire Connector Pressure Switch
1. Turn off the pressure switch.
5.
Turn 90° CW To Remove
4-7
Failure to the washer. 3. Turn the pressure switch 90° in a clockwise (CW...so can result in the chassis, then remove the switch from the washer
(see page 4-2 for the procedure). Pull the pressure hose off the pressure switch fitting.
Remove...
User Guide - Page 46
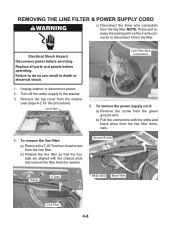
REMOVING THE LINE FILTER & POWER SUPPLY CORD
c) Disconnect the three wire connectors from the line filter. Replace all parts and panels before servicing.
Unplug washer or disconnect power. 2.
b) Position the line filter so that the four tabs are aligned with the white and black wires from the line filter terminals.
4. ...
User Guide - Page 47

Power Supply Cord Strain Relief
4-9 Align the strain relief key with the slot in either direction.
d) Use a pair of pliers and turn the strain relief on the rear panel.
c) Pull the washer away from the wall far enough to access the power supply cord on the power supply cord 90° in the rear panel, and remove the cord from the washer.
User Guide - Page 48
... 4-2 for the procedure).
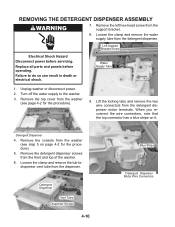
5. Loosen the clamp and remove the tub-todispenser vent tube from the detergent dispenser. Replace all parts and panels before servicing. Water Supply Tube
1. Detergent Dispenser
4. Unplug washer or disconnect power. 2. Detergent Dispenser
Vent Tube Dispenser Screws
4-10
Blue Stripe
Detergent Dispenser Motor Wire Connectors Loosen the clamp and...
User Guide - Page 49
...Panel
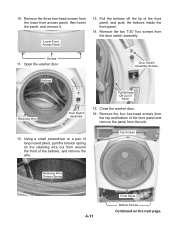
15. Top Screws
Retaining Wire Tension Spring
4-11
Front Panel
Bottom Screws
Continued on the retaining wire out from the lower front access panel, then lower the panel, and remove it. Open the washer... on the next page. Screws
11. Close the washer door. 16. Using a small screwdriver or a pair of the front panel and remove the panel from the door switch assembly. 10. Remove the ...
User Guide - Page 58
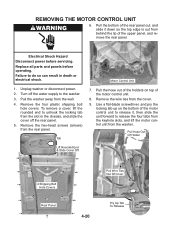
... parts and panels before servicing. Remove the four plastic shipping bolt
hole covers.
Electrical Shock Hazard Disconnect power before operating. Unplug washer or disconnect power. 2. Pull the hose out of the holders on the bottom of the motor control unit to release it down so the top edge is out from the washer. Pull Hose...
User Guide - Page 71
...washer or disconnect power.
2. Replace all parts and panels before accessing. Set the ohmmeter to the following connector pins. Touch the ohmmeter test leads to the R X 100 scale. 4.
Unplug washer...7
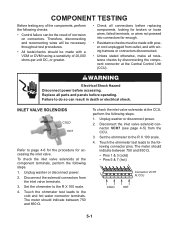
Connector VCH7 At CCU
COLD
HOT
5-1 To check the inlet valve solenoids at the Central Control Unit (CCU). Failure to the R X 100 scale.
4. INLET VALVE SOLENOIDS
COLD
HOT
...
User Guide - Page 78
...before operating.
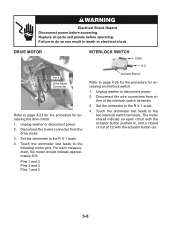
Unplug washer or disconnect power. 2. Set the ohmmeter to the R X 1 scale. 4. Set the ohmmeter to the R X 1 scale.
4.
Actuator Button
Refer to the
... so can result in , and a closed circuit (0 Ω) with the actuator button out.
5-8 Replace all parts and panels before accessing. Disconnect the 5-wire connector from either of the interlock switch terminals.
...
User Guide - Page 86
...8486;
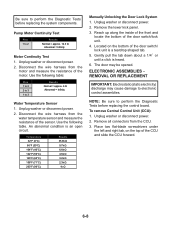
Manually Unlocking the Door Lock System 1. Unplug washer or disconnect power. 2. NOTE: Be sure to perform the Diagnostic Tests before replacing the control board. Unplug washer or disconnect power. 2. Place two flat-blade... the bottom of the CCU and slide the CCU forward.
6-8
Remove the lower kick panel. 3. Gently pull the tab down about a 1/4˝ or until a click is ...
Similar Questions

Kenmore He2 Model 110.47561600 F20 Error Code.
6 minutes into any cycle the washer stops filling and shows the F20 error code. After researching th...
6 minutes into any cycle the washer stops filling and shows the F20 error code. After researching th...
(Posted by riskoj 6 years ago)

How To Reset Washing Machine
Washing machine model 110.92195510; serial # CB1401610. Machine became unbalanced and will not run...
Washing machine model 110.92195510; serial # CB1401610. Machine became unbalanced and will not run...
(Posted by waynelfrank 10 years ago)

The Chrome Plated Plastic Ring On The Door Broke And I Need To Replace It
The chrome plated plastic ring on the door broke and I need to replace it
The chrome plated plastic ring on the door broke and I need to replace it
(Posted by solsurvivor 11 years ago)

I Replaced The Door Latch Lock On My Front Load Washer The Washer Won't Come On
I was told the door lock latch needed to be replaced. When the door latch lock was replaced the wash...
I was told the door lock latch needed to be replaced. When the door latch lock was replaced the wash...
(Posted by reginaharvey 11 years ago)

Dgree Of Difficulty To Take Out And Replace Front Boot On Front Loading Washer
(Posted by leonard483 12 years ago)