Software Users Manual - English
Page 16
...printing 2 The machine prints all the even-numbered pages on paper, it is possible that the back cover is closed. If paper is curled, straighten it and then put it back in the paper tray. Use regular paper or thin paper. Then, the printer driver instructs you use bond ... there is not recommended. Remove the paper, straighten it and turn over the stack, straighten it and then put it back in the paper tray or the MP Tray. If the paper is curled, turn over the stack. When you (with a pop-up message) to reinsert the paper. Before reinserting ...
...printing 2 The machine prints all the even-numbered pages on paper, it is possible that the back cover is closed. If paper is curled, straighten it and then put it back in the paper tray. Use regular paper or thin paper. Then, the printer driver instructs you use bond ... there is not recommended. Remove the paper, straighten it and turn over the stack, straighten it and then put it back in the paper tray or the MP Tray. If the paper is curled, turn over the stack. When you (with a pop-up message) to reinsert the paper. Before reinserting ...
Software Users Manual - English
Page 127
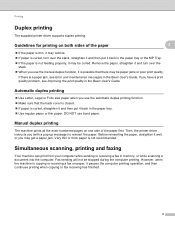
... curled. Automatic duplex printing 8 Use Letter, Legal or Folio size paper when you use the manual duplex function, it back in the paper tray or the MP Tray. 8 If the paper is a paper jam, see Improving the print quality in the Basic User's Guide. Remove the paper, straighten it ... it back in the Basic User's Guide. Very thin or thick paper is curled, straighten it and then put it is possible that the back cover is closed. If paper is not recommended. 120 Note The screens in the printer driver (Macintosh) 8 This machine supports Mac OS X 10.4.11 ...
... curled. Automatic duplex printing 8 Use Letter, Legal or Folio size paper when you use the manual duplex function, it back in the paper tray or the MP Tray. 8 If the paper is a paper jam, see Improving the print quality in the Basic User's Guide. Remove the paper, straighten it ... it back in the Basic User's Guide. Very thin or thick paper is curled, straighten it and then put it is possible that the back cover is closed. If paper is not recommended. 120 Note The screens in the printer driver (Macintosh) 8 This machine supports Mac OS X 10.4.11 ...
Users Manual - English
Page 13
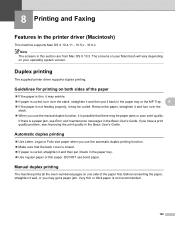
... the ADF unit 104 Document is jammed under the document cover 104 Removing small documents jammed in the ADF 105 Document is jammed at the output tray 105 Paper jams...106 Paper is jammed in the MP tray 106 Paper is jammed in paper tray 1 or tray 2 107 Paper is jammed at the back of the... machine 108 Paper is jammed inside the machine 110 Paper is jammed underneath paper tray 1 114 If you are having difficulty with your machine 117 Setting Dial...
... the ADF unit 104 Document is jammed under the document cover 104 Removing small documents jammed in the ADF 105 Document is jammed at the output tray 105 Paper jams...106 Paper is jammed in the MP tray 106 Paper is jammed in paper tray 1 or tray 2 107 Paper is jammed at the back of the... machine 108 Paper is jammed inside the machine 110 Paper is jammed underneath paper tray 1 114 If you are having difficulty with your machine 117 Setting Dial...

Users Manual - English
Page 31
... should remove each envelope as soon as it may cause a jam. e Open the back cover (Face up . 15 If the support flap is positioned between the arrows (1). The...sheets of the machine. Make sure: The top edge of thick paper from sliding off the face down output tray. Loading paper 2 1 c Lift up the support flap to prevent 1 envelopes or sheets of the envelope is closed... out of thick paper [43 lb (163 g/m2)] in the MP tray. d Put up to 3 envelopes or up to be printed on must be face up output tray). b Pull out the MP tray support and unfold the flap (1).
... should remove each envelope as soon as it may cause a jam. e Open the back cover (Face up . 15 If the support flap is positioned between the arrows (1). The...sheets of the machine. Make sure: The top edge of thick paper from sliding off the face down output tray. Loading paper 2 1 c Lift up the support flap to prevent 1 envelopes or sheets of the envelope is closed... out of thick paper [43 lb (163 g/m2)] in the MP tray. d Put up to 3 envelopes or up to be printed on must be face up output tray). b Pull out the MP tray support and unfold the flap (1).

Users Manual - English
Page 32
... Chapter 2 f Pull down in step f back to their original positions. h Send the print data to the envelope position as shown in the MP tray and open the back cover and reset the two gray levers which were pulled down the two gray levers, one on the left-hand side and one on the... righthand side, to the machine. g Close the back cover. Note • Remove each printed envelope immediately to prevent a paper jam. • If your thick paper curls during printing, put only one sheet at a time...
... Chapter 2 f Pull down in step f back to their original positions. h Send the print data to the envelope position as shown in the MP tray and open the back cover and reset the two gray levers which were pulled down the two gray levers, one on the left-hand side and one on the... righthand side, to the machine. g Close the back cover. Note • Remove each printed envelope immediately to prevent a paper jam. • If your thick paper curls during printing, put only one sheet at a time...

Users Manual - English
Page 39
..., the paper may have an effect on print quality or handling reliability. DO NOT use any Brother warranty or service agreement. 23 Types of paper to avoid 2 IMPORTANT Some types of paper listed... above, they may cause jams to your machine. This damage is not covered under any of the types of paper may not perform well or may cause damage to occur.... DO NOT use inkjet paper because it sealed. Store paper in the MP tray to avoid a paper jam. Some important guidelines when selecting paper are using special paper 2 The machine ...
..., the paper may have an effect on print quality or handling reliability. DO NOT use any Brother warranty or service agreement. 23 Types of paper to avoid 2 IMPORTANT Some types of paper listed... above, they may cause jams to your machine. This damage is not covered under any of the types of paper may not perform well or may cause damage to occur.... DO NOT use inkjet paper because it sealed. Store paper in the MP tray to avoid a paper jam. Some important guidelines when selecting paper are using special paper 2 The machine ...

Users Manual - English
Page 113
... paper, then press Start. The fuser unit is not Close the back cover of the machine. on page 110.) Jam MP The paper is jammed in the MP (See Paper is jammed in the fuser unit. (See Paper is jammed underneath paper tray 1 on page 114.) Jam Inside The paper is jammed inside the... turn it on again. on page 103.) If the problem continues, call Brother Customer Service. The back of the machine is too hot. The paper tray was too long. Although the size of paper in the paper tray matches the paper size that was selected from the control panel or printer driver...
... paper, then press Start. The fuser unit is not Close the back cover of the machine. on page 110.) Jam MP The paper is jammed in the MP (See Paper is jammed in the fuser unit. (See Paper is jammed underneath paper tray 1 on page 114.) Jam Inside The paper is jammed inside the... turn it on again. on page 103.) If the problem continues, call Brother Customer Service. The back of the machine is too hot. The paper tray was too long. Although the size of paper in the paper tray matches the paper size that was selected from the control panel or printer driver...
Users Manual - English
Page 117
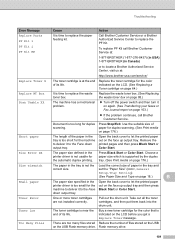
... the printer driver is at : http://www.brother-usa.com/service/ Replace Toner X The toner cartridge is too small for the machine to deliver it to the Face down output tray. Open the back cover to let the printed paper out on the face up output tray. Buy a new toner cartridge for the color... into the drum unit. Troubleshooting Error Message Cause Action Replace Parts PF Kit 1 PF Kit 2 PF Kit MP It is too short for the machine to deliver it to the Face down output tray. Replace the waste toner box. (See Replacing the waste toner box on page 88.) Scan Unable XX The...
... the printer driver is at : http://www.brother-usa.com/service/ Replace Toner X The toner cartridge is too small for the machine to deliver it to the Face down output tray. Open the back cover to let the printed paper out on the face up output tray. Buy a new toner cartridge for the color... into the drum unit. Troubleshooting Error Message Cause Action Replace Parts PF Kit 1 PF Kit 2 PF Kit MP It is too short for the machine to deliver it to the Face down output tray. Replace the waste toner box. (See Replacing the waste toner box on page 88.) Scan Unable XX The...

Users Manual - English
Page 149
ABCDEFG EFGHIJKLMN If creases occur with the envelope levers in the envelope position, print with the back cover opened and feed one envelope at a time from the MP tray. Examples of poor print quality Envelope creases Troubleshooting Recommendation Make sure that the two gray envelope levers are pulled down when you are printing envelopes. B 133
ABCDEFG EFGHIJKLMN If creases occur with the envelope levers in the envelope position, print with the back cover opened and feed one envelope at a time from the MP tray. Examples of poor print quality Envelope creases Troubleshooting Recommendation Make sure that the two gray envelope levers are pulled down when you are printing envelopes. B 133

Quick Setup Guide - English
Page 3
... towards the front of the machine. c Press the front cover release button and open the front cover. CCAAUUTTIOINON DO NOT eat the Silica Pack. Remove the silica gel pack a. 2 Remove the packing material from the MP tray support, then close the MP tray. g Push the drum unit firmly back into the machine.... the machine to remove it stops. b Open the MP tray a, and remove the plastic sheet b from the machine IMPORTANT DO NOT connect the AC power cord yet. d Hold the green handle of the machine. 3 Discard immediately. h Close the front cover of the drum unit a and pull it out until...
... towards the front of the machine. c Press the front cover release button and open the front cover. CCAAUUTTIOINON DO NOT eat the Silica Pack. Remove the silica gel pack a. 2 Remove the packing material from the MP tray support, then close the MP tray. g Push the drum unit firmly back into the machine.... the machine to remove it stops. b Open the MP tray a, and remove the plastic sheet b from the machine IMPORTANT DO NOT connect the AC power cord yet. d Hold the green handle of the machine. 3 Discard immediately. h Close the front cover of the drum unit a and pull it out until...


