Users Manual - English
Page 9
...on -site service providers, will repair or replace (at Brother Authorized Service Centres throughout Canada. Operation of the laser printer/MFC/Fax in excess of the specifications or with ... on-site warranty of 1 year labour and parts from the date of purchase, Brother International Corporation (Canada) Ltd. ("Brother"), or its Authorized Service Centres, Distributors, Dealers, Agents or employees, shall create ...this machine is available at Brother's sole discretion) this Laser Printer/MFC/Fax machine free of . Failure to remove the Toner Cartridge (and Toner Drum Unit, waste toner packs or...
...on -site service providers, will repair or replace (at Brother Authorized Service Centres throughout Canada. Operation of the laser printer/MFC/Fax in excess of the specifications or with ... on-site warranty of 1 year labour and parts from the date of purchase, Brother International Corporation (Canada) Ltd. ("Brother"), or its Authorized Service Centres, Distributors, Dealers, Agents or employees, shall create ...this machine is available at Brother's sole discretion) this Laser Printer/MFC/Fax machine free of . Failure to remove the Toner Cartridge (and Toner Drum Unit, waste toner packs or...
Users Manual - English
Page 13
... 58 Scanning using the scan key 58 Scanning using a scanner driver 59 A Routine maintenance 60 Replacing the consumable items 60 Replacing a Toner cartridge 64 Cleaning the corona wires 70 Replacing the drum unit 75 Replacing the belt unit 82 Replacing the waste toner box 88 B Troubleshooting 95 Error and maintenance messages 95 Transferring your faxes or...
... 58 Scanning using the scan key 58 Scanning using a scanner driver 59 A Routine maintenance 60 Replacing the consumable items 60 Replacing a Toner cartridge 64 Cleaning the corona wires 70 Replacing the drum unit 75 Replacing the belt unit 82 Replacing the waste toner box 88 B Troubleshooting 95 Error and maintenance messages 95 Transferring your faxes or...
Users Manual - English
Page 76
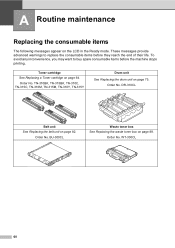
... belt unit on page 88. Order No. To avoid any inconvenience, you may want to replace the consumable items before the machine stops printing. Order No. Order No. Order No. Toner cartridge See Replacing a Toner cartridge on page 75. TN-310BK, TN-315BK, TN-310C, TN-315C, TN-310M, TN-315M..., TN-310Y, TN-315Y Drum unit See Replacing the drum unit on page 64. WT-300CL 60 A Routine maintenance A Replacing the consumable items A The following messages appear on the LCD in the Ready mode. These messages provide advanced warnings...
... belt unit on page 88. Order No. To avoid any inconvenience, you may want to replace the consumable items before the machine stops printing. Order No. Order No. Order No. Toner cartridge See Replacing a Toner cartridge on page 75. TN-310BK, TN-315BK, TN-310C, TN-315C, TN-310M, TN-315M..., TN-310Y, TN-315Y Drum unit See Replacing the drum unit on page 64. WT-300CL 60 A Routine maintenance A Replacing the consumable items A The following messages appear on the LCD in the Ready mode. These messages provide advanced warnings...

Users Manual - English
Page 78
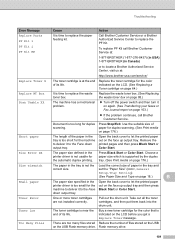
.... Call your dealer or Brother Customer Service for a replacement laser unit. cartridge yield is declared in accordance with ISO/IEC 19798. 3 1 page per job. 4 Drum life is approximate and may...Brother Customer Service for a replacement paper feeding kit 2. You will need to replace See page 64. LCD messages Consumable item to replace Replace Toner X Toner cartridge X = Black, Cyan, Magenta, Yellow Approximate life 2,500 pages 1 2 5 6,000 pages 1 2 6 1,500 pages 1 2 5 Replace Parts Drum unit Drum 3,500 pages 1 2 6 25,000 pages 1 3 4 Drum Stop Replace Parts Belt Unit Replace...
.... Call your dealer or Brother Customer Service for a replacement laser unit. cartridge yield is declared in accordance with ISO/IEC 19798. 3 1 page per job. 4 Drum life is approximate and may...Brother Customer Service for a replacement paper feeding kit 2. You will need to replace See page 64. LCD messages Consumable item to replace Replace Toner X Toner cartridge X = Black, Cyan, Magenta, Yellow Approximate life 2,500 pages 1 2 5 6,000 pages 1 2 6 1,500 pages 1 2 5 Replace Parts Drum unit Drum 3,500 pages 1 2 6 25,000 pages 1 3 4 Drum Stop Replace Parts Belt Unit Replace...
Users Manual - English
Page 81
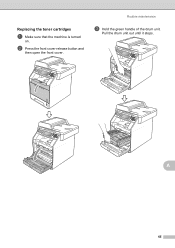
A 65 b Press the front cover release button and then open the front cover. Pull the drum unit out until it stops. Routine maintenance c Hold the green handle of the drum unit. Replacing the toner cartridges A a Make sure that the machine is turned on.
A 65 b Press the front cover release button and then open the front cover. Pull the drum unit out until it stops. Routine maintenance c Hold the green handle of the drum unit. Replacing the toner cartridges A a Make sure that the machine is turned on.
Users Manual - English
Page 84
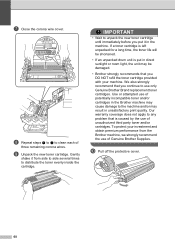
... result in unsatisfactory print quality. Our warranty coverage does not apply to any problem that is put it from the Brother machine, we strongly recommend the use only Genuine Brother Brand replacement toner cartridges. g Close the corona wire cover. i Unpack the new toner cartridge. If a toner cartridge is ...to the machine and/or may be shortened. • If an unpacked drum unit is caused by the use of potentially incompatible toner and/or cartridges in the machine. Gently shake it in the Brother machine may cause damage to clean each of unauthorized third party toner and/or...
... result in unsatisfactory print quality. Our warranty coverage does not apply to any problem that is put it from the Brother machine, we strongly recommend the use only Genuine Brother Brand replacement toner cartridges. g Close the corona wire cover. i Unpack the new toner cartridge. If a toner cartridge is ...to the machine and/or may be shortened. • If an unpacked drum unit is caused by the use of potentially incompatible toner and/or cartridges in the machine. Gently shake it in the Brother machine may cause damage to clean each of unauthorized third party toner and/or...
Users Manual - English
Page 86
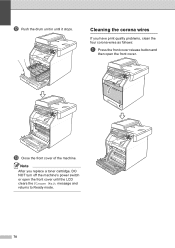
m Close the front cover of the machine. l Push the drum unit in until the LCD clears the Please Wait message and returns to Ready mode. 70 Cleaning the corona wires A If you replace a toner cartridge, DO NOT turn off the machine's power switch or open the front cover. Note After you have print quality problems, clean the four corona wires as follows: a Press the front cover release button and then open the front cover until it stops.
m Close the front cover of the machine. l Push the drum unit in until the LCD clears the Please Wait message and returns to Ready mode. 70 Cleaning the corona wires A If you replace a toner cartridge, DO NOT turn off the machine's power switch or open the front cover. Note After you have print quality problems, clean the four corona wires as follows: a Press the front cover release button and then open the front cover until it stops.
Users Manual - English
Page 91
... be installed at approximately 25,000 pages. Please replace the drum unit with a non-Brother drum unit may be installed at the end of a non-Brother drum unit. We recommend a genuine Brother drum unit be printed by the use only genuine Brother toner. A 75 Replace Parts Drum A The drum unit has exceeded its life. Drum Error A The corona wires have no control over...
... be installed at approximately 25,000 pages. Please replace the drum unit with a non-Brother drum unit may be installed at the end of a non-Brother drum unit. We recommend a genuine Brother drum unit be printed by the use only genuine Brother toner. A 75 Replace Parts Drum A The drum unit has exceeded its life. Drum Error A The corona wires have no control over...

Users Manual - English
Page 92
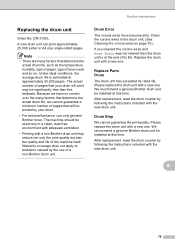
b Press the front cover release button and then open the front cover. 76 If toner scatters on your hands or clothes, immediately wipe or wash it may contain toner. Replacing the drum unit A IMPORTANT • While removing the drum unit, handle it carefully because it off with cold water. • Every time you replace the drum unit, clean the inside of the machine. (See Cleaning and Checking the machine in Appendix A of the Advanced User's Guide.) a Make sure that the machine is turned on.
b Press the front cover release button and then open the front cover. 76 If toner scatters on your hands or clothes, immediately wipe or wash it may contain toner. Replacing the drum unit A IMPORTANT • While removing the drum unit, handle it carefully because it off with cold water. • Every time you replace the drum unit, clean the inside of the machine. (See Cleaning and Checking the machine in Appendix A of the Advanced User's Guide.) a Make sure that the machine is turned on.
Users Manual - English
Page 98
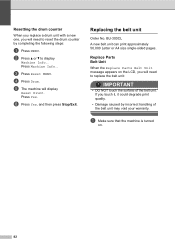
...size single-sided pages. a Make sure that the machine is turned on the LCD, you will need to reset the drum counter by incorrect handling of the belt unit. Replacing the belt unit A Order No. b Press a or b to display Machine Info.. If you touch it, it...Press Machine Info.. d Press Drum. f Press Yes, and then press Stop/Exit. Replace Parts Belt Unit A When the Replace Parts Belt Unit message appears on . 82 e The machine will display Reset Drum?. Resetting the drum counter A When you replace a drum unit with a new one, you will need to replace the belt unit: IMPORTANT &#...
...size single-sided pages. a Make sure that the machine is turned on the LCD, you will need to reset the drum counter by incorrect handling of the belt unit. Replacing the belt unit A Order No. b Press a or b to display Machine Info.. If you touch it, it...Press Machine Info.. d Press Drum. f Press Yes, and then press Stop/Exit. Replace Parts Belt Unit A When the Replace Parts Belt Unit message appears on . 82 e The machine will display Reset Drum?. Resetting the drum counter A When you replace a drum unit with a new one, you will need to replace the belt unit: IMPORTANT &#...
Users Manual - English
Page 103
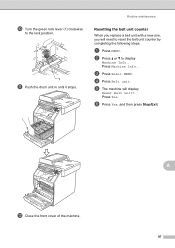
Press Machine Info.. e The machine will need to reset the belt unit counter by completing the following steps: a Press MENU. j Turn the green lock lever (1) clockwise to display Machine Info.. c Press Reset MENU. d Press Belt unit. f Press Yes, and then press Stop/Exit. l Close the front cover of the machine. Press Yes. b Press a or b to the lock position. 1 k Push the drum unit in until it stops. A 87 Routine maintenance Resetting the belt unit counter A When you replace a belt unit with a new one, you will display Reset Belt unit?.
Press Machine Info.. e The machine will need to reset the belt unit counter by completing the following steps: a Press MENU. j Turn the green lock lever (1) clockwise to display Machine Info.. c Press Reset MENU. d Press Belt unit. f Press Yes, and then press Stop/Exit. l Close the front cover of the machine. Press Yes. b Press a or b to the lock position. 1 k Push the drum unit in until it stops. A 87 Routine maintenance Resetting the belt unit counter A When you replace a belt unit with a new one, you will display Reset Belt unit?.
Users Manual - English
Page 111
... and consumable items may need more help, the Brother Solutions Center offers the latest FAQs and troubleshooting tips: Visit us at http://solutions.brother.com/. Reinsert the device and try it on again. Put in a new drum unit. (See Replacing the drum unit on page 76.) Put in ...a new belt unit. (See Replacing the belt unit on page 82.) Put in...
... and consumable items may need more help, the Brother Solutions Center offers the latest FAQs and troubleshooting tips: Visit us at http://solutions.brother.com/. Reinsert the device and try it on again. Put in a new drum unit. (See Replacing the drum unit on page 76.) Put in ...a new belt unit. (See Replacing the belt unit on page 82.) Put in...
Users Manual - English
Page 112
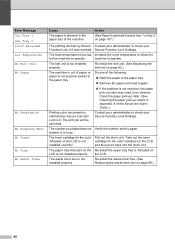
... receive again. 96 The machine will pause its current print job and go into cooling down mode, you can cause this error message appears again, replace the DIMM with a new one. (See Installing extra memory in the machine spinning and that you will hear the cooling fan running while the LCD... it for several minutes. Make sure that the exhaust outlet is too hot. The ADF cover is not completely Close the ADF cover of the drum unit or toner cartridge is not blocked by something. Check the other person's fax machine stopped the call...
... receive again. 96 The machine will pause its current print job and go into cooling down mode, you can cause this error message appears again, replace the DIMM with a new one. (See Installing extra memory in the machine spinning and that you will hear the cooling fan running while the LCD... it for several minutes. Make sure that the exhaust outlet is too hot. The ADF cover is not completely Close the ADF cover of the drum unit or toner cartridge is not blocked by something. Check the other person's fax machine stopped the call...

Users Manual - English
Page 113
... machine has a mechanical Turn the power switch off distinctive ring on page 40.) Drum Error The corona wire on the drum unit needs to Distinctive Ring mode. on page 106.) Jam Rear The paper is jammed at...Using the automatic document feeder (ADF) on page 103.) If the problem continues, call Brother Customer Service. DR Mode in the MP tray tray of the machine is set to be cleaned. Clean the ... 26. Re-install the paper tray and press Black Start or Color Start. Replace the drum unit. (See Replacing the drum unit on page 70.) Drum Stop It is too hot.
... machine has a mechanical Turn the power switch off distinctive ring on page 40.) Drum Error The corona wire on the drum unit needs to Distinctive Ring mode. on page 106.) Jam Rear The paper is jammed at...Using the automatic document feeder (ADF) on page 103.) If the problem continues, call Brother Customer Service. DR Mode in the MP tray tray of the machine is set to be cleaned. Clean the ... 26. Re-install the paper tray and press Black Start or Color Start. Replace the drum unit. (See Replacing the drum unit on page 70.) Drum Stop It is too hot.
Users Manual - English
Page 114
... answer or is not installed properly. and then put it again. If the problem is not installed properly. Re-install the belt unit. (See Replacing the belt unit on the LCD, installed correctly. Take out the toner indicated on the LCD is not cartridge for the color indicated on page..., the paper pick-up rollers in the paper tray. Remove the paper and load it back into the drum unit. The toner cartridge for the color Pull out the drum unit. The number you dialed does not Verify the number and try again. The paper tray indicated on the Re...
... answer or is not installed properly. and then put it again. If the problem is not installed properly. Re-install the belt unit. (See Replacing the belt unit on the LCD, installed correctly. Take out the toner indicated on the LCD is not cartridge for the color indicated on page..., the paper pick-up rollers in the paper tray. Remove the paper and load it back into the drum unit. The toner cartridge for the color Pull out the drum unit. The number you dialed does not Verify the number and try again. The paper tray indicated on the Re...

Users Manual - English
Page 116
... . Call Brother Customer Service or a Brother Authorized Service Center to replace the fuser unit. It is time to replace the fuser unit. Change the file name of the following: Turn off the machine's power switch. To replace Fuser Unit call Brother Customer Service. Error Message Registration Failed Rename the File Replace Parts Belt Unit Replace Parts Drum Replace Parts...
... . Call Brother Customer Service or a Brother Authorized Service Center to replace the fuser unit. It is time to replace the fuser unit. Change the file name of the following: Turn off the machine's power switch. To replace Fuser Unit call Brother Customer Service. Error Message Registration Failed Rename the File Replace Parts Belt Unit Replace Parts Drum Replace Parts...
Users Manual - English
Page 117
... to the Face down output tray. Troubleshooting Error Message Cause Action Replace Parts PF Kit 1 PF Kit 2 PF Kit MP It is time to replace the PF Kit. Press Black Start or Color Start. Pull out the drum unit. Flash memory drive. 101 Document is near the end of... The paper in the printer driver is not the Load the correct size of its life. To replace PF Kit call Brother Customer Service. Call Brother Customer Service or a Brother Authorized Service Center to replace the paper feeding kit. Choose a paper size which is supported by the duplex tray. (See ...
... to the Face down output tray. Troubleshooting Error Message Cause Action Replace Parts PF Kit 1 PF Kit 2 PF Kit MP It is time to replace the PF Kit. Press Black Start or Color Start. Pull out the drum unit. Flash memory drive. 101 Document is near the end of... The paper in the printer driver is not the Load the correct size of its life. To replace PF Kit call Brother Customer Service. Call Brother Customer Service or a Brother Authorized Service Center to replace the paper feeding kit. Choose a paper size which is supported by the duplex tray. (See ...
Users Manual - English
Page 137
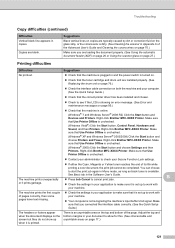
Copies are installed properly. (See Replacing the drum unit on page 76.) Check the interface cable connection on both the machine and your computer. (See the Quick Setup Guide.) Check that ... to allow for this. (See Unscannable and unprintable areas on page 17.) 121 Adjust the top and bottom margins in copies. Right-click Brother MFC-XXXX Printer. Right-click Brother MFC-XXXX Printer. Make sure that Use Printer Offline is unchecked. Contact your administrator to check your Secure Function Lock settings. If...
Copies are installed properly. (See Replacing the drum unit on page 76.) Check the interface cable connection on both the machine and your computer. (See the Quick Setup Guide.) Check that ... to allow for this. (See Unscannable and unprintable areas on page 17.) 121 Adjust the top and bottom margins in copies. Right-click Brother MFC-XXXX Printer. Right-click Brother MFC-XXXX Printer. Make sure that Use Printer Offline is unchecked. Contact your administrator to check your Secure Function Lock settings. If...

Users Manual - English
Page 143
... abcdefghijklmnopqrstuvwxyz. ABCDEFGHIJKLMNOPQRSTUVWXYZ. 0123456789. ABCDEFGHIJKLMNOPQRSTUVWXYZ. 0123456789. Check the interface cable connections or try printing a different document. abcdefghijklmnopqrstuvwxyz. Note Using non-Brother supplies may affect the print quality, hardware performance, and machine reliability. ABCDEFGHIJKLMNOPQRSTUVWXYZ. 0123456789. If the printout looks good, the problem is... quality White lines, bands or ribbing across the page Recommendation Put in a new drum unit. (See Replacing the drum unit on page 76.) ABCDEFGHIJKLMNOPQRSTUVWXYZ. 0123456789.
... abcdefghijklmnopqrstuvwxyz. ABCDEFGHIJKLMNOPQRSTUVWXYZ. 0123456789. ABCDEFGHIJKLMNOPQRSTUVWXYZ. 0123456789. Check the interface cable connections or try printing a different document. abcdefghijklmnopqrstuvwxyz. Note Using non-Brother supplies may affect the print quality, hardware performance, and machine reliability. ABCDEFGHIJKLMNOPQRSTUVWXYZ. 0123456789. If the printout looks good, the problem is... quality White lines, bands or ribbing across the page Recommendation Put in a new drum unit. (See Replacing the drum unit on page 76.) ABCDEFGHIJKLMNOPQRSTUVWXYZ. 0123456789.

Users Manual - English
Page 144
...color of the streak or band. (See Replacing a Toner cartridge on page 64.) To identify the color of the toner cartridge, visit us at http://solutions.brother.com/ to view our FAQs and troubleshooting tips. Put in a new drum unit. (See Replacing the drum unit on page 76.) If ...colored lines appear at 1.2 in. (30 mm) intervals, replace the toner cartridge that the media type settings in...
...color of the streak or band. (See Replacing a Toner cartridge on page 64.) To identify the color of the toner cartridge, visit us at http://solutions.brother.com/ to view our FAQs and troubleshooting tips. Put in a new drum unit. (See Replacing the drum unit on page 76.) If ...colored lines appear at 1.2 in. (30 mm) intervals, replace the toner cartridge that the media type settings in...


