Users Manual - English
Page 9
... consumables (including, without limitation, toner cartridges and drum units, OPC belts, fixing units, print heads, paper feed rollers, transfer rolls, cleaning...of non-Brother toner is not covered under this Laser Printer/MFC/Fax machine shall be serviced on applicable models) during shipping and will repair or replace (at Brother Authorized ...the date of purchase, Brother International Corporation (Canada) Ltd. ("Brother"), or its Authorized Service Centres, Distributors, Dealers, Agents or employees, shall create another warranty or modify this Laser Printer/MFC/Fax machine free of...
... consumables (including, without limitation, toner cartridges and drum units, OPC belts, fixing units, print heads, paper feed rollers, transfer rolls, cleaning...of non-Brother toner is not covered under this Laser Printer/MFC/Fax machine shall be serviced on applicable models) during shipping and will repair or replace (at Brother Authorized ...the date of purchase, Brother International Corporation (Canada) Ltd. ("Brother"), or its Authorized Service Centres, Distributors, Dealers, Agents or employees, shall create another warranty or modify this Laser Printer/MFC/Fax machine free of...
Users Manual - English
Page 13
... 58 Scanning using the scan key 58 Scanning using a scanner driver 59 A Routine maintenance 60 Replacing the consumable items 60 Replacing a Toner cartridge 64 Cleaning the corona wires 70 Replacing the drum unit 75 Replacing the belt unit 82 Replacing the waste toner box 88 B Troubleshooting 95 Error and maintenance messages 95 Transferring your faxes or...
... 58 Scanning using the scan key 58 Scanning using a scanner driver 59 A Routine maintenance 60 Replacing the consumable items 60 Replacing a Toner cartridge 64 Cleaning the corona wires 70 Replacing the drum unit 75 Replacing the belt unit 82 Replacing the waste toner box 88 B Troubleshooting 95 Error and maintenance messages 95 Transferring your faxes or...
Users Manual - English
Page 76
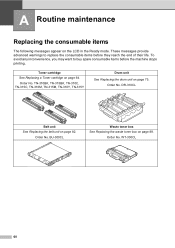
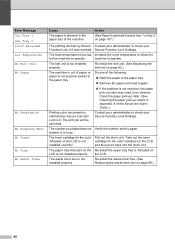
Order No. Toner cartridge See Replacing a Toner cartridge on page 82. DR-310CL Belt unit See Replacing the belt unit on page 64. BU-300CL Waste toner box See Replacing the waste toner box on page 75. These messages provide advanced warnings to buy spare consumable items before they reach the end of their life. ...
Order No. Toner cartridge See Replacing a Toner cartridge on page 82. DR-310CL Belt unit See Replacing the belt unit on page 64. BU-300CL Waste toner box See Replacing the waste toner box on page 75. These messages provide advanced warnings to buy spare consumable items before they reach the end of their life. ...

Users Manual - English
Page 78
.... Call your dealer or Brother Customer Service for a replacement paper feeding kit 1. LCD messages Consumable item to replace Replace Toner X Toner cartridge X = Black, Cyan, Magenta, Yellow Approximate life 2,500 pages 1 2 5 6,000 pages 1 2 6 1,500 pages 1 2 5 Replace Parts Drum unit Drum 3,500 pages 1 2 6 25,000 pages 1 3 4 Drum Stop Replace Parts Belt Unit Replace WT Box Belt unit Waste toner box 50...
.... Call your dealer or Brother Customer Service for a replacement paper feeding kit 1. LCD messages Consumable item to replace Replace Toner X Toner cartridge X = Black, Cyan, Magenta, Yellow Approximate life 2,500 pages 1 2 5 6,000 pages 1 2 6 1,500 pages 1 2 5 Replace Parts Drum unit Drum 3,500 pages 1 2 6 25,000 pages 1 3 4 Drum Stop Replace Parts Belt Unit Replace WT Box Belt unit Waste toner box 50...
Users Manual - English
Page 98
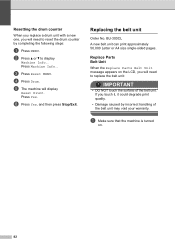
...000 Letter or A4 size single-sided pages. e The machine will need to reset the drum counter by incorrect handling of the belt unit. Replace Parts Belt Unit A When the Replace Parts Belt Unit message appears on . 82 Press Machine Info.. a Make sure that the machine is turned on the LCD, you will ...d Press Drum. f Press Yes, and then press Stop/Exit. c Press Reset MENU. b Press a or b to display Machine Info.. Resetting the drum counter A When you replace a drum unit with a new one, you will need to replace the belt unit: IMPORTANT • DO NOT touch the surface of the...
...000 Letter or A4 size single-sided pages. e The machine will need to reset the drum counter by incorrect handling of the belt unit. Replace Parts Belt Unit A When the Replace Parts Belt Unit message appears on . 82 Press Machine Info.. a Make sure that the machine is turned on the LCD, you will ...d Press Drum. f Press Yes, and then press Stop/Exit. c Press Reset MENU. b Press a or b to display Machine Info.. Resetting the drum counter A When you replace a drum unit with a new one, you will need to replace the belt unit: IMPORTANT • DO NOT touch the surface of the...
Users Manual - English
Page 103
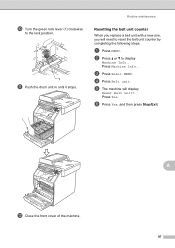
b Press a or b to reset the belt unit counter by completing the following steps: a Press MENU. Press Machine Info.. Press Yes. l Close the front cover of the machine. d Press Belt unit. f Press Yes, and then press Stop/Exit. A 87 e The machine will need to display Machine Info.. c Press Reset MENU. Routine maintenance Resetting the belt unit counter A When you replace a belt unit with a new one, you will display Reset Belt unit?. j Turn the green lock lever (1) clockwise to the lock position. 1 k Push the drum unit in until it stops.
b Press a or b to reset the belt unit counter by completing the following steps: a Press MENU. Press Machine Info.. Press Yes. l Close the front cover of the machine. d Press Belt unit. f Press Yes, and then press Stop/Exit. A 87 e The machine will need to display Machine Info.. c Press Reset MENU. Routine maintenance Resetting the belt unit counter A When you replace a belt unit with a new one, you will display Reset Belt unit?. j Turn the green lock lever (1) clockwise to the lock position. 1 k Push the drum unit in until it stops.
Users Manual - English
Page 107
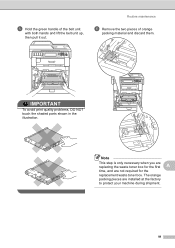
Routine maintenance f Remove the two pieces of the belt unit with both hands and lift the belt unit up, then pull it out. e Hold the green handle of orange packing material and discard them. IMPORTANT To avoid print quality problems, DO NOT touch the shaded parts shown in the illustration. Note This step is only necessary when you are replacing the waste toner box for the first A time, and are installed at the factory to protect your machine during shipment. 91 The orange packing pieces are not required for the replacement waste toner box.
Routine maintenance f Remove the two pieces of the belt unit with both hands and lift the belt unit up, then pull it out. e Hold the green handle of orange packing material and discard them. IMPORTANT To avoid print quality problems, DO NOT touch the shaded parts shown in the illustration. Note This step is only necessary when you are replacing the waste toner box for the first A time, and are installed at the factory to protect your machine during shipment. 91 The orange packing pieces are not required for the replacement waste toner box.
Users Manual - English
Page 111
...check your telephone line. 95 If the problem continues, call Brother Customer Service. Reinsert the device and try it on again. Put in a new drum unit. (See Replacing the drum unit on page 76.) Put in a new belt unit. (See Replacing the belt unit on page 82.) Put in a new... waste toner box. (See Replacing the waste toner box on the LCD, then re-install the toner ...
...check your telephone line. 95 If the problem continues, call Brother Customer Service. Reinsert the device and try it on again. Put in a new drum unit. (See Replacing the drum unit on page 76.) Put in a new belt unit. (See Replacing the belt unit on page 82.) Put in a new... waste toner box. (See Replacing the waste toner box on the LCD, then re-install the toner ...
Users Manual - English
Page 114
... roller. (See Cleaning the paper pick-up roller may need to operate. The waste toner box is not installed properly. Re-install the belt unit. (See Replacing the belt unit on the LCD is indicated on page 88.) 98 Contact your administrator to operate. Re-install the waste toner box. (See... Replacing the waste toner box on LCD is not installed properly. the LCD. The toner cartridge for the color Pull out the drum unit....
... roller. (See Cleaning the paper pick-up roller may need to operate. The waste toner box is not installed properly. Re-install the belt unit. (See Replacing the belt unit on the LCD is indicated on page 88.) 98 Contact your administrator to operate. Re-install the waste toner box. (See... Replacing the waste toner box on LCD is not installed properly. the LCD. The toner cartridge for the color Pull out the drum unit....

Users Manual - English
Page 116
... drum unit. Do one of the file on page 82.) If the problem continues, call Brother Customer Service at: 1-877-BROTHER (1-877-276-8437) (in USA) 1-877-BROTHER (in a new belt unit. (See Replacing the belt unit on the USB Flash memory drive or the file you are trying to save . Change the file name...
... drum unit. Do one of the file on page 82.) If the problem continues, call Brother Customer Service at: 1-877-BROTHER (1-877-276-8437) (in USA) 1-877-BROTHER (in a new belt unit. (See Replacing the belt unit on the USB Flash memory drive or the file you are trying to save . Change the file name...

Users Manual - English
Page 146
... in the printer driver and by using the control panel of the Advanced User's Guide). Put in a new drum unit. (See Replacing the drum unit on page 76.) Put in Appendix A of the Advanced User's Guide) or perform the manual color registration using the... control panel (see Auto Registration in a new belt unit. (See Replacing the belt unit on a monitor are different. ABCDEFGHIJKLMNOPQRSTUVWXYZ. 0123456789. The machine may not be able to reproduce the colors on your printouts is not ...
... in the printer driver and by using the control panel of the Advanced User's Guide). Put in a new drum unit. (See Replacing the drum unit on page 76.) Put in Appendix A of the Advanced User's Guide) or perform the manual color registration using the... control panel (see Auto Registration in a new belt unit. (See Replacing the belt unit on a monitor are different. ABCDEFGHIJKLMNOPQRSTUVWXYZ. 0123456789. The machine may not be able to reproduce the colors on your printouts is not ...
Users Manual - English
Page 205
... 183 Distinctive ring 38 choosing ring pattern 39 setting ring pattern 39 turning off 40 Document how to load 26, 27 Drum unit cleaning 70 replacing 75 E Envelopes 14, 21, 22, 24 Equalization 126 Error messages on LCD 95 Comm. ControlCenter4 (for Macintosh) See Software User's Guide. E Index...26 Answering machine (TAD) connecting 41 Apple Macintosh See Software User's Guide. Automatic fax receive 34 easy receive 36 fax redial 45 B Belt unit replacing 82 Brother accessories and supplies ii Brother numbers i Customer Service i FAQs (frequently asked questions) .........
... 183 Distinctive ring 38 choosing ring pattern 39 setting ring pattern 39 turning off 40 Document how to load 26, 27 Drum unit cleaning 70 replacing 75 E Envelopes 14, 21, 22, 24 Equalization 126 Error messages on LCD 95 Comm. ControlCenter4 (for Macintosh) See Software User's Guide. E Index...26 Answering machine (TAD) connecting 41 Apple Macintosh See Software User's Guide. Automatic fax receive 34 easy receive 36 fax redial 45 B Belt unit replacing 82 Brother accessories and supplies ii Brother numbers i Customer Service i FAQs (frequently asked questions) .........

Users Manual - English
Page 206
... Software User's Guide. O One touch changing 51 setting up 48 using 44 Out of Memory message 99 190 printing See Network User's Guide. Maintenance, routine replacing belt unit 82 drum unit 75 toner cartridge 64 waste toner box 88 Manual dialing 44 receive 32, 34 Menu Table 137 Mode, entering copy 53...
... Software User's Guide. O One touch changing 51 setting up 48 using 44 Out of Memory message 99 190 printing See Network User's Guide. Maintenance, routine replacing belt unit 82 drum unit 75 toner cartridge 64 waste toner box 88 Manual dialing 44 receive 32, 34 Menu Table 137 Mode, entering copy 53...

Users Manual - English
Page 207
Personalized Ring 38 Presto! Serial number how to -Guides. PageManager application. Replacing belt unit 82 drum unit 75 toner cartridge 64 waste toner box 88 Reports Transmission Verification 30 Resolution copy 179 fax (standard, fine, superfine, photo 178 ...
Personalized Ring 38 Presto! Serial number how to -Guides. PageManager application. Replacing belt unit 82 drum unit 75 toner cartridge 64 waste toner box 88 Reports Transmission Verification 30 Resolution copy 179 fax (standard, fine, superfine, photo 178 ...

Advanced Users Manual - English
Page 88
...life. Replace the laser unit. LCD message Replace Parts Fuser Unit Replace Parts Laser Unit Replace Parts PF Kit 1 Replace Parts PF Kit 2 Replace Parts PF Kit MP Description Replace the fuser unit. Replace the ...the Drum, Belt unit, Fuser, Laser, PF Kit MP, PF Kit 1 and PF Kit 2. The parts listed below will not be replaced regularly to display Machine Info.. Replace the paper...reset the part counter when you installed a new part. Replacing periodic maintenance parts A The periodic maintenance parts will be replaced after printing approximately 50,000 pages 1 for PF Kit MP...
...life. Replace the laser unit. LCD message Replace Parts Fuser Unit Replace Parts Laser Unit Replace Parts PF Kit 1 Replace Parts PF Kit 2 Replace Parts PF Kit MP Description Replace the fuser unit. Replace the ...the Drum, Belt unit, Fuser, Laser, PF Kit MP, PF Kit 1 and PF Kit 2. The parts listed below will not be replaced regularly to display Machine Info.. Replace the paper...reset the part counter when you installed a new part. Replacing periodic maintenance parts A The periodic maintenance parts will be replaced after printing approximately 50,000 pages 1 for PF Kit MP...

Advanced Users Manual - English
Page 92
e Hold the green handle of orange packing material and discard them. The orange packing pieces are replacing the waste toner box for the first time, and is not required for the replacement waste toner box. f Remove the two pieces of the belt unit with both hands and lift the belt unit up, then pull it out. Note This step is only necessary when you are installed at the factory to protect your machine during shipment from the factory. 86
e Hold the green handle of orange packing material and discard them. The orange packing pieces are replacing the waste toner box for the first time, and is not required for the replacement waste toner box. f Remove the two pieces of the belt unit with both hands and lift the belt unit up, then pull it out. Note This step is only necessary when you are installed at the factory to protect your machine during shipment from the factory. 86

Quick Setup Guide - English
Page 37
Toner cartridges Standard Toner: TN-310 (C/M/Y/BK) High Capacity Toner: TN-315 (C/M/Y/BK) Drum unit DR-310CL Belt Unit BU-300CL Waste Toner Box WT-300CL 37 When the tray is installed, the machine expands total input capacity up to 500 sheets of ... local Brother reseller. Lower Tray Unit LT-300CL The lower paper tray unit can increase the memory by the LCD on the control panel. Consumables When the time comes to 800 sheets. Options and Consumables Options The machine has the following optional accessories. SO-DIMM Memory You can hold up to replace...
Toner cartridges Standard Toner: TN-310 (C/M/Y/BK) High Capacity Toner: TN-315 (C/M/Y/BK) Drum unit DR-310CL Belt Unit BU-300CL Waste Toner Box WT-300CL 37 When the tray is installed, the machine expands total input capacity up to 500 sheets of ... local Brother reseller. Lower Tray Unit LT-300CL The lower paper tray unit can increase the memory by the LCD on the control panel. Consumables When the time comes to 800 sheets. Options and Consumables Options The machine has the following optional accessories. SO-DIMM Memory You can hold up to replace...


