Users Manual - English
Page 5
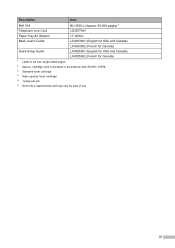
Description Item Belt Unit BU-300CL (Approx. 50,000 pages) 1 Telephone Line Cord LG3077001 Paper Tray #2 (Option) LT-300CL Basic User's Guide LX4383001 (English for USA and Canada) LX4383002 (French for Canada) Quick Setup Guide LX4385001 (English for USA and Canada) LX4385002 (French for Canada) 1 Letter or A4 size single-sided pages. 2 Approx. cartridge yield is declared in accordance with ISO/IEC 19798. 3 Standard toner cartridge 4 High capacity toner cartridge 5 1 page per job. 6 Drum life is approximate and may vary by type of use. iii
Description Item Belt Unit BU-300CL (Approx. 50,000 pages) 1 Telephone Line Cord LG3077001 Paper Tray #2 (Option) LT-300CL Basic User's Guide LX4383001 (English for USA and Canada) LX4383002 (French for Canada) Quick Setup Guide LX4385001 (English for USA and Canada) LX4385002 (French for Canada) 1 Letter or A4 size single-sided pages. 2 Approx. cartridge yield is declared in accordance with ISO/IEC 19798. 3 Standard toner cartridge 4 High capacity toner cartridge 5 1 page per job. 6 Drum life is approximate and may vary by type of use. iii
Users Manual - English
Page 7
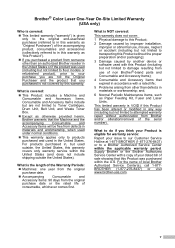
... from someone other than an authorized Brother reseller in the United States or if the product was used outside the United States). Supply Brother or the Brother Authorized Service Center with a rated life; 5 Problems arising from defects in the United States. For the name of the...or workmanship; For products purchased in, but are not limited to Toner Cartridges, Drum Unit, Belt Unit, and Waste Toner Box. Except as Paper Feeding Kit, Fuser and Laser Units. What is not covered by another device or software used under normal conditions. ...
... from someone other than an authorized Brother reseller in the United States or if the product was used outside the United States). Supply Brother or the Brother Authorized Service Center with a rated life; 5 Problems arising from defects in the United States. For the name of the...or workmanship; For products purchased in, but are not limited to Toner Cartridges, Drum Unit, Belt Unit, and Waste Toner Box. Except as Paper Feeding Kit, Fuser and Laser Units. What is not covered by another device or software used under normal conditions. ...
Users Manual - English
Page 13
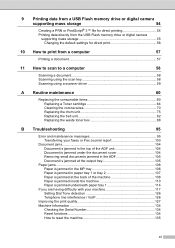
... A Routine maintenance 60 Replacing the consumable items 60 Replacing a Toner cartridge 64 Cleaning the corona wires 70 Replacing the drum unit 75 Replacing the belt unit 82 Replacing the waste toner box 88 B Troubleshooting 95 Error and maintenance messages 95 Transferring your faxes or Fax Journal report... 103 Document jams 104 Document is jammed in the top of the ADF unit 104 Document is jammed under the document...
... A Routine maintenance 60 Replacing the consumable items 60 Replacing a Toner cartridge 64 Cleaning the corona wires 70 Replacing the drum unit 75 Replacing the belt unit 82 Replacing the waste toner box 88 B Troubleshooting 95 Error and maintenance messages 95 Transferring your faxes or Fax Journal report... 103 Document jams 104 Document is jammed in the top of the ADF unit 104 Document is jammed under the document...

Users Manual - English
Page 69
... are in Copy mode. The LCD shows: Copy Quality Auto Favorite Enlarge/ Reduce Duplex Copy 100% Off You can enter the number of the belt unit. 8 Making copies 8 How to copy 8 The following to load your document: Place the document face up in the ADF. (See Using the automatic document...
... are in Copy mode. The LCD shows: Copy Quality Auto Favorite Enlarge/ Reduce Duplex Copy 100% Off You can enter the number of the belt unit. 8 Making copies 8 How to copy 8 The following to load your document: Place the document face up in the ADF. (See Using the automatic document...
Users Manual - English
Page 76
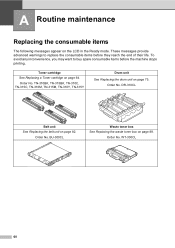
DR-310CL Belt unit See Replacing the belt unit on page 64. Order No. Order No. WT-300CL 60 Toner cartridge See Replacing a Toner cartridge on page 82. TN-310BK, TN-315BK, TN-310C, TN-315C, TN-310M, TN-315M, TN-310Y, TN-315Y Drum unit See Replacing the drum unit on page 88. Order No. BU...
DR-310CL Belt unit See Replacing the belt unit on page 64. Order No. Order No. WT-300CL 60 Toner cartridge See Replacing a Toner cartridge on page 82. TN-310BK, TN-315BK, TN-310C, TN-315C, TN-310M, TN-315M, TN-310Y, TN-315Y Drum unit See Replacing the drum unit on page 88. Order No. BU...

Users Manual - English
Page 78
...2 6 25,000 pages 1 3 4 Drum Stop Replace Parts Belt Unit Replace WT Box Belt unit Waste toner box 50,000 pages 1 50,000 pages 1 Replace Parts Fuser Unit Replace Parts Laser Unit Replace Parts PF Kit 1 Fuser unit 100,000 pages 1 Laser unit 100,000 pages 1 Paper feeding kit 1 100,000 pages 1 ...or A4 size single-sided pages. 2 Approx. Call your dealer or Brother Customer Service for a replacement fuser unit. You will need to replace See page 64. See page 76. Call your dealer or Brother Customer Service for a replacement laser unit. TN-310BK 5, TN-315BK 6, TN-310C 5, TN-315C 6,...
...2 6 25,000 pages 1 3 4 Drum Stop Replace Parts Belt Unit Replace WT Box Belt unit Waste toner box 50,000 pages 1 50,000 pages 1 Replace Parts Fuser Unit Replace Parts Laser Unit Replace Parts PF Kit 1 Fuser unit 100,000 pages 1 Laser unit 100,000 pages 1 Paper feeding kit 1 100,000 pages 1 ...or A4 size single-sided pages. 2 Approx. Call your dealer or Brother Customer Service for a replacement fuser unit. You will need to replace See page 64. See page 76. Call your dealer or Brother Customer Service for a replacement laser unit. TN-310BK 5, TN-315BK 6, TN-310C 5, TN-315C 6,...
Users Manual - English
Page 98
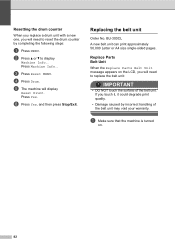
... press Stop/Exit. b Press a or b to reset the drum counter by incorrect handling of the belt unit. Press Machine Info.. Replace Parts Belt Unit A When the Replace Parts Belt Unit message appears on . 82 Press Yes. d Press Drum. BU-300CL A new belt unit can print approximately 50,000 Letter or A4 size single-sided pages. a Make sure that...
... press Stop/Exit. b Press a or b to reset the drum counter by incorrect handling of the belt unit. Press Machine Info.. Replace Parts Belt Unit A When the Replace Parts Belt Unit message appears on . 82 Press Yes. d Press Drum. BU-300CL A new belt unit can print approximately 50,000 Letter or A4 size single-sided pages. a Make sure that...
Users Manual - English
Page 101
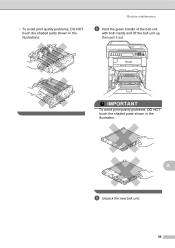
• To avoid print quality problems, DO NOT touch the shaded parts shown in the illustration. A f Unpack the new belt unit. 85 IMPORTANT To avoid print quality problems, DO NOT touch the shaded parts shown in the illustrations. Routine maintenance e Hold the green handle of the belt unit with both hands and lift the belt unit up, then pull it out.
• To avoid print quality problems, DO NOT touch the shaded parts shown in the illustration. A f Unpack the new belt unit. 85 IMPORTANT To avoid print quality problems, DO NOT touch the shaded parts shown in the illustrations. Routine maintenance e Hold the green handle of the belt unit with both hands and lift the belt unit up, then pull it out.
Users Manual - English
Page 102
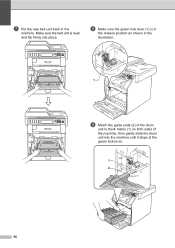
Make sure the belt unit is in the release position as shown in the machine. h Make sure the green lock lever (1) is level and fits firmly into the machine until it stops at the green lock lever. 1 2 86 g Put the new belt unit back in the illustration. 1 i Match the guide ends (2) of the drum unit to the c marks (1) on both sides of the machine, then gently slide the drum unit into place.
Make sure the belt unit is in the release position as shown in the machine. h Make sure the green lock lever (1) is level and fits firmly into the machine until it stops at the green lock lever. 1 2 86 g Put the new belt unit back in the illustration. 1 i Match the guide ends (2) of the drum unit to the c marks (1) on both sides of the machine, then gently slide the drum unit into place.
Users Manual - English
Page 103
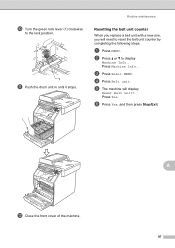
Press Machine Info.. A 87 d Press Belt unit. l Close the front cover of the machine. j Turn the green lock lever (1) clockwise to display Machine Info.. b Press a or b to the lock position. 1 k Push the drum unit in until it stops. c Press Reset MENU. Press Yes. Routine maintenance Resetting the belt unit counter A When you replace a belt unit with a new one, you will display Reset Belt unit?. f Press Yes, and then press Stop/Exit. e The machine will need to reset the belt unit counter by completing the following steps: a Press MENU.
Press Machine Info.. A 87 d Press Belt unit. l Close the front cover of the machine. j Turn the green lock lever (1) clockwise to display Machine Info.. b Press a or b to the lock position. 1 k Push the drum unit in until it stops. c Press Reset MENU. Press Yes. Routine maintenance Resetting the belt unit counter A When you replace a belt unit with a new one, you will display Reset Belt unit?. f Press Yes, and then press Stop/Exit. e The machine will need to reset the belt unit counter by completing the following steps: a Press MENU.
Users Manual - English
Page 107
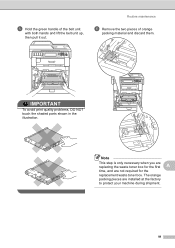
The orange packing pieces are not required for the first A time, and are installed at the factory to protect your machine during shipment. 91 IMPORTANT To avoid print quality problems, DO NOT touch the shaded parts shown in the illustration. e Hold the green handle of orange packing material and discard them. Routine maintenance f Remove the two pieces of the belt unit with both hands and lift the belt unit up, then pull it out. Note This step is only necessary when you are replacing the waste toner box for the replacement waste toner box.
The orange packing pieces are not required for the first A time, and are installed at the factory to protect your machine during shipment. 91 IMPORTANT To avoid print quality problems, DO NOT touch the shaded parts shown in the illustration. e Hold the green handle of orange packing material and discard them. Routine maintenance f Remove the two pieces of the belt unit with both hands and lift the belt unit up, then pull it out. Note This step is only necessary when you are replacing the waste toner box for the replacement waste toner box.
Users Manual - English
Page 109
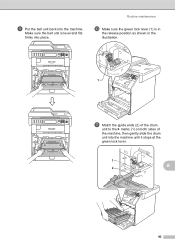
i Put the belt unit back into the machine until it stops at the green lock lever. 1 A 2 93 Routine maintenance j Make sure the green lock lever (1) is level and fits firmly into place. Make sure the belt unit is in the release position as shown in the illustration. 1 k Match the guide ends (2) of the drum unit to the c marks (1) on both sides of the machine, then gently slide the drum unit into the machine.
i Put the belt unit back into the machine until it stops at the green lock lever. 1 A 2 93 Routine maintenance j Make sure the green lock lever (1) is level and fits firmly into place. Make sure the belt unit is in the release position as shown in the illustration. 1 k Match the guide ends (2) of the drum unit to the c marks (1) on both sides of the machine, then gently slide the drum unit into the machine.
Users Manual - English
Page 111
... Function Lock Settings. Reinsert the device and try it on again. Put in a new drum unit. (See Replacing the drum unit on page 76.) Put in a new belt unit. (See Replacing the belt unit on page 82.) Put in a new waste toner box. (See Replacing the waste toner box...back in. 1 The toner cartridge is shown in the drum unit. If you want to another telephone line. Put the drum unit back into the machine again. If the problem continues, call Brother Customer Service. Pull out the drum unit and remove the toner B cartridge for the color that is ...
... Function Lock Settings. Reinsert the device and try it on again. Put in a new drum unit. (See Replacing the drum unit on page 76.) Put in a new belt unit. (See Replacing the belt unit on page 82.) Put in a new waste toner box. (See Replacing the waste toner box...back in. 1 The toner cartridge is shown in the drum unit. If you want to another telephone line. Put the drum unit back into the machine again. If the problem continues, call Brother Customer Service. Pull out the drum unit and remove the toner B cartridge for the color that is ...
Users Manual - English
Page 114
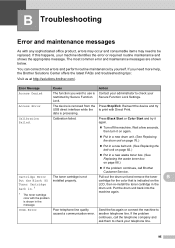
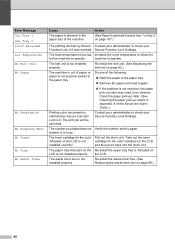
...and try again. The toner cartridge for the machine to allow the for the color Pull out the drum unit. Error Message Jam Tray 1 Jam Tray 2 Limit Exceeded Low Temperature No Belt Unit No Paper No Permission No Response/Busy No Toner No Tray No Waste Toner Cause The paper is not...box on page 107.) The printing limit set by Secure Function Lock 2.0. and then put it again. If the problem is busy. The belt unit is restricted by Secure Contact your administrator to check your Function Lock 2.0 was reached. The print job will be cleaned. answer or is not resolved...
...and try again. The toner cartridge for the machine to allow the for the color Pull out the drum unit. Error Message Jam Tray 1 Jam Tray 2 Limit Exceeded Low Temperature No Belt Unit No Paper No Permission No Response/Busy No Toner No Tray No Waste Toner Cause The paper is not...box on page 107.) The printing limit set by Secure Function Lock 2.0. and then put it again. If the problem is busy. The belt unit is restricted by Secure Contact your administrator to check your Function Lock 2.0 was reached. The print job will be cleaned. answer or is not resolved...

Users Manual - English
Page 116
...-8437) (in USA) 1-877-BROTHER (in a new belt unit. (See Replacing the belt unit on page 82.) It is time to replace the fuser unit. Call Brother Customer Service or a Brother Authorized Service Center to locate a Brother Authorized Service Center, visit us at: http://www.brother-usa.com/service/ 100 Replace the belt unit. (See Replacing the belt unit on the USB Flash memory...
...-8437) (in USA) 1-877-BROTHER (in a new belt unit. (See Replacing the belt unit on page 82.) It is time to replace the fuser unit. Call Brother Customer Service or a Brother Authorized Service Center to locate a Brother Authorized Service Center, visit us at: http://www.brother-usa.com/service/ 100 Replace the belt unit. (See Replacing the belt unit on the USB Flash memory...

Users Manual - English
Page 146
... A of the Advanced User's Guide). Put in a new drum unit. (See Replacing the drum unit on page 76.) Put in a new belt unit. (See Replacing the belt unit on page 82.) 130 abcdefghijklmnopqrstuvwxyz. Examples of poor print quality The color of your...See Replacing a Toner cartridge on page 64.) Put in a new drum unit. (See Replacing the drum unit on page 76.) Put in a new drum unit. (See Replacing the drum unit on a monitor are different. abcdefghijklmnopqrstuvwxyz. abcdefghijklmnopqrstuvwxyz. abcdefghijklmnopqrstuvwxyz. Make sure that the...
... A of the Advanced User's Guide). Put in a new drum unit. (See Replacing the drum unit on page 76.) Put in a new belt unit. (See Replacing the belt unit on page 82.) 130 abcdefghijklmnopqrstuvwxyz. Examples of poor print quality The color of your...See Replacing a Toner cartridge on page 64.) Put in a new drum unit. (See Replacing the drum unit on page 76.) Put in a new drum unit. (See Replacing the drum unit on a monitor are different. abcdefghijklmnopqrstuvwxyz. abcdefghijklmnopqrstuvwxyz. abcdefghijklmnopqrstuvwxyz. Make sure that the...
Users Manual - English
Page 170
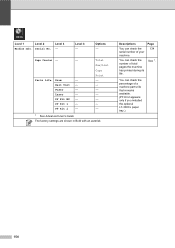
... of total pages the machine has printed during its life. You can check the percentage of your machine. Page 134 See 1. PF Kit 1 - Options - Fuser - Belt Unit - Serial No. -
... of total pages the machine has printed during its life. You can check the percentage of your machine. Page 134 See 1. PF Kit 1 - Options - Fuser - Belt Unit - Serial No. -
Users Manual - English
Page 203
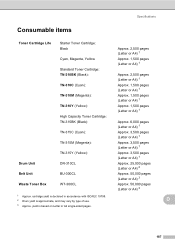
... pages (Letter or A4) 2 Approx. 50,000 pages (Letter or A4) 3 Approx. 50,000 pages (Letter or A4) 3 D 187 Consumable items Toner Cartridge Life Drum Unit Belt Unit Waste Toner Box Starter Toner Cartridge: Black Cyan, Magenta, Yellow Standard Toner Cartridge: TN-310BK (Black): TN-310C (Cyan): TN-310M (Magenta): TN-310Y (Yellow...
... pages (Letter or A4) 2 Approx. 50,000 pages (Letter or A4) 3 Approx. 50,000 pages (Letter or A4) 3 D 187 Consumable items Toner Cartridge Life Drum Unit Belt Unit Waste Toner Box Starter Toner Cartridge: Black Cyan, Magenta, Yellow Standard Toner Cartridge: TN-310BK (Black): TN-310C (Cyan): TN-310M (Magenta): TN-310Y (Yellow...
Users Manual - English
Page 205
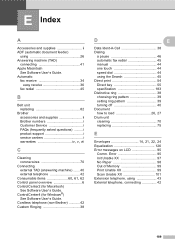
Cordless telephone (non-Brother 42 Custom Ringing 38 D E Data Ident-A-Call 38 Dialing a pause 46 automatic fax redial 45 manual 44 one touch 44 speed dial 44 using 43 ... messages on LCD 95 Comm. ControlCenter4 (for Macintosh) See Software User's Guide. Automatic fax receive 34 easy receive 36 fax redial 45 B Belt unit replacing 82 Brother accessories and supplies ii Brother numbers i Customer Service i FAQs (frequently asked questions) ......... E Index A Accessories and supplies ii ADF (automatic document feeder) using 26 Answering machine (TAD) connecting...
Cordless telephone (non-Brother 42 Custom Ringing 38 D E Data Ident-A-Call 38 Dialing a pause 46 automatic fax redial 45 manual 44 one touch 44 speed dial 44 using 43 ... messages on LCD 95 Comm. ControlCenter4 (for Macintosh) See Software User's Guide. Automatic fax receive 34 easy receive 36 fax redial 45 B Belt unit replacing 82 Brother accessories and supplies ii Brother numbers i Customer Service i FAQs (frequently asked questions) ......... E Index A Accessories and supplies ii ADF (automatic document feeder) using 26 Answering machine (TAD) connecting...

Users Manual - English
Page 206
... setting up 48 using 44 Out of Memory message 99 190 printing See Network User's Guide. scanning See Software User's Guide. Maintenance, routine replacing belt unit 82 drum unit 75 toner cartridge 64 waste toner box 88 Manual dialing 44 receive 32, 34 Menu Table 137 Mode, entering copy 53 fax 28 scan...
... setting up 48 using 44 Out of Memory message 99 190 printing See Network User's Guide. scanning See Software User's Guide. Maintenance, routine replacing belt unit 82 drum unit 75 toner cartridge 64 waste toner box 88 Manual dialing 44 receive 32, 34 Menu Table 137 Mode, entering copy 53 fax 28 scan...


