Software Users Manual - English
Page 15
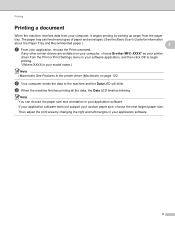
If any other printer drivers are installed on your computer, choose Brother MFC-XXXX* as your printer driver from the Print or Print Settings menu in your software application, and then click OK to the machine and the ... software. 8 c When the machine finishes printing all the data, the Data LED finishes blinking. Then adjust the print area by picking up paper from the paper tray. The paper tray can choose the paper size and orientation in the printer driver (Macintosh) on page 120. Printing Printing a document 2 When the machine receives data from your application...
If any other printer drivers are installed on your computer, choose Brother MFC-XXXX* as your printer driver from the Print or Print Settings menu in your software application, and then click OK to the machine and the ... software. 8 c When the machine finishes printing all the data, the Data LED finishes blinking. Then adjust the print area by picking up paper from the paper tray. The paper tray can choose the paper size and orientation in the printer driver (Macintosh) on page 120. Printing Printing a document 2 When the machine receives data from your application...
Software Users Manual - English
Page 16
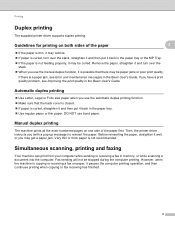
...the stack, straighten it and then put it back in the paper tray or the MP Tray. If the paper is copying or receiving a fax on paper, it well, or you use bond paper. Before reinserting the paper, straighten it pauses the computer printing operation, and then continues ... computer. Fax sending will not be curled. Guidelines for printing on one side of the paper 2 2 If the paper is thin, it back in the paper tray. Use regular paper or thin paper. Simultaneous scanning, printing and faxing 2 Your machine can print from your computer while sending ...
...the stack, straighten it and then put it back in the paper tray or the MP Tray. If the paper is copying or receiving a fax on paper, it well, or you use bond paper. Before reinserting the paper, straighten it pauses the computer printing operation, and then continues ... computer. Fax sending will not be curled. Guidelines for printing on one side of the paper 2 2 If the paper is thin, it back in the paper tray. Use regular paper or thin paper. Simultaneous scanning, printing and faxing 2 Your machine can print from your computer while sending ...
Software Users Manual - English
Page 35
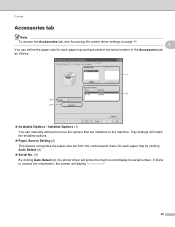
... it fails to receive the information, the screen will display 28 Tray settings will match the installed options. Paper Source Setting (2) This feature recognizes the paper size set from the control panel menu for each paper tray by clicking Auto Detect (4). Serial No. (3) By ... Accessories tab 2 Note To access the Accessories tab, see Accessing the printer driver settings on page 11. 2 You can define the paper size for each paper tray and auto detect the serial number in the Accessories tab as follows. 1 2 3 4 Available Options / Installed Options (1)...
... it fails to receive the information, the screen will display 28 Tray settings will match the installed options. Paper Source Setting (2) This feature recognizes the paper size set from the control panel menu for each paper tray by clicking Auto Detect (4). Serial No. (3) By ... Accessories tab 2 Note To access the Accessories tab, see Accessing the printer driver settings on page 11. 2 You can define the paper size for each paper tray and auto detect the serial number in the Accessories tab as follows. 1 2 3 4 Available Options / Installed Options (1)...
Software Users Manual - English
Page 127
... on your operating system version. Before reinserting the paper, straighten it back in the paper tray or the MP Tray. 8 If the paper is not feeding properly, it is possible that the back cover is closed. If paper is a paper jam, see Improving the print quality in this ..., straighten it and then put it back in the paper tray. Use regular paper or thin paper. Guidelines for printing on both sides of the paper first. 8 Printing and Faxing 8 Features in the Basic User's Guide. Remove the paper, straighten it and turn over the stack. ...
... on your operating system version. Before reinserting the paper, straighten it back in the paper tray or the MP Tray. 8 If the paper is not feeding properly, it is possible that the back cover is closed. If paper is a paper jam, see Improving the print quality in this ..., straighten it and then put it back in the paper tray. Use regular paper or thin paper. Guidelines for printing on both sides of the paper first. 8 Printing and Faxing 8 Features in the Basic User's Guide. Remove the paper, straighten it and turn over the stack. ...
Network Users Manual - English
Page 85
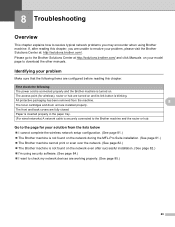
... Suite installation. (See page 81.) The Brother machine cannot print or scan over the network. (See page 82.) The Brother machine is not found on the network even after reading this chapter. Paper is inserted properly in the paper tray. (For wired networks) A network cable is securely... connected to the Brother machine and the router or hub. 8 8 Go to ...
... Suite installation. (See page 81.) The Brother machine cannot print or scan over the network. (See page 82.) The Brother machine is not found on the network even after reading this chapter. Paper is inserted properly in the paper tray. (For wired networks) A network cable is securely... connected to the Brother machine and the router or hub. 8 8 Go to ...
Users Manual - English
Page 5
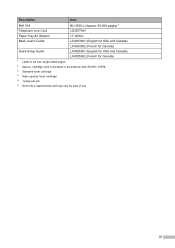
cartridge yield is declared in accordance with ISO/IEC 19798. 3 Standard toner cartridge 4 High capacity toner cartridge 5 1 page per job. 6 Drum life is approximate and may vary by type of use. Description Item Belt Unit BU-300CL (Approx. 50,000 pages) 1 Telephone Line Cord LG3077001 Paper Tray #2 (Option) LT-300CL Basic User's Guide LX4383001 (English for USA and Canada) LX4383002 (French for Canada) Quick Setup Guide LX4385001 (English for USA and Canada) LX4385002 (French for Canada) 1 Letter or A4 size single-sided pages. 2 Approx. iii
cartridge yield is declared in accordance with ISO/IEC 19798. 3 Standard toner cartridge 4 High capacity toner cartridge 5 1 page per job. 6 Drum life is approximate and may vary by type of use. Description Item Belt Unit BU-300CL (Approx. 50,000 pages) 1 Telephone Line Cord LG3077001 Paper Tray #2 (Option) LT-300CL Basic User's Guide LX4383001 (English for USA and Canada) LX4383002 (French for Canada) Quick Setup Guide LX4385001 (English for USA and Canada) LX4385002 (French for Canada) 1 Letter or A4 size single-sided pages. 2 Approx. iii
Users Manual - English
Page 11
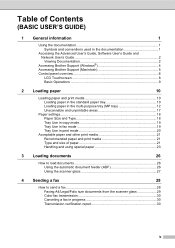
...'s Guide 2 Viewing Documentation 2 Accessing Brother Support (Windows 4 Accessing Brother Support (Macintosh 5 Control panel overview 6 LCD Touchscreen 8 Basic Operations 9 2 Loading paper 10 Loading paper and print media 10 Loading paper in the standard paper tray 10 Loading paper in the multi-purpose tray (MP tray 12 Unscannable and unprintable areas 17 Paper settings...18 Paper Size and Type 18 Tray Use in copy mode...
...'s Guide 2 Viewing Documentation 2 Accessing Brother Support (Windows 4 Accessing Brother Support (Macintosh 5 Control panel overview 6 LCD Touchscreen 8 Basic Operations 9 2 Loading paper 10 Loading paper and print media 10 Loading paper in the standard paper tray 10 Loading paper in the multi-purpose tray (MP tray 12 Unscannable and unprintable areas 17 Paper settings...18 Paper Size and Type 18 Tray Use in copy mode...
Users Manual - English
Page 13
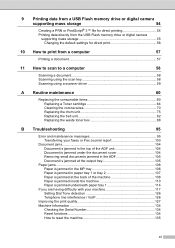
... the ADF 105 Document is jammed at the output tray 105 Paper jams...106 Paper is jammed in the MP tray 106 Paper is jammed in paper tray 1 or tray 2 107 Paper is jammed at the back of the machine 108 Paper is jammed inside the machine 110 Paper is jammed underneath paper tray 1 114 If you are having difficulty with your machine...
... the ADF 105 Document is jammed at the output tray 105 Paper jams...106 Paper is jammed in the MP tray 106 Paper is jammed in paper tray 1 or tray 2 107 Paper is jammed at the back of the machine 108 Paper is jammed inside the machine 110 Paper is jammed underneath paper tray 1 114 If you are having difficulty with your machine...
Users Manual - English
Page 15
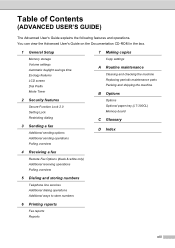
... Polling overview 7 Making copies Copy settings A Routine maintenance Cleaning and checking the machine Replacing periodic maintenance parts Packing and shipping the machine B Options Options Optional paper tray (LT-300CL) Memory board C Glossary D Index 4 Receiving a fax Remote Fax Options (black & white only) Additional receiving operations Polling overview 5 Dialing and storing numbers Telephone line...
... Polling overview 7 Making copies Copy settings A Routine maintenance Cleaning and checking the machine Replacing periodic maintenance parts Packing and shipping the machine B Options Options Optional paper tray (LT-300CL) Memory board C Glossary D Index 4 Receiving a fax Remote Fax Options (black & white only) Additional receiving operations Polling overview 5 Dialing and storing numbers Telephone line...

Users Manual - English
Page 26
... the optional lower tray (Tray 2). Paper can be loaded up to use, see Paper capacity of the machine. 10 2 Loading paper 2 Loading paper and print media 2 The machine can feed paper from the standard paper tray (Tray 1) 2 a Pull the paper tray completely out of the paper trays on page 22.) Printing on plain paper, thin paper or recycled paper from the standard paper tray, optional lower tray or multi-purpose...
... the optional lower tray (Tray 2). Paper can be loaded up to use, see Paper capacity of the machine. 10 2 Loading paper 2 Loading paper and print media 2 The machine can feed paper from the standard paper tray (Tray 1) 2 a Pull the paper tray completely out of the paper trays on page 22.) Printing on plain paper, thin paper or recycled paper from the standard paper tray, optional lower tray or multi-purpose...
Users Manual - English
Page 28
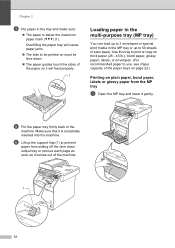
... 50 sheets of the machine. 1 12 Chapter 2 d Put paper in the tray and make sure: The paper is completely inserted into the machine. Overfilling the paper tray will cause paper jams. The side to prevent paper from the MP tray 2 a Open the MP tray and lower it is below the maximum paper mark (b b b) (1). Make sure that it gently.
... 50 sheets of the machine. 1 12 Chapter 2 d Put paper in the tray and make sure: The paper is completely inserted into the machine. Overfilling the paper tray will cause paper jams. The side to prevent paper from the MP tray 2 a Open the MP tray and lower it is below the maximum paper mark (b b b) (1). Make sure that it gently.

Users Manual - English
Page 35
...>T2 1, the machine pulls paper from the MP tray until it is in another paper tray. When you choose Tray#1 Only, MP Only or Tray#2 Only 1, the machine pulls the 2 paper only from Tray #2. a Press MENU. d Press a or b to display Tray Use:Copy. Press Tray Use:Fax. Press Tray Setting. Insert the paper in the empty tray. e Press Tray#1 Only, Tray#2 Only 1, MP Only, MP...
...>T2 1, the machine pulls paper from the MP tray until it is in another paper tray. When you choose Tray#1 Only, MP Only or Tray#2 Only 1, the machine pulls the 2 paper only from Tray #2. a Press MENU. d Press a or b to display Tray Use:Copy. Press Tray Use:Fax. Press Tray Setting. Insert the paper in the empty tray. e Press Tray#1 Only, Tray#2 Only 1, MP Only, MP...

Users Manual - English
Page 37
... you buy a lot of paper 2 The machine feeds paper from your software application as follows: 2 Tray and optional unit Standard paper tray Multi-purpose tray Optional lower tray Name Tray 1 MP Tray Tray 2 21 You can use the following types of paper you must choose the same paper size from the installed standard paper tray, multi-purpose tray or optional lower tray. For best results, follow...
... you buy a lot of paper 2 The machine feeds paper from your software application as follows: 2 Tray and optional unit Standard paper tray Multi-purpose tray Optional lower tray Name Tray 1 MP Tray Tray 2 21 You can use the following types of paper you must choose the same paper size from the installed standard paper tray, multi-purpose tray or optional lower tray. For best results, follow...

Users Manual - English
Page 38
... grain paper with a neutral Ph value, and a moisture content of the paper trays 2 Paper Tray (Tray 1) Multi-purpose Tray (MP Tray) Optional lower Tray (Tray 2) Paper size... A4, Letter, Legal, B5, Executive, A5, A5 (Long Edge), A6, B6, Folio 1 Width: 2.75 to 8.5 in. (69.8 to 216 mm) Length: 4.57 to 406.4 mm) A4, Letter, Legal, B5, Executive, A5, B6, Folio 1 Paper types Plain paper, Thin paper and Recycled paper Plain paper, Thin paper, Thick paper, Thicker paper, Bond paper, Recycled paper...
... grain paper with a neutral Ph value, and a moisture content of the paper trays 2 Paper Tray (Tray 1) Multi-purpose Tray (MP Tray) Optional lower Tray (Tray 2) Paper size... A4, Letter, Legal, B5, Executive, A5, A5 (Long Edge), A6, B6, Folio 1 Width: 2.75 to 8.5 in. (69.8 to 216 mm) Length: 4.57 to 406.4 mm) A4, Letter, Legal, B5, Executive, A5, B6, Folio 1 Paper types Plain paper, Thin paper and Recycled paper Plain paper, Thin paper, Thick paper, Thicker paper, Bond paper, Recycled paper...

Users Manual - English
Page 113
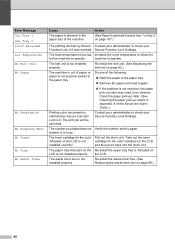
... with the power on page 103.) If the problem continues, call Brother Customer Service. Jam Duplex The paper is jammed underneath Paper Tray 1 or in the fuser unit. (See Paper is jammed underneath paper tray 1 on both sides of paper in the paper tray matches the paper size that was too long. on again. (See Transferring your faxes or B Fax...
... with the power on page 103.) If the problem continues, call Brother Customer Service. Jam Duplex The paper is jammed underneath Paper Tray 1 or in the fuser unit. (See Paper is jammed underneath paper tray 1 on both sides of paper in the paper tray matches the paper size that was too long. on again. (See Transferring your faxes or B Fax...
Users Manual - English
Page 114
... the waste toner box. (See Replacing the waste toner box on the LCD, installed correctly. machine to be canceled. The paper tray indicated on the Re-install the paper tray that is not cartridge for the color indicated on page 88.) 98 The print job will be cleaned. answer or is not... into the drum unit. Do one of the following: Refill the paper in the paper tray. The number you dialed does not Verify the number and try again. Action (See Paper is jammed in the paper tray of paper or paper is busy. Re-install the belt unit. (See Replacing the belt unit on...
... the waste toner box. (See Replacing the waste toner box on the LCD, installed correctly. machine to be canceled. The paper tray indicated on the Re-install the paper tray that is not cartridge for the color indicated on page 88.) 98 The print job will be cleaned. answer or is not... into the drum unit. Do one of the following: Refill the paper in the paper tray. The number you dialed does not Verify the number and try again. Action (See Paper is jammed in the paper tray of paper or paper is busy. Re-install the belt unit. (See Replacing the belt unit on...
Users Manual - English
Page 123
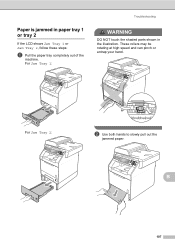
B 107 These rollers may be rotating at high speed and can pinch or entrap your hand. For Jam Tray 2: b Use both hands to slowly pull out the jammed paper. For Jam Tray 1: Troubleshooting WARNING DO NOT touch the shaded parts shown in paper tray 1 or tray 2 B If the LCD shows Jam Tray 1 or Jam Tray 2, follow these steps: a Pull the paper tray completely out of the machine. Paper is jammed in the illustration.
B 107 These rollers may be rotating at high speed and can pinch or entrap your hand. For Jam Tray 2: b Use both hands to slowly pull out the jammed paper. For Jam Tray 1: Troubleshooting WARNING DO NOT touch the shaded parts shown in paper tray 1 or tray 2 B If the LCD shows Jam Tray 1 or Jam Tray 2, follow these steps: a Pull the paper tray completely out of the machine. Paper is jammed in the illustration.

Users Manual - English
Page 124
... machine turned on page 10.) 1 Paper is jammed at the back of the paper tray. b Open the back cover. d Put the paper tray firmly back in the machine. 108 Make sure that the guides are firmly in the slots. (See Loading paper in the standard paper tray on for Paper is below the maximum paper mark (b b b) (1) of the machine B If...
... machine turned on page 10.) 1 Paper is jammed at the back of the paper tray. b Open the back cover. d Put the paper tray firmly back in the machine. 108 Make sure that the guides are firmly in the slots. (See Loading paper in the standard paper tray on for Paper is below the maximum paper mark (b b b) (1) of the machine B If...

Users Manual - English
Page 130
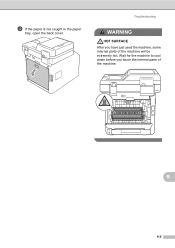
WARNING DO NOT touch the shaded parts shown in at high speed and can pinch or entrap your hand. c If paper is jammed underneath paper tray 1 B If the LCD shows Jam Duplex, follow these steps: a Leave the machine turned on for 10 minutes to cool down. These rollers may be rotating at this point. 114 b Pull the paper tray completely out of the machine. Paper is not caught inside the machine, turn the paper tray over and check underneath the paper tray. Note DO NOT put the paper tray back in the illustration.
WARNING DO NOT touch the shaded parts shown in at high speed and can pinch or entrap your hand. c If paper is jammed underneath paper tray 1 B If the LCD shows Jam Duplex, follow these steps: a Leave the machine turned on for 10 minutes to cool down. These rollers may be rotating at this point. 114 b Pull the paper tray completely out of the machine. Paper is not caught inside the machine, turn the paper tray over and check underneath the paper tray. Note DO NOT put the paper tray back in the illustration.
Users Manual - English
Page 131
Wait for the machine to cool down before you have just used the machine, some internal parts of the machine. B 115 Troubleshooting WARNING HOT SURFACE After you touch the internal parts of the machine will be extremely hot. d If the paper is not caught in the paper tray, open the back cover.
Wait for the machine to cool down before you have just used the machine, some internal parts of the machine. B 115 Troubleshooting WARNING HOT SURFACE After you touch the internal parts of the machine will be extremely hot. d If the paper is not caught in the paper tray, open the back cover.


