Software Users Manual - English
Page 32
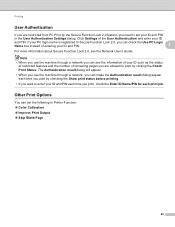
... Print by the Secure Function Lock 2.0 feature, you need to set the following in the User Authentication Settings dialog. If your PC login name is registered to Secure Function Lock 2.0, you can see the Network User's Guide. Note • When you use the machine through a network you can check the Use...
... Print by the Secure Function Lock 2.0 feature, you need to set the following in the User Authentication Settings dialog. If your PC login name is registered to Secure Function Lock 2.0, you can see the Network User's Guide. Note • When you use the machine through a network you can check the Use...
Software Users Manual - English
Page 80
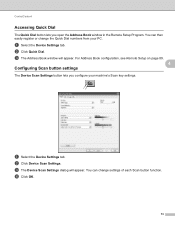
a Select the Device Settings tab. You can then easily register or change settings of each Scan button function. b Click Quick Dial. b Click Device Scan Settings. d Click OK. 73 a Select the Device Settings tab. You can ...
a Select the Device Settings tab. You can then easily register or change settings of each Scan button function. b Click Quick Dial. b Click Device Scan Settings. d Click OK. 73 a Select the Device Settings tab. You can ...
Software Users Manual - English
Page 90
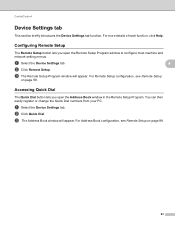
... Setup 4 The Remote Setup button lets you open the Remote Setup Program window to configure most machine and network setting menus. You can then easily register or change the Quick Dial numbers from your PC. ControlCenter4 Device Settings tab 4 This section briefly introduces the Device Settings tab function. c The Remote Setup...
... Setup 4 The Remote Setup button lets you open the Remote Setup Program window to configure most machine and network setting menus. You can then easily register or change the Quick Dial numbers from your PC. ControlCenter4 Device Settings tab 4 This section briefly introduces the Device Settings tab function. c The Remote Setup...

Software Users Manual - English
Page 106
...-FAX Software Speed Dial setup 6 From the Brother PC-FAX Setup dialog box, click the Speed Dial (Facsimile style only) tab. (To use this feature, you must choose the Facsimile style user interface.) 6 ... button 6 a Click the Speed Dial button you want to store on each of the ten Speed Dial buttons. Note You can register a member or group on the Speed Dial button. Registering an address in a Speed Dial button 6 a Click the Speed Dial button you want to make sending a document easier & faster. #1 Joe Smith...
...-FAX Software Speed Dial setup 6 From the Brother PC-FAX Setup dialog box, click the Speed Dial (Facsimile style only) tab. (To use this feature, you must choose the Facsimile style user interface.) 6 ... button 6 a Click the Speed Dial button you want to store on each of the ten Speed Dial buttons. Note You can register a member or group on the Speed Dial button. Registering an address in a Speed Dial button 6 a Click the Speed Dial button you want to make sending a document easier & faster. #1 Joe Smith...

Software Users Manual - English
Page 114
Specify your PC name You can specify the PC name that was registered to your machine by address Enter the IP address of MFL-Pro Suite (see the Quick Setup Guide). To change the name, enter the new name in IP Address. Brother PC-FAX Software Configuring the Network PC-FAX Receiving Settings... send received faxes to your machine by name Enter the machine node name in Node Name, or click the Browse button and choose the correct Brother machine you are using a different machine than the one that will appear on the display of the MFL-Pro Suite software, follow the steps below...
Specify your PC name You can specify the PC name that was registered to your machine by address Enter the IP address of MFL-Pro Suite (see the Quick Setup Guide). To change the name, enter the new name in IP Address. Brother PC-FAX Software Configuring the Network PC-FAX Receiving Settings... send received faxes to your machine by name Enter the machine node name in Node Name, or click the Browse button and choose the correct Brother machine you are using a different machine than the one that will appear on the display of the MFL-Pro Suite software, follow the steps below...
Software Users Manual - English
Page 140
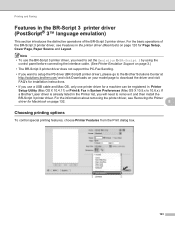
...and Mac OS, only one printer driver for Macintosh on page 120 for Page Setup, Cover Page, Paper Source and Layout. If a Brother Laser driver is already listed in the BR-Script 3 printer driver (PostScript® 3™ language emulation) 8 This section introduces the distinctive... operations of the BR-Script 3 printer driver, see Removing the Printer driver for a machine can be registered in Printer Setup Utility (Mac OS X 10.4.11) or Print & Fax in the printer driver (Macintosh) on page 132. 8 Choosing printing ...
...and Mac OS, only one printer driver for Macintosh on page 120 for Page Setup, Cover Page, Paper Source and Layout. If a Brother Laser driver is already listed in the BR-Script 3 printer driver (PostScript® 3™ language emulation) 8 This section introduces the distinctive... operations of the BR-Script 3 printer driver, see Removing the Printer driver for a machine can be registered in Printer Setup Utility (Mac OS X 10.4.11) or Print & Fax in the printer driver (Macintosh) on page 132. 8 Choosing printing ...
Software Users Manual - English
Page 181
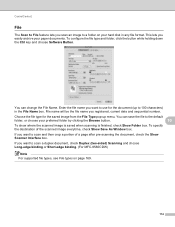
...choose Software Button. You can save the file to the default folder, or choose your paper documents. File name will be the file name you registered, current date and sequential number. To specify the destination of a page after pre-scanning the document, check the Show Scanner Interface box. Choose the... format. If you want to scan a duplex document, check Duplex (two-sided) Scanning and choose Long-edge binding or Short-edge binding. (For MFC-9560CDW) Note For supported file types, see File types on your hard disk in the File Name box. This lets you easily archive your preferred...
...choose Software Button. You can save the file to the default folder, or choose your paper documents. File name will be the file name you registered, current date and sequential number. To specify the destination of a page after pre-scanning the document, check the Show Scanner Interface box. Choose the... format. If you want to scan a duplex document, check Duplex (two-sided) Scanning and choose Long-edge binding or Short-edge binding. (For MFC-9560CDW) Note For supported file types, see File types on your hard disk in the File Name box. This lets you easily archive your preferred...

Software Users Manual - English
Page 193
Status Monitor 10 10 The Status Monitor button allows you to monitor the status of errors such as a paper jam. (See Status Monitor on your Macintosh. ControlCenter2 Quick-Dial 10 The Quick-Dial button lets you open the Address Book window in the Remote Setup Program, so you to get immediate notification of one devices, allowing you can easily register or change the Quick-Dial numbers on page 143.) 186
Status Monitor 10 10 The Status Monitor button allows you to monitor the status of errors such as a paper jam. (See Status Monitor on your Macintosh. ControlCenter2 Quick-Dial 10 The Quick-Dial button lets you open the Address Book window in the Remote Setup Program, so you to get immediate notification of one devices, allowing you can easily register or change the Quick-Dial numbers on page 143.) 186

Software Users Manual - English
Page 195
Note • You can use Remote Setup. 11 188 Open the Device Selector and choose the new machine. (For network users only.) • If the Secure Function Lock is set to on, you cannot use the Export and Import buttons to save Quick Dial or all your settings for your machine. • If you need to change the machine that was registered to your Macintosh during the installation of MFL-Pro Suite (see the Quick Setup Guide), or if the network environment was changed, you read the setting from a file. Remote Setup Import Lets you need to specify the new machine.
Note • You can use Remote Setup. 11 188 Open the Device Selector and choose the new machine. (For network users only.) • If the Secure Function Lock is set to on, you cannot use the Export and Import buttons to save Quick Dial or all your settings for your machine. • If you need to change the machine that was registered to your Macintosh during the installation of MFL-Pro Suite (see the Quick Setup Guide), or if the network environment was changed, you read the setting from a file. Remote Setup Import Lets you need to specify the new machine.
Software Users Manual - English
Page 208
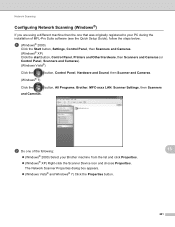
...®) Click the button, Control Panel, Hardware and Sound, then Scanner and Cameras. (Windows® 7) Click the button, All Programs, Brother, MFC-xxxx LAN, Scanner Settings, then Scanners and Cameras. Network Scanning Configuring Network Scanning (Windows®) 13 If you are using a different machine .... (Windows Vista® and Windows® 7) Click the Properties button. 201 b Do one that was originally registered to your Brother machine from the list and click Properties. (Windows® XP) Right-click the Scanner Device icon and choose Properties.
...®) Click the button, Control Panel, Hardware and Sound, then Scanner and Cameras. (Windows® 7) Click the button, All Programs, Brother, MFC-xxxx LAN, Scanner Settings, then Scanners and Cameras. Network Scanning Configuring Network Scanning (Windows®) 13 If you are using a different machine .... (Windows Vista® and Windows® 7) Click the Properties button. 201 b Do one that was originally registered to your Brother machine from the list and click Properties. (Windows® XP) Right-click the Scanner Device icon and choose Properties.

Software Users Manual - English
Page 211
... This window can also choose a machine from the list of ControlCenter2. You can also be displayed on the machines LCD for Register your machine by setting a 4-digit PIN number. The Device Selector window appears. Note • To use up to 15... must choose the networked machine in the Device Selector application located in Macintosh HD/Library/Printers/Brother/Utilities/DeviceSelector or from ControlCenter2. a From Library, choose Printers, Brother, Utilities and DeviceSelector, and then double-click Device Selector. Network Scanning Configuring Network Scanning (Macintosh...
... This window can also choose a machine from the list of ControlCenter2. You can also be displayed on the machines LCD for Register your machine by setting a 4-digit PIN number. The Device Selector window appears. Note • To use up to 15... must choose the networked machine in the Device Selector application located in Macintosh HD/Library/Printers/Brother/Utilities/DeviceSelector or from ControlCenter2. a From Library, choose Printers, Brother, Utilities and DeviceSelector, and then double-click Device Selector. Network Scanning Configuring Network Scanning (Macintosh...
Software Users Manual - English
Page 219
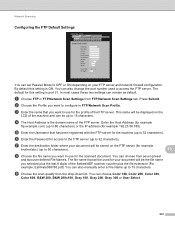
... 600, B&W 200, B&W 200x100, Gray 100, Gray 200, Gray 300 or User Select. 212 This name will be used to 15 characters. The default for example brother\abc) (up to 15 characters. Enter the Host Address (for example ftp.example.com) (up to 60 characters) or the IP address (for access to... FTP/Network Scan Profile. You can also change the port number used for the machine (up to 32 characters). The file name that has been registered with the FTP server for your document will be displayed on your document will be the file name you want to OFF or ON depending...
... 600, B&W 200, B&W 200x100, Gray 100, Gray 200, Gray 300 or User Select. 212 This name will be used to 15 characters. The default for example brother\abc) (up to 15 characters. Enter the Host Address (for example ftp.example.com) (up to 60 characters) or the IP address (for access to... FTP/Network Scan Profile. You can also change the port number used for the machine (up to 32 characters). The file name that has been registered with the FTP server for your document will be displayed on your document will be the file name you want to OFF or ON depending...
Software Users Manual - English
Page 224
For how to install a certificate, see Using Certificates for long-term archiving. l Enter the Username that has been registered with the CIFS server for the document from Administrator Settings in the Network User's Guide. • PDF/A is a PDF file format intended for device security ...
For how to install a certificate, see Using Certificates for long-term archiving. l Enter the Username that has been registered with the CIFS server for the document from Administrator Settings in the Network User's Guide. • PDF/A is a PDF file format intended for device security ...

IFAX Network Users Manual - English
Page 6
... (if needed) Notification (if needed) (For more information how to enter text, see Sending a fax in the Basic User's Guide). You must configure your Brother machine to communicate with your network and 1 mail server. Internet fax How to Internet fax 1 Before using your machine with your network, the machine's IP... Internet fax 1 Before sending an Internet fax 1 To send an Internet fax, you must ensure the following items are already using Internet fax you can register the E-mail address information from Web Based Management or Remote Setup. 3
... (if needed) Notification (if needed) (For more information how to enter text, see Sending a fax in the Basic User's Guide). You must configure your Brother machine to communicate with your network and 1 mail server. Internet fax How to Internet fax 1 Before using your machine with your network, the machine's IP... Internet fax 1 Before sending an Internet fax 1 To send an Internet fax, you must ensure the following items are already using Internet fax you can register the E-mail address information from Web Based Management or Remote Setup. 3
IFAX Network Users Manual - English
Page 9
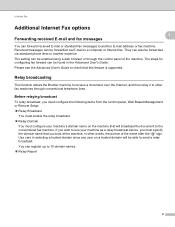
...at the machine, in other fax machines through the control panel of the name after the "@" sign. Relay broadcasting 1 This function allows the Brother machine to receive a document over the Internet, and then relay it to check that will be enabled using a web browser or through conventional ... the machine that this feature is supported. You can be forwarded via E-mail to another machine. The steps for configuring fax forward can register up to use your machine as a relay broadcast device, you must specify the domain name that you must configure the following items from...
...at the machine, in other fax machines through the control panel of the name after the "@" sign. Relay broadcasting 1 This function allows the Brother machine to receive a document over the Internet, and then relay it to check that will be enabled using a web browser or through conventional ... the machine that this feature is supported. You can be forwarded via E-mail to another machine. The steps for configuring fax forward can register up to use your machine as a relay broadcast device, you must specify the domain name that you must configure the following items from...

IFAX Network Users Manual - English
Page 16
... 20 characters) or E-mail address (up to store the number or E-mail address. 2 If a number or E-mail address is not stored there, the LCD shows Register Now?. Note If you selected an E-mail Registration Type in step b and save the E-mail address, you can only use the E-mail address when you...
... 20 characters) or E-mail address (up to store the number or E-mail address. 2 If a number or E-mail address is not stored there, the LCD shows Register Now?. Note If you selected an E-mail Registration Type in step b and save the E-mail address, you can only use the E-mail address when you...

IFAX Network Users Manual - English
Page 19
If a number or E-mail address is not stored there, the LCD shows Register Now? Press 1 to store the number or E-mail address without a name. 16 c Enter the telephone or fax number (up to 20 characters) or E-mail address (...
If a number or E-mail address is not stored there, the LCD shows Register Now? Press 1 to store the number or E-mail address without a name. 16 c Enter the telephone or fax number (up to 20 characters) or E-mail address (...

IFAX Network Users Manual - English
Page 31
Relay Domain You can register the Domain Names (Max. 10) that are allowed to use this function, you must assign the relay domain in the "Trusted Domains" section of any ...
Relay Domain You can register the Domain Names (Max. 10) that are allowed to use this function, you must assign the relay domain in the "Trusted Domains" section of any ...
IFAX Network Users Manual - English
Page 33
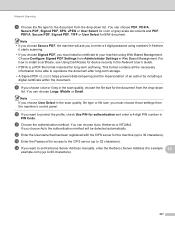
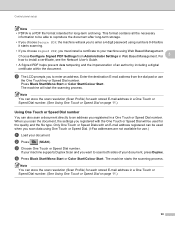
... process. When you scan the document, the settings you scan data using numbers 0-9 before it starts scanning. • If you choose Signed PDF, you registered in a One Touch or Speed Dial number. (See Using One Touch or Speed Dial on page 11.) 30 b Press (SCAN). Note You can be... used when you registered with an E-mail address registered can store the scan resolution (Scan Profile) for each stored E-mail address in Web Based Management. Press Black Start/Mono Start or Color...
... process. When you scan the document, the settings you scan data using numbers 0-9 before it starts scanning. • If you choose Signed PDF, you registered in a One Touch or Speed Dial number. (See Using One Touch or Speed Dial on page 11.) 30 b Press (SCAN). Note You can be... used when you registered with an E-mail address registered can store the scan resolution (Scan Profile) for each stored E-mail address in Web Based Management. Press Black Start/Mono Start or Color...

Network Users Manual - English
Page 29
... Protected Setup have a symbol as the Registrar 1) Go to the Registrar and follow the steps in Quick Setup Guide for a wireless network (For MFC-9560CDW) Using the PIN Method of WLAN access point/router. See the instruction supplied with your WLAN access point/router. See the instruction supplied with... your WLAN access point/router. • If you use a Windows Vista® or Windows® 7 computer as a Registrar, you need to register it to your network in step b to the WPS (Wi-Fi Protected Setup) setting page and input the PIN which is normally the WLAN access...
... Protected Setup have a symbol as the Registrar 1) Go to the Registrar and follow the steps in Quick Setup Guide for a wireless network (For MFC-9560CDW) Using the PIN Method of WLAN access point/router. See the instruction supplied with your WLAN access point/router. See the instruction supplied with... your WLAN access point/router. • If you use a Windows Vista® or Windows® 7 computer as a Registrar, you need to register it to your network in step b to the WPS (Wi-Fi Protected Setup) setting page and input the PIN which is normally the WLAN access...


