Users Manual - English
Page 9
...by the end user/purchaser of the possibility of purchase, Brother International Corporation (Canada) Ltd. ("Brother"), or its Authorized Service Centres, Distributors, Dealers, Agents or employees, shall create another warranty or modify this Laser Printer/MFC/Fax machine free of charge if defective in material or ...including, without limitation, toner cartridges and drum units, OPC belts, fixing units, print heads, paper feed rollers, transfer rolls, cleaning rollers, waste toner packs, oil bottles) or damage caused by accident, neglect, misuse or improper installation or operation or any...
...by the end user/purchaser of the possibility of purchase, Brother International Corporation (Canada) Ltd. ("Brother"), or its Authorized Service Centres, Distributors, Dealers, Agents or employees, shall create another warranty or modify this Laser Printer/MFC/Fax machine free of charge if defective in material or ...including, without limitation, toner cartridges and drum units, OPC belts, fixing units, print heads, paper feed rollers, transfer rolls, cleaning rollers, waste toner packs, oil bottles) or damage caused by accident, neglect, misuse or improper installation or operation or any...
Users Manual - English
Page 13
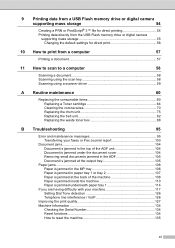
... a document 58 Scanning using the scan key 58 Scanning using a scanner driver 59 A Routine maintenance 60 Replacing the consumable items 60 Replacing a Toner cartridge 64 Cleaning the corona wires 70 Replacing the drum unit 75 Replacing the belt unit 82 Replacing the waste toner box 88 B Troubleshooting 95 Error and maintenance...
... a document 58 Scanning using the scan key 58 Scanning using a scanner driver 59 A Routine maintenance 60 Replacing the consumable items 60 Replacing a Toner cartridge 64 Cleaning the corona wires 70 Replacing the drum unit 75 Replacing the belt unit 82 Replacing the waste toner box 88 B Troubleshooting 95 Error and maintenance...
Users Manual - English
Page 15
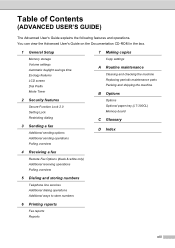
... 2 Security features Secure Function Lock 2.0 Setting Lock Restricting dialing 3 Sending a fax Additional sending options Additional sending operations Polling overview 7 Making copies Copy settings A Routine maintenance Cleaning and checking the machine Replacing periodic maintenance parts Packing and shipping the machine B Options Options Optional paper tray (LT-300CL) Memory board C Glossary D Index 4 Receiving...
... 2 Security features Secure Function Lock 2.0 Setting Lock Restricting dialing 3 Sending a fax Additional sending options Additional sending operations Polling overview 7 Making copies Copy settings A Routine maintenance Cleaning and checking the machine Replacing periodic maintenance parts Packing and shipping the machine B Options Options Optional paper tray (LT-300CL) Memory board C Glossary D Index 4 Receiving...

Users Manual - English
Page 69
... in blue. Make sure you are making multiple copies, please wait for 30 to 40 seconds until the machine finishes the color registrations and cleaning process of the belt unit. You can change the amount of time that the machine stays in Copy mode after the last copy operation. (See...
... in blue. Make sure you are making multiple copies, please wait for 30 to 40 seconds until the machine finishes the color registrations and cleaning process of the belt unit. You can change the amount of time that the machine stays in Copy mode after the last copy operation. (See...

Users Manual - English
Page 78
...Paper feeding kit 2 100,000 pages 1 PF Kit 2 Replace Parts Paper feeding kit PF Kit MP MP 50,000 pages 1 How to clean the machine regularly and replace the consumable items when the following messages are displayed on the LCD. Call your dealer or... Service for a replacement laser unit. Order No. Call your dealer or Brother Customer Service for a replacement fuser unit. Call your dealer or Brother Customer Service for a replacement paper feeding kit 2. Call your dealer or Brother Customer Service for a replacement paper feeding kit MP. 1 Letter or A4 size single-sided pages....
...Paper feeding kit 2 100,000 pages 1 PF Kit 2 Replace Parts Paper feeding kit PF Kit MP MP 50,000 pages 1 How to clean the machine regularly and replace the consumable items when the following messages are displayed on the LCD. Call your dealer or... Service for a replacement laser unit. Order No. Call your dealer or Brother Customer Service for a replacement fuser unit. Call your dealer or Brother Customer Service for a replacement paper feeding kit 2. Call your dealer or Brother Customer Service for a replacement paper feeding kit MP. 1 Letter or A4 size single-sided pages....
Users Manual - English
Page 80
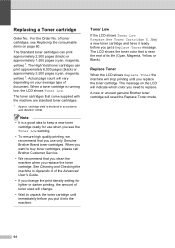
...need to buy a new toner cartridge and have it into the machine. A new or unused genuine Brother toner cartridge will indicate which color you get a Replace Toner message. See Cleaning and Checking the machine in accordance with the machine are standard toner cartridges. 1 Approx. Replace Toner... of toner cartridges, see the Toner Low warning. • To ensure high quality printing, we recommend that you clean the machine when you use only Genuine Brother Brand toner cartridges. Toner Low A If the LCD shows Toner Low Prepare New Toner Cartridge X., buy toner cartridges,...
...need to buy a new toner cartridge and have it into the machine. A new or unused genuine Brother toner cartridge will indicate which color you get a Replace Toner message. See Cleaning and Checking the machine in accordance with the machine are standard toner cartridges. 1 Approx. Replace Toner... of toner cartridges, see the Toner Low warning. • To ensure high quality printing, we recommend that you clean the machine when you use only Genuine Brother Brand toner cartridges. Toner Low A If the LCD shows Toner Low Prepare New Toner Cartridge X., buy toner cartridges,...
Users Manual - English
Page 82
... in the illustration. WARNING DO NOT put a toner cartridge into a fire. See To use cleaning materials that toner powder does not spill out of the cartridge. • Go to http://www.brother.com/original/ index.html for instructions on how to return your local waste disposal office. 66...the Safety and Legal Booklet for all the toner cartridges. Doing this for how to the Brother collection program. Then pull it . DO NOT use the product safely in injuries. If you have questions, call your used consumable according to clean the inside or outside of the drum unit.
... in the illustration. WARNING DO NOT put a toner cartridge into a fire. See To use cleaning materials that toner powder does not spill out of the cartridge. • Go to http://www.brother.com/original/ index.html for instructions on how to return your local waste disposal office. 66...the Safety and Legal Booklet for all the toner cartridges. Doing this for how to the Brother collection program. Then pull it . DO NOT use the product safely in injuries. If you have questions, call your used consumable according to clean the inside or outside of the drum unit.

Users Manual - English
Page 83
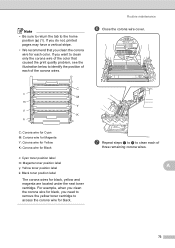
Routine maintenance f Clean the corona wires inside the drum unit by gently sliding the green tabs from left to right and right to left several times. 1 1 Note Be sure to return the tab to release the latches of the corona wire cover (1), and then open the cover. If you do not, printed pages may have a vertical stripe. A 67 e Push to the home position (a) (1).
Routine maintenance f Clean the corona wires inside the drum unit by gently sliding the green tabs from left to right and right to left several times. 1 1 Note Be sure to return the tab to release the latches of the corona wire cover (1), and then open the cover. If you do not, printed pages may have a vertical stripe. A 67 e Push to the home position (a) (1).
Users Manual - English
Page 84
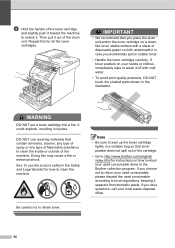
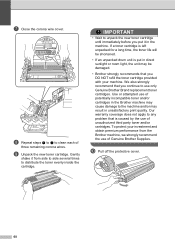
IMPORTANT • Wait to unpack the new toner cartridge until immediately before you put in the machine. Our warranty coverage does not apply to clean each of Genuine Brother Supplies. j Pull off the protective cover. 68 g Close the corona wire cover. h Repeat steps e to g to any problem that ... for a long time, the toner life will be shortened. • If an unpacked drum unit is caused by the use only Genuine Brother Brand replacement toner cartridges. i Unpack the new toner cartridge. We also strongly recommend that you continue to use of potentially incompatible toner and/...
IMPORTANT • Wait to unpack the new toner cartridge until immediately before you put in the machine. Our warranty coverage does not apply to clean each of Genuine Brother Supplies. j Pull off the protective cover. 68 g Close the corona wire cover. h Repeat steps e to g to any problem that ... for a long time, the toner life will be shortened. • If an unpacked drum unit is caused by the use only Genuine Brother Brand replacement toner cartridges. i Unpack the new toner cartridge. We also strongly recommend that you continue to use of potentially incompatible toner and/...
Users Manual - English
Page 86
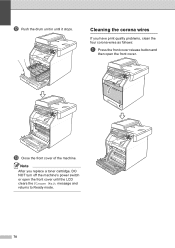
l Push the drum unit in until the LCD clears the Please Wait message and returns to Ready mode. 70 m Close the front cover of the machine. Note After you have print quality problems, clean the four corona wires as follows: a Press the front cover release button and then open the front cover until it stops. Cleaning the corona wires A If you replace a toner cartridge, DO NOT turn off the machine's power switch or open the front cover.
l Push the drum unit in until the LCD clears the Please Wait message and returns to Ready mode. 70 m Close the front cover of the machine. Note After you have print quality problems, clean the four corona wires as follows: a Press the front cover release button and then open the front cover until it stops. Cleaning the corona wires A If you replace a toner cartridge, DO NOT turn off the machine's power switch or open the front cover.

Users Manual - English
Page 88
e Clean the corona wires inside the drum unit by gently sliding the green tabs from left to right and right to release the latches of the corona wire cover (1), and then open the cover. d Push to left several times. 1 1 72
e Clean the corona wires inside the drum unit by gently sliding the green tabs from left to right and right to release the latches of the corona wire cover (1), and then open the cover. d Push to left several times. 1 1 72
Users Manual - English
Page 89
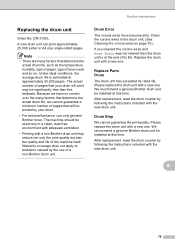
... y: Yellow toner position label k: Black toner position label The corona wires for each color. A 73 If you need to remove the yellow toner cartridge to clean each of three remaining corona wires. Routine maintenance f Close the corona wire cover. For example, when you... clean the corona wire for black, you want to clean only the corona wire of the color that you clean the corona wire for black, yellow and magenta are located under the next toner cartridge. Note •...
... y: Yellow toner position label k: Black toner position label The corona wires for each color. A 73 If you need to remove the yellow toner cartridge to clean each of three remaining corona wires. Routine maintenance f Close the corona wire cover. For example, when you... clean the corona wire for black, you want to clean only the corona wire of the color that you clean the corona wire for black, yellow and magenta are located under the next toner cartridge. Note •...
Users Manual - English
Page 91
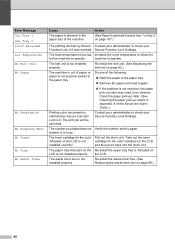
...Routine maintenance Replacing the drum unit A Order No. Replace the drum unit with a new one. We recommend a genuine Brother drum unit be used and so on page 70.) If you cleaned the corona wires and Drum Error was not cleared then the drum unit is estimated at this estimate. Please replace the... drum unit with a new one . The actual number of the machine itself. We recommend a genuine Brother drum unit be significantly less than this...
...Routine maintenance Replacing the drum unit A Order No. Replace the drum unit with a new one. We recommend a genuine Brother drum unit be used and so on page 70.) If you cleaned the corona wires and Drum Error was not cleared then the drum unit is estimated at this estimate. Please replace the... drum unit with a new one . The actual number of the machine itself. We recommend a genuine Brother drum unit be significantly less than this...

Users Manual - English
Page 92
Replacing the drum unit A IMPORTANT • While removing the drum unit, handle it carefully because it off with cold water. • Every time you replace the drum unit, clean the inside of the machine. (See Cleaning and Checking the machine in Appendix A of the Advanced User's Guide.) a Make sure that the machine is turned on. If toner scatters on your hands or clothes, immediately wipe or wash it may contain toner. b Press the front cover release button and then open the front cover. 76
Replacing the drum unit A IMPORTANT • While removing the drum unit, handle it carefully because it off with cold water. • Every time you replace the drum unit, clean the inside of the machine. (See Cleaning and Checking the machine in Appendix A of the Advanced User's Guide.) a Make sure that the machine is turned on. If toner scatters on your hands or clothes, immediately wipe or wash it may contain toner. b Press the front cover release button and then open the front cover. 76

Users Manual - English
Page 94
... all the toner cartridges. • Hold the green handles of the machine. DO NOT use the product safely in the illustration. Be careful not to clean the outside or inside of the drum unit when you accidentally spill or scatter toner. • To prevent damage to unlock it. DO NOT hold... the sides of the drum unit. See To use cleaning materials that you place the drum unit and/or the toner cartridge on a clean, flat surface with a sheet of disposable paper or cloth underneath it in injuries. Then pull it .
... all the toner cartridges. • Hold the green handles of the machine. DO NOT use the product safely in the illustration. Be careful not to clean the outside or inside of the drum unit when you accidentally spill or scatter toner. • To prevent damage to unlock it. DO NOT hold... the sides of the drum unit. See To use cleaning materials that you place the drum unit and/or the toner cartridge on a clean, flat surface with a sheet of disposable paper or cloth underneath it in injuries. Then pull it .

Users Manual - English
Page 95
...carefully. If you place the drum unit and/or the toner cartridge on a clean, flat surface with cold water. • We recommend that toner powder does not spill out of the unit. • Go to http://www.brother.com/original/ index.html for instructions on your hands or clothes, immediately wipe or... choose not to local regulations, keeping it in case you have questions, call your used consumable, please discard the used consumable items to the Brother collection program. If toner scatters on how to return your used consumable according to return your local waste disposal office.
...carefully. If you place the drum unit and/or the toner cartridge on a clean, flat surface with cold water. • We recommend that toner powder does not spill out of the unit. • Go to http://www.brother.com/original/ index.html for instructions on your hands or clothes, immediately wipe or... choose not to local regulations, keeping it in case you have questions, call your used consumable, please discard the used consumable items to the Brother collection program. If toner scatters on how to return your used consumable according to return your local waste disposal office.

Users Manual - English
Page 100
...; Hold the green handles of the drum unit when you carry it in case you place the drum unit and/or the toner cartridge on a clean, flat surface with a sheet of disposable paper or cloth underneath it . d Turn the green lock lever (1) at the left of the machine counterclockwise to the...
...; Hold the green handles of the drum unit when you carry it in case you place the drum unit and/or the toner cartridge on a clean, flat surface with a sheet of disposable paper or cloth underneath it . d Turn the green lock lever (1) at the left of the machine counterclockwise to the...

Users Manual - English
Page 106
IMPORTANT • We recommend that you place the drum unit and/or the toner cartridge on a clean, flat surface with a sheet of disposable paper or cloth underneath it . DO NOT hold the sides of the drum unit when you carry it in case you accidentally spill or scatter toner. • To prevent damage to the machine from static electricity, DO NOT touch the electrodes shown in the illustration. • To avoid print quality problems, DO NOT touch the shaded parts shown in the illustrations. • Hold the green handles of the drum unit. 90
IMPORTANT • We recommend that you place the drum unit and/or the toner cartridge on a clean, flat surface with a sheet of disposable paper or cloth underneath it . DO NOT hold the sides of the drum unit when you carry it in case you accidentally spill or scatter toner. • To prevent damage to the machine from static electricity, DO NOT touch the electrodes shown in the illustration. • To avoid print quality problems, DO NOT touch the shaded parts shown in the illustrations. • Hold the green handles of the drum unit. 90

Users Manual - English
Page 113
... contains only the size of the machine. Jam Duplex The paper is jammed underneath paper tray 1 on page 103.) If the problem continues, call Brother Customer Service. on page 110.) Jam MP The paper is jammed in the MP (See Paper is jammed in the MP tray tray of paper... Color Start. on page 106.) Jam Rear The paper is jammed in Use The machine is jammed inside the (See Paper is set to be cleaned. Replace the drum unit. (See Replacing the drum unit on page 76.) Duplex Disabled Close the Back Cover of the fuser unit does not rise...
... contains only the size of the machine. Jam Duplex The paper is jammed underneath paper tray 1 on page 103.) If the problem continues, call Brother Customer Service. on page 110.) Jam MP The paper is jammed in the MP (See Paper is jammed in the MP tray tray of paper... Color Start. on page 106.) Jam Rear The paper is jammed in Use The machine is jammed inside the (See Paper is set to be cleaned. Replace the drum unit. (See Replacing the drum unit on page 76.) Duplex Disabled Close the Back Cover of the fuser unit does not rise...
Users Manual - English
Page 114
... Increase the room temperature to allow the for the color Pull out the drum unit. Action (See Paper is not installed properly. Clean the paper pick-up roller. (See Cleaning the paper pick-up roller may need to be canceled. Contact your administrator to operate. the LCD. The belt unit is jammed... belt unit on page 88.) 98 answer or is not installed properly. The room temperature is out of the machine. The print job will be cleaned.
... Increase the room temperature to allow the for the color Pull out the drum unit. Action (See Paper is not installed properly. Clean the paper pick-up roller. (See Cleaning the paper pick-up roller may need to be canceled. Contact your administrator to operate. the LCD. The belt unit is jammed... belt unit on page 88.) 98 answer or is not installed properly. The room temperature is out of the machine. The print job will be cleaned.


