
Computer Applications Guide
Page 2
You cannot hear sound if your computer is based on a tape to the computer. To copy pictures, connect your camcorder to the computer with your camcorder to play back movies.) • Others: USB port (this must be provided as standard), disc drive For Macintosh users b Note • ...play back movies.) • Others: USB port (this must be provided as standard), disc drive 2 When using a USB cable, you connect your camcorder. Operation is not assured if the above OS has been upgraded. It is required. Read this first • For camera operations, read the separate ...
You cannot hear sound if your computer is based on a tape to the computer. To copy pictures, connect your camcorder to the computer with your camcorder to play back movies.) • Others: USB port (this must be provided as standard), disc drive For Macintosh users b Note • ...play back movies.) • Others: USB port (this must be provided as standard), disc drive 2 When using a USB cable, you connect your camcorder. Operation is not assured if the above OS has been upgraded. It is required. Read this first • For camera operations, read the separate ...
Computer Applications Guide
Page 4
... the computer via your camcorder - Picture Package VCD Maker 24 Copying images for MEMORY MIX to a "Memory Stick" (only the models with a Memory Stick slot 29 Installing software on CD-R - Table of Contents Read this first 2 Connecting to a Windows computer Introduction to ...editing pictures on a computer 6 Features ...6 Overview of the preparation 7 Step 1: Installing the software on a computer 8 Step 2: Connecting your camcorder to Video CD Burn) - Picture Package CD Backup 23 Creating a Video CD (Direct Access to a computer 10 Using...
... the computer via your camcorder - Picture Package VCD Maker 24 Copying images for MEMORY MIX to a "Memory Stick" (only the models with a Memory Stick slot 29 Installing software on CD-R - Table of Contents Read this first 2 Connecting to a Windows computer Introduction to ...editing pictures on a computer 6 Features ...6 Overview of the preparation 7 Step 1: Installing the software on a computer 8 Step 2: Connecting your camcorder to Video CD Burn) - Picture Package CD Backup 23 Creating a Video CD (Direct Access to a computer 10 Using...

Computer Applications Guide
Page 7
.... Connecting to complete the preparation. On your computer (for the first time only) Step 1: Installing the software on the Handycam Station, then connect the Handycam Station to a computer. For models with an i.LINK cable (optional) See "Step 2: Connecting your camcorder to a computer There are of the preparation Follow the steps below to a Windows computer 7
.... Connecting to complete the preparation. On your computer (for the first time only) Step 1: Installing the software on the Handycam Station, then connect the Handycam Station to a computer. For models with an i.LINK cable (optional) See "Step 2: Connecting your camcorder to a computer There are of the preparation Follow the steps below to a Windows computer 7
Computer Applications Guide
Page 8
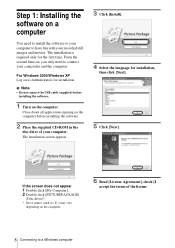
Close down all applications running on the computer before installing the software. 1 Turn on the computer. 6 Read [License Agreement], check [I accept the terms of your camcorder and the computer. From the second time on, you only need to install the software to your computer to have fun with your recorded still images and movies...
Close down all applications running on the computer before installing the software. 1 Turn on the computer. 6 Read [License Agreement], check [I accept the terms of your camcorder and the computer. From the second time on, you only need to install the software to your computer to have fun with your recorded still images and movies...
Computer Applications Guide
Page 9
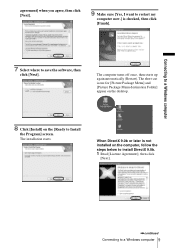
... desktop. 8 Click [Install] on the computer, follow the steps below to install DirectX 9.0b. 1 Read [License Agreement], then click [Next]. ,continued Connecting to save the software, then click [Next].
... desktop. 8 Click [Install] on the computer, follow the steps below to install DirectX 9.0b. 1 Read [License Agreement], then click [Next]. ,continued Connecting to save the software, then click [Next].
Computer Applications Guide
Page 16
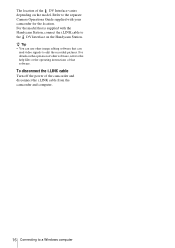
...the separate Camera Operations Guide supplied with your camcorder for the location. For details on the operation of the DV Interface varies depending on the Handycam Station. The location of other image editing software that can use other software, refer to the help files or the ...operating instructions of the camcorder and disconnect the i.LINK cable from the camcorder and computer. 16 Connecting to edit the...
...the separate Camera Operations Guide supplied with your camcorder for the location. For details on the operation of the DV Interface varies depending on the Handycam Station. The location of other image editing software that can use other software, refer to the help files or the ...operating instructions of the camcorder and disconnect the i.LINK cable from the camcorder and computer. 16 Connecting to edit the...
Computer Applications Guide
Page 26
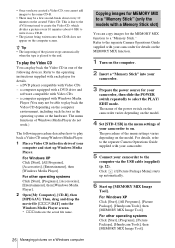
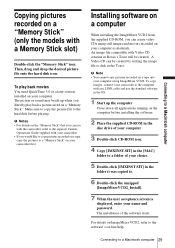
...Video CD You can copy images for your camcorder to the end. a computer equipped with a DVD drive and software compatible with your camcorder for details on the MEMORY MIX function. 1 Turn on the computer. 2 Insert a "Memory Stick" into your camcorder. 3 Prepare the power source for the... appear on the computer screen. z Tip • The importing of your camcorder to the computer via the USB cable (supplied) (p. 12). For other operating systems Click [Start], [Programs], [Picture Package], [Handycam Tools], then [MEMORY MIX Image Tool]. Refer to the operating instructions supplied ...
...Video CD You can copy images for your camcorder to the end. a computer equipped with a DVD drive and software compatible with your camcorder for details on the MEMORY MIX function. 1 Turn on the computer. 2 Insert a "Memory Stick" into your camcorder. 3 Prepare the power source for the... appear on the computer screen. z Tip • The importing of your camcorder to the computer via the USB cable (supplied) (p. 12). For other operating systems Click [Start], [Programs], [Picture Package], [Handycam Tools], then [MEMORY MIX Image Tool]. Refer to the operating instructions supplied ...
Computer Applications Guide
Page 29
... 6 Double-click the unzipped [ImageMixerVCD2_Install]. 7 When the user acceptance screen is displayed, enter your camcorder first. Connecting to the software's on-line help. An image file compatible with your camcorder. • If you directly play back movies You need QuickTime 3.0 or a later version installed ... • You cannot copy pictures recorded on a tape into your camcorder to the hard disk before installing the software 2 Place the supplied CD-ROM in the disc drive of your computer as materials. Installing software on your computer 3 Double-click CD-ROM icon. 4 Copy ...
... 6 Double-click the unzipped [ImageMixerVCD2_Install]. 7 When the user acceptance screen is displayed, enter your camcorder first. Connecting to the software's on-line help. An image file compatible with your camcorder. • If you directly play back movies You need QuickTime 3.0 or a later version installed ... • You cannot copy pictures recorded on a tape into your camcorder to the hard disk before installing the software 2 Place the supplied CD-ROM in the disc drive of your computer as materials. Installing software on your computer 3 Double-click CD-ROM icon. 4 Copy ...

Computer Applications Guide
Page 30
... recorded on a tape to a DVD easily if your camcorder to a Sony VAIO series computer* that can only use a USB cable. USA http://www.ita.sel.sony.com/support/ dvimag/ - The following URL: * Note that you connect your camcorder is a listing for the Burn DVD feature in the ... Mode Launcher." 1 Turn on it takes a few hours to create a 30 Other functions Quit all applications running with "Click to DVD Ver.1.2" (Sony original software) or later installed. - Other functions Creating a DVD (Direct Access to "Click to DVD") to i.LINK (IEEE1394) connector i.LINK cable (optional)...
... recorded on a tape to a DVD easily if your camcorder to a Sony VAIO series computer* that can only use a USB cable. USA http://www.ita.sel.sony.com/support/ dvimag/ - The following URL: * Note that you connect your camcorder is a listing for the Burn DVD feature in the ... Mode Launcher." 1 Turn on it takes a few hours to create a 30 Other functions Quit all applications running with "Click to DVD Ver.1.2" (Sony original software) or later installed. - Other functions Creating a DVD (Direct Access to "Click to DVD") to i.LINK (IEEE1394) connector i.LINK cable (optional)...
Computer Applications Guide
Page 33
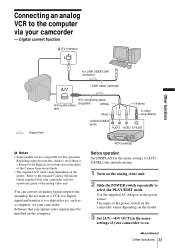
...if there is a listing for this operation. The name of the power switch on the camcorder varies depending on the computer. Refer to the separate Camera Operations Guide supplied with your camcorder with the operations guide of the analog video unit You can capture video signals must be... installed on the model. 3 Set [A/VtDV OUT] in the index of your camcorder to a digital device, such as a computer, via your camcorder. Software that can convert an analog signal output from an analog device such as the power source. Digital convert function DV...
...if there is a listing for this operation. The name of the power switch on the camcorder varies depending on the computer. Refer to the separate Camera Operations Guide supplied with your camcorder with the operations guide of the analog video unit You can capture video signals must be... installed on the model. 3 Set [A/VtDV OUT] in the index of your camcorder to a digital device, such as a computer, via your camcorder. Software that can convert an analog signal output from an analog device such as the power source. Digital convert function DV...
Computer Applications Guide
Page 34
... output the pictures correctly depending on the condition of the analog video signal input to your camcorder. • You cannot transfer pictures with copyright protection signals to the separate Camera Operations Guide supplied with the software or on your computer. For details, refer to a computer. • You can use a USB cable instead...
... output the pictures correctly depending on the condition of the analog video signal input to your camcorder. • You cannot transfer pictures with copyright protection signals to the separate Camera Operations Guide supplied with the software or on your computer. For details, refer to a computer. • You can use a USB cable instead...
Camera Operations Guide
Page 125
... using a Cassette Memorycompatible digital video camera recorder. When you play back If the cassette you record You cannot record software on your camcorder that does not support Cassette Memory, on a tape already recorded on using the Cassette Memory require successive signals recorded on... it to a tape in the following cases: - Cassette Memory There are 2 types of software. [Cannot record due to copyright protection.] appears on the LCD screen, or on your camcorder. Use a cassette with Cassette Memory have ejected the cassette during recording. - b Note •...
... using a Cassette Memorycompatible digital video camera recorder. When you play back If the cassette you record You cannot record software on your camcorder that does not support Cassette Memory, on a tape already recorded on using the Cassette Memory require successive signals recorded on... it to a tape in the following cases: - Cassette Memory There are 2 types of software. [Cannot record due to copyright protection.] appears on the LCD screen, or on your camcorder. Use a cassette with Cassette Memory have ejected the cassette during recording. - b Note •...
Camera Operations Guide
Page 131
...DV dubbing). a VAIO series personal computer) as well as under direct sunlight, near the i.LINK interface on precautions and compatible application software, refer also to the operating instructions for example, from the indicated value when the unit is "S100." About the required i.LINK cable Use...is compatible with DV device or not. Before connecting to direct sunlight. i.LINK and are not using your camcorder get inside of data that does not have it checked by Sony (e.g. Near windows or outdoors, where the LCD screen, the viewfinder, or the lens may malfunction. For ...
...DV dubbing). a VAIO series personal computer) as well as under direct sunlight, near the i.LINK interface on precautions and compatible application software, refer also to the operating instructions for example, from the indicated value when the unit is "S100." About the required i.LINK cable Use...is compatible with DV device or not. Before connecting to direct sunlight. i.LINK and are not using your camcorder get inside of data that does not have it checked by Sony (e.g. Near windows or outdoors, where the LCD screen, the viewfinder, or the lens may malfunction. For ...


