
Camera Operations Guide
Page 1
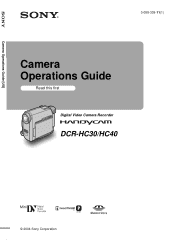
Camera Operations Guide [US] 3-088-339-11(1) Camera Operations Guide Read this first Digital Video Camera Recorder DCR-HC30/HC40 © 2004 Sony Corporation
Camera Operations Guide [US] 3-088-339-11(1) Camera Operations Guide Read this first Digital Video Camera Recorder DCR-HC30/HC40 © 2004 Sony Corporation
Camera Operations Guide
Page 3
... accept any problems. ,continued DCR-HC30/HC40 3 b Note: This equipment has been tested and found to operate this product. If this device must be determined by one or more of "Memory Stick" you can use in a particular installation. Consult a Sony dealer or an experienced radio/... that interference will not occur in your camcorder (p. 126). Refer to an outlet on the DV format. Model No.ACSerial No. The mark is connected. - For customers in a residential installation. Address: 680 Kinderkamack Road, Oradell, NJ 07649 U.S.A. DCR-HC Serial No. Reorient or relocate the...
... accept any problems. ,continued DCR-HC30/HC40 3 b Note: This equipment has been tested and found to operate this product. If this device must be determined by one or more of "Memory Stick" you can use in a particular installation. Consult a Sony dealer or an experienced radio/... that interference will not occur in your camcorder (p. 126). Refer to an outlet on the DV format. Model No.ACSerial No. The mark is connected. - For customers in a residential installation. Address: 680 Kinderkamack Road, Oradell, NJ 07649 U.S.A. DCR-HC Serial No. Reorient or relocate the...
Camera Operations Guide
Page 4
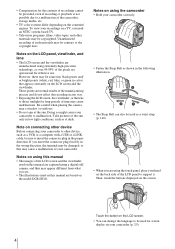
.... • You can also be used as a VCR or a computer with a USB or i.LINK cable, be used for screen display on your camcorder to support it. Notes on the LCD panel, viewfinder, and lens • The LCD screen and the viewfinder are manufactured using extremely high-precision technology... constantly on the LCD screen and the viewfinder. Unauthorized recording of the sun only in the proper direction. These points are based on the model DCR-HC40. Be careful when placing the camera near a window or outdoors. • Do not aim at dusk. Take pictures of such materials may cause...
.... • You can also be used as a VCR or a computer with a USB or i.LINK cable, be used for screen display on your camcorder to support it. Notes on the LCD panel, viewfinder, and lens • The LCD screen and the viewfinder are manufactured using extremely high-precision technology... constantly on the LCD screen and the viewfinder. Unauthorized recording of the sun only in the proper direction. These points are based on the model DCR-HC40. Be careful when placing the camera near a window or outdoors. • Do not aim at dusk. Take pictures of such materials may cause...
Camera Operations Guide
Page 18
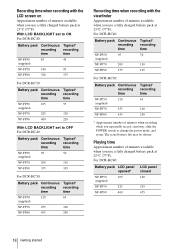
...repeatedly record, start/stop, slide the POWER switch to OFF For DCR-HC40: Battery pack Continuous Typical* recording recording time time NP-FP50 95 50 (supplied) NP-FP70 200 110 NP-FP90 355 195 For DCR-HC30: Battery pack Continuous Typical* recording recording time time NP-FP50 120...LCD BACKLIGHT set to change the power mode, and zoom. For DCR-HC40: Battery pack Continuous Typical* recording recording time time NP-FP50 95 50 (supplied) NP-FP70 200 110 NP-FP90 355 195 For DCR-HC30: Battery pack Continuous Typical* recording recording time time NP-FP50 ...
...repeatedly record, start/stop, slide the POWER switch to OFF For DCR-HC40: Battery pack Continuous Typical* recording recording time time NP-FP50 95 50 (supplied) NP-FP70 200 110 NP-FP90 355 195 For DCR-HC30: Battery pack Continuous Typical* recording recording time time NP-FP50 120...LCD BACKLIGHT set to change the power mode, and zoom. For DCR-HC40: Battery pack Continuous Typical* recording recording time time NP-FP50 95 50 (supplied) NP-FP70 200 110 NP-FP90 355 195 For DCR-HC30: Battery pack Continuous Typical* recording recording time time NP-FP50 ...
Camera Operations Guide
Page 31
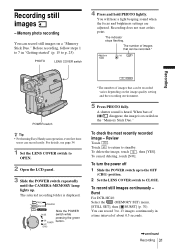
...focus and brightness settings are adjusted. When bars of about 0.5 seconds. ,continued Recording 31 To delete the image, touch , then [YES]. Burst For DCR-HC40: Select the (MEMORY SET) menu, [STILL SET], then [ BURST] (p. 70). PHOTO LENS COVER switch 4 Press and hold PHOTO lightly. The ... P-MENU *The number of images that can be recorded.* 60min 101 1152 FINE 30 Recording POWER switch z Tip • Performing Easy Handycam operation, even first time users can be recorded varies depending on the image quality setting and the recording environment. 5 Press PHOTO fully. A...
...focus and brightness settings are adjusted. When bars of about 0.5 seconds. ,continued Recording 31 To delete the image, touch , then [YES]. Burst For DCR-HC40: Select the (MEMORY SET) menu, [STILL SET], then [ BURST] (p. 70). PHOTO LENS COVER switch 4 Press and hold PHOTO lightly. The ... P-MENU *The number of images that can be recorded.* 60min 101 1152 FINE 30 Recording POWER switch z Tip • Performing Easy Handycam operation, even first time users can be recorded varies depending on the image quality setting and the recording environment. 5 Press PHOTO fully. A...
Camera Operations Guide
Page 32
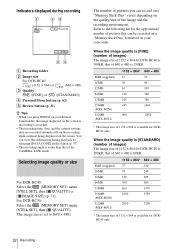
...on the quality/size of the image and the recording environment. For DCR-HC30: Select the (MEMORY SET) menu, [STILL SET], then [ QUALITY]. The number of pictures you press PHOTO on your camcorder. Selecting image quality or size For DCR-HC40: Select the (MEMORY SET) menu, [STILL SET], then [ ... wider than that of the CAMERA-TAPE mode. You can view this information during recording 60min 101 1152 FINE P-MENU A Recording folder B Image size For DCR-HC40: (1152 × 864) or (640 × 480) C Quality ([FINE]) or ([STANDARD]) D Personal Menu button (p. 62) E Review button (p. 31...
...on the quality/size of the image and the recording environment. For DCR-HC30: Select the (MEMORY SET) menu, [STILL SET], then [ QUALITY]. The number of pictures you press PHOTO on your camcorder. Selecting image quality or size For DCR-HC40: Select the (MEMORY SET) menu, [STILL SET], then [ ... wider than that of the CAMERA-TAPE mode. You can view this information during recording 60min 101 1152 FINE P-MENU A Recording folder B Image size For DCR-HC40: (1152 × 864) or (640 × 480) C Quality ([FINE]) or ([STANDARD]) D Personal Menu button (p. 62) E Review button (p. 31...
Camera Operations Guide
Page 34
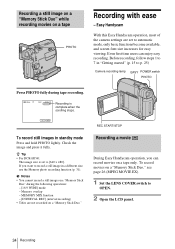
...only basic functions become available, and screen font size increases for easy viewing. If you can enjoy easy recording. Recording a movie During Easy Handycam operation, you want to [640 × 480]. Even first time users can record movies on a "Memory Stick Duo," see page 26 ...p. 25) Camera recording lamp EASY POWER switch PHOTO Press PHOTO fully during the following operations: - [16:9 WIDE] mode - z Tip • For DCR-HC40: The image size is complete when the scrolling stops. Before recording, follow steps 1 to 7 in "Getting started" (p. 15 to OPEN. 2 Open the...
...only basic functions become available, and screen font size increases for easy viewing. If you can enjoy easy recording. Recording a movie During Easy Handycam operation, you want to [640 × 480]. Even first time users can record movies on a "Memory Stick Duo," see page 26 ...p. 25) Camera recording lamp EASY POWER switch PHOTO Press PHOTO fully during the following operations: - [16:9 WIDE] mode - z Tip • For DCR-HC40: The image size is complete when the scrolling stops. Before recording, follow steps 1 to 7 in "Getting started" (p. 15 to OPEN. 2 Open the...
Camera Operations Guide
Page 66
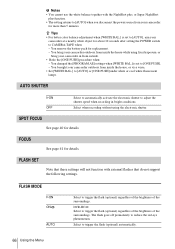
...after setting the POWER switch to [AUTO] when you disconnect the power source from your camcorder for replacement. - The flash goes off prematurely to adjust the shutter speed when recording ...white or cool white fluorescent lamps. Select when recording without using fixed exposure, or bring your camcorder outdoors from inside the house, or vice versa. • Set [WHITE BAL.] to trigger ...changed the [PROGRAM AE] settings when [WHITE BAL.] is set to [AUTO], aim your camcorder outdoors from inside the house while using the electronic shutter. SPOT FOCUS See page 40 for ...
...after setting the POWER switch to [AUTO] when you disconnect the power source from your camcorder for replacement. - The flash goes off prematurely to adjust the shutter speed when recording ...white or cool white fluorescent lamps. Select when recording without using fixed exposure, or bring your camcorder outdoors from inside the house, or vice versa. • Set [WHITE BAL.] to trigger ...changed the [PROGRAM AE] settings when [WHITE BAL.] is set to [AUTO], aim your camcorder outdoors from inside the house while using the electronic shutter. SPOT FOCUS See page 40 for ...
Camera Operations Guide
Page 67
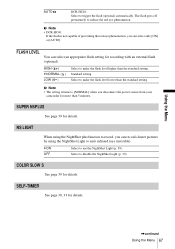
...). SUPER NSPLUS See page 39 for details. COLOR SLOW S See page 39 for details. Using the Menu AUTO DCR-HC40: Select to [NORMAL] when you disconnect the power source from your camcorder for more than 5 minutes. b Note • The setting returns to trigger the flash (optional) automatically. Standard... setting. b Note • DCR-HC40: If the flash is not capable of preventing the red-eye phenomenon, ...
...). SUPER NSPLUS See page 39 for details. COLOR SLOW S See page 39 for details. Using the Menu AUTO DCR-HC40: Select to [NORMAL] when you disconnect the power source from your camcorder for more than 5 minutes. b Note • The setting returns to trigger the flash (optional) automatically. Standard... setting. b Note • DCR-HC40: If the flash is not capable of preventing the red-eye phenomenon, ...
Camera Operations Guide
Page 70
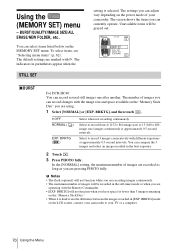
...menu - You can record changes with the image size and space available on the LCD screen, connect your camcorder. The number of your camcorder to record 3 images consecutively with G. You can record several still images one after another. The indicators in... the best exposure. 2 Touch . 3 Press PHOTO fully. b Notes • The flash (optional) will be grayed out. 60min 1152 FINE 30 MEMORY SET STILL SET MOVIE SET FORMAT OK BURST For DCR-HC40...
...menu - You can record changes with the image size and space available on the LCD screen, connect your camcorder. The number of your camcorder to record 3 images consecutively with G. You can record several still images one after another. The indicators in... the best exposure. 2 Touch . 3 Press PHOTO fully. b Notes • The flash (optional) will be grayed out. 60min 1152 FINE 30 MEMORY SET STILL SET MOVIE SET FORMAT OK BURST For DCR-HC40...
Camera Operations Guide
Page 71
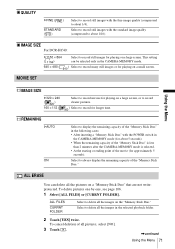
... delete all the pictures on the "Memory Stick Duo." Select to record still images with the standard image quality (compressed to about 1/4). IMAGE SIZE For DCR-HC40: G1152 × 864 ( ) 640 × 480 ( Select to record still images for longer time. Select to always display the remaining capacity of all the images...
... delete all the pictures on the "Memory Stick Duo." Select to record still images with the standard image quality (compressed to about 1/4). IMAGE SIZE For DCR-HC40: G1152 × 864 ( ) 640 × 480 ( Select to record still images for longer time. Select to always display the remaining capacity of all the images...
Camera Operations Guide
Page 96
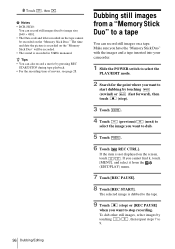
... image is not displayed on the "Memory Stick Duo." Make sure you have the "Memory Stick Duo" with the images and a tape inserted into your camcorder. 1 Slide the POWER switch to select the PLAY/EDIT mode. 2 Search for the point where you want to start dubbing by touching / , then repeat ... tape playback. • For the recording time of movies, see page 28. If the item is dubbed to the tape. 9 Touch (stop recording. b Notes • DCR-HC40: You can record still images fixed to stop ) or [REC PAUSE] when you want to image size [640 × 480]. • The Data code and...
... image is not displayed on the "Memory Stick Duo." Make sure you have the "Memory Stick Duo" with the images and a tape inserted into your camcorder. 1 Slide the POWER switch to select the PLAY/EDIT mode. 2 Search for the point where you want to start dubbing by touching / , then repeat ... tape playback. • For the recording time of movies, see page 28. If the item is dubbed to the tape. 9 Touch (stop recording. b Notes • DCR-HC40: You can record still images fixed to stop ) or [REC PAUSE] when you want to image size [640 × 480]. • The Data code and...
Camera Operations Guide
Page 104
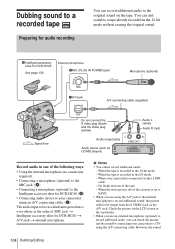
... microphone (optional) to the MIC jack. (A) • Connecting a microphone (optional) to the Intelligent accessory shoe for DCR-HC40. (B) • Connecting audio device to your camcorder using the A/V jack or the internal microphone to record additional sound, the picture will not be recorded takes precedence over ... audio, you are using an A/V connecting cable. (C) The audio input to the original sound on the tape. B Intelligent accessory shoe for DCR-HC40 t A/V jack t internal microphone. b Notes • You cannot record additional audio: - When the tape is recorded in the order of...
... microphone (optional) to the MIC jack. (A) • Connecting a microphone (optional) to the Intelligent accessory shoe for DCR-HC40. (B) • Connecting audio device to your camcorder using the A/V jack or the internal microphone to record additional sound, the picture will not be recorded takes precedence over ... audio, you are using an A/V connecting cable. (C) The audio input to the original sound on the tape. B Intelligent accessory shoe for DCR-HC40 t A/V jack t internal microphone. b Notes • You cannot record additional audio: - When the tape is recorded in the order of...
Camera Operations Guide
Page 105
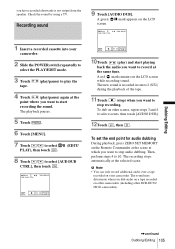
Check the sound by using a TV. A green X mark appears on other DCR-HC30/ HC40 camcorders). A red mark remains on your camcorder. 2 Slide the POWER switch repeatedly to select the PLAY/EDIT mode. 3 Touch tape. (play/pause) to play the 4 Touch (play ) and start recording ... dub on the LCD screen. 60min AUD DUB CTRL 0:00:00:00 1 Insert a recorded cassette into your camcorder. To set the end point for audio dubbing During playback, press ZERO SET MEMORY on other camcorders (including other scenes, repeat steps 3 and 4 to select scenes, then touch [AUDIO DUB]. 12Touch , then . ...
Check the sound by using a TV. A green X mark appears on other DCR-HC30/ HC40 camcorders). A red mark remains on your camcorder. 2 Slide the POWER switch repeatedly to select the PLAY/EDIT mode. 3 Touch tape. (play/pause) to play the 4 Touch (play ) and start recording ... dub on the LCD screen. 60min AUD DUB CTRL 0:00:00:00 1 Insert a recorded cassette into your camcorder. To set the end point for audio dubbing During playback, press ZERO SET MEMORY on other camcorders (including other scenes, repeat steps 3 and 4 to select scenes, then touch [AUDIO DUB]. 12Touch , then . ...
Camera Operations Guide
Page 134
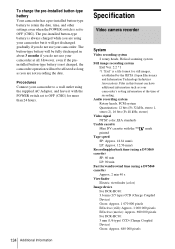
... Electric viewfinder (color) Image device For DCR-HC40: 3.6 mm (1/5 type) CCD (Charge Coupled Device) Gross: Approx. 1 070 000 pixels Effective (still): Approx. 1 000 000 pixels Effective (movie): Approx. 690 000 pixels For DCR-HC30: 3 mm (1/6 type) CCD (Charge Coupled Device) Gross: Approx. 680 000 pixels Procedures Connect your camcorder at the time of recording. The button...
... Electric viewfinder (color) Image device For DCR-HC40: 3.6 mm (1/5 type) CCD (Charge Coupled Device) Gross: Approx. 1 070 000 pixels Effective (still): Approx. 1 000 000 pixels Effective (movie): Approx. 690 000 pixels For DCR-HC30: 3 mm (1/6 type) CCD (Charge Coupled Device) Gross: Approx. 680 000 pixels Procedures Connect your camcorder at the time of recording. The button...
Camera Operations Guide
Page 135
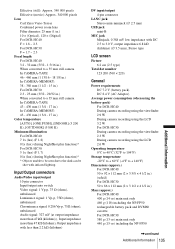
... Zeiss Vario-Tessar Combined power zoom lens Filter diameter: 25 mm (1 in.) 10 × (Optical), 120 × (Digital) For DCR-HC40: F = 1.8 ~ 2.3 For DCR-HC30: F = 1.7 ~ 2.3 Focal length For DCR-HC40: 3.2 - 32 mm (5/32 - 1 5/16 in.) When converted to a 35 mm still camera In CAMERA-TAPE: 46 - 460... -20°C to + 60°C (-4°F to the dark can be seen due to + 140°F) Dimensions (approx.) For DCR-HC40: 50 × 92 × 112 mm (2 × 3 5/8 × 4 1/2 in.) (w/h/d) For DCR-HC30: 50 × 86 × 112 mm (2 × 3 1/2 × 4 1/2 in .) Color temperature [AUTO], [ONE PUSH...
... Zeiss Vario-Tessar Combined power zoom lens Filter diameter: 25 mm (1 in.) 10 × (Optical), 120 × (Digital) For DCR-HC40: F = 1.8 ~ 2.3 For DCR-HC30: F = 1.7 ~ 2.3 Focal length For DCR-HC40: 3.2 - 32 mm (5/32 - 1 5/16 in.) When converted to a 35 mm still camera In CAMERA-TAPE: 46 - 460... -20°C to + 60°C (-4°F to the dark can be seen due to + 140°F) Dimensions (approx.) For DCR-HC40: 50 × 92 × 112 mm (2 × 3 5/8 × 4 1/2 in.) (w/h/d) For DCR-HC30: 50 × 86 × 112 mm (2 × 3 1/2 × 4 1/2 in .) Color temperature [AUTO], [ONE PUSH...
Camera Operations Guide
Page 137
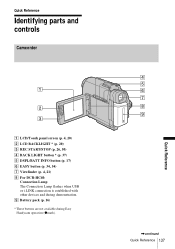
Quick Reference Identifying parts and controls Camcorder 1 2 3 A LCD/Touch panel screen (p. 4, 20) B LCD BACKLIGHT * (p. 20) C REC START/STOP (p. 26, 50) D BACK LIGHT button * (p. 37) E DSPL/BATT INFO button (p. 17) F EASY button (p. 34, 54) G Viewfinder (p. 4, 21) H For DCR-HC40: Connection Lamp The Connection Lamp flashes when USB or i.LINK connection is established with other devices and during Easy Handycam operation (zmark). 4 5 6 7 8 9 ,continued Quick Reference 137 Quick Reference I Battery pack (p. 16) * These buttons are not available during demonstration.
Quick Reference Identifying parts and controls Camcorder 1 2 3 A LCD/Touch panel screen (p. 4, 20) B LCD BACKLIGHT * (p. 20) C REC START/STOP (p. 26, 50) D BACK LIGHT button * (p. 37) E DSPL/BATT INFO button (p. 17) F EASY button (p. 34, 54) G Viewfinder (p. 4, 21) H For DCR-HC40: Connection Lamp The Connection Lamp flashes when USB or i.LINK connection is established with other devices and during Easy Handycam operation (zmark). 4 5 6 7 8 9 ,continued Quick Reference 137 Quick Reference I Battery pack (p. 16) * These buttons are not available during demonstration.
Camera Operations Guide
Page 139
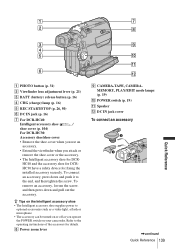
...Tips on the Intelligent accessory shoe • The Intelligent accessory shoe supplies power to the operating instructions of the accessory for DCR- HC40 and the accessory shoe for fixing the installed accessory securely. To remove an accessory, loosen the screw, and then press ... IN jack (p. 16) G For DCR-HC40: Intelligent accessory shoe / shoe cover (p. 104) For DCR-HC30: Accessory shoe/shoe cover • Remove the shoe cover when you use an accessory. • Extend the viewfinder when you operate the POWER switch on your camcorder. Refer to optional accessories such as ...
...Tips on the Intelligent accessory shoe • The Intelligent accessory shoe supplies power to the operating instructions of the accessory for DCR- HC40 and the accessory shoe for fixing the installed accessory securely. To remove an accessory, loosen the screw, and then press ... IN jack (p. 16) G For DCR-HC40: Intelligent accessory shoe / shoe cover (p. 104) For DCR-HC30: Accessory shoe/shoe cover • Remove the shoe cover when you use an accessory. • Extend the viewfinder when you operate the POWER switch on your camcorder. Refer to optional accessories such as ...


