
Camera Operations Guide
Page 4
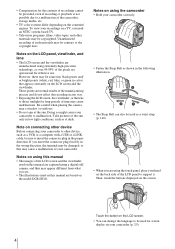
... of time may cause a malfunction of the LCD panel to insert the connector plug in color) that appear constantly on the model DCR-HC40. Then, touch the buttons displayed on using a digital still camera, and thus may be copyrighted. However, there may appear...; The illustrations used on this manual are captured using the camcorder • Hold your camcorder to direct sunlight for screen display on connecting other device Before connecting your camcorder correctly. • Fasten the Strap Belt as shown in low light conditions, such as a VCR or a computer with a ...
... of time may cause a malfunction of the LCD panel to insert the connector plug in color) that appear constantly on the model DCR-HC40. Then, touch the buttons displayed on using a digital still camera, and thus may be copyrighted. However, there may appear...; The illustrations used on this manual are captured using the camcorder • Hold your camcorder to direct sunlight for screen display on connecting other device Before connecting your camcorder correctly. • Fasten the Strap Belt as shown in low light conditions, such as a VCR or a computer with a ...
Camera Operations Guide
Page 11
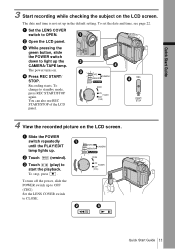
... recorded picture on the LCD screen. Quick Start Guide 11 To change to CLOSE. c While pressing the green button, slide the POWER switch down to light up to OFF (CHG). To turn off the power, slide the POWER switch up the CAMERA-TAPE lamp. a Set the LENS COVER switch to start... the playback. c Touch (play) to OPEN. a Slide the POWER switch repeatedly until the PLAY/EDIT lamp lights up in the default setting. Recording starts. To set up .
... recorded picture on the LCD screen. Quick Start Guide 11 To change to CLOSE. c While pressing the green button, slide the POWER switch down to light up to OFF (CHG). To turn off the power, slide the POWER switch up the CAMERA-TAPE lamp. a Set the LENS COVER switch to start... the playback. c Touch (play) to OPEN. a Slide the POWER switch repeatedly until the PLAY/EDIT lamp lights up in the default setting. Recording starts. To set up .

Camera Operations Guide
Page 13
... short beep sound is heard when the focus is displayed. Quick Start Guide 13 a Set the LENS COVER switch to CLOSE. d Press PHOTO lightly. Set the LENS COVER switch to OPEN. Quick Start Guide 3 Start recording while checking the subject on . c While pressing the green button,... slide the POWER switch repeatedly until the PLAY/EDIT lamp lights up in sequence. c Touch (next) or (previous) to OFF (CHG). The most recently recorded image is adjusted. A shutter sound is heard...
... short beep sound is heard when the focus is displayed. Quick Start Guide 13 a Set the LENS COVER switch to CLOSE. d Press PHOTO lightly. Set the LENS COVER switch to OPEN. Quick Start Guide 3 Start recording while checking the subject on . c While pressing the green button,... slide the POWER switch repeatedly until the PLAY/EDIT lamp lights up in sequence. c Touch (next) or (previous) to OFF (CHG). The most recently recorded image is adjusted. A shutter sound is heard...
Camera Operations Guide
Page 14
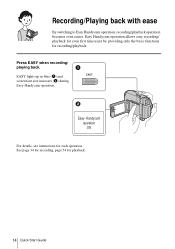
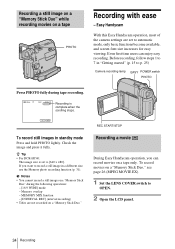
See page 34 for recording, page 54 for recording/playback. Easy Handycam operation allows easy recording/ playback for even first time users by providing only the basic functions for playback. 14 Quick Start Guide Easy Handycam operation ON For details, see instructions for each operation. Press EASY when recording/ playing back. Recording/Playing back with ease By switching to Easy Handycam operation, recording/playback operation becomes even easier. EASY lights up in blue (1) and screen font size increases (2) during Easy Handycam operation.
See page 34 for recording, page 54 for recording/playback. Easy Handycam operation allows easy recording/ playback for even first time users by providing only the basic functions for playback. 14 Quick Start Guide Easy Handycam operation ON For details, see instructions for each operation. Press EASY when recording/ playing back. Recording/Playing back with ease By switching to Easy Handycam operation, recording/playback operation becomes even easier. EASY lights up in blue (1) and screen font size increases (2) during Easy Handycam operation.
Camera Operations Guide
Page 16
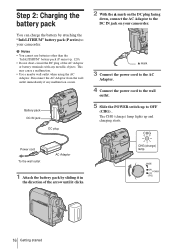
... charge the battery by sliding it in the direction of the AC Adaptor or battery terminals with any malfunction occurs. The CHG (charge) lamp lights up to your camcorder. CHG Power cord To the wall outlet AC Adaptor CHG (charge) lamp 1 Attach the battery pack by attaching the "InfoLITHIUM" battery pack (P ...immediately if any metallic objects. v mark 3 Connect the power cord to the AC Adaptor. 4 Connect the power cord to the DC IN jack on your camcorder. Battery pack DC IN jack DC plug 2 With the v mark on the DC plug facing down, connect the AC Adaptor to the wall outlet. 5 ...
... charge the battery by sliding it in the direction of the AC Adaptor or battery terminals with any malfunction occurs. The CHG (charge) lamp lights up to your camcorder. CHG Power cord To the wall outlet AC Adaptor CHG (charge) lamp 1 Attach the battery pack by attaching the "InfoLITHIUM" battery pack (P ...immediately if any metallic objects. v mark 3 Connect the power cord to the AC Adaptor. 4 Connect the power cord to the DC IN jack on your camcorder. Battery pack DC IN jack DC plug 2 With the v mark on the DC plug facing down, connect the AC Adaptor to the wall outlet. 5 ...
Camera Operations Guide
Page 19
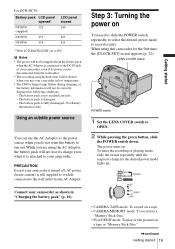
...battery pack is disconnected from the wall outlet. • The recording and playback time will be shorter when you are using this camcorder for the desired power mode lights up. LENS COVER switch POWER switch 1 Set the LENS COVER switch to ON. Step 3: Turning the power on . The ...battery pack is damaged. - PRECAUTION Even if your camcorder as the power source when you do not want the battery to record or play or edit pictures on a tape or "Memory Stick Duo." ,continued Getting started For DCR-HC30: Battery pack LCD panel opened* NP-FP50 120 (supplied) ...
...battery pack is disconnected from the wall outlet. • The recording and playback time will be shorter when you are using this camcorder for the desired power mode lights up. LENS COVER switch POWER switch 1 Set the LENS COVER switch to ON. Step 3: Turning the power on . The ...battery pack is damaged. - PRECAUTION Even if your camcorder as the power source when you do not want the battery to record or play or edit pictures on a tape or "Memory Stick Duo." ,continued Getting started For DCR-HC30: Battery pack LCD panel opened* NP-FP50 120 (supplied) ...
Camera Operations Guide
Page 21
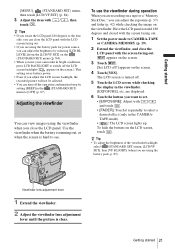
... with / , then touch . z Tip • To adjust the brightness of the viewfinder backlight, select (STANDARD SET) menu, [LCD/VF SET], then [VF B.LIGHT] (when you are using the viewfinder when you are using the battery pack, p. 85). To use your camcorder in the viewfinder. [EXPOSURE], etc. TAPE mode). • : The LCD screen...
... with / , then touch . z Tip • To adjust the brightness of the viewfinder backlight, select (STANDARD SET) menu, [LCD/VF SET], then [VF B.LIGHT] (when you are using the viewfinder when you are using the battery pack, p. 85). To use your camcorder in the viewfinder. [EXPOSURE], etc. TAPE mode). • : The LCD screen...
Camera Operations Guide
Page 23
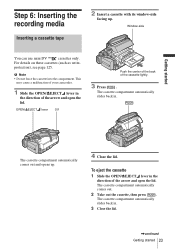
This may cause a malfunction of your camcorder. 1 Slide the OPEN/ZEJECT lever in the direction of the arrow and open the lid. The cassette compartment automatically slides back in . 3 Close the lid. ,... slides back in . Window-side You can use mini DV cassettes only. OPEN/ZEJECT lever Lid Push the center of the back of the cassette lightly. 3 Press . Getting started 23 For details on these cassettes (such as write- The cassette compartment automatically comes out. 2 Take out the cassette, then press...
This may cause a malfunction of your camcorder. 1 Slide the OPEN/ZEJECT lever in the direction of the arrow and open the lid. The cassette compartment automatically slides back in . 3 Close the lid. ,... slides back in . Window-side You can use mini DV cassettes only. OPEN/ZEJECT lever Lid Push the center of the back of the cassette lightly. 3 Press . Getting started 23 For details on these cassettes (such as write- The cassette compartment automatically comes out. 2 Take out the cassette, then press...
Camera Operations Guide
Page 24
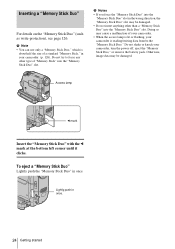
Doing so may cause a malfunction of your camcorder. • When the access lamp is reading/writing data from/to force any other than a "Memory Stick Duo" into the "Memory Stick Duo" slot. Lightly push in once. Otherwise, image data may be damaged. Access lamp b mark Insert the "Memory Stick... lit or flashing, your camcorder (p. 126). Inserting a "Memory Stick Duo" For details on the "Memory Stick Duo" (such as write-protection), see page 126. To eject a "Memory Stick Duo" Lightly push the "Memory Stick Duo" in once. 24 Getting started b Note • You can use only a "...
Doing so may cause a malfunction of your camcorder. • When the access lamp is reading/writing data from/to force any other than a "Memory Stick Duo" into the "Memory Stick Duo" slot. Lightly push in once. Otherwise, image data may be damaged. Access lamp b mark Insert the "Memory Stick... lit or flashing, your camcorder (p. 126). Inserting a "Memory Stick Duo" For details on the "Memory Stick Duo" (such as write-protection), see page 126. To eject a "Memory Stick Duo" Lightly push the "Memory Stick Duo" in once. 24 Getting started b Note • You can use only a "...
Camera Operations Guide
Page 26
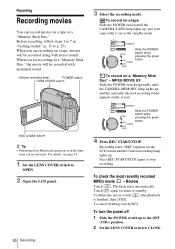
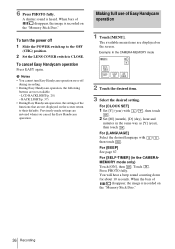
... a "Memory Stick Duo." REC START/STOP z Tip • Performing Easy Handycam operation, even first time users can record movies on a tape Slide the POWER switch until the CAMERA-MEMORY lamp lights up , and your camcorder is finished, then [YES]. Review Touch . Recording Recording movies You can record... easily. To record on the screen. MPEG MOVIE EX Slide the POWER switch repeatedly until the CAMERA-TAPE lamp lights up , and the ...
... a "Memory Stick Duo." REC START/STOP z Tip • Performing Easy Handycam operation, even first time users can record movies on a tape Slide the POWER switch until the CAMERA-MEMORY lamp lights up , and your camcorder is finished, then [YES]. Review Touch . Recording Recording movies You can record... easily. To record on the screen. MPEG MOVIE EX Slide the POWER switch repeatedly until the CAMERA-TAPE lamp lights up , and the ...
Camera Operations Guide
Page 31
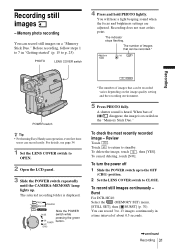
...images on a "Memory Stick Duo." Review Touch . To cancel deleting, touch [NO]. Burst For DCR-HC40: Select the (MEMORY SET) menu, [STILL SET], then [ BURST] (p. 70). To ...check the most recently recorded image - To record still images continuously - You will hear a light beeping sound when the focus and brightness settings are adjusted. Slide the POWER switch while pressing the...can be recorded.* 60min 101 1152 FINE 30 Recording POWER switch z Tip • Performing Easy Handycam operation, even first time users can record 3 to 13 images continuously in "Getting started" ...
...images on a "Memory Stick Duo." Review Touch . To cancel deleting, touch [NO]. Burst For DCR-HC40: Select the (MEMORY SET) menu, [STILL SET], then [ BURST] (p. 70). To ...check the most recently recorded image - To record still images continuously - You will hear a light beeping sound when the focus and brightness settings are adjusted. Slide the POWER switch while pressing the...can be recorded.* 60min 101 1152 FINE 30 Recording POWER switch z Tip • Performing Easy Handycam operation, even first time users can record 3 to 13 images continuously in "Getting started" ...
Camera Operations Guide
Page 34
...; For DCR-HC40: The image size is complete when the scrolling stops. P-MENU REC START/STOP To record still images in a different size, use the Memory photo recording function (p. 31). Memory overlap - Recording a movie During Easy Handycam operation, you want to record a still image in standby mode Press and hold PHOTO lightly. If...
...; For DCR-HC40: The image size is complete when the scrolling stops. P-MENU REC START/STOP To record still images in a different size, use the Memory photo recording function (p. 31). Memory overlap - Recording a movie During Easy Handycam operation, you want to record a still image in standby mode Press and hold PHOTO lightly. If...
Camera Operations Guide
Page 35
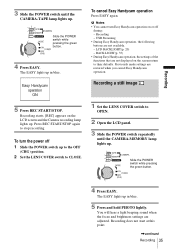
...power off during: - LCD BACKLIGHT(p. 20) - USB Streaming • During Easy Handycam operation, the following buttons are adjusted. The EASY lights up in blue. 5 Press and hold PHOTO lightly. To cancel Easy Handycam operation Press EASY again. Recording does not start at this point. ,continued Recording .... Recording starts. [REC] appears on or off 1 Slide the POWER switch up . To turn Easy Handycam operation on the LCD screen and the Camera recording lamp lights up . Recording a still image 1 Set the LENS COVER switch to stop recording. Recording - Slide the...
...power off during: - LCD BACKLIGHT(p. 20) - USB Streaming • During Easy Handycam operation, the following buttons are adjusted. The EASY lights up in blue. 5 Press and hold PHOTO lightly. To cancel Easy Handycam operation Press EASY again. Recording does not start at this point. ,continued Recording .... Recording starts. [REC] appears on or off 1 Slide the POWER switch up . To turn Easy Handycam operation on the LCD screen and the Camera recording lamp lights up . Recording a still image 1 Set the LENS COVER switch to stop recording. Recording - Slide the...
Camera Operations Guide
Page 36
...-TIMER] (in the same way as [Y] (year), then touch . You will hear a beep sound counting down for about 10 seconds. To turn Easy Handycam operation on or off 1 Slide the POWER switch up to the OFF (CHG) position. 2 Set the LENS COVER switch to their defaults. Touch . When... the bars of the functions that are displayed on the screen return to CLOSE. 6 Press PHOTO fully. BACK LIGHT(p. 37) • During Easy Handycam operation, the settings of disappear, the image is heard. The available menu items are not displayed on the screen. Example: In ...
...-TIMER] (in the same way as [Y] (year), then touch . You will hear a beep sound counting down for about 10 seconds. To turn Easy Handycam operation on or off 1 Slide the POWER switch up to the OFF (CHG) position. 2 Set the LENS COVER switch to their defaults. Touch . When... the bars of the functions that are displayed on the screen return to CLOSE. 6 Press PHOTO fully. BACK LIGHT(p. 37) • During Easy Handycam operation, the settings of disappear, the image is heard. The available menu items are not displayed on the screen. Example: In ...
Camera Operations Guide
Page 37
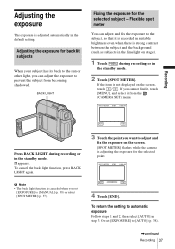
...]. Adjusting the exposure The exposure is adjusted automatically in step 3. Flexible spot meter You can adjust the exposure to the sun or other light, you cannot find it, touch [MENU], and select it is recorded in suitable brightness even when there is strong contrast between the subject... exposure on stage). 1 Touch during recording or in the standby mode. 2 Touch [SPOT METER]. To cancel the back light function, press BACK LIGHT again. b Note • The back light function is not displayed on the screen, touch / . If the item is canceled when you want to the subject,...
...]. Adjusting the exposure The exposure is adjusted automatically in step 3. Flexible spot meter You can adjust the exposure to the sun or other light, you cannot find it, touch [MENU], and select it is recorded in suitable brightness even when there is strong contrast between the subject... exposure on stage). 1 Touch during recording or in the standby mode. 2 Touch [SPOT METER]. To cancel the back light function, press BACK LIGHT again. b Note • The back light function is not displayed on the screen, touch / . If the item is canceled when you want to the subject,...
Camera Operations Guide
Page 39
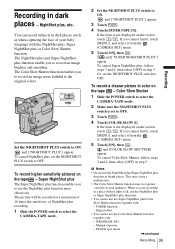
... the NIGHTSHOT PLUS switch is not displayed on the tape - To cancel Color Slow Shutter, follow steps 3 and 4, then select [OFF] in a place with no light at a maximum of 16 times the sensitivity of your baby sleeping) with : - [PROGRAM AE] - Flexible spot meter ,continued Recording 39 Recording
... the NIGHTSHOT PLUS switch is not displayed on the tape - To cancel Color Slow Shutter, follow steps 3 and 4, then select [OFF] in a place with no light at a maximum of 16 times the sensitivity of your baby sleeping) with : - [PROGRAM AE] - Flexible spot meter ,continued Recording 39 Recording
Camera Operations Guide
Page 40
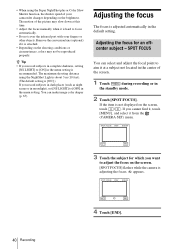
...the standby mode. 2 Touch [SPOT FOCUS]. If the item is adjusted automatically in complete darkness, setting [NS LIGHT] to focus automatically. • Do not cover the infrared port with your camcorder changes depending on the brightness. SPOT FOCUS STBY 0:00:00 AUTO END 4 Touch [END]. 40 Recording Remove ... or in the menu setting. SPOT FOCUS STBY 0:00:00 AUTO END 3 Touch the subject for an offcenter subject - • When using the NightShot Light is about 3 m (10 feet). (The default setting is [ON].) If you cannot find it, touch [MENU], and select it is adjusting the ...
...the standby mode. 2 Touch [SPOT FOCUS]. If the item is adjusted automatically in complete darkness, setting [NS LIGHT] to focus automatically. • Do not cover the infrared port with your camcorder changes depending on the brightness. SPOT FOCUS STBY 0:00:00 AUTO END 4 Touch [END]. 40 Recording Remove ... or in the menu setting. SPOT FOCUS STBY 0:00:00 AUTO END 3 Touch the subject for an offcenter subject - • When using the NightShot Light is about 3 m (10 feet). (The default setting is [ON].) If you cannot find it, touch [MENU], and select it is adjusting the ...
Camera Operations Guide
Page 54
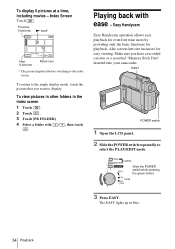
To view pictures in other folders in blue. 54 Playback Make sure you want to display. The EASY lights up in the index screen 1 Touch . 2 Touch . 3 Touch [PB FOLDER]. 4 Select a folder with . / , then touch Playing back with ease - EASY POWER switch 1 Open... Handycam operation allows easy playback for even first time users by providing only the basic functions for easy viewing. Index Screen Touch . To return to the single display mode, touch the picture that you have a recorded cassette or a recorded "Memory Stick Duo" inserted into your camcorder. Slide the POWER ...
To view pictures in other folders in blue. 54 Playback Make sure you want to display. The EASY lights up in the index screen 1 Touch . 2 Touch . 3 Touch [PB FOLDER]. 4 Select a folder with . / , then touch Playing back with ease - EASY POWER switch 1 Open... Handycam operation allows easy playback for even first time users by providing only the basic functions for easy viewing. Index Screen Touch . To return to the single display mode, touch the picture that you have a recorded cassette or a recorded "Memory Stick Duo" inserted into your camcorder. Slide the POWER ...

Camera Operations Guide
Page 64
... or metal mesh in windows that requires various techniques by strong light, such as people or portrait) ( ) flowers while creating a soft background. Select to prevent people's faces from appearing ) dark in between the camcorder and the subject. 64 Using the Menu lesson) ( ) ...shooting fast- BEACH&SKI* (beach & ski) ( Select to maintain the atmosphere of your camcorder from focusing on the CAMERA SET menu. The indicators in a situation that comes in strong light or reflected light, such as sunsets, general night views, fireworks, () and neon signs. G AUTO SPOTLIGHT...
... or metal mesh in windows that requires various techniques by strong light, such as people or portrait) ( ) flowers while creating a soft background. Select to prevent people's faces from appearing ) dark in between the camcorder and the subject. 64 Using the Menu lesson) ( ) ...shooting fast- BEACH&SKI* (beach & ski) ( Select to maintain the atmosphere of your camcorder from focusing on the CAMERA SET menu. The indicators in a situation that comes in strong light or reflected light, such as sunsets, general night views, fireworks, () and neon signs. G AUTO SPOTLIGHT...
Camera Operations Guide
Page 65
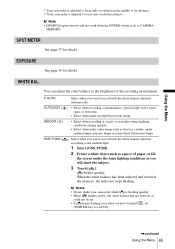
...general night views, neon signs, or fireworks. • Select when under daylight fluorescent lamps. • Select when recording at a party or in studios where lighting conditions change quickly. • Select when under video lamps such as a piece of the recording environment. b Note • [SPORTS] (sports lesson) will... is set . • If keeps flashing even after you will shoot the subject. 3 Touch [ ]. b Notes • Do not shake your camcorder while is flashing quickly. • When flashes slowly, the white balance has not been set, or could not be set to focus only on distant...
...general night views, neon signs, or fireworks. • Select when under daylight fluorescent lamps. • Select when recording at a party or in studios where lighting conditions change quickly. • Select when under video lamps such as a piece of the recording environment. b Note • [SPORTS] (sports lesson) will... is set . • If keeps flashing even after you will shoot the subject. 3 Touch [ ]. b Notes • Do not shake your camcorder while is flashing quickly. • When flashes slowly, the white balance has not been set, or could not be set to focus only on distant...


