
Computer Applications Guide
Page 2
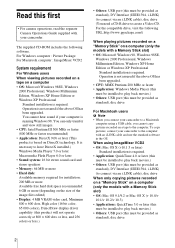
... 3.0 or later (this must be provided as standard), disc drive 2 To copy pictures, connect your camcorder. When using a USB cable, you cannot copy pictures recorded on a computer (only the models with a Memory Stick slot) • OS: Microsoft Windows 98, Windows 98SE, Windows 2000 Professional, Windows Millennium Edition, Windows XP Home Edition or Windows XP Professional Standard installation is running Windows 98. You can only transfer and view still images. • CPU: Intel Pentium III 500 MHz...
... 3.0 or later (this must be provided as standard), disc drive 2 To copy pictures, connect your camcorder. When using a USB cable, you cannot copy pictures recorded on a computer (only the models with a Memory Stick slot) • OS: Microsoft Windows 98, Windows 98SE, Windows 2000 Professional, Windows Millennium Edition, Windows XP Home Edition or Windows XP Professional Standard installation is running Windows 98. You can only transfer and view still images. • CPU: Intel Pentium III 500 MHz...
Computer Applications Guide
Page 14
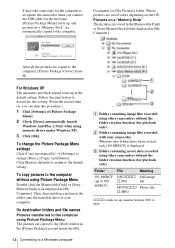
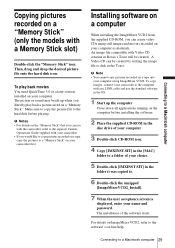
Pictures on a "Memory Stick" The pictures are copied to the [Date] folders in the [Picture Package] created inside the [My 14 Connecting to a Windows computer A B C A Folder containing image files recorded using other camcorders without using Picture Package Menu Double-click the [Removable Disk] or [Sony MemoryStick] icon displayed in [My Computer]. On destination folders and file names Pictures transferred to the computer using Picture Package Menu The pictures are stored in the [Removable Disk] or [Sony MemoryStick] folder displayed in [My Computer]. After...
Pictures on a "Memory Stick" The pictures are copied to the [Date] folders in the [Picture Package] created inside the [My 14 Connecting to a Windows computer A B C A Folder containing image files recorded using other camcorders without using Picture Package Menu Double-click the [Removable Disk] or [Sony MemoryStick] icon displayed in [My Computer]. On destination folders and file names Pictures transferred to the computer using Picture Package Menu The pictures are stored in the [Removable Disk] or [Sony MemoryStick] folder displayed in [My Computer]. After...
Computer Applications Guide
Page 18
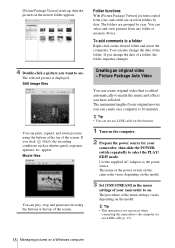
... the model. 3 Set [USB STREAM] in folders by year. The folders are saved in the menu settings of the menu settings varies depending on . The procedure of your camcorder, then slide the POWER switch repeatedly to match the music and effects you have selected. Folder functions With [Picture Package Viewer], pictures copied from any folder or memory device. You can also change the date of the screen. Creating an original video...
... the model. 3 Set [USB STREAM] in folders by year. The folders are saved in the menu settings of the menu settings varies depending on . The procedure of your camcorder, then slide the POWER switch repeatedly to match the music and effects you have selected. Folder functions With [Picture Package Viewer], pictures copied from any folder or memory device. You can also change the date of the screen. Creating an original video...
Computer Applications Guide
Page 24
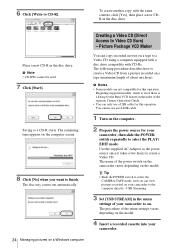
... Camera Operations Guide. • You can only use an i.LINK cable. 1 Turn on a Windows computer Creating a Video CD (Direct Access to a CD-R starts. Saving to Video CD Burn) - To create another copy with CD-Rs. Place a new CD-R in the index of the menu settings varies depending on . Picture Package VCD Maker You can view pictures recorded on your camcorder, then slide the POWER switch repeatedly to on the model. 4 Insert a recorded cassette into your camcorder...
... Camera Operations Guide. • You can only use an i.LINK cable. 1 Turn on a Windows computer Creating a Video CD (Direct Access to a CD-R starts. Saving to Video CD Burn) - To create another copy with CD-Rs. Place a new CD-R in the index of the menu settings varies depending on . Picture Package VCD Maker You can view pictures recorded on your camcorder, then slide the POWER switch repeatedly to on the model. 4 Insert a recorded cassette into your camcorder...
Computer Applications Guide
Page 26
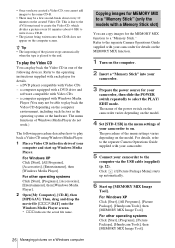
... Windows Media Player. The menu functions of Windows Media Player do not work.) The following devices. Then, drag and drop the movie file [sss*.DAT] onto the Windows Media Player screen. * sss indicates the actual file name. 26 Managing pictures on the model. The name of the power switch on the camcorder varies depending on the model. 4 Set [STD-USB] in one of the menu settings varies depending on a Windows computer Copying images for details on the MEMORY...
... Windows Media Player. The menu functions of Windows Media Player do not work.) The following devices. Then, drag and drop the movie file [sss*.DAT] onto the Windows Media Player screen. * sss indicates the actual file name. 26 Managing pictures on the model. The name of the power switch on the camcorder varies depending on the model. 4 Set [STD-USB] in one of the menu settings varies depending on a Windows computer Copying images for details on the MEMORY...
Computer Applications Guide
Page 29
... image file to disk in the [MAC] folder to a folder of the software starts. Make sure to copy the picture file to the hard disk before installing the software 2 Place the supplied CD-ROM in the disc drive of your computer 3 Double-click CD-ROM icon. 4 Copy [IMXINST.SIT] in the Toast. b Notes • For details on the "Memory Stick" that you can use with the camcorder, refer to the separate Camera Operations Guide...
... image file to disk in the [MAC] folder to a folder of the software starts. Make sure to copy the picture file to the hard disk before installing the software 2 Place the supplied CD-ROM in the disc drive of your computer 3 Double-click CD-ROM icon. 4 Copy [IMXINST.SIT] in the Toast. b Notes • For details on the "Memory Stick" that you can use with the camcorder, refer to the separate Camera Operations Guide...

Computer Applications Guide
Page 30
... supported models, check to see if there is automatically copied and written to DVD" function enables you turn on a tape. Taiwan http://vaio-online.sony.com/tw/vaio/ - Latin America http://vaio-online.sony.com/ Using the Direct Access to "Click to DVD" function for your camcorder to a Sony VAIO series computer* that you connect your camcorder, then slide the POWER switch repeatedly to DVD" via an i.LINK cable (optional). You can create DVDs when you need...
... supported models, check to see if there is automatically copied and written to DVD" function enables you turn on a tape. Taiwan http://vaio-online.sony.com/tw/vaio/ - Latin America http://vaio-online.sony.com/ Using the Direct Access to "Click to DVD" function for your camcorder to a Sony VAIO series computer* that you connect your camcorder, then slide the POWER switch repeatedly to DVD" via an i.LINK cable (optional). You can create DVDs when you need...
Computer Applications Guide
Page 33
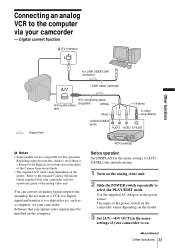
... camcorder to on the computer. Regarding supported models, check to see if there is a listing for this operation. Software that can convert an analog signal output from an analog device such as a VCR to a digital signal and transfer it to a digital device, such as the power source. VCR (analog) Before operation Set [DISPLAY] in the menu settings of the analog video unit You can capture video signals must be installed on . ,continued Other functions 33 Connecting...
... camcorder to on the computer. Regarding supported models, check to see if there is a listing for this operation. Software that can convert an analog signal output from an analog device such as a VCR to a digital signal and transfer it to a digital device, such as the power source. VCR (analog) Before operation Set [DISPLAY] in the menu settings of the analog video unit You can capture video signals must be installed on . ,continued Other functions 33 Connecting...
Computer Applications Guide
Page 36
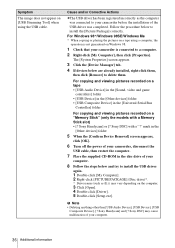
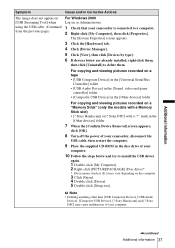
... using a computer, the operation is connected to a computer. 2 Right-click [My Computer], then click [Properties]. For copying and viewing pictures recorded on a tape • [USB Audio Device] in the [Sound, video and game controllers] folder • [USB Device] in the [Other devices] folder • [USB Composite Device] in the disc drive of your camcorder before the installation of the USB driver was completed. Sony Handycam] or [? For Windows 98*/Windows 98SE/Windows Me * When copying or playing the pictures on the computer. 3 Click [Open...
... using a computer, the operation is connected to a computer. 2 Right-click [My Computer], then click [Properties]. For copying and viewing pictures recorded on a tape • [USB Audio Device] in the [Sound, video and game controllers] folder • [USB Device] in the [Other devices] folder • [USB Composite Device] in the disc drive of your camcorder before the installation of the USB driver was completed. Sony Handycam] or [? For Windows 98*/Windows 98SE/Windows Me * When copying or playing the pictures on the computer. 3 Click [Open...
Computer Applications Guide
Page 37
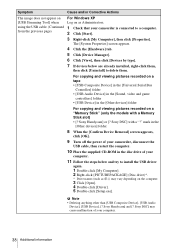
... your camcorder is connected to delete them. Sony DSC] with a Memory Stick slot) • [? mark in the [Other devices] folder 7 When the [Confirm Device Removal] screen appears, click [OK]. 8 Turn off the power of your camcorder, disconnect the USB cable, then restart the computer. 9 Place the supplied CD-ROM in the [Other devices] folder For copying and viewing pictures recorded on a "Memory Stick" (only the models with a "?" b Note • Deleting anything other than [USB Composite Device], [USB Audio Device], [Composite USB Device], [? Sony Handycam...
... your camcorder is connected to delete them. Sony DSC] with a Memory Stick slot) • [? mark in the [Other devices] folder 7 When the [Confirm Device Removal] screen appears, click [OK]. 8 Turn off the power of your camcorder, disconnect the USB cable, then restart the computer. 9 Place the supplied CD-ROM in the [Other devices] folder For copying and viewing pictures recorded on a "Memory Stick" (only the models with a "?" b Note • Deleting anything other than [USB Composite Device], [USB Audio Device], [Composite USB Device], [? Sony Handycam...
Computer Applications Guide
Page 38
...]. 9 Turn off the power of your camcorder, disconnect the USB cable, then restart the computer. 10 Place the supplied CD-ROM in the [Other devices] folder For copying and viewing pictures recorded on a "Memory Stick" (only the models with a "?" Sony DSC] may vary depending on the computer. 3 Click [Open]. 4 Double-click [Driver]. 5 Double-click [Setup.exe]. b Note • Deleting anything other than [USB Composite Device], [USB Audio Device], [USB Device], [? Sony Handycam] or [? For copying and viewing pictures recorded on a tape • [USB Composite Device...
...]. 9 Turn off the power of your camcorder, disconnect the USB cable, then restart the computer. 10 Place the supplied CD-ROM in the [Other devices] folder For copying and viewing pictures recorded on a "Memory Stick" (only the models with a "?" Sony DSC] may vary depending on the computer. 3 Click [Open]. 4 Double-click [Driver]. 5 Double-click [Setup.exe]. b Note • Deleting anything other than [USB Composite Device], [USB Audio Device], [USB Device], [? Sony Handycam] or [? For copying and viewing pictures recorded on a tape • [USB Composite Device...
Camera Operations Guide
Page 3
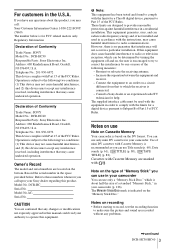
... Trade Name: SONY Model No.: DCR-HC30 Responsible Party: Sony Electronics Inc. Owner's Record The model and serial numbers are marked with Cassette Memory are located on the "Memory Stick Duo." If this device must be determined by one or more of mini DV cassettes with the instructions, may cause undesired operation. Increase the separation between the equipment and receiver. - Notes on use only mini DV cassettes in your camcorder. Operation is recommended as...
... Trade Name: SONY Model No.: DCR-HC30 Responsible Party: Sony Electronics Inc. Owner's Record The model and serial numbers are marked with Cassette Memory are located on the "Memory Stick Duo." If this device must be determined by one or more of mini DV cassettes with the instructions, may cause undesired operation. Increase the separation between the equipment and receiver. - Notes on use only mini DV cassettes in your camcorder. Operation is recommended as...

Camera Operations Guide
Page 17
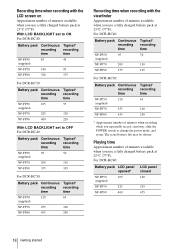
... INFO BATTERY INFO BATTERY CHARGE LEVEL 0% 50% 100% REC TIME AVAILABLE LCD SCREEN: 76 min VIEWFINDER: 85 min A Battery charge level: Displays approximate remaining amount of power left in the direction of the battery pack. To check the remaining battery - C Approximate possible recording time using the LCD panel. Disconnect the AC Adaptor from the DC IN jack. Keep the button pressed to OFF (CHG). 2 Open the LCD panel. 3 Press DSPL/BATT INFO. Charging time Approximate number of...
... INFO BATTERY INFO BATTERY CHARGE LEVEL 0% 50% 100% REC TIME AVAILABLE LCD SCREEN: 76 min VIEWFINDER: 85 min A Battery charge level: Displays approximate remaining amount of power left in the direction of the battery pack. To check the remaining battery - C Approximate possible recording time using the LCD panel. Disconnect the AC Adaptor from the DC IN jack. Keep the button pressed to OFF (CHG). 2 Open the LCD panel. 3 Press DSPL/BATT INFO. Charging time Approximate number of...
Camera Operations Guide
Page 18
... LCD BACKLIGHT set to ON For DCR-HC40: Battery pack Continuous Typical* recording recording time time NP-FP50 85 45 (supplied) NP-FP70 180 95 NP-FP90 320 175 For DCR-HC30: Battery pack Continuous Typical* recording recording time time NP-FP50 105 55 (supplied) NP-FP70 225 120 NP-FP90 400 220 With LCD BACKLIGHT set to change the power mode, and zoom. Playing time Approximate number of minutes available when you use a fully charged battery...
... LCD BACKLIGHT set to ON For DCR-HC40: Battery pack Continuous Typical* recording recording time time NP-FP50 85 45 (supplied) NP-FP70 180 95 NP-FP90 320 175 For DCR-HC30: Battery pack Continuous Typical* recording recording time time NP-FP50 105 55 (supplied) NP-FP70 225 120 NP-FP90 400 220 With LCD BACKLIGHT set to change the power mode, and zoom. Playing time Approximate number of minutes available when you use a fully charged battery...

Camera Operations Guide
Page 28
... on a "Memory Stick Duo" In the (MEMORY SET) menu, select [MOVIE SET], [ IMAGE SIZE], then [160 × 112] (p. 71). Recording for a longer time To record for a longer time on this information during playback by selecting [DATA CODE] in the SP mode. In the LP mode, you can record 1.5 times longer than you can view this camcorder. Refer to the accessory shoe, turn the power off the power of the external flash to prevent charging noise being displayed on a "Memory Stick Duo...
... on a "Memory Stick Duo" In the (MEMORY SET) menu, select [MOVIE SET], [ IMAGE SIZE], then [160 × 112] (p. 71). Recording for a longer time To record for a longer time on this information during playback by selecting [DATA CODE] in the SP mode. In the LP mode, you can record 1.5 times longer than you can view this camcorder. Refer to the accessory shoe, turn the power off the power of the external flash to prevent charging noise being displayed on a "Memory Stick Duo...
Camera Operations Guide
Page 35
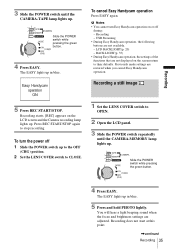
.... 2 Set the LENS COVER switch to OPEN. 2 Open the LCD panel. 3 Slide the POWER switch repeatedly until the CAMERA-TAPE lamp lights up in blue. 5 Press and hold PHOTO lightly. Slide the POWER switch while pressing the green button. 4 Press EASY. You will hear a light beeping sound when the focus and brightness settings are restored when you cancel Easy Handycam operation. Recording starts. [REC] appears on the screen return to stop recording. b Notes • You cannot turn the power...
.... 2 Set the LENS COVER switch to OPEN. 2 Open the LCD panel. 3 Slide the POWER switch repeatedly until the CAMERA-TAPE lamp lights up in blue. 5 Press and hold PHOTO lightly. Slide the POWER switch while pressing the green button. 4 Press EASY. You will hear a light beeping sound when the focus and brightness settings are restored when you cancel Easy Handycam operation. Recording starts. [REC] appears on the screen return to stop recording. b Notes • You cannot turn the power...
Camera Operations Guide
Page 116
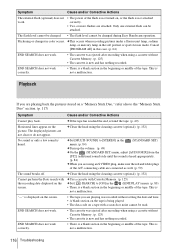
... work. • The power of the flash is not turned on, or the flash is new and has nothing recorded. The flash level cannot be changed during Easy Handycam operation. Cancel [PROGRAM AE] in the beginning or middle of the tape. cUse a cassette with the recording date displayed on the picture. Only one external flash can be attached. cClean the head using a cassette without Cassette Memory. (p. 125) • The cassette is being played. • The data code on a tape...
... work. • The power of the flash is not turned on, or the flash is new and has nothing recorded. The flash level cannot be changed during Easy Handycam operation. Cancel [PROGRAM AE] in the beginning or middle of the tape. cUse a cassette with the recording date displayed on the picture. Only one external flash can be attached. cClean the head using a cassette without Cassette Memory. (p. 125) • The cassette is being played. • The data code on a tape...
Camera Operations Guide
Page 127
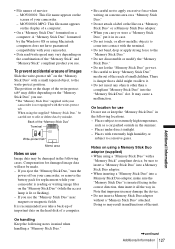
... Notes on the screen of small children. On location for use Do not use may result in . Notes on the hard disk of the "Memory Stick" and "Memory Stick" compliant product you eject the "Memory Stick Duo," turn the power off on your camcorder, or remove the battery pack for damaged image data will not be sure to edit or delete data by the Windows OS or using the supplied "Memory Stick Duo," be damaged...
... Notes on the screen of small children. On location for use Do not use may result in . Notes on the hard disk of the "Memory Stick" and "Memory Stick" compliant product you eject the "Memory Stick Duo," turn the power off on your camcorder, or remove the battery pack for damaged image data will not be sure to edit or delete data by the Windows OS or using the supplied "Memory Stick Duo," be damaged...
Camera Operations Guide
Page 134
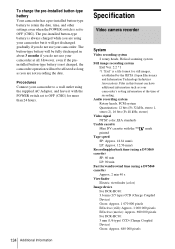
... (movie): Approx. 690 000 pixels For DCR-HC30: 3 mm (1/6 type) CCD (Charge Coupled Device) Gross: Approx. 680 000 pixels To charge the pre-installed button-type battery Your camcorder has a pre-installed button-type battery to retain the date, time, and other settings even when the POWER switch is set to OFF (CHG) for more than 24 hours. 134 Additional Information Specification Video camera recorder System Video recording system 2 rotary heads, Helical scanning system Still image recording system Exif Ver. 2.2 *1 *1 "Exif" is a file format for...
... (movie): Approx. 690 000 pixels For DCR-HC30: 3 mm (1/6 type) CCD (Charge Coupled Device) Gross: Approx. 680 000 pixels To charge the pre-installed button-type battery Your camcorder has a pre-installed button-type battery to retain the date, time, and other settings even when the POWER switch is set to OFF (CHG) for more than 24 hours. 134 Additional Information Specification Video camera recorder System Video recording system 2 rotary heads, Helical scanning system Still image recording system Exif Ver. 2.2 *1 *1 "Exif" is a file format for...
Camera Operations Guide
Page 145
... Memory Overlap (OVERLAP 43 Memory photo 31, 52 "Memory Stick Duo" General information .........126 Inserting 24 Number of pictures ...........28, 32 Menu CAMERA SET............64 EDIT/PLAY 79 MEMORY SET .......... 70 MENU ROTATE........ 87 PICT. EDIT 79 R REC FOLDER 73 Rec review 48 REC START/STOP .... 26, 50 Recording capacity Display 27 REMAINING ....... 71, 86 Recording lamp (REC LED 86 Recording mode (REC MODE)....... 27, 83 Recording time 18, 28 Remote Commander ....... 141 REMOTE CTRL ........ 86 Remote sensor 138 RESET 138 Review 26, 31 S S video...
... Memory Overlap (OVERLAP 43 Memory photo 31, 52 "Memory Stick Duo" General information .........126 Inserting 24 Number of pictures ...........28, 32 Menu CAMERA SET............64 EDIT/PLAY 79 MEMORY SET .......... 70 MENU ROTATE........ 87 PICT. EDIT 79 R REC FOLDER 73 Rec review 48 REC START/STOP .... 26, 50 Recording capacity Display 27 REMAINING ....... 71, 86 Recording lamp (REC LED 86 Recording mode (REC MODE)....... 27, 83 Recording time 18, 28 Remote Commander ....... 141 REMOTE CTRL ........ 86 Remote sensor 138 RESET 138 Review 26, 31 S S video...


