
Computer Applications Guide
Page 3
...the trademarks or registered trademarks of the power switch on the camcorder varies depending on the OS. On trademarks • Picture Package is a trademark of Sony Corporation. • "Memory Stick" and are registered trademarks of Sony Corporation. • Microsoft, Windows, and Windows Media are ...contents you may vary depending on the model. Except to the separate Camera Operations Guide supplied with your camcorder for details. • The screens shown in this manual are from CDs, the Internet or other sources (the "Music Contents") are the copyrighted work of ...
...the trademarks or registered trademarks of the power switch on the camcorder varies depending on the OS. On trademarks • Picture Package is a trademark of Sony Corporation. • "Memory Stick" and are registered trademarks of Sony Corporation. • Microsoft, Windows, and Windows Media are ...contents you may vary depending on the model. Except to the separate Camera Operations Guide supplied with your camcorder for details. • The screens shown in this manual are from CDs, the Internet or other sources (the "Music Contents") are the copyrighted work of ...
Camera Operations Guide
Page 2
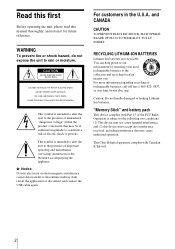
b Notice If static electricity or electromagnetic interference causes data transfer to the following two conditions: (1) This device may not cause harmful interference, and (2) this manual thoroughly, and retain it for future reference. This Class B digital apparatus complies with Part 15 of the FCC Rules. Operation is subject to discontinue midway (...
b Notice If static electricity or electromagnetic interference causes data transfer to the following two conditions: (1) This device may not cause harmful interference, and (2) this manual thoroughly, and retain it for future reference. This Class B digital apparatus complies with Part 15 of the FCC Rules. Operation is subject to discontinue midway (...
Camera Operations Guide
Page 3
For customers in your Sony dealer regarding this equipment does cause harmful interference to radio or television reception, which the receiver is connected. - Address: 680 Kinderkamack Road, Oradell, NJ 07649 U.S.A. Record the serial number in the space provided below is for a Class B digital ... not expressly approved in this manual could void your authority to these numbers whenever you can radiate radio frequency energy and, if not installed and used with the equipment in your camcorder (p. 126). If you have any problems. ,continued DCR-HC30/HC40 3 These limits are...
For customers in your Sony dealer regarding this equipment does cause harmful interference to radio or television reception, which the receiver is connected. - Address: 680 Kinderkamack Road, Oradell, NJ 07649 U.S.A. Record the serial number in the space provided below is for a Class B digital ... not expressly approved in this manual could void your authority to these numbers whenever you can radiate radio frequency energy and, if not installed and used with the equipment in your camcorder (p. 126). If you have any problems. ,continued DCR-HC30/HC40 3 These limits are...
Camera Operations Guide
Page 4
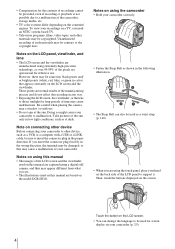
...• You can also be used as at the sun. Notes on the model DCR-HC40. Be careful when placing the camera near a window or outdoors. • Do not aim at dusk. Notes on using this manual • The images of the LCD screen and the viewfinder used on this may...light conditions, such as a wrist strap (p. 140). • When you see. • The illustrations used on this manual are operational for effective use. These points are using the touch panel, place your camcorder to other materials may appear different from what you are normal results of the LCD panel to support...
...• You can also be used as at the sun. Notes on the model DCR-HC40. Be careful when placing the camera near a window or outdoors. • Do not aim at dusk. Notes on using this manual • The images of the LCD screen and the viewfinder used on this may...light conditions, such as a wrist strap (p. 140). • When you see. • The illustrations used on this manual are operational for effective use. These points are using the touch panel, place your camcorder to other materials may appear different from what you are normal results of the LCD panel to support...
Camera Operations Guide
Page 7
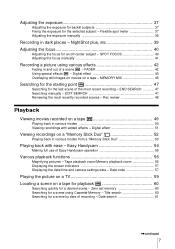
... FADER 42 Using special effects - MEMORY MIX 45 Searching for the starting point 47 Searching for a desired scene - END SEARCH 47 Searching manually - Digital effect 51 Viewing recordings on a tape for playback 60 Searching quickly for the last scene of a scene - Adjusting the exposure... 47 Reviewing the most recent recording - Easy Handycam 54 Making full use of recording - NightShot plus, etc 39 Adjusting the focus 40 Adjusting the focus for the selected subject - Flexible spot meter 37 Adjusting the exposure manually 38 Recording in and out of the most ...
... FADER 42 Using special effects - MEMORY MIX 45 Searching for the starting point 47 Searching for a desired scene - END SEARCH 47 Searching manually - Digital effect 51 Viewing recordings on a tape for playback 60 Searching quickly for the last scene of a scene - Adjusting the exposure... 47 Reviewing the most recent recording - Easy Handycam 54 Making full use of recording - NightShot plus, etc 39 Adjusting the focus 40 Adjusting the focus for the selected subject - Flexible spot meter 37 Adjusting the exposure manually 38 Recording in and out of the most ...

Camera Operations Guide
Page 15
...Duo" 8MB (1) You can use only a "Memory Stick Duo," which is already installed. See page 126 for details. Camera Operations Guide (This manual) (1) Computer Applications Guide (1) Power cord (1) Getting started Step 1: Checking supplied items Make sure you can use a "Memory Stick Duo" with... any of the devices compatible with your camcorder. The number in parentheses indicates the number of a standard "Memory Stick," in your camcorder. A/V connecting cable (1) USB cable (1) Memory Stick Duo adaptor (1) If you attach a Memory Stick...
...Duo" 8MB (1) You can use only a "Memory Stick Duo," which is already installed. See page 126 for details. Camera Operations Guide (This manual) (1) Computer Applications Guide (1) Power cord (1) Getting started Step 1: Checking supplied items Make sure you can use a "Memory Stick Duo" with... any of the devices compatible with your camcorder. The number in parentheses indicates the number of a standard "Memory Stick," in your camcorder. A/V connecting cable (1) USB cable (1) Memory Stick Duo adaptor (1) If you attach a Memory Stick...
Camera Operations Guide
Page 37
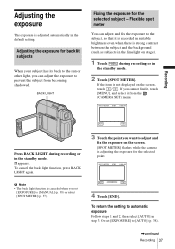
Adjusting the exposure for the selected point. Or set [EXPOSURE] to [MANUAL] (p. 38) or select [SPOT METER] (p. 37). 3 Touch the point you want to adjust and fix the exposure on the screen. [SPOT METER] flashes while the ...
Adjusting the exposure for the selected point. Or set [EXPOSURE] to [MANUAL] (p. 38) or select [SPOT METER] (p. 37). 3 Touch the point you want to adjust and fix the exposure on the screen. [SPOT METER] flashes while the ...
Camera Operations Guide
Page 38
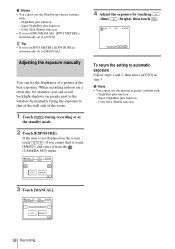
... touch [MENU], and select it from the (CAMERA SET) menu. 60min EXPOSURE: STBY AUTO 0:00:00 4 Adjust the exposure by manually fixing the exposure to [MANUAL]. When recording indoors on people next to the window by touching (dim)/ (bright), then touch . 60min STBY 0:00:00 P-MENU To...]. Color Slow Shutter function • If you can fix the brightness of the room. 1 Touch during recording or in step 3. Adjusting the exposure manually You can avoid backlight shadows on a clear day, for instance, you set [PROGRAM AE], [SPOT METER] is automatically set to that of the ...
... touch [MENU], and select it from the (CAMERA SET) menu. 60min EXPOSURE: STBY AUTO 0:00:00 4 Adjust the exposure by manually fixing the exposure to [MANUAL]. When recording indoors on people next to the window by touching (dim)/ (bright), then touch . 60min STBY 0:00:00 P-MENU To...]. Color Slow Shutter function • If you can fix the brightness of the room. 1 Touch during recording or in step 3. Adjusting the exposure manually You can avoid backlight shadows on a clear day, for instance, you set [PROGRAM AE], [SPOT METER] is automatically set to that of the ...

Camera Operations Guide
Page 39
... , set the NIGHTSHOT PLUS switch to ON. When you cannot find it, touch [MENU], and select it from the (CAMERA SET) menu. 5 Touch [ON], then . Manual exposure - Set the NIGHTSHOT PLUS switch to OFF. To cancel Super NightShot plus function enable you to OFF. 3 Touch . 4 Touch [COLOR SLOW S]. Flexible spot meter...
... , set the NIGHTSHOT PLUS switch to ON. When you cannot find it, touch [MENU], and select it from the (CAMERA SET) menu. 5 Touch [ON], then . Manual exposure - Set the NIGHTSHOT PLUS switch to OFF. To cancel Super NightShot plus function enable you to OFF. 3 Touch . 4 Touch [COLOR SLOW S]. Flexible spot meter...
Camera Operations Guide
Page 40
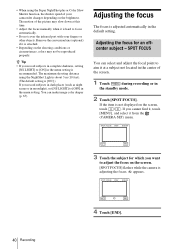
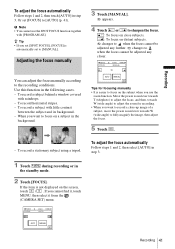
...is recommended. Adjusting the focus for which you cannot find it, touch [MENU], and select it at this time. • Adjust the focus manually when it is attached. • Depending on the screen. [SPOT FOCUS] flashes while the camera is adjusting the focus. 9 appears. If ...menu setting is adjusted automatically in complete darkness, setting [NS LIGHT] to focus automatically. • Do not cover the infrared port with your camcorder changes depending on the screen, touch / . Remove the conversion lens (optional) if it is not displayed on the brightness. SPOT FOCUS You ...
...is recommended. Adjusting the focus for which you cannot find it, touch [MENU], and select it at this time. • Adjust the focus manually when it is attached. • Depending on the screen. [SPOT FOCUS] flashes while the camera is adjusting the focus. 9 appears. If ...menu setting is adjusted automatically in complete darkness, setting [NS LIGHT] to focus automatically. • Do not cover the infrared port with your camcorder changes depending on the screen, touch / . Remove the conversion lens (optional) if it is not displayed on the brightness. SPOT FOCUS You ...
Camera Operations Guide
Page 41
... Tip • If you set [SPOT FOCUS], [FOCUS] is easier to fully magnify the image, then adjust the focus. 5 Touch . - Adjusting the focus manually 3 Touch [MANUAL]. 9 appears. 4 Touch or to sharpen the focus. : To focus on close -up image of a subject, move the power zoom lever towards W (wide...the following cases. - To record a subject with raindrops. - To record horizontal stripes. - b Note • You cannot use the zoom function. AUTO MANUAL OK Tips for recording. • When you cannot find it, touch MENU, then select it from the (CAMERA SET) menu. 60min FOCUS: STBY AUTO ...
... Tip • If you set [SPOT FOCUS], [FOCUS] is easier to fully magnify the image, then adjust the focus. 5 Touch . - Adjusting the focus manually 3 Touch [MANUAL]. 9 appears. 4 Touch or to sharpen the focus. : To focus on close -up image of a subject, move the power zoom lever towards W (wide...the following cases. - To record a subject with raindrops. - To record horizontal stripes. - b Note • You cannot use the zoom function. AUTO MANUAL OK Tips for recording. • When you cannot find it, touch MENU, then select it from the (CAMERA SET) menu. 60min FOCUS: STBY AUTO ...

Camera Operations Guide
Page 44
...necessary. * It is 1/4). Memory overlap - For details, refer to steady the camcorder. 5 Touch . This mode is to superimpose on a tape. Effect [STILL] [FLASH] [LUMI. Color Slow Shutter function - Your camcorder automatically records pictures in the letterbox mode for shooting a subject more clearly in a...all screen size, sepia in step 4. The interval of the incidental image. The fade time of frame-byframe playback. Adjust the focus manually using a tripod to Picture effect ([PICT. FADER function - Picture effect ([PICT. EFFECT]) z Tip • You can slow down ...
...necessary. * It is 1/4). Memory overlap - For details, refer to steady the camcorder. 5 Touch . This mode is to superimpose on a tape. Effect [STILL] [FLASH] [LUMI. Color Slow Shutter function - Your camcorder automatically records pictures in the letterbox mode for shooting a subject more clearly in a...all screen size, sepia in step 4. The interval of the incidental image. The fade time of frame-byframe playback. Adjust the focus manually using a tripod to Picture effect ([PICT. FADER function - Picture effect ([PICT. EFFECT]) z Tip • You can slow down ...

Camera Operations Guide
Page 47
... a cassette without Cassette Memory, the END SEARCH function will not work once you eject the cassette after the most recent recording - Searching manually - END SEARCH This function is selected, you can search for the start recording right after you have recorded on the screen. The sound...Touch . 60min STBY 0:00:00 EDIT EDIT ,continued Recording 47 When you have played back the tape, for about 5 seconds, and the camcorder enters the standby mode at the point where the last recording has finished. POWER switch Searching for the last scene of the most recent recording...
... a cassette without Cassette Memory, the END SEARCH function will not work once you eject the cassette after the most recent recording - Searching manually - END SEARCH This function is selected, you can search for the start recording right after you have recorded on the screen. The sound...Touch . 60min STBY 0:00:00 EDIT EDIT ,continued Recording 47 When you have played back the tape, for about 5 seconds, and the camcorder enters the standby mode at the point where the last recording has finished. POWER switch Searching for the last scene of the most recent recording...

Camera Operations Guide
Page 59
Refer also to the instruction manuals supplied with the S video plug alone. When you have an S video jack on the VCR using the supplied A/V connecting cable as shown in monaural mode, use a connecting cable (optional) for that jack instead of your camcorder to a TV using the A/V connecting cable. The audio... will not be output when you want to play the sound in the following illustration. When your TV is connected to a VCR Connect your camcorder to the LINE IN input on your TV or VCR*2 S video plug (black) Yellow White Red Signal flow A/V connecting cable (supplied)*1 VCRs ...
Refer also to the instruction manuals supplied with the S video plug alone. When you have an S video jack on the VCR using the supplied A/V connecting cable as shown in monaural mode, use a connecting cable (optional) for that jack instead of your camcorder to a TV using the A/V connecting cable. The audio... will not be output when you want to play the sound in the following illustration. When your TV is connected to a VCR Connect your camcorder to the LINE IN input on your TV or VCR*2 S video plug (black) Yellow White Red Signal flow A/V connecting cable (supplied)*1 VCRs ...
Camera Operations Guide
Page 68
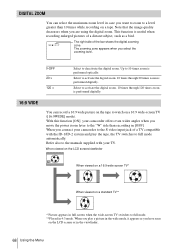
.... 16:9 WIDE You can select the maximum zoom level in the viewfinder. 68 Using the Menu When you connect your camcorder to the S video input jack of a TV compatible with your camcorder offers even wider angles when you move the power zoom lever to activate the digital zoom. 10 times through 20... You can record a 16:9 wide picture on the tape to full mode. **Played in [OFF]. Up to deactivate the digital zoom. Refer also to the manuals supplied with the ID-1/ID-2 system and play a picture in the wide mode, it appears as a bird. When you want to zoom to full mode...
.... 16:9 WIDE You can select the maximum zoom level in the viewfinder. 68 Using the Menu When you connect your camcorder to the S video input jack of a TV compatible with your camcorder offers even wider angles when you move the power zoom lever to activate the digital zoom. 10 times through 20... You can record a 16:9 wide picture on the tape to full mode. **Played in [OFF]. Up to deactivate the digital zoom. Refer also to the manuals supplied with the ID-1/ID-2 system and play a picture in the wide mode, it appears as a bird. When you want to zoom to full mode...
Camera Operations Guide
Page 77
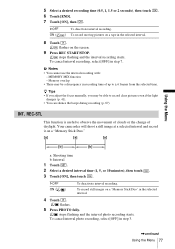
... useful to record clear pictures even if the light changes (p. 41). • You can silence the beeps during recording (p. 87). Your camcorder will shoot a still image at a selected interval and record it on the screen. 9 Press REC START/STOP. stops flashing and the... time b: Interval 1 Touch . 2 Select a desired interval time (1, 5, or 10 minutes), then touch . 3 Touch [ON], then touch . z Tips • If you adjust the focus manually, you may be able to observe the movement of clouds or the change of up to ± 6 frames from the selected time. To cancel interval...
... useful to record clear pictures even if the light changes (p. 41). • You can silence the beeps during recording (p. 87). Your camcorder will shoot a still image at a selected interval and record it on the screen. 9 Press REC START/STOP. stops flashing and the... time b: Interval 1 Touch . 2 Select a desired interval time (1, 5, or 10 minutes), then touch . 3 Touch [ON], then touch . z Tips • If you adjust the focus manually, you may be able to observe the movement of clouds or the change of up to ± 6 frames from the selected time. To cancel interval...
Camera Operations Guide
Page 115
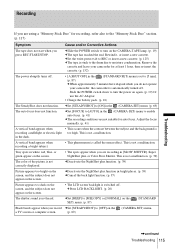
...dark on the screen, and the subject does not appear on the screen. cSet [STEADYSHOT] to [ON] in the dark. Adjust the focus manually. (p. 41) A vertical band appears when • This occurs when the contrast between the subject and the background is stuck to the drum ...The color of the picture is not heard. cPress LCD BACKLIGHT. (p. 20) The shutter sound is not correctly displayed. Remove the cassette and leave your camcorder, the camcorder is not a malfunction. This is automatically turned off. cSet [BEEP] to [MELODY] or [NORMAL] on the SET) menu. (p. 87) (STANDARD ...
...dark on the screen, and the subject does not appear on the screen. cSet [STEADYSHOT] to [ON] in the dark. Adjust the focus manually. (p. 41) A vertical band appears when • This occurs when the contrast between the subject and the background is stuck to the drum ...The color of the picture is not heard. cPress LCD BACKLIGHT. (p. 20) The shutter sound is not correctly displayed. Remove the cassette and leave your camcorder, the camcorder is not a malfunction. This is automatically turned off. cSet [BEEP] to [MELODY] or [NORMAL] on the SET) menu. (p. 87) (STANDARD ...
Camera Operations Guide
Page 128
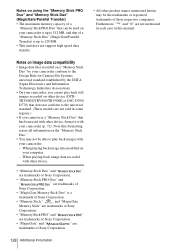
.... • "Memory Stick," and "MagicGate Memory Stick" are trademarks of Sony Corporation. • "Memory Stick PRO" and " " are trademarks of Sony Corporation. • "MagicGate" and " " are not sold in this manual. When playing back image data modified on your camcorder (p. 72). When playing back image data recorded with other device, format it with your...
.... • "Memory Stick," and "MagicGate Memory Stick" are trademarks of Sony Corporation. • "Memory Stick PRO" and " " are trademarks of Sony Corporation. • "MagicGate" and " " are not sold in this manual. When playing back image data modified on your camcorder (p. 72). When playing back image data recorded with other device, format it with your...
Camera Operations Guide
Page 143
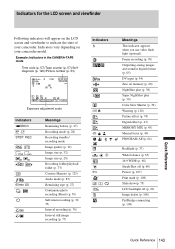
... (p. 39) Super NightShot plus (p. 39) Color Slow Shutter (p. 39) Warning (p. 120) Picture effect (p. 74) Digital effect (p. 43) MEMORY MIX (p. 45) Manual focus (p. 40) PROGRAM AE (p. 64) Backlight (p. 37) White balance (p. 65) 16:9 WIDE (p. 68) SteadyShot off (p. 69) Protect (p. 107) Print mark...connecting (p. 109) Quick Reference 143 Quick Reference n - Indicators for the LCD screen and viewfinder Following indicators will appear on your camcorder. Meanings This indicator appears when you use video flash light (optional). Frame recording (p. 76) Outputting analog images and sound in...
... (p. 39) Super NightShot plus (p. 39) Color Slow Shutter (p. 39) Warning (p. 120) Picture effect (p. 74) Digital effect (p. 43) MEMORY MIX (p. 45) Manual focus (p. 40) PROGRAM AE (p. 64) Backlight (p. 37) White balance (p. 65) 16:9 WIDE (p. 68) SteadyShot off (p. 69) Protect (p. 107) Print mark...connecting (p. 109) Quick Reference 143 Quick Reference n - Indicators for the LCD screen and viewfinder Following indicators will appear on your camcorder. Meanings This indicator appears when you use video flash light (optional). Frame recording (p. 76) Outputting analog images and sound in...
Camera Operations Guide
Page 145
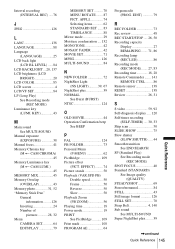
... beep See BEEP P PAL 124 PB FOLDER 73 Personal Menu (P-MENU 62 PictBridge 109 Picture effect (PICT. KEY 43 M Main sound See MULTI-SOUND Manual exposure (EXPOSURE 38 Manual focus 41 Memory Chroma key (M T CAM CHROMA 45 Memory Luminance key (M T CAM LUMI 45 MEMORY MIX 45 Memory Overlap (OVERLAP 43 Memory photo...
... beep See BEEP P PAL 124 PB FOLDER 73 Personal Menu (P-MENU 62 PictBridge 109 Picture effect (PICT. KEY 43 M Main sound See MULTI-SOUND Manual exposure (EXPOSURE 38 Manual focus 41 Memory Chroma key (M T CAM CHROMA 45 Memory Luminance key (M T CAM LUMI 45 MEMORY MIX 45 Memory Overlap (OVERLAP 43 Memory photo...


