
Computer Applications Guide
Page 25
...Disctray opens. b Note • When you connect your camcorder to a computer, make sure you insert the connector forcibly, it may be used. 8 For touch panel models, select [EXEC] of your camcorder, then select [VCD] on -screen instructions, place a new CD-R in the correct direction. ...b Note • CD-RWs cannot be damaged, and causes a malfunction of your camcorder. 6 For touch panel models, select [BURN VCD] on the LCD screen of your camcorder. b Notes • The importing of the picture stops automatically, when there is being converted to finish...
...Disctray opens. b Note • When you connect your camcorder to a computer, make sure you insert the connector forcibly, it may be used. 8 For touch panel models, select [EXEC] of your camcorder, then select [VCD] on -screen instructions, place a new CD-R in the correct direction. ...b Note • CD-RWs cannot be damaged, and causes a malfunction of your camcorder. 6 For touch panel models, select [BURN VCD] on the LCD screen of your camcorder. b Notes • The importing of the picture stops automatically, when there is being converted to finish...
Computer Applications Guide
Page 31
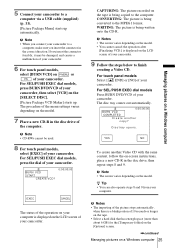
...drive of the power switch on the camcorder varies depending on your camcorder. z Tip • If you insert the connector in the disc drive. b Note • The screen varies depending on it may be damaged, and causes a malfunction of your camcorder. 5 For touch panel models, select [BURN DVD] ...:00 BURN DVD COMPLETED Create another DVD with the same content, follow the on-screen instructions, then repeat steps 7 and 8. The name of the computer. 7 For touch panel models, select [EXEC] on your camcorder. The disc tray comes out and place a new writable DVD in the correct ...
...drive of the power switch on the camcorder varies depending on your camcorder. z Tip • If you insert the connector in the disc drive. b Note • The screen varies depending on it may be damaged, and causes a malfunction of your camcorder. 5 For touch panel models, select [BURN DVD] ...:00 BURN DVD COMPLETED Create another DVD with the same content, follow the on-screen instructions, then repeat steps 7 and 8. The name of the computer. 7 For touch panel models, select [EXEC] on your camcorder. The disc tray comes out and place a new writable DVD in the correct ...
Computer Applications Guide
Page 32
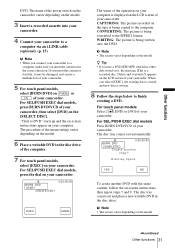
...cancel the operation For touch panel models Select [CANCEL] on the LCD screen of the later images. - When the data of the tape contains a date before the recording date of your camcorder. When normal and wide size pictures are recorded on . • You cannot operate your camcorder in the following occurs... to on the same tape. - b Notes • You cannot cancel the operation after [Finalizing DVD.] is displayed on the LCD screen of your camcorder. A DVD containing the data up from an 8mm tape if it contains pictures recorded in the menu settings of 10 seconds or longer ...
...cancel the operation For touch panel models Select [CANCEL] on the LCD screen of the later images. - When the data of the tape contains a date before the recording date of your camcorder. When normal and wide size pictures are recorded on . • You cannot operate your camcorder in the following occurs... to on the same tape. - b Notes • You cannot cancel the operation after [Finalizing DVD.] is displayed on the LCD screen of your camcorder. A DVD containing the data up from an 8mm tape if it contains pictures recorded in the menu settings of 10 seconds or longer ...
Camera Operations Guide
Page 4
...TV. • Television programs, films, video tapes, and other device Before connecting your camcorder. Then, touch the buttons displayed on the LCD screen and the viewfinder. These points are based on the model DCR-HC40. However, there may cause malfunctions. Be careful when placing the camera near a ...white, red, blue, or green in the proper direction. • Compensation for screen display on your camcorder (p. 25). 4 Doing so might cause your recordings on a TV, you are captured using the touch panel, place your hand on the back side of time may be copyrighted. To...
...TV. • Television programs, films, video tapes, and other device Before connecting your camcorder. Then, touch the buttons displayed on the LCD screen and the viewfinder. These points are based on the model DCR-HC40. However, there may cause malfunctions. Be careful when placing the camera near a ...white, red, blue, or green in the proper direction. • Compensation for screen display on your camcorder (p. 25). 4 Doing so might cause your recordings on a TV, you are captured using the touch panel, place your hand on the back side of time may be copyrighted. To...
Camera Operations Guide
Page 11
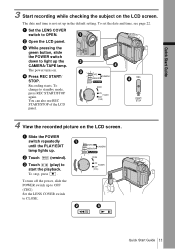
... starts. To stop, press . d Press REC START/ STOP. To change to start the playback. c Touch (play) to standby mode, press REC START/STOP again. Set the LENS COVER switch to OPEN. The power turns on the LCD screen. To set up to light up . b Open the LCD panel. a Slide the POWER switch... 3 Start recording while checking the subject on . You can also use REC START/STOP of the LCD panel. 4 View the recorded picture on the LCD screen. b Touch (rewind). The date and time is not set the date and time, see page 22.
... starts. To stop, press . d Press REC START/ STOP. To change to start the playback. c Touch (play) to standby mode, press REC START/STOP again. Set the LENS COVER switch to OPEN. The power turns on the LCD screen. To set up to light up . b Open the LCD panel. a Slide the POWER switch... 3 Start recording while checking the subject on . You can also use REC START/STOP of the LCD panel. 4 View the recorded picture on the LCD screen. b Touch (rewind). The date and time is not set the date and time, see page 22.

Camera Operations Guide
Page 13
... sound is heard and the still image is not set the date and time, see page 22. b Touch . The date and time is recorded. 4 View the recorded picture on the LCD screen. a Slide the POWER switch repeatedly until the CAMERA-MEMORY lamp lights up to CLOSE. To turn off the...view images in the default setting. c While pressing the green button, slide the POWER switch repeatedly until the PLAY/EDIT lamp lights up in sequence. c Touch (next) or (previous) to OPEN. Quick Start Guide 3 Start recording while checking the subject on . To set up . d Press PHOTO lightly. The...
... sound is heard and the still image is not set the date and time, see page 22. b Touch . The date and time is recorded. 4 View the recorded picture on the LCD screen. a Slide the POWER switch repeatedly until the CAMERA-MEMORY lamp lights up to CLOSE. To turn off the...view images in the default setting. c While pressing the green button, slide the POWER switch repeatedly until the PLAY/EDIT lamp lights up in sequence. c Touch (next) or (previous) to OPEN. Quick Start Guide 3 Start recording while checking the subject on . To set up . d Press PHOTO lightly. The...
Camera Operations Guide
Page 20
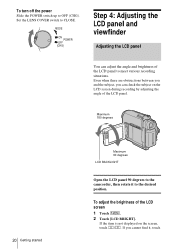
...switch to the desired position. Maximum 180 degrees 20 Getting started Maximum 90 degrees LCD BACKLIGHT Open the LCD panel 90 degrees to the camcorder, then rotate it , touch To adjust the brightness of the LCD panel. If you can adjust the angle and brightness of the LCD panel to OFF (CHG..., you cannot find it to CLOSE. Step 4: Adjusting the LCD panel and viewfinder Adjusting the LCD panel You can check the subject on the screen, touch / . To turn off the power Slide the POWER switch up to meet various recording situations. If the item is not displayed on the LCD...
...switch to the desired position. Maximum 180 degrees 20 Getting started Maximum 90 degrees LCD BACKLIGHT Open the LCD panel 90 degrees to the camcorder, then rotate it , touch To adjust the brightness of the LCD panel. If you can adjust the angle and brightness of the LCD panel to OFF (CHG..., you cannot find it to CLOSE. Step 4: Adjusting the LCD panel and viewfinder Adjusting the LCD panel You can check the subject on the screen, touch / . To turn off the power Slide the POWER switch up to meet various recording situations. If the item is not displayed on the LCD...
Camera Operations Guide
Page 21
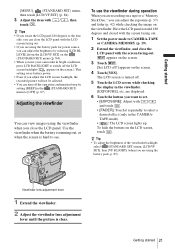
...8226; Even if you can turn off the LCD screen backlight ( appears on the viewfinder. To hide the buttons on the screen. 4 Touch [YES]. To use the viewfinder during operation When you are using the viewfinder when you use your camcorder in the (STANDARD SET) menu to the lens ...side, you can close the LCD panel with / , then touch . The LCD screen is turned off ?] ...
...8226; Even if you can turn off the LCD screen backlight ( appears on the viewfinder. To hide the buttons on the screen. 4 Touch [YES]. To use the viewfinder during operation When you are using the viewfinder when you use your camcorder in the (STANDARD SET) menu to the lens ...side, you can close the LCD panel with / , then touch . The LCD screen is turned off ?] ...
Camera Operations Guide
Page 22
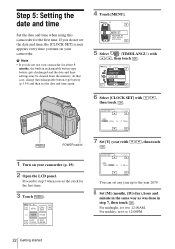
... SET] screen appears every time you do not set the date and time again. CLOCK SET -:--:-- CLOCK SET -:--:-- CAMERA SET PROGRAM AE SPOT METER EXPOSURE OK 5 Select (TIME/LANGU.) with / , then touch . SHUT OFF CLOCK SET WORLD --:--:-- POWER switch 1 Turn on your camcorder for the... first time. EXPO- LANGUAGE PROGRAM AE OK 6 Select [CLOCK SET] with / , then touch . DATE 2004Y JAN M 1D 0: 00 AM OK You can...
... SET] screen appears every time you do not set the date and time again. CLOCK SET -:--:-- CLOCK SET -:--:-- CAMERA SET PROGRAM AE SPOT METER EXPOSURE OK 5 Select (TIME/LANGU.) with / , then touch . SHUT OFF CLOCK SET WORLD --:--:-- POWER switch 1 Turn on your camcorder for the... first time. EXPO- LANGUAGE PROGRAM AE OK 6 Select [CLOCK SET] with / , then touch . DATE 2004Y JAN M 1D 0: 00 AM OK You can...
Camera Operations Guide
Page 25
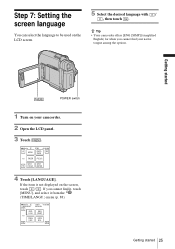
... not displayed on the LCD screen. 5 Select the desired language with / , then touch . z Tip • Your camcorder offers [ENG [SIMP]] (simplified English) for when you cannot find your camcorder. 2 Open the LCD panel. 3 Touch . 60min MENU STBY 0:00:00 EXPO- If you cannot find it, touch [MENU], and select it from... ÇAIS ENG [SIMP] ESPA ÑOL Getting started POWER switch 1 Turn on your native tongue among the options. Step 7: Setting the screen language You can select the language to be used on the screen, touch / . SURE 1/3 FADER FOCUS SPOT SPOT FOCUS METER...
... not displayed on the LCD screen. 5 Select the desired language with / , then touch . z Tip • Your camcorder offers [ENG [SIMP]] (simplified English) for when you cannot find your camcorder. 2 Open the LCD panel. 3 Touch . 60min MENU STBY 0:00:00 EXPO- If you cannot find it, touch [MENU], and select it from... ÇAIS ENG [SIMP] ESPA ÑOL Getting started POWER switch 1 Turn on your native tongue among the options. Step 7: Setting the screen language You can select the language to be used on the screen, touch / . SURE 1/3 FADER FOCUS SPOT SPOT FOCUS METER...
Camera Operations Guide
Page 26
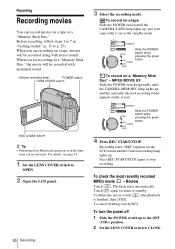
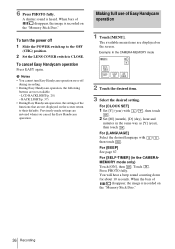
When you are recording on the LCD screen and the Camera recording lamp lights up , and your camcorder is finished, then [YES]. Slide the POWER switch while pressing the green button. To turn the power off 1 Slide the POWER switch up , and the ... the green button. To delete the movie, touch after playback is set to CLOSE. 26 Recording To check the most recently recorded MPEG movie - REC START/STOP z Tip • Performing Easy Handycam operation, even first time users can record movies on the screen. To cancel deleting, touch [NO]. Press REC START/STOP again to...
When you are recording on the LCD screen and the Camera recording lamp lights up , and your camcorder is finished, then [YES]. Slide the POWER switch while pressing the green button. To turn the power off 1 Slide the POWER switch up , and the ... the green button. To delete the movie, touch after playback is set to CLOSE. 26 Recording To check the most recently recorded MPEG movie - REC START/STOP z Tip • Performing Easy Handycam operation, even first time users can record movies on the screen. To cancel deleting, touch [NO]. Press REC START/STOP again to...
Camera Operations Guide
Page 30
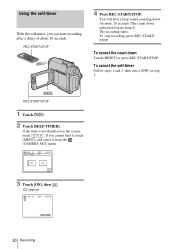
...the self-timer Follow steps 1 and 2, then select [OFF] in step 3. REC START/STOP 1 Touch . 2 Touch [SELF-TIMER]. The recording starts. If you can start recording after a delay of about 10 seconds (The count down Touch [RESET] or press REC START/STOP. appears. 60min STBY 0:00:00 P-MENU 30 Recording REC ...STOP 4 Press REC START/STOP. You will hear a beep sound counting down for about 10 seconds. If the item is not displayed on the screen, touch / . To cancel the count down indication begins from the (CAMERA SET) menu. 60min STBY SELF-TIMER: OFF 0:00:00 OFF ON...
...the self-timer Follow steps 1 and 2, then select [OFF] in step 3. REC START/STOP 1 Touch . 2 Touch [SELF-TIMER]. The recording starts. If you can start recording after a delay of about 10 seconds (The count down Touch [RESET] or press REC START/STOP. appears. 60min STBY 0:00:00 P-MENU 30 Recording REC ...STOP 4 Press REC START/STOP. You will hear a beep sound counting down for about 10 seconds. If the item is not displayed on the screen, touch / . To cancel the count down indication begins from the (CAMERA SET) menu. 60min STBY SELF-TIMER: OFF 0:00:00 OFF ON...
Camera Operations Guide
Page 33
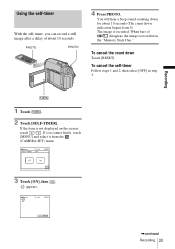
To cancel the count down for about 10 seconds. The image is not displayed on the "Memory Stick Duo." Recording 1 Touch . 2 Touch [SELF-TIMER]. If the item is recorded. appears. 60min 101 1152 FINE 30 P-MENU ,continued Recording 33 PHOTO PHOTO 4 Press PHOTO. To cancel ... steps 1 and 2, then select [OFF] in step 3. If you can record a still image after a delay of disappear, the image is recorded on the screen, touch / . When bars of about 10 seconds (The count down indication begins from the (CAMERA SET) menu. 60min 1152 FINE 30 SELF-TIMER: OFF OFF ON...
To cancel the count down for about 10 seconds. The image is not displayed on the "Memory Stick Duo." Recording 1 Touch . 2 Touch [SELF-TIMER]. If the item is recorded. appears. 60min 101 1152 FINE 30 P-MENU ,continued Recording 33 PHOTO PHOTO 4 Press PHOTO. To cancel ... steps 1 and 2, then select [OFF] in step 3. If you can record a still image after a delay of disappear, the image is recorded on the screen, touch / . When bars of about 10 seconds (The count down indication begins from the (CAMERA SET) menu. 60min 1152 FINE 30 SELF-TIMER: OFF OFF ON...
Camera Operations Guide
Page 36
...TIMER] (in the same way as [Y] (year), then touch . To turn Easy Handycam operation on the "Memory Stick Duo." 36 Recording Making full use of disappear, the image is recorded on the screen. For [CLOCK SET] 1 Set [Y] (year) with then touch . /, For [BEEP] See page 87. b Notes ...• You cannot turn the power off during recording. • During Easy Handycam operation, the following buttons are restored when you ...
...TIMER] (in the same way as [Y] (year), then touch . To turn Easy Handycam operation on the "Memory Stick Duo." 36 Recording Making full use of disappear, the image is recorded on the screen. For [CLOCK SET] 1 Set [Y] (year) with then touch . /, For [BEEP] See page 87. b Notes ...• You cannot turn the power off during recording. • During Easy Handycam operation, the following buttons are restored when you ...
Camera Operations Guide
Page 37
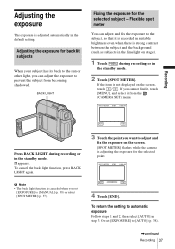
.... Flexible spot meter You can adjust the exposure to automatic exposure Follow steps 1 and 2, then select [AUTO] in the limelight on the screen, touch / . b Note • The back light function is canceled when you set [EXPOSURE] to adjust and fix the exposure on the... screen. [SPOT METER] flashes while the camera is adjusting the exposure for the selected subject - Or set [EXPOSURE] to [MANUAL] (p. 38) or select [SPOT METER] (p. 37). 3 Touch the point you cannot find it, touch [MENU], and select it is recorded in suitable...
.... Flexible spot meter You can adjust the exposure to automatic exposure Follow steps 1 and 2, then select [AUTO] in the limelight on the screen, touch / . b Note • The back light function is canceled when you set [EXPOSURE] to adjust and fix the exposure on the... screen. [SPOT METER] flashes while the camera is adjusting the exposure for the selected subject - Or set [EXPOSURE] to [MANUAL] (p. 38) or select [SPOT METER] (p. 37). 3 Touch the point you cannot find it, touch [MENU], and select it is recorded in suitable...
Camera Operations Guide
Page 38
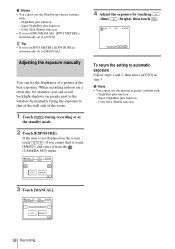
... You can avoid backlight shadows on people next to the window by touching (dim)/ (bright), then touch . 60min STBY 0:00:00 P-MENU To return the setting to [MANUAL]. When recording indoors on the screen, touch / . z Tip • If you cannot find it, touch [MENU], and select it from the (CAMERA SET) menu. 60min EXPOSURE: STBY...
... You can avoid backlight shadows on people next to the window by touching (dim)/ (bright), then touch . 60min STBY 0:00:00 P-MENU To return the setting to [MANUAL]. When recording indoors on the screen, touch / . z Tip • If you cannot find it, touch [MENU], and select it from the (CAMERA SET) menu. 60min EXPOSURE: STBY...
Camera Operations Guide
Page 39
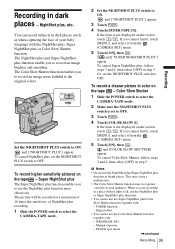
... Recording in total darkness. If you cannot find it, touch [MENU], and select it from the (CAMERA SET) menu. 5 Touch [ON], then . Flexible spot meter ,continued Recording 39 Recording You can record subjects in color on the screen, touch / . To cancel Super NightShot plus function in step ...and 4, then select [OFF] in bright places. If you cannot find it, touch [MENU], and select it from the (CAMERA SET) menu. 5 Touch [ON], then . To record higher sensitivity pictures on the screen, touch / . When you to OFF. NightShot plus or Color Slow Shutter function. To...
... Recording in total darkness. If you cannot find it, touch [MENU], and select it from the (CAMERA SET) menu. 5 Touch [ON], then . Flexible spot meter ,continued Recording 39 Recording You can record subjects in color on the screen, touch / . To cancel Super NightShot plus function in step ...and 4, then select [OFF] in bright places. If you cannot find it, touch [MENU], and select it from the (CAMERA SET) menu. 5 Touch [ON], then . To record higher sensitivity pictures on the screen, touch / . When you to OFF. NightShot plus or Color Slow Shutter function. To...
Camera Operations Guide
Page 40
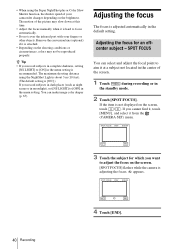
... END 4 Touch [END]. 40 Recording Adjusting the focus for which you want to [OFF] in the menu setting. z Tip • If you record subjects in complete darkness, setting [NS LIGHT] to focus automatically. • Do not cover the infrared port with your camcorder changes depending on...down at a subject not located in the center of the picture may not be reproduced properly. The motion of the screen. 1 Touch during recording or in the standby mode. 2 Touch [SPOT FOCUS]. SPOT FOCUS You can make image color deeper (p. 67). Remove the conversion lens (optional) if it...
... END 4 Touch [END]. 40 Recording Adjusting the focus for which you want to [OFF] in the menu setting. z Tip • If you record subjects in complete darkness, setting [NS LIGHT] to focus automatically. • Do not cover the infrared port with your camcorder changes depending on...down at a subject not located in the center of the picture may not be reproduced properly. The motion of the screen. 1 Touch during recording or in the standby mode. 2 Touch [SPOT FOCUS]. SPOT FOCUS You can make image color deeper (p. 67). Remove the conversion lens (optional) if it...
Camera Operations Guide
Page 41
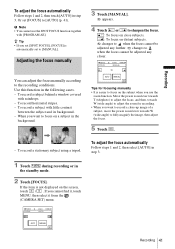
...focusing manually • It is easier to [AUTO] (p. 41). Recording To adjust the focus automatically Follow steps 1 and 2, then touch [AUTO] in the standby mode. 2 Touch [FOCUS]. b Note • You cannot use the zoom function. To record a subject with raindrops. - If the item is ...automatically set [FOCUS] to focus on the screen, touch / . z Tip • If you set [SPOT FOCUS], [FOCUS] is not displayed on the subject when you cannot find it, touch MENU, then select it from the (CAMERA SET) menu. 60min FOCUS: STBY...
...focusing manually • It is easier to [AUTO] (p. 41). Recording To adjust the focus automatically Follow steps 1 and 2, then touch [AUTO] in the standby mode. 2 Touch [FOCUS]. b Note • You cannot use the zoom function. To record a subject with raindrops. - If the item is ...automatically set [FOCUS] to focus on the screen, touch / . z Tip • If you set [SPOT FOCUS], [FOCUS] is not displayed on the subject when you cannot find it, touch MENU, then select it from the (CAMERA SET) menu. 60min FOCUS: STBY...
Camera Operations Guide
Page 42
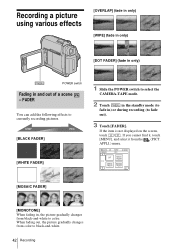
If you cannot find it, touch [MENU], and select it from color to black-and-white. 42 Recording When fading out, the picture gradually changes from the (...[BLACK FADER] [WHITE FADER] 1 Slide the POWER switch to select the CAMERA-TAPE mode. 2 Touch in the standby mode (to fade in , the picture gradually changes from black-and-white to fade out). 3 Touch [FADER]. APPLI.) menu. 60min FADER: STBY OFF 0:00:00 OFF BLACK FADER 1/2 WHITE MOSAIC ... in only) [DOT FADER] (fade in only) POWER switch Fading in and out of a scene - If the item is not displayed on the screen, touch / .
If you cannot find it, touch [MENU], and select it from color to black-and-white. 42 Recording When fading out, the picture gradually changes from the (...[BLACK FADER] [WHITE FADER] 1 Slide the POWER switch to select the CAMERA-TAPE mode. 2 Touch in the standby mode (to fade in , the picture gradually changes from black-and-white to fade out). 3 Touch [FADER]. APPLI.) menu. 60min FADER: STBY OFF 0:00:00 OFF BLACK FADER 1/2 WHITE MOSAIC ... in only) [DOT FADER] (fade in only) POWER switch Fading in and out of a scene - If the item is not displayed on the screen, touch / .


