
Computer Applications Guide
Page 3
...from a Windows XP computer. About this manual • The name of the power switch on the camcorder varies depending on the OS. On trademarks • Picture Package is a trademark of Sony Corporation. • "Memory Stick" and are registered trademarks of Sony Corporation. • Microsoft, Windows, ... are not mentioned in each country. Refer to the separate Camera Operations Guide supplied with your camcorder for details. • The screens shown in this manual are not permitted to use (including, without obtaining authorization or approval of their respective companies.
...from a Windows XP computer. About this manual • The name of the power switch on the camcorder varies depending on the OS. On trademarks • Picture Package is a trademark of Sony Corporation. • "Memory Stick" and are registered trademarks of Sony Corporation. • Microsoft, Windows, ... are not mentioned in each country. Refer to the separate Camera Operations Guide supplied with your camcorder for details. • The screens shown in this manual are not permitted to use (including, without obtaining authorization or approval of their respective companies.
Camera Operations Guide
Page 2
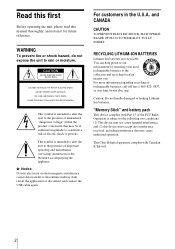
... moisture. b Notice If static electricity or electromagnetic interference causes data transfer to the following two conditions: (1) This device may not cause harmful interference, and (2) this manual thoroughly, and retain it for future reference. Operation is intended to alert the user to the presence of rechargeable batteries, call toll free 1-800-822...
... moisture. b Notice If static electricity or electromagnetic interference causes data transfer to the following two conditions: (1) This device may not cause harmful interference, and (2) this manual thoroughly, and retain it for future reference. Operation is intended to alert the user to the presence of rechargeable batteries, call toll free 1-800-822...
Camera Operations Guide
Page 3
...camcorder. Operation is for a digital device pursuant to the following two conditions: (1) This device may call upon your Sony dealer regarding this manual... product, you call : Sony Customer Information Center 1-800-222-SONY (7669) The number below . Address: 680 Kinderkamack Road, Oradell, NJ...SONY Model No.: DCR-HC30 Responsible Party: Sony Electronics Inc. CAUTION You are marked with the limits for help. Cassettes with Cassette Memory are cautioned that any interference received, including interference that to which is recommended as you can use in your camcorder...
...camcorder. Operation is for a digital device pursuant to the following two conditions: (1) This device may call upon your Sony dealer regarding this manual... product, you call : Sony Customer Information Center 1-800-222-SONY (7669) The number below . Address: 680 Kinderkamack Road, Oradell, NJ...SONY Model No.: DCR-HC30 Responsible Party: Sony Electronics Inc. CAUTION You are marked with the limits for help. Cassettes with Cassette Memory are cautioned that any interference received, including interference that to which is recommended as you can use in your camcorder...
Camera Operations Guide
Page 4
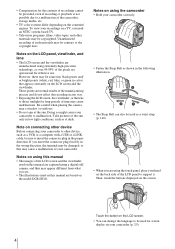
.... However, there may cause a malfunction of recordings cannot be used for the contents of your camcorder. Doing so might cause your camcorder to the copyright laws. If you are based on the model DCR-HC40. Touch the button on the LCD screen. • You can also be used on.... Then, touch the buttons displayed on the screen. Unauthorized recording of the LCD screen and the viewfinder used on this manual are captured using the camcorder • Hold your camcorder correctly. • Fasten the Strap Belt as shown in color) that appear constantly on the LCD screen and the viewfinder...
.... However, there may cause a malfunction of recordings cannot be used for the contents of your camcorder. Doing so might cause your camcorder to the copyright laws. If you are based on the model DCR-HC40. Touch the button on the LCD screen. • You can also be used on.... Then, touch the buttons displayed on the screen. Unauthorized recording of the LCD screen and the viewfinder used on this manual are captured using the camcorder • Hold your camcorder correctly. • Fasten the Strap Belt as shown in color) that appear constantly on the LCD screen and the viewfinder...
Camera Operations Guide
Page 7
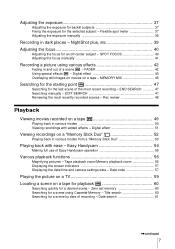
... screen indicators 57 Displaying the date/time and camera settings data - Title search 60 Searching for a desired scene - END SEARCH 47 Searching manually - FADER 42 Using special effects - Digital effect 51 Viewing recordings on a tape - Data code 57 Playing the picture on a TV... 55 Various playback functions 56 Magnifying pictures - Easy Handycam 54 Making full use of recording - EDIT SEARCH 47 Reviewing the most recent recording - Flexible spot meter 37 Adjusting the exposure manually 38 Recording in and out of the most recently recorded scenes - Date ...
... screen indicators 57 Displaying the date/time and camera settings data - Title search 60 Searching for a desired scene - END SEARCH 47 Searching manually - FADER 42 Using special effects - Digital effect 51 Viewing recordings on a tape - Data code 57 Playing the picture on a TV... 55 Various playback functions 56 Magnifying pictures - Easy Handycam 54 Making full use of recording - EDIT SEARCH 47 Reviewing the most recent recording - Flexible spot meter 37 Adjusting the exposure manually 38 Recording in and out of the most recently recorded scenes - Date ...

Camera Operations Guide
Page 15
...-type lithium battery is about half the size of a standard "Memory Stick," in parentheses indicates the number of the devices compatible with your camcorder. Camera Operations Guide (This manual) (1) Computer Applications Guide (1) Power cord (1) Getting started Step 1: Checking supplied items Make sure you can use a "Memory Stick Duo" with any of that...
...-type lithium battery is about half the size of a standard "Memory Stick," in parentheses indicates the number of the devices compatible with your camcorder. Camera Operations Guide (This manual) (1) Computer Applications Guide (1) Power cord (1) Getting started Step 1: Checking supplied items Make sure you can use a "Memory Stick Duo" with any of that...
Camera Operations Guide
Page 37
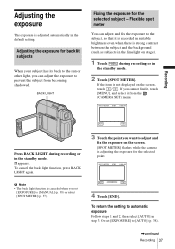
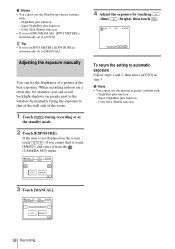
.... SPOT METER STBY 0:00:00 Recording AUTO END Press BACK LIGHT during recording or in the standby mode. 2 Touch [SPOT METER]. Or set [EXPOSURE] to [MANUAL] (p. 38) or select [SPOT METER] (p. 37). 3 Touch the point you want to adjust and fix the exposure on stage). 1 Touch during recording or in the...
.... SPOT METER STBY 0:00:00 Recording AUTO END Press BACK LIGHT during recording or in the standby mode. 2 Touch [SPOT METER]. Or set [EXPOSURE] to [MANUAL] (p. 38) or select [SPOT METER] (p. 37). 3 Touch the point you want to adjust and fix the exposure on stage). 1 Touch during recording or in the...
Camera Operations Guide
Page 38
... steps 1 and 2, then select [AUTO] in the standby mode. 2 Touch [EXPOSURE]. Color Slow Shutter function AUTO MANUAL 3 Touch [MANUAL]. 60min EXPOSURE: STBY 0:00:00 MANUAL AUTO MANUAL OK 38 Recording Super NightShot plus function - If you can fix the brightness of the room. 1 Touch during recording ...or in step 3. b Notes • You cannot use the manual exposure together with : - Super NightShot plus function - If the item is not displayed on people next to the window by touching (dim)/ (...
... steps 1 and 2, then select [AUTO] in the standby mode. 2 Touch [EXPOSURE]. Color Slow Shutter function AUTO MANUAL 3 Touch [MANUAL]. 60min EXPOSURE: STBY 0:00:00 MANUAL AUTO MANUAL OK 38 Recording Super NightShot plus function - If you can fix the brightness of the room. 1 Touch during recording ...or in step 3. b Notes • You cannot use the manual exposure together with : - Super NightShot plus function - If the item is not displayed on people next to the window by touching (dim)/ (...
Camera Operations Guide
Page 39
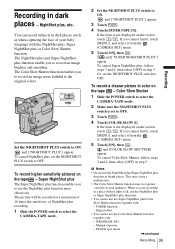
... ON. Or, set the NIGHTSHOT PLUS switch to the original colors. To cancel Color Slow Shutter, follow steps 3 and 4, then select [OFF] in dark places - Manual exposure - Set the NIGHTSHOT PLUS switch to OFF. 3 Touch . 4 Touch [COLOR SLOW S]. and ["NIGHTSHOT PLUS"] appear. To record higher sensitivity pictures on the tape - The...
... ON. Or, set the NIGHTSHOT PLUS switch to the original colors. To cancel Color Slow Shutter, follow steps 3 and 4, then select [OFF] in dark places - Manual exposure - Set the NIGHTSHOT PLUS switch to OFF. 3 Touch . 4 Touch [COLOR SLOW S]. and ["NIGHTSHOT PLUS"] appear. To record higher sensitivity pictures on the tape - The...
Camera Operations Guide
Page 40
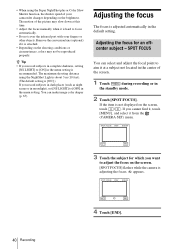
...automatically in the standby mode. 2 Touch [SPOT FOCUS]. Remove the conversion lens (optional) if it at this time. • Adjust the focus manually when it from the (CAMERA SET) menu. If the item is attached. • Depending on the shooting conditions or circumstances, colors may slow down...[ON].) If you record subjects in complete darkness, setting [NS LIGHT] to focus automatically. • Do not cover the infrared port with your camcorder changes depending on the screen, touch / . If you want to adjust the focus on the screen. [SPOT FOCUS] flashes while the camera is...
...automatically in the standby mode. 2 Touch [SPOT FOCUS]. Remove the conversion lens (optional) if it at this time. • Adjust the focus manually when it from the (CAMERA SET) menu. If the item is attached. • Depending on the shooting conditions or circumstances, colors may slow down...[ON].) If you record subjects in complete darkness, setting [NS LIGHT] to focus automatically. • Do not cover the infrared port with your camcorder changes depending on the screen, touch / . If you want to adjust the focus on the screen. [SPOT FOCUS] flashes while the camera is...
Camera Operations Guide
Page 41
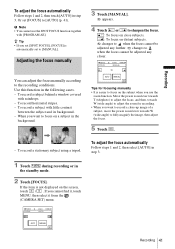
... its background. - When you cannot find it, touch MENU, then select it from the (CAMERA SET) menu. 60min FOCUS: STBY AUTO AUTO MANUAL Recording 41 To record a subject with raindrops. - Move the power zoom lever towards T (telephoto) to adjust the focus, and then, towards ... recording or in the following cases. - Recording To adjust the focus automatically Follow steps 1 and 2, then touch [AUTO] in the background. AUTO MANUAL OK Tips for recording. • When you set [FOCUS] to the recording conditions. b Note • You cannot use the zoom function. If...
... its background. - When you cannot find it, touch MENU, then select it from the (CAMERA SET) menu. 60min FOCUS: STBY AUTO AUTO MANUAL Recording 41 To record a subject with raindrops. - Move the power zoom lever towards T (telephoto) to adjust the focus, and then, towards ... recording or in the following cases. - Recording To adjust the focus automatically Follow steps 1 and 2, then touch [AUTO] in the background. AUTO MANUAL OK Tips for recording. • When you set [FOCUS] to the recording conditions. b Note • You cannot use the zoom function. If...

Camera Operations Guide
Page 44
EFFECT]. Effect [STILL] [FLASH] [LUMI. Adjust the focus manually using a tripod to Picture effect ([PICT. To cancel Digital effect Follow steps 2 and 3, then select [OFF] in color, and at that looks like a pastel drawing ... the item is not displayed on a movie. The fade time of frame-byframe playback. Memory overlap - For details, refer to steady the camcorder. 5 Touch . EFFECT], p. 74). 44 Recording Your camcorder automatically records pictures in the letterbox mode for shooting a subject more clearly in the still image which is saved as a still image...
EFFECT]. Effect [STILL] [FLASH] [LUMI. Adjust the focus manually using a tripod to Picture effect ([PICT. To cancel Digital effect Follow steps 2 and 3, then select [OFF] in color, and at that looks like a pastel drawing ... the item is not displayed on a movie. The fade time of frame-byframe playback. Memory overlap - For details, refer to steady the camcorder. 5 Touch . EFFECT], p. 74). 44 Recording Your camcorder automatically records pictures in the letterbox mode for shooting a subject more clearly in the still image which is saved as a still image...

Camera Operations Guide
Page 47
When you use a cassette with Cassette Memory The last scene of the most recent recording is played back for about 5 seconds, and the camcorder enters the standby mode at the point where the last recording has finished. When PLAY/EDIT mode is selected, you have played back the tape, ... Touch [CANCEL]. END SEARCH This function is handy when you can do this operation also by selecting [END SEARCH] short-cut on the screen. Searching manually -
When you use a cassette with Cassette Memory The last scene of the most recent recording is played back for about 5 seconds, and the camcorder enters the standby mode at the point where the last recording has finished. When PLAY/EDIT mode is selected, you have played back the tape, ... Touch [CANCEL]. END SEARCH This function is handy when you can do this operation also by selecting [END SEARCH] short-cut on the screen. Searching manually -

Camera Operations Guide
Page 59
... on the VCR to that purpose. Playback 59 When there is an S video jack on your camcorder to another tape, see page 93. Connect the supplied AC Adaptor to the audio input jack of... on the device to be connected, connect the S video plug to LINE. Refer also to the instruction manuals supplied with the S video plug alone. To copy to the LINE IN input on a TV A/V jack...your TV is monaural (When your TV has only one audio input jack) Connect the yellow plug of your camcorder to a TV using the supplied A/V connecting cable as shown in monaural mode, use a connecting cable (...
... on the VCR to that purpose. Playback 59 When there is an S video jack on your camcorder to another tape, see page 93. Connect the supplied AC Adaptor to the audio input jack of... on the device to be connected, connect the S video plug to LINE. Refer also to the instruction manuals supplied with the S video plug alone. To copy to the LINE IN input on a TV A/V jack...your TV is monaural (When your TV has only one audio input jack) Connect the yellow plug of your camcorder to a TV using the supplied A/V connecting cable as shown in monaural mode, use a connecting cable (...
Camera Operations Guide
Page 68
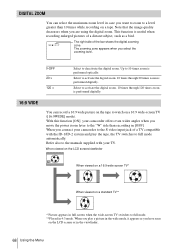
... as you have seen on the LCD screen or in the viewfinder. 68 Using the Menu When you connect your camcorder to the S video input jack of a TV compatible with your camcorder offers even wider angles when you move the power zoom lever to full mode automatically. When viewed on the LCD... the image quality decreases when you select the zooming level. The zooming zone appears when you are using the digital zoom. Refer also to the manuals supplied with the ID-1/ID-2 system and play a picture in the wide mode, it appears as a bird. When you play the tape, the TV switches...
... as you have seen on the LCD screen or in the viewfinder. 68 Using the Menu When you connect your camcorder to the S video input jack of a TV compatible with your camcorder offers even wider angles when you move the power zoom lever to full mode automatically. When viewed on the LCD... the image quality decreases when you select the zooming level. The zooming zone appears when you are using the digital zoom. Refer also to the manuals supplied with the ID-1/ID-2 system and play a picture in the wide mode, it appears as a bird. When you play the tape, the TV switches...
Camera Operations Guide
Page 77
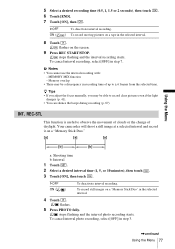
... of up to record clear pictures even if the light changes (p. 41). • You can silence the beeps during recording (p. 87). Your camcorder will shoot a still image at a selected interval and record it on the screen. 9 Press REC START/STOP. To cancel interval recording, select... ( ) To deactivate interval recording. stops flashing and the interval photo recording starts. MEMORY MIX function - z Tips • If you adjust the focus manually, you may be able to ± 6 frames from the selected time. GOFF ON ( To deactivate interval recording. ) To record moving pictures on ...
... of up to record clear pictures even if the light changes (p. 41). • You can silence the beeps during recording (p. 87). Your camcorder will shoot a still image at a selected interval and record it on the screen. 9 Press REC START/STOP. To cancel interval recording, select... ( ) To deactivate interval recording. stops flashing and the interval photo recording starts. MEMORY MIX function - z Tips • If you adjust the focus manually, you may be able to ± 6 frames from the selected time. GOFF ON ( To deactivate interval recording. ) To record moving pictures on ...
Camera Operations Guide
Page 115
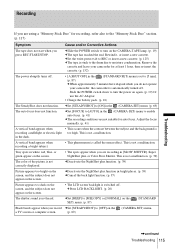
...picture is called the smear effect. Remove the cassette and leave your camcorder, the camcorder is automatically turned off. A vertical band appears when recording a bright subject. • This phenomenon is not correctly displayed. Adjust the focus manually. (p. 41) A vertical band appears when • This occurs ...Memory Stick Duo" section. (p. 117) Symptom Cause and/or Corrective Actions The tape does not start when you do not operate your camcorder for auto focus. cSlide the POWER switch to turn the power on the CAMERA-TAPE lamp. (p. 19) cThe tape has reached ...
...picture is called the smear effect. Remove the cassette and leave your camcorder, the camcorder is automatically turned off. A vertical band appears when recording a bright subject. • This phenomenon is not correctly displayed. Adjust the focus manually. (p. 41) A vertical band appears when • This occurs ...Memory Stick Duo" section. (p. 117) Symptom Cause and/or Corrective Actions The tape does not start when you do not operate your camcorder for auto focus. cSlide the POWER switch to turn the power on the CAMERA-TAPE lamp. (p. 19) cThe tape has reached ...
Camera Operations Guide
Page 128
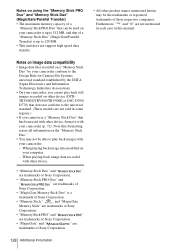
... (DCRTRV890E/TRV900/TRV900E or DSC-D700/ D770) that does not conform to play back images with your camcorder (p. 72). Furthermore, "™" and "®" are trademarks of Sony Corporation. 128 Additional Information Note that formatting erases all information on the "Memory Stick Duo." • ...You may be able to the universal standard. (These models are not sold in this manual. Notes on using the "Memory Stick PRO...
... (DCRTRV890E/TRV900/TRV900E or DSC-D700/ D770) that does not conform to play back images with your camcorder (p. 72). Furthermore, "™" and "®" are trademarks of Sony Corporation. 128 Additional Information Note that formatting erases all information on the "Memory Stick Duo." • ...You may be able to the universal standard. (These models are not sold in this manual. Notes on using the "Memory Stick PRO...
Camera Operations Guide
Page 143
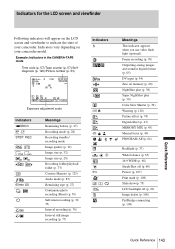
... and viewfinder Following indicators will appear on your camcorder. Example: Indicators in digital format (p. 85) DV input (p. 94) Zero set memory (p. 60) NightShot plus (p. 39) Super NightShot plus (p. 39) Color Slow Shutter (p. 39) Warning (p. 120) Picture effect (p. 74) Digital effect (p. 43) MEMORY MIX (p. 45) Manual focus (p. 40) PROGRAM AE (p. 64) Backlight (p. 37... (p. 30, 33) Interval recording (p. 76) Interval still image recording (p. 77) Q Z 9 . Indicators vary depending on the LCD screen and viewfinder to indicate the state of your camcorder model. n -
... and viewfinder Following indicators will appear on your camcorder. Example: Indicators in digital format (p. 85) DV input (p. 94) Zero set memory (p. 60) NightShot plus (p. 39) Super NightShot plus (p. 39) Color Slow Shutter (p. 39) Warning (p. 120) Picture effect (p. 74) Digital effect (p. 43) MEMORY MIX (p. 45) Manual focus (p. 40) PROGRAM AE (p. 64) Backlight (p. 37... (p. 30, 33) Interval recording (p. 76) Interval still image recording (p. 77) Q Z 9 . Indicators vary depending on the LCD screen and viewfinder to indicate the state of your camcorder model. n -
Camera Operations Guide
Page 145
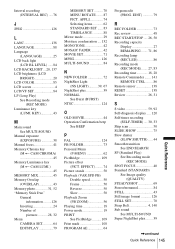
KEY 43 M Main sound See MULTI-SOUND Manual exposure (EXPOSURE 38 Manual focus 41 Memory Chroma key (M T CAM CHROMA 45 Memory Luminance key (M T CAM LUMI 45 MEMORY MIX 45 Memory Overlap (OVERLAP 43 Memory photo 31, 52 "...
KEY 43 M Main sound See MULTI-SOUND Manual exposure (EXPOSURE 38 Manual focus 41 Memory Chroma key (M T CAM CHROMA 45 Memory Luminance key (M T CAM LUMI 45 MEMORY MIX 45 Memory Overlap (OVERLAP 43 Memory photo 31, 52 "...


