
Computer Applications Guide
Page 2
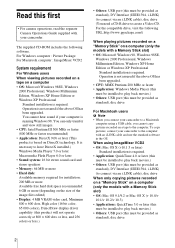
...using a USB cable, you connect your computer is not assured if the above OS has been upgraded. To copy pictures, connect your camcorder. Read this first • For camera operations, read the separate Camera Operations Guide supplied with an i.LINK cable and use the standard ...includes the following URL:http://www.ppackage.com/) When playing pictures recorded on a "Memory Stick" on DirectX technology. You cannot hear sound if your camcorder to play back movies.) • Others: USB port (this must be provided as standard), DV Interface (IEEE1394, i.LINK) (to connect via ...
...using a USB cable, you connect your computer is not assured if the above OS has been upgraded. To copy pictures, connect your camcorder. Read this first • For camera operations, read the separate Camera Operations Guide supplied with an i.LINK cable and use the standard ...includes the following URL:http://www.ppackage.com/) When playing pictures recorded on a "Memory Stick" on DirectX technology. You cannot hear sound if your camcorder to play back movies.) • Others: USB port (this must be provided as standard), DV Interface (IEEE1394, i.LINK) (to connect via ...
Computer Applications Guide
Page 3
...Media are either registered trademarks or trademarks of Microsoft Corporation in the United States and/or other applicable laws of Picture Package by Sony Corporation would not be the trademarks or registered trademarks of Intel Corporation. About this manual • The name of Macromedia, ...the respective owners thereof and are trademarks or registered trademarks of the power switch on the camcorder varies depending on the OS. Refer to the separate Camera Operations Guide supplied with your camcorder for details. • The screens shown in this manual. 3 Except to the ...
...Media are either registered trademarks or trademarks of Microsoft Corporation in the United States and/or other applicable laws of Picture Package by Sony Corporation would not be the trademarks or registered trademarks of Intel Corporation. About this manual • The name of Macromedia, ...the respective owners thereof and are trademarks or registered trademarks of the power switch on the camcorder varies depending on the OS. Refer to the separate Camera Operations Guide supplied with your camcorder for details. • The screens shown in this manual. 3 Except to the ...
Computer Applications Guide
Page 4
...Introduction to editing pictures on a computer 6 Features ...6 Overview of the preparation 7 Step 1: Installing the software on a computer 8 Step 2: Connecting your camcorder to a computer 10 Using the USB cable (supplied) when viewing pictures on a tape 11 Using the USB cable (supplied) when copying pictures on a... i.LINK cable (optional 15 Managing pictures on a Windows computer Copying, viewing and creating pictures 17 Viewing video and pictures on your camcorder - Picture Package VCD Maker 24 Copying images for MEMORY MIX to a "Memory Stick" (only the models with a Memory Stick ...
...Introduction to editing pictures on a computer 6 Features ...6 Overview of the preparation 7 Step 1: Installing the software on a computer 8 Step 2: Connecting your camcorder to a computer 10 Using the USB cable (supplied) when viewing pictures on a tape 11 Using the USB cable (supplied) when copying pictures on a... i.LINK cable (optional 15 Managing pictures on a Windows computer Copying, viewing and creating pictures 17 Viewing video and pictures on your camcorder - Picture Package VCD Maker 24 Copying images for MEMORY MIX to a "Memory Stick" (only the models with a Memory Stick ...
Computer Applications Guide
Page 6
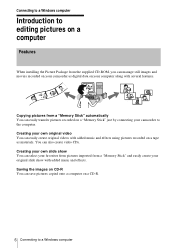
... original video You can easily create original videos with added music and effects using pictures recorded on a tape as digital data on your camcorder to a Windows computer Creating your own slide show with several features. Connecting to a Windows computer Introduction to editing pictures on a computer... Features When installing the Picture Package from the supplied CD-ROM, you can manage still images and movies recorded on your camcorder as materials. Saving the images on CD-R You can also create video CDs. You can save pictures copied onto a computer on a ...
... original video You can easily create original videos with added music and effects using pictures recorded on a tape as digital data on your camcorder to a Windows computer Creating your own slide show with several features. Connecting to a Windows computer Introduction to editing pictures on a computer... Features When installing the Picture Package from the supplied CD-ROM, you can manage still images and movies recorded on your camcorder as materials. Saving the images on CD-R You can also create video CDs. You can save pictures copied onto a computer on a ...

Computer Applications Guide
Page 7
.... On your computer (for the first time only) Step 1: Installing the software on the Handycam Station, then connect the Handycam Station to a computer. Now, start from Step1 ! * These illustrations are two ways to connect your camcorder to a computer. • Connecting with a USB cable (supplied) • Connecting with an i.LINK cable (optional) See "Step...
.... On your computer (for the first time only) Step 1: Installing the software on the Handycam Station, then connect the Handycam Station to a computer. Now, start from Step1 ! * These illustrations are two ways to connect your camcorder to a computer. • Connecting with a USB cable (supplied) • Connecting with an i.LINK cable (optional) See "Step...
Computer Applications Guide
Page 8
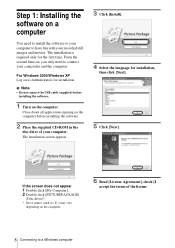
... software. 1 Turn on the computer. From the second time on, you only need to install the software to your computer to have fun with your camcorder and the computer. The installation is required only for installation, then click [Next]. 5 Click [Next]. If the screen does not appear 1 Double-click [My Computer...
... software. 1 Turn on the computer. From the second time on, you only need to install the software to your computer to have fun with your camcorder and the computer. The installation is required only for installation, then click [Next]. 5 Click [Next]. If the screen does not appear 1 Double-click [My Computer...
Computer Applications Guide
Page 10
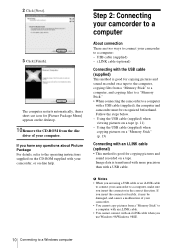
...be recognized beforehand. Using the USB cable (supplied) when viewing pictures on -line help. USB cable (supplied) - Step 2: Connecting your camcorder to a computer About connection There are using a USB cable or an i.LINK cable to a Windows computer i.LINK cable (optional) Connecting ...with a USB cable (supplied), the computer and camcorder must be damaged, and causes a malfunction of your camcorder to a computer with the USB cable (supplied) This method is good for copying pictures and sound recorded...
...be recognized beforehand. Using the USB cable (supplied) when viewing pictures on -line help. USB cable (supplied) - Step 2: Connecting your camcorder to a computer About connection There are using a USB cable or an i.LINK cable to a Windows computer i.LINK cable (optional) Connecting ...with a USB cable (supplied), the computer and camcorder must be damaged, and causes a malfunction of your camcorder to a computer with the USB cable (supplied) This method is good for copying pictures and sound recorded...
Computer Applications Guide
Page 11
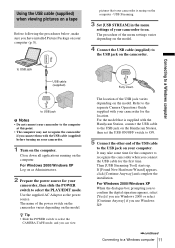
...the menu settings varies depending on the model. 4 Connect the USB cable (supplied) to the separate Camera Operations Guide supplied with your camcorder for your camcorder, then slide the POWER switch to confirm the digital signature appears, select [Yes] if you use Windows XP. ,continued Connecting to...Fully insert. pictures that is seeing on the computer - For Windows 2000/Windows XP Log on your camcorder is supplied with the Handycam Station, connect the USB cable to the USB jack on the Handycam Station, then set the USB ON/OFF switch to ON. 5 Connect the other end of your computer...
...the menu settings varies depending on the model. 4 Connect the USB cable (supplied) to the separate Camera Operations Guide supplied with your camcorder for your camcorder, then slide the POWER switch to confirm the digital signature appears, select [Yes] if you use Windows XP. ,continued Connecting to...Fully insert. pictures that is seeing on the computer - For Windows 2000/Windows XP Log on your camcorder is supplied with the Handycam Station, connect the USB cable to the USB jack on the Handycam Station, then set the USB ON/OFF switch to ON. 5 Connect the other end of your computer...
Computer Applications Guide
Page 13
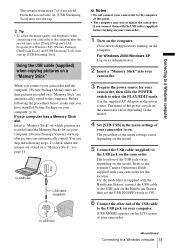
...separate Camera Operations Guide supplied with your camcorder to the computer at this point. • The computer may not recognize the camcorder if you connect them with the Handycam Station, connect the USB cable to the USB jack on the Handycam Station, then set the USB ON...You can skip the following the procedures below, make sure you connect your camcorder and the computer, [Picture Package Menu] starts up after the second time, select [Start], [Programs] ([All Programs] for Windows XP), [Picture Package], [Handycam Tools], and [USB Streaming Tool], then start up [USB Streaming Tool...
...separate Camera Operations Guide supplied with your camcorder to the computer at this point. • The computer may not recognize the camcorder if you connect them with the Handycam Station, connect the USB cable to the USB jack on the Handycam Station, then set the USB ON...You can skip the following the procedures below, make sure you connect your camcorder and the computer, [Picture Package Menu] starts up after the second time, select [Start], [Programs] ([All Programs] for Windows XP), [Picture Package], [Handycam Tools], and [USB Streaming Tool], then start up [USB Streaming Tool...
Computer Applications Guide
Page 14
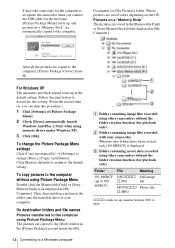
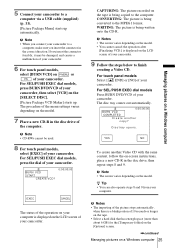
...Package Menu Double-click the [Removable Disk] or [Sony MemoryStick] icon displayed in the [Picture Package] created inside the [My 14 Connecting to a Windows computer A B C A Folder containing image files recorded using other camcorders without the folder creation function (for playback only) B... Package Menu settings Click [Copy automatically] t [Settings] to the default setting. To copy pictures to the computer without using other camcorders without the folder creation function (for playback only) Folder File Meaning 101 MSDCF (up at the default setting. Then, drag and ...
...Package Menu Double-click the [Removable Disk] or [Sony MemoryStick] icon displayed in the [Picture Package] created inside the [My 14 Connecting to a Windows computer A B C A Folder containing image files recorded using other camcorders without the folder creation function (for playback only) B... Package Menu settings Click [Copy automatically] t [Settings] to the default setting. To copy pictures to the computer without using other camcorders without the folder creation function (for playback only) Folder File Meaning 101 MSDCF (up at the default setting. Then, drag and ...

Computer Applications Guide
Page 15
... has a USB keyboard and a USB mouse as shown in the following illustrations to operate the camcorder correctly. • Connect the camcorder to a Windows computer task tray 2 Click [Safely remove Sony Camcorder] ([Unplug or eject hardware] in Windows 2000/Windows Me. 4 Disconnect the USB cable from ...the camcorder and computer. Connecting to a computer via the USB cable (supplied). Click here. 3 Click [OK] in Windows ...
... has a USB keyboard and a USB mouse as shown in the following illustrations to operate the camcorder correctly. • Connect the camcorder to a Windows computer task tray 2 Click [Safely remove Sony Camcorder] ([Unplug or eject hardware] in Windows 2000/Windows Me. 4 Disconnect the USB cable from ...the camcorder and computer. Connecting to a computer via the USB cable (supplied). Click here. 3 Click [OK] in Windows ...
Computer Applications Guide
Page 16
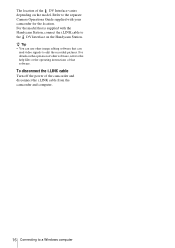
For the model that is supplied with your camcorder for the location. For details on the operation of other image editing software that software. Refer to the separate Camera Operations Guide supplied with the Handycam Station, connect the i.LINK cable to edit the recorded pictures. To ...model. The location of the DV Interface varies depending on the Handycam Station. z Tip • You can use other software, refer to the help files or the operating instructions of the camcorder and disconnect the i.LINK cable from the camcorder and computer. 16 Connecting to a Windows computer
For the model that is supplied with your camcorder for the location. For details on the operation of other image editing software that software. Refer to the separate Camera Operations Guide supplied with the Handycam Station, connect the i.LINK cable to edit the recorded pictures. To ...model. The location of the DV Interface varies depending on the Handycam Station. z Tip • You can use other software, refer to the help files or the operating instructions of the camcorder and disconnect the i.LINK cable from the camcorder and computer. 16 Connecting to a Windows computer
Computer Applications Guide
Page 17
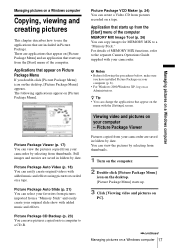
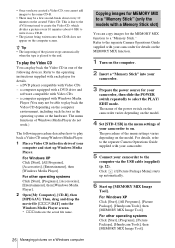
...effects. There are included in folders by selecting from a "Memory Stick" and easily create your camcorder are saved in Picture Package. Picture Package Viewer (p. 17) You can select your camcorder by date. Picture Package Auto Slide (p. 21) You can view the pictures copied from your...on Picture Package Menu If you have installed Picture Package on your computer (p. 8). • For Windows 2000/Windows XP, log on your camcorder. The following the procedures below, make sure you double-click [Picture Package Menu] icon on a Windows computer Viewing video and pictures on...
...effects. There are included in folders by selecting from a "Memory Stick" and easily create your camcorder are saved in Picture Package. Picture Package Viewer (p. 17) You can select your camcorder by date. Picture Package Auto Slide (p. 21) You can view the pictures copied from your...on Picture Package Menu If you have installed Picture Package on your computer (p. 8). • For Windows 2000/Windows XP, log on your camcorder. The following the procedures below, make sure you double-click [Picture Package Menu] icon on a Windows computer Viewing video and pictures on...
Computer Applications Guide
Page 18
...The folders are saved in the newest folder appears. 4 Double-click a picture you can create on a computer is not necessary when connecting the camcorder to the computer via an i.LINK cable (p. 15). 18 Managing pictures on the desired folder and insert the comments. Creating an original video -...date. Folder functions With [Picture Package Viewer], pictures copied from any folder or memory device. The name of the power switch on the camcorder varies depending on . You can print, expand, and rotate pictures using the buttons at the top of a folder, the folder sequence ...
...The folders are saved in the newest folder appears. 4 Double-click a picture you can create on a computer is not necessary when connecting the camcorder to the computer via an i.LINK cable (p. 15). 18 Managing pictures on the desired folder and insert the comments. Creating an original video -...date. Folder functions With [Picture Package Viewer], pictures copied from any folder or memory device. The name of the power switch on the camcorder varies depending on . You can print, expand, and rotate pictures using the buttons at the top of a folder, the folder sequence ...

Computer Applications Guide
Page 19
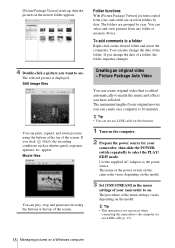
...]. . 8 Click [Effect settings], then select the effect. Select an effect, then click [OK]. . music on the tape where you want to start copying. 5 Connect your camcorder to the computer using a USB cable (supplied) or i.LINK cable (optional) (p. 11, 15). [Picture Package Menu] starts up automatically. 6 Click [Automatic Video Producer]. [Picture Package...
...]. . 8 Click [Effect settings], then select the effect. Select an effect, then click [OK]. . music on the tape where you want to start copying. 5 Connect your camcorder to the computer using a USB cable (supplied) or i.LINK cable (optional) (p. 11, 15). [Picture Package Menu] starts up automatically. 6 Click [Automatic Video Producer]. [Picture Package...
Computer Applications Guide
Page 20
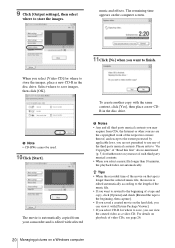
...; Any and all third party musical contents you may acquire from your use any of video CDs, see page 26. 20 Managing pictures on your camcorder and is edited with the same content, click [Yes], then place a new CDR in the disc drive. Please refer to "On Copyrights" of the respective...
...; Any and all third party musical contents you may acquire from your use any of video CDs, see page 26. 20 Managing pictures on your camcorder and is edited with the same content, click [Yes], then place a new CDR in the disc drive. Please refer to "On Copyrights" of the respective...
Computer Applications Guide
Page 24
...VCD feature in the menu settings of the separate Camera Operations Guide. • You can view pictures recorded on your camcorder to on the model. 4 Insert a recorded cassette into your camcorder, then slide the POWER switch repeatedly to create a Video CD from a picture recorded on a tape (maximum length... power source since it takes a few hours to CD-R]. . Place a new CD-R in the disc drive. You cannot use a USB cable for your camcorder. 6 Click [Write to create a Video CD. To create another copy with CD-Rs. Saving to finish. z Tip • Slide the POWER switch ...
...VCD feature in the menu settings of the separate Camera Operations Guide. • You can view pictures recorded on your camcorder to on the model. 4 Insert a recorded cassette into your camcorder, then slide the POWER switch repeatedly to create a Video CD from a picture recorded on a tape (maximum length... power source since it takes a few hours to CD-R]. . Place a new CD-R in the disc drive. You cannot use a USB cable for your camcorder. 6 Click [Write to create a Video CD. To create another copy with CD-Rs. Saving to finish. z Tip • Slide the POWER switch ...
Computer Applications Guide
Page 25
...the model. b Note • The screen varies depending on -screen instructions, place a new CD-R in the correct direction. If you connect your camcorder. YES NO To create another copy? For SEL/PUSH EXEC dial models, press BURN DVD/VCD of the picture stops automatically, when there is being... written onto the CD-R. b Notes • The importing of your camcorder. CONVERTING: The picture is a blank portion of 10 seconds or longer on the tape. • Select a hard disk that has enough space (...
...the model. b Note • The screen varies depending on -screen instructions, place a new CD-R in the correct direction. If you connect your camcorder. YES NO To create another copy? For SEL/PUSH EXEC dial models, press BURN DVD/VCD of the picture stops automatically, when there is being... written onto the CD-R. b Notes • The importing of your camcorder. CONVERTING: The picture is a blank portion of 10 seconds or longer on the tape. • Select a hard disk that has enough space (...
Computer Applications Guide
Page 26
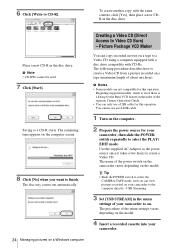
...CDs - a computer equipped with a DVD drive and software compatible with each player for your camcorder for the MEMORY MIX function to a "Memory Stick." For Windows XP Click [Start], [All Programs], [Picture Package], [Handycam Tools], then [MEMORY MIX Image Tool]. • Once you have created a Video CD... back a Video CD using Windows Media Player. 1 Place a Video CD in the menu settings of your camcorder to on the computer. 2 Insert a "Memory Stick" into your camcorder to the computer via the USB cable (supplied) (p. 12). The procedure of the menu settings varies depending ...
...CDs - a computer equipped with a DVD drive and software compatible with each player for your camcorder for the MEMORY MIX function to a "Memory Stick." For Windows XP Click [Start], [All Programs], [Picture Package], [Handycam Tools], then [MEMORY MIX Image Tool]. • Once you have created a Video CD... back a Video CD using Windows Media Player. 1 Place a Video CD in the menu settings of your camcorder to on the computer. 2 Insert a "Memory Stick" into your camcorder to the computer via the USB cable (supplied) (p. 12). The procedure of the menu settings varies depending ...
Computer Applications Guide
Page 28
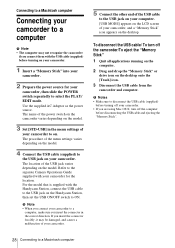
... location of the USB jack varies depending on the Handycam Station, then set the USB ON/OFF switch to ON. If you insert the connector forcibly, it may not recognize the camcorder if you connect them with your camcorder for your camcorder, then slide the POWER switch repeatedly to the USB...USB jack on the model. For the model that is supplied with the Handycam Station, connect the USB cable to a Macintosh computer The procedure of your camcorder to disconnect the USB cable (supplied) before turning off your camcorder. Use the supplied AC Adaptor as the power source. b Note •...
... location of the USB jack varies depending on the Handycam Station, then set the USB ON/OFF switch to ON. If you insert the connector forcibly, it may not recognize the camcorder if you connect them with your camcorder for your camcorder, then slide the POWER switch repeatedly to the USB...USB jack on the model. For the model that is supplied with the Handycam Station, connect the USB cable to a Macintosh computer The procedure of your camcorder to disconnect the USB cable (supplied) before turning off your camcorder. Use the supplied AC Adaptor as the power source. b Note •...


