
Camera Operations Guide
Page 3
..., pursuant to operate this manual could void your camcorder (p. 126). Reorient or relocate the receiving antenna. - Note on the type of a standard "Memory Stick," in this equipment. Notes on the "Memory Stick Duo." Address: 680 Kinderkamack Road, Oradell, NJ 07649 U.S.A. Connect the...without any changes or modifications not expressly approved in your authority to Part 15 of Conformity Trade Name: SONY Model No.: DCR-HC30 Responsible Party: Sony Electronics Inc. Regulatory Information Declaration of the FCC Rules. b Note: This equipment has been tested and...
..., pursuant to operate this manual could void your camcorder (p. 126). Reorient or relocate the receiving antenna. - Note on the type of a standard "Memory Stick," in this equipment. Notes on the "Memory Stick Duo." Address: 680 Kinderkamack Road, Oradell, NJ 07649 U.S.A. Connect the...without any changes or modifications not expressly approved in your authority to Part 15 of Conformity Trade Name: SONY Model No.: DCR-HC30 Responsible Party: Sony Electronics Inc. Regulatory Information Declaration of the FCC Rules. b Note: This equipment has been tested and...
Camera Operations Guide
Page 4
...do not affect the recording in any way. • Exposing the LCD screen, the viewfinder, or the lens to malfunction. Notes on the model DCR-HC40. To view your recordings on a TV, you see. • The illustrations used on this manual are using extremely high-precision technology, ...and lens • The LCD screen and the viewfinder are manufactured using the touch panel, place your hand on connecting other device Before connecting your camcorder correctly. • Fasten the Strap Belt as shown in the following illustration. • The Strap Belt can change the language to be used...
...do not affect the recording in any way. • Exposing the LCD screen, the viewfinder, or the lens to malfunction. Notes on the model DCR-HC40. To view your recordings on a TV, you see. • The illustrations used on this manual are using extremely high-precision technology, ...and lens • The LCD screen and the viewfinder are manufactured using the touch panel, place your hand on connecting other device Before connecting your camcorder correctly. • Fasten the Strap Belt as shown in the following illustration. • The Strap Belt can change the language to be used...
Camera Operations Guide
Page 19
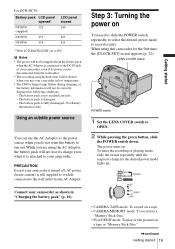
...MEMORY mode: To record on a "Memory Stick Duo." • PLAY/EDIT mode: To play . The battery pack is damaged. - PRECAUTION Even if your camcorder in low temperature. • The CHG (charge) lamp flashes during charging, or the battery information will not lose its power cord is disconnected from the...correctly. - The battery pack is attached to record or play or edit pictures on a tape or "Memory Stick Duo." ,continued Getting started For DCR-HC30: Battery pack LCD panel opened* NP-FP50 120 (supplied) NP-FP70 255 NP-FP90 455 LCD panel closed 140 295 525 * With LCD ...
...MEMORY mode: To record on a "Memory Stick Duo." • PLAY/EDIT mode: To play . The battery pack is damaged. - PRECAUTION Even if your camcorder in low temperature. • The CHG (charge) lamp flashes during charging, or the battery information will not lose its power cord is disconnected from the...correctly. - The battery pack is attached to record or play or edit pictures on a tape or "Memory Stick Duo." ,continued Getting started For DCR-HC30: Battery pack LCD panel opened* NP-FP50 120 (supplied) NP-FP70 255 NP-FP90 455 LCD panel closed 140 295 525 * With LCD ...
Camera Operations Guide
Page 32
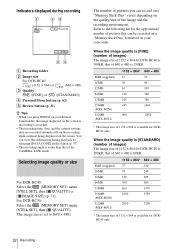
... approximate number of pictures that of 1152 × 864 is [STANDARD] (number of images) The image size of 1152 × 864 for DCRHC40 only. For DCR-HC30: Select the (MEMORY SET) menu, [STILL SET], then [ QUALITY]. When the image quality is [FINE] (number of images) The image size of 1152 ... 300 980 600 1970 1000 3550 2050 7200 * The image size of the CAMERA-TAPE mode. The number of pictures you press PHOTO on your camcorder. Refer to [640 × 480]. Indicators displayed during playback by selecting [DATA CODE] on the screen (p. 57). • The recording angle is ...
... approximate number of pictures that of 1152 × 864 is [STANDARD] (number of images) The image size of 1152 × 864 for DCRHC40 only. For DCR-HC30: Select the (MEMORY SET) menu, [STILL SET], then [ QUALITY]. When the image quality is [FINE] (number of images) The image size of 1152 ... 300 980 600 1970 1000 3550 2050 7200 * The image size of the CAMERA-TAPE mode. The number of pictures you press PHOTO on your camcorder. Refer to [640 × 480]. Indicators displayed during playback by selecting [DATA CODE] on the screen (p. 57). • The recording angle is ...
Camera Operations Guide
Page 66
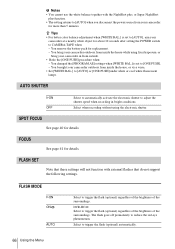
... the electronic shutter to adjust the shutter speed when recording in from outside. • Redo the [ONE PUSH] procedure when: - DCR-HC40: Select to trigger the flash (optional) regardless of the brightness of the surroundings. You remove the battery pack for details. FOCUS...10 seconds after setting the POWER switch to [ONE PUSH]. - Select when recording without using fixed exposure, or bring your camcorder outdoors from your camcorder in bright conditions. FLASH SET Note that these settings will not function with the NightShot plus, or Super NightShot plus function....
... the electronic shutter to adjust the shutter speed when recording in from outside. • Redo the [ONE PUSH] procedure when: - DCR-HC40: Select to trigger the flash (optional) regardless of the brightness of the surroundings. You remove the battery pack for details. FOCUS...10 seconds after setting the POWER switch to [ONE PUSH]. - Select when recording without using fixed exposure, or bring your camcorder outdoors from your camcorder in bright conditions. FLASH SET Note that these settings will not function with the NightShot plus, or Super NightShot plus function....
Camera Operations Guide
Page 67
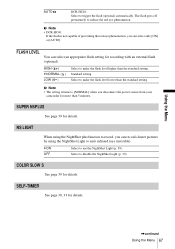
...-TIMER See page 30, 33 for more than the standard setting. HIGH ( ) GNORMAL ( ) LOW ( ) Select to reduce the red-eye phenomenon. b Note • DCR-HC40: If the flash is not capable of preventing the red-eye phenomenon, you can select an appropriate flash setting for recording with an external...(optional). b Note • The setting returns to disable the NightShot Light (p. 39). Select to [NORMAL] when you disconnect the power source from your camcorder for details. ,continued Using the Menu 67 The flash goes off prematurely to make the flash level lower than 5 minutes.
...-TIMER See page 30, 33 for more than the standard setting. HIGH ( ) GNORMAL ( ) LOW ( ) Select to reduce the red-eye phenomenon. b Note • DCR-HC40: If the flash is not capable of preventing the red-eye phenomenon, you can select an appropriate flash setting for recording with an external...(optional). b Note • The setting returns to disable the NightShot Light (p. 39). Select to [NORMAL] when you disconnect the power source from your camcorder for details. ,continued Using the Menu 67 The flash goes off prematurely to make the flash level lower than 5 minutes.
Camera Operations Guide
Page 70
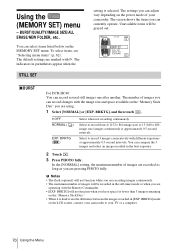
Select to your camcorder. The default settings are recording images continuously. • The maximum number of images you can adjust vary depending on the "Memory Stick Duo." • When ... (optional) will be grayed out. 60min 1152 FINE 30 MEMORY SET STILL SET MOVIE SET FORMAT OK BURST For DCR-HC40: You can select items listed below on the LCD screen, connect your camcorder to record 3 images consecutively with G. Using the (MEMORY SET) menu - You can record several still images one after...
Select to your camcorder. The default settings are recording images continuously. • The maximum number of images you can adjust vary depending on the "Memory Stick Duo." • When ... (optional) will be grayed out. 60min 1152 FINE 30 MEMORY SET STILL SET MOVIE SET FORMAT OK BURST For DCR-HC40: You can select items listed below on the LCD screen, connect your camcorder to record 3 images consecutively with G. Using the (MEMORY SET) menu - You can record several still images one after...
Camera Operations Guide
Page 96
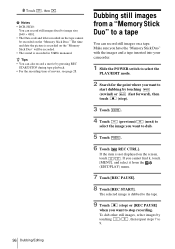
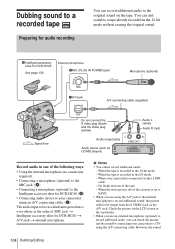
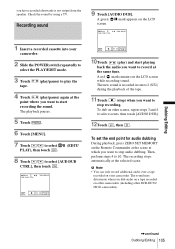
Make sure you have the "Memory Stick Duo" with the images and a tape inserted into your camcorder. 1 Slide the POWER switch to select the PLAY/EDIT mode. 2 Search for the point where you want to start dubbing by touching (rewind) or (fast ... images, select images by pressing REC START/STOP during tape playback. • For the recording time of movies, see page 28. 8 Touch , then . b Notes • DCR-HC40: You can also record a movie by touching / , then repeat steps 7 to the tape. 9 Touch (stop recording. z Tips • You can record still images fixed...
Make sure you have the "Memory Stick Duo" with the images and a tape inserted into your camcorder. 1 Slide the POWER switch to select the PLAY/EDIT mode. 2 Search for the point where you want to start dubbing by touching (rewind) or (fast ... images, select images by pressing REC START/STOP during tape playback. • For the recording time of movies, see page 28. 8 Touch , then . b Notes • DCR-HC40: You can also record a movie by touching / , then repeat steps 7 to the tape. 9 Touch (stop recording. z Tips • You can record still images fixed...
Camera Operations Guide
Page 104
...players) Audio L (white) Audio R (red) Record audio in one of MIC jack t Intelligent accessory shoe for DCR-HC40 t A/V jack t internal microphone. When your camcorder to a TV using the A/V jack or the internal microphone to record additional sound, the picture will not be recorded...Connecting a microphone (optional) to the MIC jack. (A) • Connecting a microphone (optional) to the Intelligent accessory shoe for DCR-HC40. (B) • Connecting audio device to your camcorder using an A/V connecting cable. (C) The audio input to be output from the S VIDEO jack or the A/V jack. Check ...
...players) Audio L (white) Audio R (red) Record audio in one of MIC jack t Intelligent accessory shoe for DCR-HC40 t A/V jack t internal microphone. When your camcorder to a TV using the A/V jack or the internal microphone to record additional sound, the picture will not be recorded...Connecting a microphone (optional) to the MIC jack. (A) • Connecting a microphone (optional) to the Intelligent accessory shoe for DCR-HC40. (B) • Connecting audio device to your camcorder using an A/V connecting cable. (C) The audio input to be output from the S VIDEO jack or the A/V jack. Check ...
Camera Operations Guide
Page 105
... which you want to start playing back the audio you dub audio on a tape recorded on other DCR-HC30/ HC40 camcorders). b Note • You can only record additional audio over a tape recorded on your camcorder. 2 Slide the POWER switch repeatedly to select the PLAY/EDIT mode. 3 Touch tape. (play/pause...) to play the 4 Touch (play ) and start recording the sound. To dub on other camcorders (including other scenes, repeat steps 3 and 4 to 10. To set the end point for audio dubbing During playback, press ZERO SET MEMORY on ...
... which you want to start playing back the audio you dub audio on a tape recorded on other DCR-HC30/ HC40 camcorders). b Note • You can only record additional audio over a tape recorded on your camcorder. 2 Slide the POWER switch repeatedly to select the PLAY/EDIT mode. 3 Touch tape. (play/pause...) to play the 4 Touch (play ) and start recording the sound. To dub on other camcorders (including other scenes, repeat steps 3 and 4 to 10. To set the end point for audio dubbing During playback, press ZERO SET MEMORY on ...
Camera Operations Guide
Page 134
..." is a file format for still images, established by the JEITA (Japan Electronics and Information Technology Industries Association). Procedures Connect your camcorder to a wall outlet using the supplied AC Adaptor, and leave it will not be fully discharged in this format can have additional... 070 000 pixels Effective (still): Approx. 1 000 000 pixels Effective (movie): Approx. 690 000 pixels For DCR-HC30: 3 mm (1/6 type) CCD (Charge Coupled Device) Gross: Approx. 680 000 pixels However, even if the preinstalled button-type battery is always charged while you do not use your...
..." is a file format for still images, established by the JEITA (Japan Electronics and Information Technology Industries Association). Procedures Connect your camcorder to a wall outlet using the supplied AC Adaptor, and leave it will not be fully discharged in this format can have additional... 070 000 pixels Effective (still): Approx. 1 000 000 pixels Effective (movie): Approx. 690 000 pixels For DCR-HC30: 3 mm (1/6 type) CCD (Charge Coupled Device) Gross: Approx. 680 000 pixels However, even if the preinstalled button-type battery is always charged while you do not use your...
Camera Operations Guide
Page 137
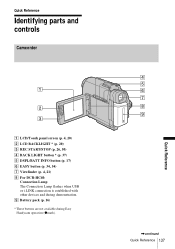
I Battery pack (p. 16) * These buttons are not available during demonstration. Quick Reference Identifying parts and controls Camcorder 1 2 3 A LCD/Touch panel screen (p. 4, 20) B LCD BACKLIGHT * (p. 20) C REC START/STOP (p. 26, 50) D BACK LIGHT button * (p. 37) E DSPL/BATT INFO button (p. 17) F EASY button (p. 34, 54) G Viewfinder (p. 4, 21) H For DCR-HC40: Connection Lamp The Connection Lamp flashes when USB or i.LINK connection is established with other devices and during Easy Handycam operation (zmark). 4 5 6 7 8 9 ,continued Quick Reference 137 Quick Reference
I Battery pack (p. 16) * These buttons are not available during demonstration. Quick Reference Identifying parts and controls Camcorder 1 2 3 A LCD/Touch panel screen (p. 4, 20) B LCD BACKLIGHT * (p. 20) C REC START/STOP (p. 26, 50) D BACK LIGHT button * (p. 37) E DSPL/BATT INFO button (p. 17) F EASY button (p. 34, 54) G Viewfinder (p. 4, 21) H For DCR-HC40: Connection Lamp The Connection Lamp flashes when USB or i.LINK connection is established with other devices and during Easy Handycam operation (zmark). 4 5 6 7 8 9 ,continued Quick Reference 137 Quick Reference
Camera Operations Guide
Page 139
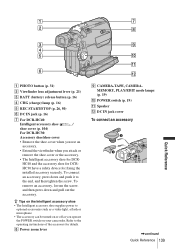
... shoe supplies power to optional accessories such as a video light, a flash or microphone. • The accessory can be turned on your camcorder. HC40 and the accessory shoe for fixing the installed accessory securely. Refer to the end, and then tighten the screw. H Power zoom ... (p. 16) D CHG (charge) lamp (p. 16) E REC START/STOP (p. 26, 50) F DC IN jack (p. 16) G For DCR-HC40: Intelligent accessory shoe / shoe cover (p. 104) For DCR-HC30: Accessory shoe/shoe cover • Remove the shoe cover when you use an accessory. • Extend the viewfinder when you operate...
... shoe supplies power to optional accessories such as a video light, a flash or microphone. • The accessory can be turned on your camcorder. HC40 and the accessory shoe for fixing the installed accessory securely. Refer to the end, and then tighten the screw. H Power zoom ... (p. 16) D CHG (charge) lamp (p. 16) E REC START/STOP (p. 26, 50) F DC IN jack (p. 16) G For DCR-HC40: Intelligent accessory shoe / shoe cover (p. 104) For DCR-HC30: Accessory shoe/shoe cover • Remove the shoe cover when you use an accessory. • Extend the viewfinder when you operate...


