
Camera Operations Guide
Page 2
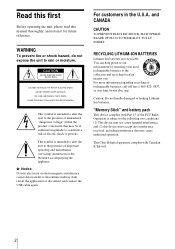
...the presence of important operating and maintenance (servicing) instructions in the U.S.A. For more information regarding recycling of rechargeable batteries, call toll free 1-800-822- 8837, or visit http://www.rbrc.org/ Caution: Do not handle damaged or leaking LithiumIon... WIDE BLADE OF PLUG TO WIDE SLOT, FULLY INSERT. For customers in the literature accompanying the appliance. RECYCLING LITHIUM-ION BATTERIES Lithium-Ion batteries are recyclable. Read this first Before operating the unit, please read this device must accept any interference received, including interference that...
...the presence of important operating and maintenance (servicing) instructions in the U.S.A. For more information regarding recycling of rechargeable batteries, call toll free 1-800-822- 8837, or visit http://www.rbrc.org/ Caution: Do not handle damaged or leaking LithiumIon... WIDE BLADE OF PLUG TO WIDE SLOT, FULLY INSERT. For customers in the literature accompanying the appliance. RECYCLING LITHIUM-ION BATTERIES Lithium-Ion batteries are recyclable. Read this first Before operating the unit, please read this device must accept any interference received, including interference that...
Camera Operations Guide
Page 5
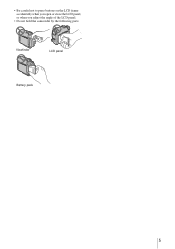
• Be careful not to press buttons on the LCD frame accidentally when you open or close the LCD panel, or when you adjust the angle of the LCD panel. • Do not hold the camcorder by the following parts. Viewfinder LCD panel Battery pack 5
• Be careful not to press buttons on the LCD frame accidentally when you open or close the LCD panel, or when you adjust the angle of the LCD panel. • Do not hold the camcorder by the following parts. Viewfinder LCD panel Battery pack 5
Camera Operations Guide
Page 6
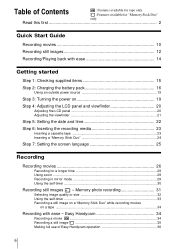
Easy Handycam 34 Recording a movie 34 Recording a still image 35 Making full use of Contents : Features available for tape only. : Features ... Duo" while recording movies on a tape ...34 Recording with ease 14 Getting started Step 1: Checking supplied items 15 Step 2: Charging the battery pack 16 Using an outside power source 19 Step 3: Turning the power on 19 Step 4: Adjusting the LCD panel and viewfinder 20 Adjusting the... 24 Step 7: Setting the screen language 25 Recording Recording movies 26 Recording for "Memory Stick Duo" only. Table of Easy Handycam operation 36 6
Easy Handycam 34 Recording a movie 34 Recording a still image 35 Making full use of Contents : Features available for tape only. : Features ... Duo" while recording movies on a tape ...34 Recording with ease 14 Getting started Step 1: Checking supplied items 15 Step 2: Charging the battery pack 16 Using an outside power source 19 Step 3: Turning the power on 19 Step 4: Adjusting the LCD panel and viewfinder 20 Adjusting the... 24 Step 7: Setting the screen language 25 Recording Recording movies 26 Recording for "Memory Stick Duo" only. Table of Easy Handycam operation 36 6
Camera Operations Guide
Page 9
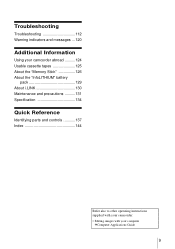
Troubleshooting Troubleshooting 112 Warning indicators and messages ...120 Additional Information Using your camcorder abroad ..........124 Usable cassette tapes 125 About the "Memory Stick 126 About the "InfoLITHIUM" battery pack 129 About i.LINK 130 Maintenance and precautions ..........131 Specification 134 Quick Reference Identifying parts and controls ...........137 Index 144 Refer also to other operating instructions supplied with your camcorder: • Editing images with your computer cComputer Applications Guide 9
Troubleshooting Troubleshooting 112 Warning indicators and messages ...120 Additional Information Using your camcorder abroad ..........124 Usable cassette tapes 125 About the "Memory Stick 126 About the "InfoLITHIUM" battery pack 129 About i.LINK 130 Maintenance and precautions ..........131 Specification 134 Quick Reference Identifying parts and controls ...........137 Index 144 Refer also to other operating instructions supplied with your camcorder: • Editing images with your computer cComputer Applications Guide 9
Camera Operations Guide
Page 10
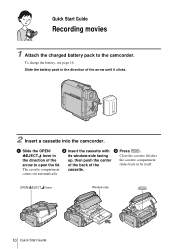
... to open the lid. Slide the battery pack in the direction of the the cassette compartment slides back in its window-side facing Close the cassette lid after the direction of the arrow to the camcorder. The cassette compartment cassette. a Slide the OPEN/ b Insert the cassette with c ...Press . up, then push the center of the back of the arrow until it clicks. 2 Insert a cassette into the camcorder. To charge the battery, see page 16.
... to open the lid. Slide the battery pack in the direction of the the cassette compartment slides back in its window-side facing Close the cassette lid after the direction of the arrow to the camcorder. The cassette compartment cassette. a Slide the OPEN/ b Insert the cassette with c ...Press . up, then push the center of the back of the arrow until it clicks. 2 Insert a cassette into the camcorder. To charge the battery, see page 16.
Camera Operations Guide
Page 12
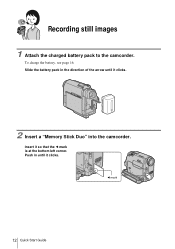
Recording still images 1 Attach the charged battery pack to the camcorder. Push in the direction of the arrow until it so that the b mark is at the bottom left corner. To charge the battery, see page 16. b mark 12 Quick Start Guide Insert it clicks. Slide the battery pack in until it clicks. 2 Insert a "Memory Stick Duo" into the camcorder.
Recording still images 1 Attach the charged battery pack to the camcorder. Push in the direction of the arrow until it so that the b mark is at the bottom left corner. To charge the battery, see page 16. b mark 12 Quick Start Guide Insert it clicks. Slide the battery pack in until it clicks. 2 Insert a "Memory Stick Duo" into the camcorder.

Camera Operations Guide
Page 15
...which is already installed. Wireless Remote Commander (1) A button-type lithium battery is about half the size of a standard "Memory Stick," in parentheses indicates the number of the devices compatible with your camcorder. A/V connecting cable (1) USB cable (1) Memory Stick Duo adaptor ...(1) If you attach a Memory Stick Duo adaptor to the camcorder. AC Adaptor (1) Rechargeable battery pack NP-FP50 (1) CD-ROM "SPVD-012 USB Driver"...
...which is already installed. Wireless Remote Commander (1) A button-type lithium battery is about half the size of a standard "Memory Stick," in parentheses indicates the number of the devices compatible with your camcorder. A/V connecting cable (1) USB cable (1) Memory Stick Duo adaptor ...(1) If you attach a Memory Stick Duo adaptor to the camcorder. AC Adaptor (1) Rechargeable battery pack NP-FP50 (1) CD-ROM "SPVD-012 USB Driver"...
Camera Operations Guide
Page 16
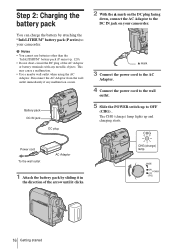
...any metallic objects. CHG Power cord To the wall outlet AC Adaptor CHG (charge) lamp 1 Attach the battery pack by attaching the "InfoLITHIUM" battery pack (P series) to the DC IN jack on your camcorder. Battery pack DC IN jack DC plug 2 With the v mark on the DC plug facing down, connect ...the AC Adaptor to your camcorder. b Notes • You cannot use batteries other than the "InfoLITHIUM" battery pack (P series) (p. 129). • Do not short-circuit the DC plug of the arrow until it in the ...
...any metallic objects. CHG Power cord To the wall outlet AC Adaptor CHG (charge) lamp 1 Attach the battery pack by attaching the "InfoLITHIUM" battery pack (P series) to the DC IN jack on your camcorder. Battery pack DC IN jack DC plug 2 With the v mark on the DC plug facing down, connect ...the AC Adaptor to your camcorder. b Notes • You cannot use batteries other than the "InfoLITHIUM" battery pack (P series) (p. 129). • Do not short-circuit the DC plug of the arrow until it in the ...

Camera Operations Guide
Page 17
...Keep the button pressed to view it . To check the remaining battery - C Approximate possible recording time using the LCD panel. B Approximate possible recording time using the viewfinder. Battery Info DSPL/BATT INFO BATTERY INFO BATTERY CHARGE LEVEL 0% 50% 100% REC TIME AVAILABLE LCD SCREEN: 76... min VIEWFINDER: 85 min A Battery charge level: Displays approximate remaining amount of power left in ...
...Keep the button pressed to view it . To check the remaining battery - C Approximate possible recording time using the LCD panel. B Approximate possible recording time using the viewfinder. Battery Info DSPL/BATT INFO BATTERY INFO BATTERY CHARGE LEVEL 0% 50% 100% REC TIME AVAILABLE LCD SCREEN: 76... min VIEWFINDER: 85 min A Battery charge level: Displays approximate remaining amount of power left in ...
Camera Operations Guide
Page 18
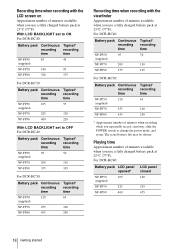
... Continuous Typical* recording recording time time NP-FP50 95 50 (supplied) NP-FP70 200 110 NP-FP90 355 195 For DCR-HC30: Battery pack Continuous Typical* recording recording time time NP-FP50 120 65 (supplied) NP-FP70 255 140 NP-FP90 455 250 * Approximate number of minutes... Continuous Typical* recording recording time time NP-FP50 95 50 (supplied) NP-FP70 200 110 NP-FP90 355 195 For DCR-HC30: Battery pack Continuous Typical* recording recording time time NP-FP50 120 65 (supplied) NP-FP70 255 140 NP-FP90 455 250 Recording time when ...
... Continuous Typical* recording recording time time NP-FP50 95 50 (supplied) NP-FP70 200 110 NP-FP90 355 195 For DCR-HC30: Battery pack Continuous Typical* recording recording time time NP-FP50 120 65 (supplied) NP-FP70 255 140 NP-FP90 455 250 * Approximate number of minutes... Continuous Typical* recording recording time time NP-FP50 95 50 (supplied) NP-FP70 200 110 NP-FP90 355 195 For DCR-HC30: Battery pack Continuous Typical* recording recording time time NP-FP50 120 65 (supplied) NP-FP70 255 140 NP-FP90 455 250 Recording time when ...
Camera Operations Guide
Page 19
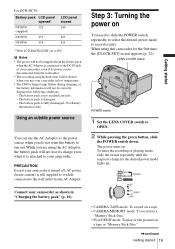
... on a tape. • CAMERA-MEMORY mode: To record on a "Memory Stick Duo." • PLAY/EDIT mode: To play . The battery pack is not attached correctly. - PRECAUTION Even if your camcorder is turned off, AC power (house current) is still supplied to run out. Getting started 19 The...lights up. LENS COVER switch POWER switch 1 Set the LENS COVER switch to ON. Connect your camcorder. The power turns on a tape or "Memory Stick Duo." ,continued Getting started For DCR-HC30: Battery pack LCD panel opened* NP-FP50 120 (supplied) NP-FP70 255 NP-FP90 455 LCD panel...
... on a tape. • CAMERA-MEMORY mode: To record on a "Memory Stick Duo." • PLAY/EDIT mode: To play . The battery pack is not attached correctly. - PRECAUTION Even if your camcorder is turned off, AC power (house current) is still supplied to run out. Getting started 19 The...lights up. LENS COVER switch POWER switch 1 Set the LENS COVER switch to ON. Connect your camcorder. The power turns on a tape or "Memory Stick Duo." ,continued Getting started For DCR-HC30: Battery pack LCD panel opened* NP-FP50 120 (supplied) NP-FP70 255 NP-FP90 455 LCD panel...
Camera Operations Guide
Page 21
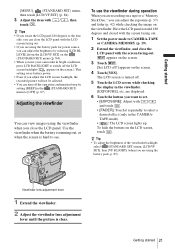
... checking the display in the (STANDARD SET) menu to [OFF] (p. 87). are displayed. 6 Touch the button you can view images using the battery pack, p. 85). Viewfinder lens adjustment lever 1 Extend the viewfinder. 2 Adjust the viewfinder lens adjustment lever until the picture is hard to switch off... ?] appears on the screen.). Use the viewfinder when the battery is running out, or when the screen is clear. To use your camcorder in the CAMERA- Getting started [MENU], (STANDARD SET) menu, then touch [LCD/VF SET] (p. 84)....
... checking the display in the (STANDARD SET) menu to [OFF] (p. 87). are displayed. 6 Touch the button you can view images using the battery pack, p. 85). Viewfinder lens adjustment lever 1 Extend the viewfinder. 2 Adjust the viewfinder lens adjustment lever until the picture is hard to switch off... ?] appears on the screen.). Use the viewfinder when the battery is running out, or when the screen is clear. To use your camcorder in the CAMERA- Getting started [MENU], (STANDARD SET) menu, then touch [LCD/VF SET] (p. 84)....
Camera Operations Guide
Page 22
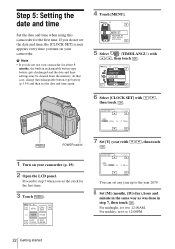
Step 5: Setting the date and time Set the date and time when using this camcorder for the first time. 3 Touch . 60min MENU -:--:-- POWER switch 1 Turn on your camcorder. EXPO- CLOCK SET -:--:-- CLOCK SET -:--:-- In that case, charge the rechargeable button-type battery (p. 134) and then set it to the year 2079. 8 Set [M] (month), [D] (day...
Step 5: Setting the date and time Set the date and time when using this camcorder for the first time. 3 Touch . 60min MENU -:--:-- POWER switch 1 Turn on your camcorder. EXPO- CLOCK SET -:--:-- CLOCK SET -:--:-- In that case, charge the rechargeable button-type battery (p. 134) and then set it to the year 2079. 8 Set [M] (month), [D] (day...
Camera Operations Guide
Page 24
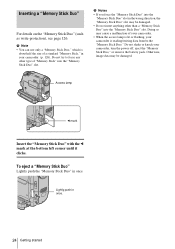
...Memory Stick Duo" slot. Lightly push in once. b Notes • If you force the "Memory Stick Duo" into the "Memory Stick Duo" slot in your camcorder (p. 126). b Note • You can use only a "Memory Stick Duo," which is reading/writing data from/to force any other than a "Memory Stick ... Duo" slot may be damaged. Otherwise, image data may cause a malfunction of your camcorder. • When the access lamp is lit or flashing, your camcorder, turn the power off, eject the "Memory Stick Duo," or remove the battery pack. Access lamp b mark Insert the "Memory Stick Duo" with the b mark...
...Memory Stick Duo" slot. Lightly push in once. b Notes • If you force the "Memory Stick Duo" into the "Memory Stick Duo" slot in your camcorder (p. 126). b Note • You can use only a "Memory Stick Duo," which is reading/writing data from/to force any other than a "Memory Stick ... Duo" slot may be damaged. Otherwise, image data may cause a malfunction of your camcorder. • When the access lamp is lit or flashing, your camcorder, turn the power off, eject the "Memory Stick Duo," or remove the battery pack. Access lamp b mark Insert the "Memory Stick Duo" with the b mark...
Camera Operations Guide
Page 27
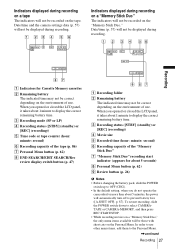
...second) F Recording capacity of the "Memory Stick Duo" G "Memory Stick Duo" recording start indicator (appears for about 1 minute to display the correct remaining battery time. When you opened or closed the LCD panel, it takes about 5 seconds) H Personal Menu button (p. 62) I Review button (p. 26) b...," the only menu items available will be recorded on the "Memory Stick Duo." When you do not operate the camcorder for Cassette Memory cassettes B Remaining battery The indicated time may not be displayed during recording. Date/time (p. 57) will not be displayed during recording....
...second) F Recording capacity of the "Memory Stick Duo" G "Memory Stick Duo" recording start indicator (appears for about 1 minute to display the correct remaining battery time. When you opened or closed the LCD panel, it takes about 5 seconds) H Personal Menu button (p. 62) I Review button (p. 26) b...," the only menu items available will be recorded on the "Memory Stick Duo." When you do not operate the camcorder for Cassette Memory cassettes B Remaining battery The indicated time may not be displayed during recording. Date/time (p. 57) will not be displayed during recording....

Camera Operations Guide
Page 28
... you are recorded automatically on the recording media without a break even when you do not use your camcorder. To record for the approximate length of time it . • You can also use the large capacity battery pack (NP-FP70/FP90). • To ensure smooth transition on a tape from the last recorded scene.... The length of time you use REC START/STOP of the external flash to record on a "Memory Stick Duo" of time you can view this camcorder. Do not record pictures in the SP mode. You can when recording in SP mode and LP mode on your...
... you are recorded automatically on the recording media without a break even when you do not use your camcorder. To record for the approximate length of time it . • You can also use the large capacity battery pack (NP-FP70/FP90). • To ensure smooth transition on a tape from the last recorded scene.... The length of time you use REC START/STOP of the external flash to record on a "Memory Stick Duo" of time you can view this camcorder. Do not record pictures in the SP mode. You can when recording in SP mode and LP mode on your...
Camera Operations Guide
Page 50
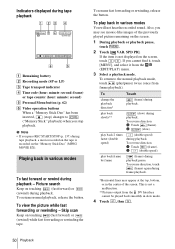
... images of the screen. To resume fast forwarding or rewinding, release the button. Indicators displayed during tape playback 60min 0:00:00:15 60min P-MENU A Remaining battery B Recording mode (SP or LP) C Tape transport indicator D Time code (hour: minute: second: frame) or tape counter (hour: minute: second) E Personal Menu button (p. 62) F Video...
... images of the screen. To resume fast forwarding or rewinding, release the button. Indicators displayed during tape playback 60min 0:00:00:15 60min P-MENU A Remaining battery B Recording mode (SP or LP) C Tape transport indicator D Time code (hour: minute: second: frame) or tape counter (hour: minute: second) E Personal Menu button (p. 62) F Video...
Camera Operations Guide
Page 53
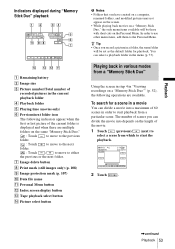
... in various modes from a particular scene. Playback Indicators displayed during "Memory Stick Duo" playback 60min 1152 101-0010 10 / 10 101 0:00:00 P-MENU A Remaining battery B Image size C Picture number/Total number of recorded pictures in the current playback folder D Playback folder E Playing time (movies only) F Previous/next folder icon The...
... in various modes from a particular scene. Playback Indicators displayed during "Memory Stick Duo" playback 60min 1152 101-0010 10 / 10 101 0:00:00 P-MENU A Remaining battery B Image size C Picture number/Total number of recorded pictures in the current playback folder D Playback folder E Playing time (movies only) F Previous/next folder icon The...
Camera Operations Guide
Page 66
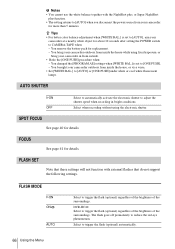
...See page 41 for details. DCR-HC40: Select to [ONE PUSH]. - The flash goes off prematurely to trigger the flash (optional) automatically. 66 Using the Menu You remove the battery pack for replacement. - Select when recording without using fixed exposure, or bring your camcorder outdoors from outside. •... NightShot plus, or Super NightShot plus function. • The setting returns to [AUTO] when you disconnect the power source from your camcorder at a nearby white object for about 10 seconds after setting the POWER switch to CAMERA-TAPE when: - FLASH MODE GON ON AUTO...
...See page 41 for details. DCR-HC40: Select to [ONE PUSH]. - The flash goes off prematurely to trigger the flash (optional) automatically. 66 Using the Menu You remove the battery pack for replacement. - Select when recording without using fixed exposure, or bring your camcorder outdoors from outside. •... NightShot plus, or Super NightShot plus function. • The setting returns to [AUTO] when you disconnect the power source from your camcorder at a nearby white object for about 10 seconds after setting the POWER switch to CAMERA-TAPE when: - FLASH MODE GON ON AUTO...
Camera Operations Guide
Page 78
When a cassette or "Memory Stick Duo" is used on the battery pack, the power will be turned off after approximately 5 minutes (p. 87). When a mode other than CAMERA-TAPE is selected. • If [A.SHUT OFF] is set ... use the DEMO MODE. GON OFF Select to ON. z Tips • The demonstration will be suspended in situations such as when you are using this camcorder for details. 78 Using the Menu DEMO MODE When you remove both cassette and "Memory Stick Duo" from your...
When a cassette or "Memory Stick Duo" is used on the battery pack, the power will be turned off after approximately 5 minutes (p. 87). When a mode other than CAMERA-TAPE is selected. • If [A.SHUT OFF] is set ... use the DEMO MODE. GON OFF Select to ON. z Tips • The demonstration will be suspended in situations such as when you are using this camcorder for details. 78 Using the Menu DEMO MODE When you remove both cassette and "Memory Stick Duo" from your...


