
Computer Applications Guide
Page 2
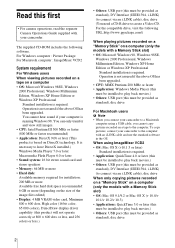
... this first • For camera operations, read the separate Camera Operations Guide supplied with an i.LINK cable and use the standard software in the OS. Operation is not assured if the above OS has been upgraded. To copy pictures, connect your camcorder. For the compatible drive, ...memory required for installation: 200 MB or more Available free hard disk space recommended: 6 GB or more (depending on a tape to create a Video CD. Operation is required. The supplied CD-ROM includes the following URL:http://www.ppackage.com/) When playing pictures recorded on a "Memory Stick"...
... this first • For camera operations, read the separate Camera Operations Guide supplied with an i.LINK cable and use the standard software in the OS. Operation is not assured if the above OS has been upgraded. To copy pictures, connect your camcorder. For the compatible drive, ...memory required for installation: 200 MB or more Available free hard disk space recommended: 6 GB or more (depending on a tape to create a Video CD. Operation is required. The supplied CD-ROM includes the following URL:http://www.ppackage.com/) When playing pictures recorded on a "Memory Stick"...
Computer Applications Guide
Page 16
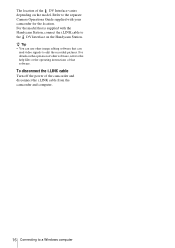
... depending on the Handycam Station. z Tip • You can use other software, refer to the help files or the operating instructions of other image editing software that is supplied with your camcorder for the location. For the model that can read video signals to edit the... recorded pictures. The location of the camcorder and disconnect the i.LINK cable from the camcorder and computer. 16 Connecting to a Windows computer Refer to the separate Camera Operations Guide supplied with the Handycam Station, connect the i.LINK cable...
... depending on the Handycam Station. z Tip • You can use other software, refer to the help files or the operating instructions of other image editing software that is supplied with your camcorder for the location. For the model that can read video signals to edit the... recorded pictures. The location of the camcorder and disconnect the i.LINK cable from the camcorder and computer. 16 Connecting to a Windows computer Refer to the separate Camera Operations Guide supplied with the Handycam Station, connect the i.LINK cable...
Computer Applications Guide
Page 17
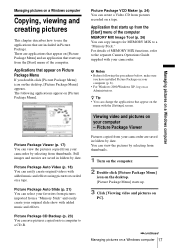
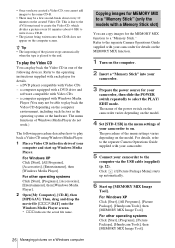
...your favorites from pictures imported from thumbnails. z Tip • You can copy images for MEMORY MIX to the separate Camera Operations Guide supplied with your original slide show with the [Settings] screen. Picture Package Auto Slide (p. 21) You can easily create original... using pictures recorded on the menu with added music and effects. Application that appear on a tape. Picture Package Auto Video (p. 18) You can select your camcorder are applications that appear on Picture Package Menu If you have installed Picture Package on your computer - There are saved...
...your favorites from pictures imported from thumbnails. z Tip • You can copy images for MEMORY MIX to the separate Camera Operations Guide supplied with your original slide show with the [Settings] screen. Picture Package Auto Slide (p. 21) You can easily create original... using pictures recorded on the menu with added music and effects. Application that appear on a tape. Picture Package Auto Video (p. 18) You can select your camcorder are applications that appear on Picture Package Menu If you have installed Picture Package on your computer - There are saved...
Computer Applications Guide
Page 24
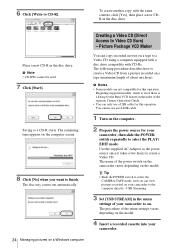
...Streaming. 3 Set [USB STREAM] in the index of your camcorder. Saving to create a Video CD. The following procedure describes how to create a Video CD from a picture recorded on your camcorder, then slide the POWER switch repeatedly to a Video CD using a computer equipped with a disc drive compatible with...a CD-R starts. z Tip • Slide the POWER switch to select the CAMERA-TAPE mode, and you want to Video CD Burn) - Regarding supported models, check to see if there is a listing for your camcorder to CD-R]. . The procedure of about one hour). The disc tray comes out...
...Streaming. 3 Set [USB STREAM] in the index of your camcorder. Saving to create a Video CD. The following procedure describes how to create a Video CD from a picture recorded on your camcorder, then slide the POWER switch repeatedly to a Video CD using a computer equipped with a disc drive compatible with...a CD-R starts. z Tip • Slide the POWER switch to select the CAMERA-TAPE mode, and you want to Video CD Burn) - Regarding supported models, check to see if there is a listing for your camcorder to CD-R]. . The procedure of about one hour). The disc tray comes out...
Computer Applications Guide
Page 26
... [All Programs], [Accessories], [Entertainment], then [Windows Media Player]. a DVD player compatible with Video CDs - For details, refer to the separate Camera Operations Guide supplied with your camcorder to select the PLAY/ EDIT mode. Click if [Picture Package Menu] starts up automatically. 6... computer equipped with a DVD drive and software compatible with Video CDs - For other operating systems Click [Start], [Programs], [Picture Package], [Handycam Tools], then [MEMORY MIX Image Tool]. • Once you have created a Video CD, you cannot add images to the end. z ...
... [All Programs], [Accessories], [Entertainment], then [Windows Media Player]. a DVD player compatible with Video CDs - For details, refer to the separate Camera Operations Guide supplied with your camcorder to select the PLAY/ EDIT mode. Click if [Picture Package Menu] starts up automatically. 6... computer equipped with a DVD drive and software compatible with Video CDs - For other operating systems Click [Start], [Programs], [Picture Package], [Handycam Tools], then [MEMORY MIX Image Tool]. • Once you have created a Video CD, you cannot add images to the end. z ...
Computer Applications Guide
Page 29
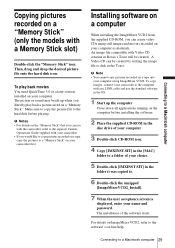
... Stick slot) Double-click the "Memory Stick" icon. To copy images, connect your camcorder to the computer with an i.LINK cable and use with the camcorder, refer to the separate Camera Operations Guide supplied with your camcorder. • If you can create video CDs using ImageMixer VCD2. b Notes • For details on the "Memory Stick...
... Stick slot) Double-click the "Memory Stick" icon. To copy images, connect your camcorder to the computer with an i.LINK cable and use with the camcorder, refer to the separate Camera Operations Guide supplied with your camcorder. • If you can create video CDs using ImageMixer VCD2. b Notes • For details on the "Memory Stick...
Computer Applications Guide
Page 33
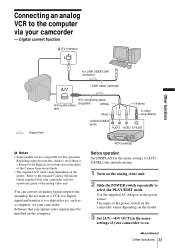
...Digital convert function in the index of the analog video unit You can capture video signals must be installed on the model. Refer to the separate Camera Operations Guide supplied with your camcorder with the operations guide of the Camera Operations Guide. • The supplied A/V cable varies... depending on the computer. The name of your camcorder to on the analog video unit. 2 Slide the POWER switch...
...Digital convert function in the index of the analog video unit You can capture video signals must be installed on the model. Refer to the separate Camera Operations Guide supplied with your camcorder with the operations guide of the Camera Operations Guide. • The supplied A/V cable varies... depending on the computer. The name of your camcorder to on the analog video unit. 2 Slide the POWER switch...
Computer Applications Guide
Page 34
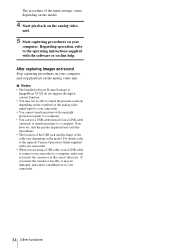
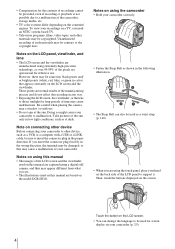
... If you insert the connector forcibly, it may lack the smoothness. • The location of the USB jack and the shape of your camcorder to a computer, make sure you are using a USB cable or an i.LINK cable to the operating instructions supplied with copyright protection signals to... the menu settings varies depending on the model. 4 Start playback on the analog video unit. 5 Start capturing procedures on your computer. For details, refer to the separate Camera Operations Guide supplied with your camcorder. • When you insert the connector in the correct direction. The procedure of...
... If you insert the connector forcibly, it may lack the smoothness. • The location of the USB jack and the shape of your camcorder to a computer, make sure you are using a USB cable or an i.LINK cable to the operating instructions supplied with copyright protection signals to... the menu settings varies depending on the model. 4 Start playback on the analog video unit. 5 Start capturing procedures on your computer. For details, refer to the separate Camera Operations Guide supplied with your camcorder. • When you insert the connector in the correct direction. The procedure of...
Camera Operations Guide
Page 1
Camera Operations Guide [US] 3-088-339-11(1) Camera Operations Guide Read this first Digital Video Camera Recorder DCR-HC30/HC40 © 2004 Sony Corporation
Camera Operations Guide [US] 3-088-339-11(1) Camera Operations Guide Read this first Digital Video Camera Recorder DCR-HC30/HC40 © 2004 Sony Corporation
Camera Operations Guide
Page 4
...• The Strap Belt can change the language to support it. Notes on using a digital still camera, and thus may be some tiny black points and/ or bright points (white, red, blue, ... buttons displayed on your camcorder correctly. • Fasten the Strap Belt as a wrist strap (p. 140). • When you need an NTSC system-based TV. • Television programs, films, video tapes, and other materials... touch panel, place your hand on the model DCR-HC40. Note on connecting other device such as at the sun. To view your camcorder to other device Before connecting your recordings on a...
...• The Strap Belt can change the language to support it. Notes on using a digital still camera, and thus may be some tiny black points and/ or bright points (white, red, blue, ... buttons displayed on your camcorder correctly. • Fasten the Strap Belt as a wrist strap (p. 140). • When you need an NTSC system-based TV. • Television programs, films, video tapes, and other materials... touch panel, place your hand on the model DCR-HC40. Note on connecting other device such as at the sun. To view your camcorder to other device Before connecting your recordings on a...
Camera Operations Guide
Page 65
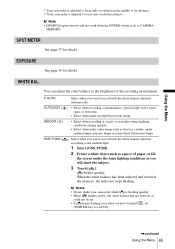
...when under daylight fluorescent lamps. • Select when recording at a party or in studios where lighting conditions change quickly. • Select when under video lamps such as those in a studio, under sodium lamps, mercury lamps or warm white fluorescent lamps. ) Select when you have touched , set to... to focus only on distant subjects. When the white balance has been adjusted and stored in the middle to far distance. **Your camcorder is set [WHITE BAL.] to CAMERA- b Note • [SPORTS] (sports lesson) will shoot the subject. 3 Touch [ ]. EXPOSURE See page 38 for details...
...when under daylight fluorescent lamps. • Select when recording at a party or in studios where lighting conditions change quickly. • Select when under video lamps such as those in a studio, under sodium lamps, mercury lamps or warm white fluorescent lamps. ) Select when you have touched , set to... to focus only on distant subjects. When the white balance has been adjusted and stored in the middle to far distance. **Your camcorder is set [WHITE BAL.] to CAMERA- b Note • [SPORTS] (sports lesson) will shoot the subject. 3 Touch [ ]. EXPOSURE See page 38 for details...
Camera Operations Guide
Page 69
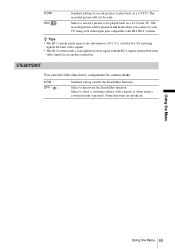
... the SteadyShot function). The recorded picture will not be played back on a 4:3 TV). Select to compensate for camera-shake. Select to shoot a stationary subject with the ID-1 signals inserted between video signals. • The ID-2 system sends a copyright protection signal with a tripod, or when using a conversion... record a picture to be wide. The recorded picture will be played in full mode when you connect to your TV using an S video input jack compatible with ID-1/ID-2 systems. z Tips • The ID-1 system sends aspect ratio information (16:9, 4:3, or letter box)...
... the SteadyShot function). The recorded picture will not be played back on a 4:3 TV). Select to compensate for camera-shake. Select to shoot a stationary subject with the ID-1 signals inserted between video signals. • The ID-2 system sends a copyright protection signal with a tripod, or when using a conversion... record a picture to be wide. The recorded picture will be played in full mode when you connect to your TV using an S video input jack compatible with ID-1/ID-2 systems. z Tips • The ID-1 system sends aspect ratio information (16:9, 4:3, or letter box)...
Camera Operations Guide
Page 85
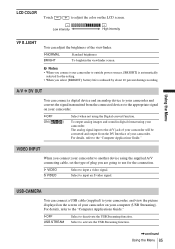
... Low intensity High intensity VF B.LIGHT You can adjust the brightness of your camcorder. GNORMAL BRIGHT Standard brightness. For details, refer to deactivate the USB Streaming function. G VIDEO S VIDEO Select to activate the USB Streaming function. ,continued Using the Menu 85 The... type of your camcorder on your camcorder. Select to input a video signal. Using the Menu USB-CAMERA You can connect a digital device and an analog device to your camcorder and convert the signal transmitted from the connected devices to your camcorder will be converted and...
... Low intensity High intensity VF B.LIGHT You can adjust the brightness of your camcorder. GNORMAL BRIGHT Standard brightness. For details, refer to deactivate the USB Streaming function. G VIDEO S VIDEO Select to activate the USB Streaming function. ,continued Using the Menu 85 The... type of your camcorder on your camcorder. Select to input a video signal. Using the Menu USB-CAMERA You can connect a digital device and an analog device to your camcorder and convert the signal transmitted from the connected devices to your camcorder will be converted and...
Camera Operations Guide
Page 109
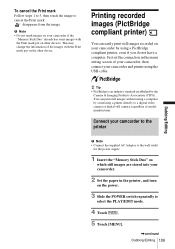
... set the connection in the printer, and turn on your camcorder and printer using a computer by the Camera & Imaging Products Association (CIPA). Dubbing/Editing z Tip • PictBridge is an industry standard established by connecting a printer directly to a digital video camera or digital still camera, regardless of the images with the Print mark put on other...
... set the connection in the printer, and turn on your camcorder and printer using a computer by the Camera & Imaging Products Association (CIPA). Dubbing/Editing z Tip • PictBridge is an industry standard established by connecting a printer directly to a digital video camera or digital still camera, regardless of the images with the Print mark put on other...
Camera Operations Guide
Page 123
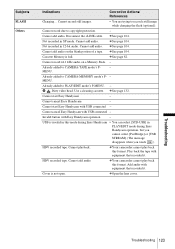
...audio on a Memory Stick. - x Dirty video head. cSee page 132. Invalid button with USB connected - HDV recorded tape. Cannot add audio. Cannot add audio. cSee page 82. Cannot cancel Easy Handycam with Easy Handycam operation - Play back the tape with USB ... Already added to CAMERA-TAPE mode's P- - Cannot cancel Easy Handycam - Cannot add audio. Cover is full. Cannot add audio. Already added to CAMERA-MEMORY mode's P- - cYour camcorder cannot play back this format. cYour camcorder cannot play back this mode during Easy Handycam • You ...
...audio on a Memory Stick. - x Dirty video head. cSee page 132. Invalid button with USB connected - HDV recorded tape. Cannot add audio. Cannot add audio. cSee page 82. Cannot cancel Easy Handycam with Easy Handycam operation - Play back the tape with USB ... Already added to CAMERA-TAPE mode's P- - Cannot cancel Easy Handycam - Cannot add audio. Cover is full. Cannot add audio. Already added to CAMERA-MEMORY mode's P- - cYour camcorder cannot play back this format. cYour camcorder cannot play back this mode during Easy Handycam • You ...
Camera Operations Guide
Page 125
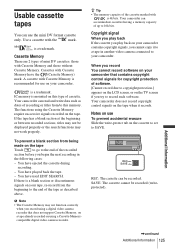
...the next recording in another video camera connected to your camcorder. Your camcorder can read and write data such as described above. b Note • The Cassette Memory may not function correctly when you record You cannot record software on your camcorder contains copyright signals, you... try to record such software. When you record using a digital video camera recorder that contains copyright control signals for use on your tape, re-record from...
...the next recording in another video camera connected to your camcorder. Your camcorder can read and write data such as described above. b Note • The Cassette Memory may not function correctly when you record You cannot record software on your camcorder contains copyright signals, you... try to record such software. When you record using a digital video camera recorder that contains copyright control signals for use on your tape, re-record from...
Camera Operations Guide
Page 134
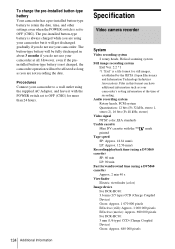
... Approx. 690 000 pixels For DCR-HC30: 3 mm (1/6 type) CCD (Charge Coupled Device) Gross: Approx. 680 000 pixels Audio recording system Rotary heads, PCM system Quantization: 12 bits (Fs 32 kHz, stereo 1, stereo 2), 16 bits (Fs 48 kHz, stereo) Video signal NTSC color, EIA standards ...installed button-type battery Your camcorder has a pre-installed button-type battery to retain the date, time, and other settings even when the POWER switch is a file format for more than 24 hours. 134 Additional Information Specification Video camera recorder System Video recording system 2 rotary ...
... Approx. 690 000 pixels For DCR-HC30: 3 mm (1/6 type) CCD (Charge Coupled Device) Gross: Approx. 680 000 pixels Audio recording system Rotary heads, PCM system Quantization: 12 bits (Fs 32 kHz, stereo 1, stereo 2), 16 bits (Fs 48 kHz, stereo) Video signal NTSC color, EIA standards ...installed button-type battery Your camcorder has a pre-installed button-type battery to retain the date, time, and other settings even when the POWER switch is a file format for more than 24 hours. 134 Additional Information Specification Video camera recorder System Video recording system 2 rotary ...
Camera Operations Guide
Page 135
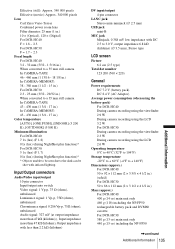
... a 35 mm still camera In CAMERA-TAPE: 46 - 460 mm (1 13/16 - 18 1/8 in.) In CAMERA-MEMORY: 38 - 380 mm (1 1/2 - 15 in.) For DCR-HC30: 2.3 - 23 mm (3/32 - 29/32 in.) When converted to the dark can be shot with infrared lighting. Input/Output connectors Audio/Video input/output 10-pin ...connector Input/output auto switch Video signal: 1 Vp-p, 75 Ω (ohms...
... a 35 mm still camera In CAMERA-TAPE: 46 - 460 mm (1 13/16 - 18 1/8 in.) In CAMERA-MEMORY: 38 - 380 mm (1 1/2 - 15 in.) For DCR-HC30: 2.3 - 23 mm (3/32 - 29/32 in.) When converted to the dark can be shot with infrared lighting. Input/Output connectors Audio/Video input/output 10-pin ...connector Input/output auto switch Video signal: 1 Vp-p, 75 Ω (ohms...
Camera Operations Guide
Page 138
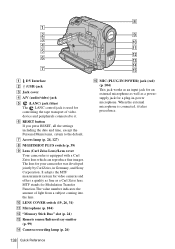
It adopts the MTF measurement system for video cameras and offers a quality as fine as a powersupply jack for a plug-in Germany, and Sony Corporation. 1 2 3 4 5 6 7 A DV Interface B (USB) jack C Jack cover D A/V (audio/video) jack E (LANC) jack (blue) The LANC control jack is connected, it . F RESET button If you press RESET, all the settings...light from a subject coming into the lens. G Access lamp (p. 24, 127) H NIGHTSHOT PLUS switch (p. 39) I Lens (Carl Zeiss Lens)/Lens cover Your camcorder is equipped with a Carl Zeiss lens which can reproduce fine images. MTF stands for your...
It adopts the MTF measurement system for video cameras and offers a quality as fine as a powersupply jack for a plug-in Germany, and Sony Corporation. 1 2 3 4 5 6 7 A DV Interface B (USB) jack C Jack cover D A/V (audio/video) jack E (LANC) jack (blue) The LANC control jack is connected, it . F RESET button If you press RESET, all the settings...light from a subject coming into the lens. G Access lamp (p. 24, 127) H NIGHTSHOT PLUS switch (p. 39) I Lens (Carl Zeiss Lens)/Lens cover Your camcorder is equipped with a Carl Zeiss lens which can reproduce fine images. MTF stands for your...
Camera Operations Guide
Page 139
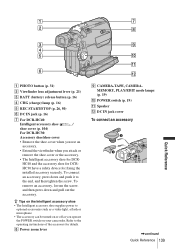
... camcorder. HC30 have a safety device for DCR- Refer to the end, and then tighten the screw. To connect an accessory, press down and pull out the accessory. z Tips on the Intelligent accessory shoe • The Intelligent accessory shoe supplies power to optional accessories such as a video light... loosen the screw, and then press down and push it to the operating instructions of the accessory for DCR- HC40 and the accessory shoe for details. H Power zoom lever 9 q; qa qs I CAMERA-TAPE, CAMERAMEMORY, PLAY/EDIT mode lamps (p. 19) J POWER switch (p. 19) K Speaker L DC...
... camcorder. HC30 have a safety device for DCR- Refer to the end, and then tighten the screw. To connect an accessory, press down and pull out the accessory. z Tips on the Intelligent accessory shoe • The Intelligent accessory shoe supplies power to optional accessories such as a video light... loosen the screw, and then press down and push it to the operating instructions of the accessory for DCR- HC40 and the accessory shoe for details. H Power zoom lever 9 q; qa qs I CAMERA-TAPE, CAMERAMEMORY, PLAY/EDIT mode lamps (p. 19) J POWER switch (p. 19) K Speaker L DC...


