
Camera Operations Guide
Page 11
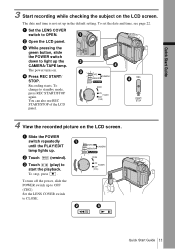
... (CHG). To turn off the power, slide the POWER switch up the CAMERA-TAPE lamp. b Open the LCD panel. c Touch (play) to light up to standby mode, press REC START/STOP again. To set up . d Press REC START/ STOP. You can also use REC START/STOP of the LCD panel. 4 View...
... (CHG). To turn off the power, slide the POWER switch up the CAMERA-TAPE lamp. b Open the LCD panel. c Touch (play) to light up to standby mode, press REC START/STOP again. To set up . d Press REC START/ STOP. You can also use REC START/STOP of the LCD panel. 4 View...
Camera Operations Guide
Page 26
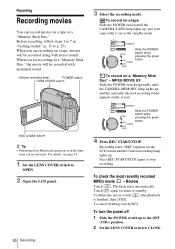
... . To record on a tape or a "Memory Stick Duo." REC START/STOP z Tip • Performing Easy Handycam operation, even first time users can record movies on a "Memory Stick Duo" - Press REC START/STOP again to...TAPE lamp lights up to the OFF (CHG) position. 2 Set the LENS COVER switch to the standby mode. Recording starts. [REC] appears on the LCD screen and the Camera recording lamp lights up ... the screen. Review Touch . To turn the power off 1 Slide the POWER switch up , and your camcorder is finished, then [YES]. To record on a "Memory Stick Duo," the movie will be recorded with ...
... . To record on a tape or a "Memory Stick Duo." REC START/STOP z Tip • Performing Easy Handycam operation, even first time users can record movies on a "Memory Stick Duo" - Press REC START/STOP again to...TAPE lamp lights up to the OFF (CHG) position. 2 Set the LENS COVER switch to the standby mode. Recording starts. [REC] appears on the LCD screen and the Camera recording lamp lights up ... the screen. Review Touch . To turn the power off 1 Slide the POWER switch up , and your camcorder is finished, then [YES]. To record on a "Memory Stick Duo," the movie will be recorded with ...
Camera Operations Guide
Page 27
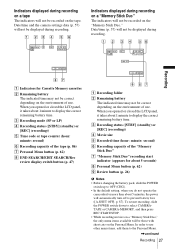
...during recording on a "Memory Stick Duo" The indicators will automatically turn off to display the correct remaining battery time. C Recording status ([STBY] (standby) or [REC] (recording)) D Movie size E Recorded time (hour: minute: second) F Recording capacity of use other menu items, add ...them to display the correct remaining battery time. When you do not operate the camcorder for about 5 seconds) H Personal Menu button (p. 62) I Review button (p. 26) b Notes • Before changing the battery pack, slide ...
...during recording on a "Memory Stick Duo" The indicators will automatically turn off to display the correct remaining battery time. C Recording status ([STBY] (standby) or [REC] (recording)) D Movie size E Recorded time (hour: minute: second) F Recording capacity of use other menu items, add ...them to display the correct remaining battery time. When you do not operate the camcorder for about 5 seconds) H Personal Menu button (p. 62) I Review button (p. 26) b Notes • Before changing the battery pack, slide ...
Camera Operations Guide
Page 31
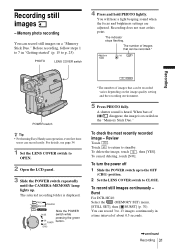
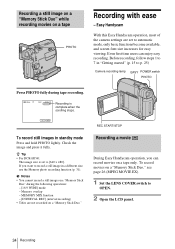
...the most recently recorded image - Touch to return to p. 25). To record still images continuously - Burst For DCR-HC40: Select the (MEMORY SET) menu, [STILL SET], then [ BURST] (p. 70). When bars of images... be recorded.* 60min 101 1152 FINE 30 Recording POWER switch z Tip • Performing Easy Handycam operation, even first time users can record still images on the "Memory Stick Duo." You .... 1 Set the LENS COVER switch to 13 images continuously in "Getting started" (p. 15 to standby. A shutter sound is recorded on a "Memory Stick Duo." You will hear a light beeping ...
...the most recently recorded image - Touch to return to p. 25). To record still images continuously - Burst For DCR-HC40: Select the (MEMORY SET) menu, [STILL SET], then [ BURST] (p. 70). When bars of images... be recorded.* 60min 101 1152 FINE 30 Recording POWER switch z Tip • Performing Easy Handycam operation, even first time users can record still images on the "Memory Stick Duo." You .... 1 Set the LENS COVER switch to 13 images continuously in "Getting started" (p. 15 to standby. A shutter sound is recorded on a "Memory Stick Duo." You will hear a light beeping ...
Camera Operations Guide
Page 34
...switch PHOTO Press PHOTO fully during the following operations: - [16:9 WIDE] mode - z Tip • For DCR-HC40: The image size is complete when the scrolling stops. P-MENU REC START/STOP To record still images in a...mode, only basic functions become available, and screen font size increases for easy viewing. Recording a movie During Easy Handycam operation, you want to [640 × 480]. Recording a still image on a "Memory Stick Duo" while ...) • Titles are set to record a still image in standby mode Press and hold PHOTO lightly. Check the image and press it fully.
...switch PHOTO Press PHOTO fully during the following operations: - [16:9 WIDE] mode - z Tip • For DCR-HC40: The image size is complete when the scrolling stops. P-MENU REC START/STOP To record still images in a...mode, only basic functions become available, and screen font size increases for easy viewing. Recording a movie During Easy Handycam operation, you want to [640 × 480]. Recording a still image on a "Memory Stick Duo" while ...) • Titles are set to record a still image in standby mode Press and hold PHOTO lightly. Check the image and press it fully.
Camera Operations Guide
Page 37
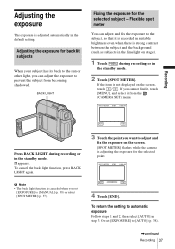
... the exposure for the selected point. Flexible spot meter You can adjust the exposure to automatic exposure Follow steps 1 and 2, then select [AUTO] in the standby mode. 2 Touch [SPOT METER]. To cancel the back light function, press BACK LIGHT again. If you can adjust and fix the exposure to the sun... select [SPOT METER] (p. 37). 3 Touch the point you want to [AUTO] (p. 38). ,continued Recording 37 Adjusting the exposure The exposure is adjusted automatically in the standby mode. .
... the exposure for the selected point. Flexible spot meter You can adjust the exposure to automatic exposure Follow steps 1 and 2, then select [AUTO] in the standby mode. 2 Touch [SPOT METER]. To cancel the back light function, press BACK LIGHT again. If you can adjust and fix the exposure to the sun... select [SPOT METER] (p. 37). 3 Touch the point you want to [AUTO] (p. 38). ,continued Recording 37 Adjusting the exposure The exposure is adjusted automatically in the standby mode. .
Camera Operations Guide
Page 38
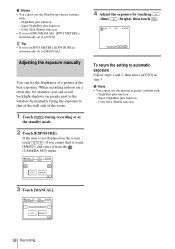
.... 60min EXPOSURE: STBY AUTO 0:00:00 4 Adjust the exposure by manually fixing the exposure to automatic exposure Follow steps 1 and 2, then select [AUTO] in the standby mode. 2 Touch [EXPOSURE]. If you can fix the brightness of the room. 1 Touch during recording or in step 3. NightShot plus function - If the item is...
.... 60min EXPOSURE: STBY AUTO 0:00:00 4 Adjust the exposure by manually fixing the exposure to automatic exposure Follow steps 1 and 2, then select [AUTO] in the standby mode. 2 Touch [EXPOSURE]. If you can fix the brightness of the room. 1 Touch during recording or in step 3. NightShot plus function - If the item is...
Camera Operations Guide
Page 40
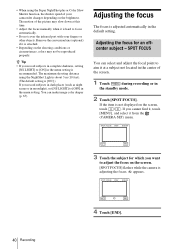
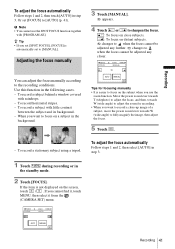
... at this time. • Adjust the focus manually when it is hard to focus automatically. • Do not cover the infrared port with your camcorder changes depending on the brightness. If you cannot find it, touch [MENU], and select it is attached. • Depending on the screen, touch... the shooting conditions or circumstances, colors may slow down at a subject not located in the center of the screen. 1 Touch during recording or in the standby mode. 2 Touch [SPOT FOCUS]. If the item is adjusting the focus. 9 appears. z Tip • If you record subjects in complete darkness,...
... at this time. • Adjust the focus manually when it is hard to focus automatically. • Do not cover the infrared port with your camcorder changes depending on the brightness. If you cannot find it, touch [MENU], and select it is attached. • Depending on the screen, touch... the shooting conditions or circumstances, colors may slow down at a subject not located in the center of the screen. 1 Touch during recording or in the standby mode. 2 Touch [SPOT FOCUS]. If the item is adjusting the focus. 9 appears. z Tip • If you record subjects in complete darkness,...
Camera Operations Guide
Page 41
...] (p. 41). z Tip • If you set [SPOT FOCUS], [FOCUS] is easier to focus on the subject when you want to focus on a subject in the standby mode. 2 Touch [FOCUS]. To record a stationary subject using a tripod. To record a subject behind a window covered with little contrast between the subject and its background. - Use...
...] (p. 41). z Tip • If you set [SPOT FOCUS], [FOCUS] is easier to focus on the subject when you want to focus on a subject in the standby mode. 2 Touch [FOCUS]. To record a stationary subject using a tripod. To record a subject behind a window covered with little contrast between the subject and its background. - Use...
Camera Operations Guide
Page 42
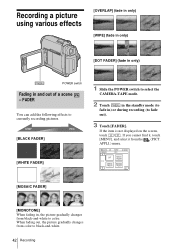
... add the following effects to currently recording pictures. [BLACK FADER] [WHITE FADER] 1 Slide the POWER switch to select the CAMERA-TAPE mode. 2 Touch in the standby mode (to fade in and out of a scene - When fading out, the picture gradually changes from black-and-white to color. APPLI.) menu. 60min FADER...
... add the following effects to currently recording pictures. [BLACK FADER] [WHITE FADER] 1 Slide the POWER switch to select the CAMERA-TAPE mode. 2 Touch in the standby mode (to fade in and out of a scene - When fading out, the picture gradually changes from black-and-white to color. APPLI.) menu. 60min FADER...

Camera Operations Guide
Page 47
... SEARCH You can do this operation also by selecting [END SEARCH] short-cut on the screen. POWER switch Searching for about 5 seconds, and the camcorder enters the standby mode at the point where the last recording has finished. When you use a cassette with Cassette Memory The last scene of the most recent...
... SEARCH You can do this operation also by selecting [END SEARCH] short-cut on the screen. POWER switch Searching for about 5 seconds, and the camcorder enters the standby mode at the point where the last recording has finished. When you use a cassette with Cassette Memory The last scene of the most recent...
Camera Operations Guide
Page 48
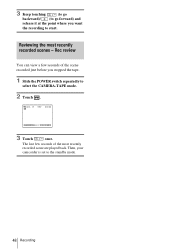
3 Keep touching (to go backward)/ (to go forward) and release it at the point where you stopped the tape. 1 Slide the POWER switch repeatedly to select the CAMERA-TAPE mode. 2 Touch . 60min STBY 0:00:00 EDIT 3 Touch once. Then, your camcorder is set to start. Rec review You can view a few seconds of the scene recorded just before you want the recording to the standby mode. 48 Recording The last few seconds of the most recently recorded scenes - Reviewing the most recently recorded scene are played back.
3 Keep touching (to go backward)/ (to go forward) and release it at the point where you stopped the tape. 1 Slide the POWER switch repeatedly to select the CAMERA-TAPE mode. 2 Touch . 60min STBY 0:00:00 EDIT 3 Touch once. Then, your camcorder is set to start. Rec review You can view a few seconds of the scene recorded just before you want the recording to the standby mode. 48 Recording The last few seconds of the most recently recorded scenes - Reviewing the most recently recorded scene are played back.
Camera Operations Guide
Page 76
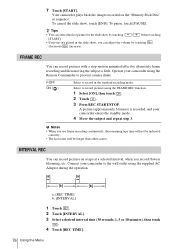
...INTERVAL]. 3 Select a desired interval time (30 seconds, 1, 5 or 10 minutes), then touch . 4 Touch [REC TIME]. 76 Using the Menu Connect your camcorder enters the standby mode. 4 Move the subject and repeat step 3. FRAME REC You can record pictures on the "Memory Stick Duo" in the standard recording mode. Operate... your camcorder using the FRAME REC function. 1 Select [ON], then touch . 2 Touch . 3 Press REC START/STOP....
...INTERVAL]. 3 Select a desired interval time (30 seconds, 1, 5 or 10 minutes), then touch . 4 Touch [REC TIME]. 76 Using the Menu Connect your camcorder enters the standby mode. 4 Move the subject and repeat step 3. FRAME REC You can record pictures on the "Memory Stick Duo" in the standard recording mode. Operate... your camcorder using the FRAME REC function. 1 Select [ON], then touch . 2 Touch . 3 Press REC START/STOP....
Camera Operations Guide
Page 81
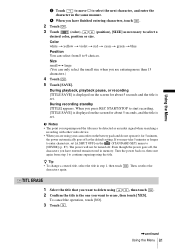
... the screen for about 5 seconds, and the title is set . Then, reselect the TITL ERASE 1 Select the title that you want to delete using your camcorder on the (STANDARD SET) menu to [NEVER] (p. 87). The power will not be detected as an index signal when searching a recording with other video device.... • When you have finished entering characters, touch . 2 Touch . 3 Touch (color), / (position), [SIZE] as the default setting. During recording standby [TITLE] appears. When you want to erase, then touch [YES].
... the screen for about 5 seconds, and the title is set . Then, reselect the TITL ERASE 1 Select the title that you want to delete using your camcorder on the (STANDARD SET) menu to [NEVER] (p. 87). The power will not be detected as an index signal when searching a recording with other video device.... • When you have finished entering characters, touch . 2 Touch . 3 Touch (color), / (position), [SIZE] as the default setting. During recording standby [TITLE] appears. When you want to erase, then touch [YES].
Camera Operations Guide
Page 129
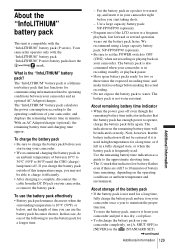
.... • After charging is complete, disconnect the cable from your camcorder. If you can use the battery pack effectively • Battery pack performance decreases when the surrounding temperature is in recording standby or playback pause. • Have spare battery packs ready for communicating... information related to warm it up, and insert it on your camcorder once a year to use it in a pocket to operating ...
.... • After charging is complete, disconnect the cable from your camcorder. If you can use the battery pack effectively • Battery pack performance decreases when the surrounding temperature is in recording standby or playback pause. • Have spare battery packs ready for communicating... information related to warm it up, and insert it on your camcorder once a year to use it in a pocket to operating ...
Camera Operations Guide
Page 130
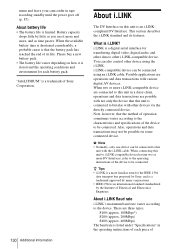
... varies depending on how it more and more DV Interfaces, refer to the operating instructions of Sony Corporation. 130 Additional Information About i.LINK The DV Interface on some connected device. "InfoLITHIUM"...8226; i.LINK is a more i.LINK-compatible device are connected to this unit in tape recording standby until the power goes off (p. 87). When the available battery time is shortened considerably, a .... This section describes the i.LINK standard and its life. menu and leave your camcorder in a daisy chain, operations and data transactions are possible with not only the device...
... varies depending on how it more and more DV Interfaces, refer to the operating instructions of Sony Corporation. 130 Additional Information About i.LINK The DV Interface on some connected device. "InfoLITHIUM"...8226; i.LINK is a more i.LINK-compatible device are connected to this unit in tape recording standby until the power goes off (p. 87). When the available battery time is shortened considerably, a .... This section describes the i.LINK standard and its life. menu and leave your camcorder in a daisy chain, operations and data transactions are possible with not only the device...
Camera Operations Guide
Page 143
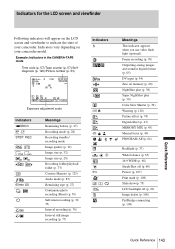
...Indicators P-MENU Exposure adjustment scale Indicators y60min SP , LP STBY REC 60min q Meanings Remaining battery (p. 27) Recording mode (p. 28) Recording standby/ recording mode Image quality (p. 32) Image size (p. 32) Image size (p. 28) Recording folder/playback folder (p. 73) Cassette Memory ... recording (p. 76) Interval still image recording (p. 77) Q Z 9 . Indicators for the LCD screen and viewfinder Following indicators will appear on your camcorder. n - Example: Indicators in digital format (p. 85) DV input (p. 94) Zero set memory (p. 60) NightShot plus (p. 39) Super NightShot ...
...Indicators P-MENU Exposure adjustment scale Indicators y60min SP , LP STBY REC 60min q Meanings Remaining battery (p. 27) Recording mode (p. 28) Recording standby/ recording mode Image quality (p. 32) Image size (p. 32) Image size (p. 28) Recording folder/playback folder (p. 73) Cassette Memory ... recording (p. 76) Interval still image recording (p. 77) Q Z 9 . Indicators for the LCD screen and viewfinder Following indicators will appear on your camcorder. n - Example: Indicators in digital format (p. 85) DV input (p. 94) Zero set memory (p. 60) NightShot plus (p. 39) Super NightShot ...

