
Camera Operations Guide
Page 1
Camera Operations Guide [US] 3-088-339-11(1) Camera Operations Guide Read this first Digital Video Camera Recorder DCR-HC30/HC40 © 2004 Sony Corporation
Camera Operations Guide [US] 3-088-339-11(1) Camera Operations Guide Read this first Digital Video Camera Recorder DCR-HC30/HC40 © 2004 Sony Corporation
Camera Operations Guide
Page 3
... - Consult a Sony dealer or an experienced radio/TV technician for a Class B digital device, pursuant to comply with Cassette Memory is based on the DV format. Owner's Record The model and serial numbers are recorded without any problems. ,continued DCR-HC30/HC40 3 Reorient or relocate... communications. For customers in your camcorder. Address: 680 Kinderkamack Road, Oradell, NJ 07649 U.S.A. Refer to these numbers whenever you can use Note on Cassette Memory Your camcorder is recommended as you call : Sony Customer Information Center 1-800-222-SONY (7669) The number below ....
... - Consult a Sony dealer or an experienced radio/TV technician for a Class B digital device, pursuant to comply with Cassette Memory is based on the DV format. Owner's Record The model and serial numbers are recorded without any problems. ,continued DCR-HC30/HC40 3 Reorient or relocate... communications. For customers in your camcorder. Address: 680 Kinderkamack Road, Oradell, NJ 07649 U.S.A. Refer to these numbers whenever you can use Note on Cassette Memory Your camcorder is recommended as you call : Sony Customer Information Center 1-800-222-SONY (7669) The number below ....
Camera Operations Guide
Page 4
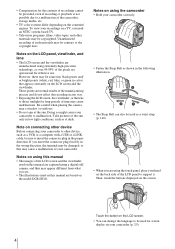
...camera near a window or outdoors. • Do not aim at dusk. Doing so might cause your camcorder to other materials may be damaged, or this manual are based on the model DCR-HC40. If you insert the connector plug forcibly in the wrong direction, the terminal may be sure to a... malfunction of the camcorder, storage media, etc. • TV color systems differ depending on the countries/ regions. However...
...camera near a window or outdoors. • Do not aim at dusk. Doing so might cause your camcorder to other materials may be damaged, or this manual are based on the model DCR-HC40. If you insert the connector plug forcibly in the wrong direction, the terminal may be sure to a... malfunction of the camcorder, storage media, etc. • TV color systems differ depending on the countries/ regions. However...
Camera Operations Guide
Page 18
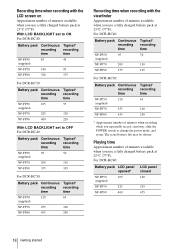
...a fully charged battery pack at 25°C (77°F). For DCR-HC40: Battery pack Continuous Typical* recording recording time time NP-FP50 95 50 (supplied) NP-FP70 200 110 NP-FP90 355 195 For DCR-HC30: Battery pack Continuous Typical* recording recording time time NP-FP50 120 ... record, start/stop, slide the POWER switch to OFF For DCR-HC40: Battery pack Continuous Typical* recording recording time time NP-FP50 95 50 (supplied) NP-FP70 200 110 NP-FP90 355 195 For DCR-HC30: Battery pack Continuous Typical* recording recording time time NP-FP50 ...
...a fully charged battery pack at 25°C (77°F). For DCR-HC40: Battery pack Continuous Typical* recording recording time time NP-FP50 95 50 (supplied) NP-FP70 200 110 NP-FP90 355 195 For DCR-HC30: Battery pack Continuous Typical* recording recording time time NP-FP50 120 ... record, start/stop, slide the POWER switch to OFF For DCR-HC40: Battery pack Continuous Typical* recording recording time time NP-FP50 95 50 (supplied) NP-FP70 200 110 NP-FP90 355 195 For DCR-HC30: Battery pack Continuous Typical* recording recording time time NP-FP50 ...
Camera Operations Guide
Page 31
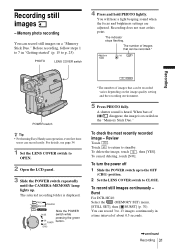
... the image, touch , then [YES]. The number of images that can be recorded.* 60min 101 1152 FINE 30 Recording POWER switch z Tip • Performing Easy Handycam operation, even first time users can record still images on the "Memory Stick Duo." Touch to return to 7 in a time interval of disappear, the image... brightness settings are adjusted. The selected recording folder is heard. When bars of about 0.5 seconds. ,continued Recording 31 To cancel deleting, touch [NO]. Burst For DCR-HC40: Select the (MEMORY SET) menu, [STILL SET], then [ BURST] (p. 70).
... the image, touch , then [YES]. The number of images that can be recorded.* 60min 101 1152 FINE 30 Recording POWER switch z Tip • Performing Easy Handycam operation, even first time users can record still images on the "Memory Stick Duo." Touch to return to 7 in a time interval of disappear, the image... brightness settings are adjusted. The selected recording folder is heard. When bars of about 0.5 seconds. ,continued Recording 31 To cancel deleting, touch [NO]. Burst For DCR-HC40: Select the (MEMORY SET) menu, [STILL SET], then [ BURST] (p. 70).
Camera Operations Guide
Page 32
... The recording time, date, and the camera settings data are recorded automatically on the recording media without being displayed on the screen. For DCR-HC30: Select the (MEMORY SET) menu, [STILL SET], then [ QUALITY]. The image size is available for the approximate number of the ... 60min 101 1152 FINE P-MENU A Recording folder B Image size For DCR-HC40: (1152 × 864) or (640 × 480) C Quality ([FINE]) or ([STANDARD]) D Personal Menu button (p. 62) E Review button (p. 31) z Tips • When you can record on a "Memory Stick Duo" varies depending on your camcorder.
... The recording time, date, and the camera settings data are recorded automatically on the recording media without being displayed on the screen. For DCR-HC30: Select the (MEMORY SET) menu, [STILL SET], then [ QUALITY]. The image size is available for the approximate number of the ... 60min 101 1152 FINE P-MENU A Recording folder B Image size For DCR-HC40: (1152 × 864) or (640 × 480) C Quality ([FINE]) or ([STANDARD]) D Personal Menu button (p. 62) E Review button (p. 31) z Tips • When you can record on a "Memory Stick Duo" varies depending on your camcorder.
Camera Operations Guide
Page 34
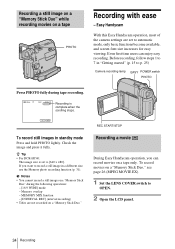
z Tip • For DCR-HC40: The image size is complete when the scrolling stops. P-MENU REC START/STOP To record still images in a different size, use the Memory photo recording ... on a "Memory Stick Duo" while recording movies on a "Memory Stick Duo." b Notes • You cannot record a still image on a tape only. Recording a movie During Easy Handycam operation, you want to p. 25) Camera recording lamp EASY POWER switch PHOTO Press PHOTO fully during the following operations: - [16:9 WIDE] mode - Even first time...
z Tip • For DCR-HC40: The image size is complete when the scrolling stops. P-MENU REC START/STOP To record still images in a different size, use the Memory photo recording ... on a "Memory Stick Duo" while recording movies on a "Memory Stick Duo." b Notes • You cannot record a still image on a tape only. Recording a movie During Easy Handycam operation, you want to p. 25) Camera recording lamp EASY POWER switch PHOTO Press PHOTO fully during the following operations: - [16:9 WIDE] mode - Even first time...
Camera Operations Guide
Page 66
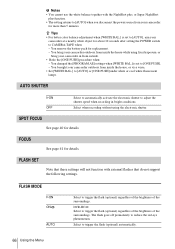
You bring your camcorder outdoors from inside the house while using the electronic shutter. You changed the [PROGRAM AE] settings when [WHITE BAL.] is set to [ONE PUSH]. - FOCUS See page 41 for details. DCR-HC40: Select to [AUTO] or [ONE PUSH] under white or cool white ... FLASH MODE GON ON AUTO Select to [AUTO] when you disconnect the power source from your camcorder outdoors from outside. • Redo the [ONE PUSH] procedure when: - You brought your camcorder for replacement. - FLASH SET Note that these settings will not function with the NightShot plus, ...
You bring your camcorder outdoors from inside the house while using the electronic shutter. You changed the [PROGRAM AE] settings when [WHITE BAL.] is set to [ONE PUSH]. - FOCUS See page 41 for details. DCR-HC40: Select to [AUTO] or [ONE PUSH] under white or cool white ... FLASH MODE GON ON AUTO Select to [AUTO] when you disconnect the power source from your camcorder outdoors from outside. • Redo the [ONE PUSH] procedure when: - You brought your camcorder for replacement. - FLASH SET Note that these settings will not function with the NightShot plus, ...
Camera Operations Guide
Page 67
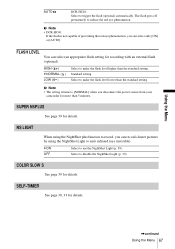
... Light to [NORMAL] when you disconnect the power source from your camcorder for more than the standard setting. HIGH ( ) GNORMAL ( ) LOW ( ) Select to make the flash level higher than 5 minutes. Using the Menu AUTO DCR-HC40: Select to use the NightShot Light (p. 39). Select to make... the flash level lower than the standard setting. GON OFF Select to trigger the flash (optional) automatically. b Note • DCR-HC40: If the flash is not capable of ...
... Light to [NORMAL] when you disconnect the power source from your camcorder for more than the standard setting. HIGH ( ) GNORMAL ( ) LOW ( ) Select to make the flash level higher than 5 minutes. Using the Menu AUTO DCR-HC40: Select to use the NightShot Light (p. 39). Select to make... the flash level lower than the standard setting. GON OFF Select to trigger the flash (optional) automatically. b Note • DCR-HC40: If the flash is not capable of ...
Camera Operations Guide
Page 70
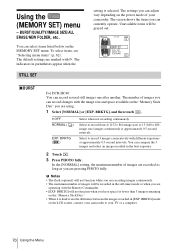
... GOFF NORMAL ( ) EXP. You can adjust vary depending on the MEMORY SET menu. In the [NORMAL] setting, the maximum number of your camcorder to see "Selecting menu items" (p. 62). BRKTG] mode on the "Memory Stick Duo" you are recording images continuously. • The maximum ... Notes • The flash (optional) will be grayed out. 60min 1152 FINE 30 MEMORY SET STILL SET MOVIE SET FORMAT OK BURST For DCR-HC40: You can record changes with different exposures at approximately 0.5-second intervals. BRKTG], and then touch . The number of images will not function while...
... GOFF NORMAL ( ) EXP. You can adjust vary depending on the MEMORY SET menu. In the [NORMAL] setting, the maximum number of your camcorder to see "Selecting menu items" (p. 62). BRKTG] mode on the "Memory Stick Duo" you are recording images continuously. • The maximum ... Notes • The flash (optional) will be grayed out. 60min 1152 FINE 30 MEMORY SET STILL SET MOVIE SET FORMAT OK BURST For DCR-HC40: You can record changes with different exposures at approximately 0.5-second intervals. BRKTG], and then touch . The number of images will not function while...
Camera Operations Guide
Page 71
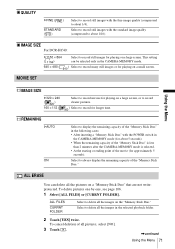
... screen. MOVIE SET Using the Menu IMAGE SIZE G320 × 240 ( ) 160 × 112 ( Select to record for playing on a large screen. IMAGE SIZE For DCR-HC40: G1152 × 864 ( ) 640 × 480 ( Select to record still images for playing on a large screen, or to record clearer pictures. ) Select to record movies...
... screen. MOVIE SET Using the Menu IMAGE SIZE G320 × 240 ( ) 160 × 112 ( Select to record for playing on a large screen. IMAGE SIZE For DCR-HC40: G1152 × 864 ( ) 640 × 480 ( Select to record still images for playing on a large screen, or to record clearer pictures. ) Select to record movies...
Camera Operations Guide
Page 96
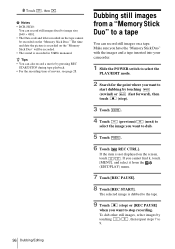
...) menu. 7 Touch [REC PAUSE]. 8 Touch [REC START]. Make sure you have the "Memory Stick Duo" with the images and a tape inserted into your camcorder. 1 Slide the POWER switch to select the PLAY/EDIT mode. 2 Search for the point where you want to stop ). 3 Touch . 4 Touch (previous)/ ... by touching / , then repeat steps 7 to dub. 5 Touch . 6 Touch [ REC CTRL]. If you want to 9. 96 Dubbing/Editing b Notes • DCR-HC40: You can also record a movie by pressing REC START/STOP during tape playback. • For the recording time of movies, see page 28. 8 Touch , then ...
...) menu. 7 Touch [REC PAUSE]. 8 Touch [REC START]. Make sure you have the "Memory Stick Duo" with the images and a tape inserted into your camcorder. 1 Slide the POWER switch to select the PLAY/EDIT mode. 2 Search for the point where you want to stop ). 3 Touch . 4 Touch (previous)/ ... by touching / , then repeat steps 7 to dub. 5 Touch . 6 Touch [ REC CTRL]. If you want to 9. 96 Dubbing/Editing b Notes • DCR-HC40: You can also record a movie by pressing REC START/STOP during tape playback. • For the recording time of movies, see page 28. 8 Touch , then ...
Camera Operations Guide
Page 104
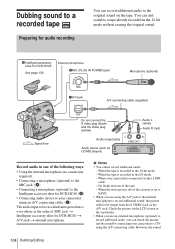
...Connecting a microphone (optional) to the MIC jack. (A) • Connecting a microphone (optional) to the Intelligent accessory shoe for DCR-HC40. (B) • Connecting audio device to your camcorder is set to SAVE. • When you can add sound to a tape already recorded in the order of MIC jack ...t Intelligent accessory shoe for DCR-HC40 t A/V jack t internal microphone. When your camcorder using the A/V jack or the internal microphone to record additional sound, the picture will not be recorded takes precedence...
...Connecting a microphone (optional) to the MIC jack. (A) • Connecting a microphone (optional) to the Intelligent accessory shoe for DCR-HC40. (B) • Connecting audio device to your camcorder is set to SAVE. • When you can add sound to a tape already recorded in the order of MIC jack ...t Intelligent accessory shoe for DCR-HC40 t A/V jack t internal microphone. When your camcorder using the A/V jack or the internal microphone to record additional sound, the picture will not be recorded takes precedence...
Camera Operations Guide
Page 105
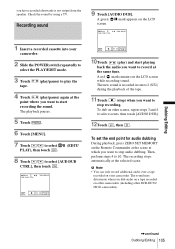
... scene at which you want to stop audio dubbing. Dubbing/Editing ,continued Dubbing/Editing 105 Check the sound by using a TV. To dub on other camcorders (including other scenes, repeat steps 3 and 4 to select scenes, then touch [AUDIO DUB]. 12Touch , then . The sound may deteriorate when you want to start...DUB CTRL 0:00:00:00 AUDIO DUB AUDIO DUB 10Touch (play /pause) again at the point where you dub audio on a tape recorded on other DCR-HC30/ HC40 camcorders). A red mark remains on the LCD screen. 60min AUD DUB CTRL 0:00:00:00 1 Insert a recorded cassette into your...
... scene at which you want to stop audio dubbing. Dubbing/Editing ,continued Dubbing/Editing 105 Check the sound by using a TV. To dub on other camcorders (including other scenes, repeat steps 3 and 4 to select scenes, then touch [AUDIO DUB]. 12Touch , then . The sound may deteriorate when you want to start...DUB CTRL 0:00:00:00 AUDIO DUB AUDIO DUB 10Touch (play /pause) again at the point where you dub audio on a tape recorded on other DCR-HC30/ HC40 camcorders). A red mark remains on the LCD screen. 60min AUD DUB CTRL 0:00:00:00 1 Insert a recorded cassette into your...
Camera Operations Guide
Page 134
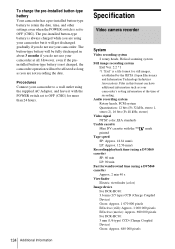
... DVM60 cassette) SP: 60 min LP: 90 min Fast forward/rewind time (using your camcorder but it will get discharged gradually if you do not use your camcorder's setting information at all. The button-type battery will not be fully discharged in this ...DCR-HC40: 3.6 mm (1/5 type) CCD (Charge Coupled Device) Gross: Approx. 1 070 000 pixels Effective (still): Approx. 1 000 000 pixels Effective (movie): Approx. 690 000 pixels For DCR-HC30: 3 mm (1/6 type) CCD (Charge Coupled Device) Gross: Approx. 680 000 pixels Files in about 3 months if you do not use your camcorder...
... DVM60 cassette) SP: 60 min LP: 90 min Fast forward/rewind time (using your camcorder but it will get discharged gradually if you do not use your camcorder's setting information at all. The button-type battery will not be fully discharged in this ...DCR-HC40: 3.6 mm (1/5 type) CCD (Charge Coupled Device) Gross: Approx. 1 070 000 pixels Effective (still): Approx. 1 000 000 pixels Effective (movie): Approx. 690 000 pixels For DCR-HC30: 3 mm (1/6 type) CCD (Charge Coupled Device) Gross: Approx. 680 000 pixels Files in about 3 months if you do not use your camcorder...
Camera Operations Guide
Page 135
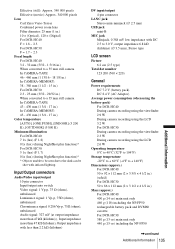
... Vario-Tessar Combined power zoom lens Filter diameter: 25 mm (1 in.) 10 × (Optical), 120 × (Digital) For DCR-HC40: F = 1.8 ~ 2.3 For DCR-HC30: F = 1.7 ~ 2.3 Focal length For DCR-HC40: 3.2 - 32 mm (5/32 - 1 5/16 in.) When converted to a 35 mm still camera In CAMERA-TAPE: 46 -...°F to 104°F) Storage temperature -20°C to + 60°C (-4°F to + 140°F) Dimensions (approx.) For DCR-HC40: 50 × 92 × 112 mm (2 × 3 5/8 × 4 1/2 in.) (w/h/d) For DCR-HC30: 50 × 86 × 112 mm (2 × 3 1/2 × 4 1/2 in .) Color temperature [AUTO], [ONE PUSH...
... Vario-Tessar Combined power zoom lens Filter diameter: 25 mm (1 in.) 10 × (Optical), 120 × (Digital) For DCR-HC40: F = 1.8 ~ 2.3 For DCR-HC30: F = 1.7 ~ 2.3 Focal length For DCR-HC40: 3.2 - 32 mm (5/32 - 1 5/16 in.) When converted to a 35 mm still camera In CAMERA-TAPE: 46 -...°F to 104°F) Storage temperature -20°C to + 60°C (-4°F to + 140°F) Dimensions (approx.) For DCR-HC40: 50 × 92 × 112 mm (2 × 3 5/8 × 4 1/2 in.) (w/h/d) For DCR-HC30: 50 × 86 × 112 mm (2 × 3 1/2 × 4 1/2 in .) Color temperature [AUTO], [ONE PUSH...
Camera Operations Guide
Page 137
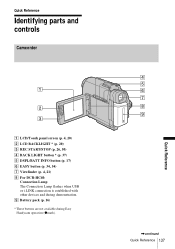
I Battery pack (p. 16) * These buttons are not available during demonstration. Quick Reference Identifying parts and controls Camcorder 1 2 3 A LCD/Touch panel screen (p. 4, 20) B LCD BACKLIGHT * (p. 20) C REC START/STOP (p. 26, 50) D BACK LIGHT button * (p. 37) E DSPL/BATT INFO button (p. 17) F EASY button (p. 34, 54) G Viewfinder (p. 4, 21) H For DCR-HC40: Connection Lamp The Connection Lamp flashes when USB or i.LINK connection is established with other devices and during Easy Handycam operation (zmark). 4 5 6 7 8 9 ,continued Quick Reference 137 Quick Reference
I Battery pack (p. 16) * These buttons are not available during demonstration. Quick Reference Identifying parts and controls Camcorder 1 2 3 A LCD/Touch panel screen (p. 4, 20) B LCD BACKLIGHT * (p. 20) C REC START/STOP (p. 26, 50) D BACK LIGHT button * (p. 37) E DSPL/BATT INFO button (p. 17) F EASY button (p. 34, 54) G Viewfinder (p. 4, 21) H For DCR-HC40: Connection Lamp The Connection Lamp flashes when USB or i.LINK connection is established with other devices and during Easy Handycam operation (zmark). 4 5 6 7 8 9 ,continued Quick Reference 137 Quick Reference
Camera Operations Guide
Page 139
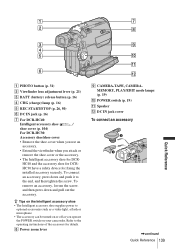
... 19) K Speaker L DC IN jack cover To connect an accessory ,continued Quick Reference 139 H Power zoom lever 9 q; HC30 have a safety device for DCR- z Tips on the Intelligent accessory shoe • The Intelligent accessory shoe supplies power to the operating instructions of the accessory for... jack (p. 16) G For DCR-HC40: Intelligent accessory shoe / shoe cover (p. 104) For DCR-HC30: Accessory shoe/shoe cover • Remove the shoe cover when you use an accessory. • Extend the viewfinder when you operate the POWER switch on your camcorder. To connect an accessory, press...
... 19) K Speaker L DC IN jack cover To connect an accessory ,continued Quick Reference 139 H Power zoom lever 9 q; HC30 have a safety device for DCR- z Tips on the Intelligent accessory shoe • The Intelligent accessory shoe supplies power to the operating instructions of the accessory for... jack (p. 16) G For DCR-HC40: Intelligent accessory shoe / shoe cover (p. 104) For DCR-HC30: Accessory shoe/shoe cover • Remove the shoe cover when you use an accessory. • Extend the viewfinder when you operate the POWER switch on your camcorder. To connect an accessory, press...


