
Camera Operations Guide
Page 7
...MIX 45 Searching for the starting point 47 Searching for a desired scene - Rec review 48 Playback Viewing movies recorded on a tape for playback 60 Searching quickly for the last scene of Easy Handycam operation 55 Various playback functions 56 Magnifying pictures - Flexible spot meter 37 Adjusting ... manually 38 Recording in and out of recording - SPOT FOCUS 40 Adjusting the focus manually 41 Recording a picture using Cassette Memory - Easy Handycam 54 Making full use of the most recently recorded scenes - Zero set memory 60 Searching for a scene by date of a scene - ...
...MIX 45 Searching for the starting point 47 Searching for a desired scene - Rec review 48 Playback Viewing movies recorded on a tape for playback 60 Searching quickly for the last scene of Easy Handycam operation 55 Various playback functions 56 Magnifying pictures - Flexible spot meter 37 Adjusting ... manually 38 Recording in and out of recording - SPOT FOCUS 40 Adjusting the focus manually 41 Recording a picture using Cassette Memory - Easy Handycam 54 Making full use of the most recently recorded scenes - Zero set memory 60 Searching for a scene by date of a scene - ...
Camera Operations Guide
Page 26
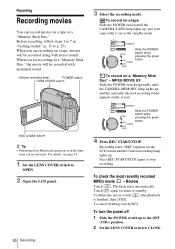
...Recording starts. [REC] appears on a tape Slide the POWER switch until the CAMERA-MEMORY lamp lights up , and your camcorder is finished, then [YES]. To check the most recently recorded MPEG movie - To delete the movie, touch after playback is...to OPEN. 2 Open the LCD panel. 4 Press REC START/STOP. REC START/STOP z Tip • Performing Easy Handycam operation, even first time users can record movies on the screen. For details, see page 34. 1 Set the LENS COVER..., follow steps 1 to 7 in "Getting started" (p. 15 to the standby mode. Review Touch . To cancel deleting, touch [NO].
...Recording starts. [REC] appears on a tape Slide the POWER switch until the CAMERA-MEMORY lamp lights up , and your camcorder is finished, then [YES]. To check the most recently recorded MPEG movie - To delete the movie, touch after playback is...to OPEN. 2 Open the LCD panel. 4 Press REC START/STOP. REC START/STOP z Tip • Performing Easy Handycam operation, even first time users can record movies on the screen. For details, see page 34. 1 Set the LENS COVER..., follow steps 1 to 7 in "Getting started" (p. 15 to the standby mode. Review Touch . To cancel deleting, touch [NO].
Camera Operations Guide
Page 27
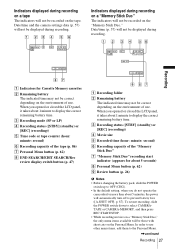
... Date/time and the camera settings data (p. 57) will not be correct depending on the Personal Menu. When you do not operate the camcorder for Cassette Memory cassettes B Remaining battery The indicated time may not be those with short cuts on the environment of the tape (p. 86)... G Personal Menu button (p. 62) H END SEARCH/EDIT SEARCH/Rec review display switch button (p. 47) A Recording folder B Remaining battery The indicated time may not be displayed during recording. C Recording mode (SP or LP) ...
... Date/time and the camera settings data (p. 57) will not be correct depending on the Personal Menu. When you do not operate the camcorder for Cassette Memory cassettes B Remaining battery The indicated time may not be those with short cuts on the environment of the tape (p. 86)... G Personal Menu button (p. 62) H END SEARCH/EDIT SEARCH/Rec review display switch button (p. 47) A Recording folder B Remaining battery The indicated time may not be displayed during recording. C Recording mode (SP or LP) ...
Camera Operations Guide
Page 31
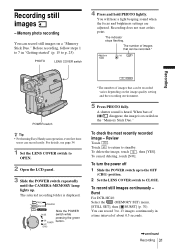
...p. 25). PHOTO LENS COVER switch 4 Press and hold PHOTO lightly. You will hear a light beeping sound when the focus and brightness settings are adjusted. Review Touch . For details, see page 34. 1 Set the LENS COVER switch to OPEN. 2 Open the LCD panel. 3 Slide the POWER switch repeatedly .... Recording still images - Slide the POWER switch while pressing the green button. To turn the power off 1 Slide the POWER switch up . Burst For DCR-HC40: Select the (MEMORY SET) menu, [STILL SET], then [ BURST] (p. 70). You can be recorded.* 60min 101 1152 FINE 30 Recording POWER...
...p. 25). PHOTO LENS COVER switch 4 Press and hold PHOTO lightly. You will hear a light beeping sound when the focus and brightness settings are adjusted. Review Touch . For details, see page 34. 1 Set the LENS COVER switch to OPEN. 2 Open the LCD panel. 3 Slide the POWER switch repeatedly .... Recording still images - Slide the POWER switch while pressing the green button. To turn the power off 1 Slide the POWER switch up . Burst For DCR-HC40: Select the (MEMORY SET) menu, [STILL SET], then [ BURST] (p. 70). You can be recorded.* 60min 101 1152 FINE 30 Recording POWER...
Camera Operations Guide
Page 32
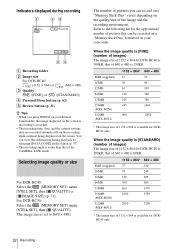
... is set to the following list for DCRHC40 only. Selecting image quality or size For DCR-HC40: Select the (MEMORY SET) menu, [STILL SET], then [ QUALITY] or [ IMAGE SIZE] (p. 71). For DCR-HC30: Select the (MEMORY SET) menu, [STILL SET], then [ QUALITY]. Indicators displayed... without being displayed on your camcorder. You can view this information during recording 60min 101 1152 FINE P-MENU A Recording folder B Image size For DCR-HC40: (1152 × 864) or (640 × 480) C Quality ([FINE]) or ([STANDARD]) D Personal Menu button (p. 62) E Review button (p. 31) z Tips...
... is set to the following list for DCRHC40 only. Selecting image quality or size For DCR-HC40: Select the (MEMORY SET) menu, [STILL SET], then [ QUALITY] or [ IMAGE SIZE] (p. 71). For DCR-HC30: Select the (MEMORY SET) menu, [STILL SET], then [ QUALITY]. Indicators displayed... without being displayed on your camcorder. You can view this information during recording 60min 101 1152 FINE P-MENU A Recording folder B Image size For DCR-HC40: (1152 × 864) or (640 × 480) C Quality ([FINE]) or ([STANDARD]) D Personal Menu button (p. 62) E Review button (p. 31) z Tips...
Camera Operations Guide
Page 48
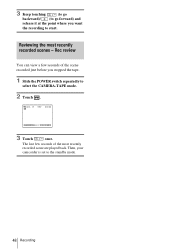
Reviewing the most recently recorded scene are played back. Rec review You can view a few seconds of the scene recorded just before you want the recording to start. 3 Keep touching (to go backward)/ (to go forward) and release it at the point where you stopped the tape. 1 Slide the POWER switch repeatedly to select the CAMERA-TAPE mode. 2 Touch . 60min STBY 0:00:00 EDIT 3 Touch once. The last few seconds of the most recently recorded scenes - Then, your camcorder is set to the standby mode. 48 Recording
Reviewing the most recently recorded scene are played back. Rec review You can view a few seconds of the scene recorded just before you want the recording to start. 3 Keep touching (to go backward)/ (to go forward) and release it at the point where you stopped the tape. 1 Slide the POWER switch repeatedly to select the CAMERA-TAPE mode. 2 Touch . 60min STBY 0:00:00 EDIT 3 Touch once. The last few seconds of the most recently recorded scenes - Then, your camcorder is set to the standby mode. 48 Recording
Camera Operations Guide
Page 49
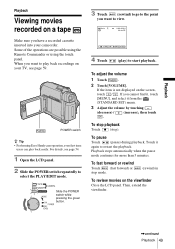
POWER switch z Tip • Performing Easy Handycam operation, even first time users can play back recordings on the viewfinder Close the LCD panel. To adjust the volume 1 Touch . 2 Touch [VOLUME]. To stop playback Touch (stop mode. (rewind) in To review movies on your camcorder. Playback stops automatically when the pause mode continues for more...
POWER switch z Tip • Performing Easy Handycam operation, even first time users can play back recordings on the viewfinder Close the LCD panel. To adjust the volume 1 Touch . 2 Touch [VOLUME]. To stop playback Touch (stop mode. (rewind) in To review movies on your camcorder. Playback stops automatically when the pause mode continues for more...
Camera Operations Guide
Page 145
...85 LCD screen 4 LCD/VF SET 84 LP (Long Play) See Recording mode (REC MODE) Luminance key (LUMI. EDIT 79 R REC FOLDER 73 Rec review 48 REC START/STOP .... 26, 50 Recording capacity Display 27 REMAINING ....... 71, 86 Recording lamp (REC LED 86 Recording mode (REC MODE)....... 27, 83... Recording time 18, 28 Remote Commander ....... 141 REMOTE CTRL ........ 86 Remote sensor 138 RESET 138 Review 26, 31 S S video 59, 92 Self-diagnosis display ..... 120 Self-timer recording (SELF-TIMER) .... 30, 33 Skip scan 50 SLIDE SHOW 75 Slow ...
...85 LCD screen 4 LCD/VF SET 84 LP (Long Play) See Recording mode (REC MODE) Luminance key (LUMI. EDIT 79 R REC FOLDER 73 Rec review 48 REC START/STOP .... 26, 50 Recording capacity Display 27 REMAINING ....... 71, 86 Recording lamp (REC LED 86 Recording mode (REC MODE)....... 27, 83... Recording time 18, 28 Remote Commander ....... 141 REMOTE CTRL ........ 86 Remote sensor 138 RESET 138 Review 26, 31 S S video 59, 92 Self-diagnosis display ..... 120 Self-timer recording (SELF-TIMER) .... 30, 33 Skip scan 50 SLIDE SHOW 75 Slow ...

