
Computer Applications Guide
Page 11
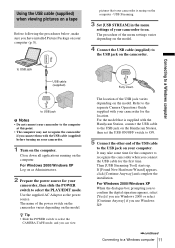
... on your camcorder. 1 Turn on your camcorder to the USB jack on the computer. For the model that your camcorder for the computer to recognize the camcorder when you connect them with the Handycam Station, connect the USB cable to the USB jack on the Handycam Station, then set the USB ON/OFF ...POWER switch to a Windows computer 11 The procedure of your computer. to USB jack b Notes • Do not connect your camcorder to select the PLAY/EDIT mode. Close down all applications running on your camcorder, then slide the POWER switch to the computer at this point. •...
... on your camcorder. 1 Turn on your camcorder to the USB jack on the computer. For the model that your camcorder for the computer to recognize the camcorder when you connect them with the Handycam Station, connect the USB cable to the USB jack on the Handycam Station, then set the USB ON/OFF ...POWER switch to a Windows computer 11 The procedure of your computer. to USB jack b Notes • Do not connect your camcorder to select the PLAY/EDIT mode. Close down all applications running on your camcorder, then slide the POWER switch to the computer at this point. •...
Computer Applications Guide
Page 13
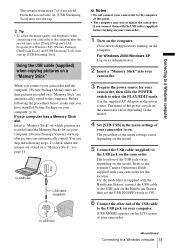
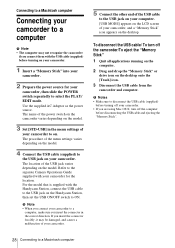
... of your camcorder. ,continued Connecting to the USB jack on the camcorder. For the model that is supplied with the Handycam Station, connect the USB cable to the USB jack on the Handycam Station, then set the USB ON/OFF switch to ON. 6 Connect the other end of the USB cable to the USB jack on your computer. [USB MODE] appears on...
... of your camcorder. ,continued Connecting to the USB jack on the camcorder. For the model that is supplied with the Handycam Station, connect the USB cable to the USB jack on the Handycam Station, then set the USB ON/OFF switch to ON. 6 Connect the other end of the USB cable to the USB jack on your computer. [USB MODE] appears on...

Computer Applications Guide
Page 15
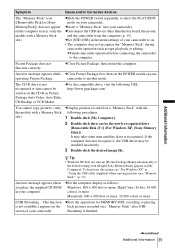
...98SE Do only step 4 above . Make sure no other USB devices are connected to a Windows computer task tray 2 Click [Safely remove Sony Camcorder] ([Unplug or eject hardware] in Windows 2000/Windows Me). b Notes • Do not disconnect the USB cable while the access lamp is not guaranteed if you ...connect the USB cable to the USB jack on a keyboard or USB hub. • Make sure to connect the cable to a Windows computer 15 Click this icon. • If your camcorder. Connecting to the computer. To disconnect the USB cable For Windows 2000/Windows Me/ Windows XP If [USB MODE] appears on...
...98SE Do only step 4 above . Make sure no other USB devices are connected to a Windows computer task tray 2 Click [Safely remove Sony Camcorder] ([Unplug or eject hardware] in Windows 2000/Windows Me). b Notes • Do not disconnect the USB cable while the access lamp is not guaranteed if you ...connect the USB cable to the USB jack on a keyboard or USB hub. • Make sure to connect the cable to a Windows computer 15 Click this icon. • If your camcorder. Connecting to the computer. To disconnect the USB cable For Windows 2000/Windows Me/ Windows XP If [USB MODE] appears on...
Computer Applications Guide
Page 18
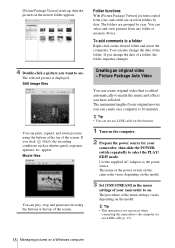
...any folder or memory device. Creating an original video - The maximum length of your camcorder are grouped by date. The name of the power switch on the camcorder varies depending on the model. 3 Set [USB STREAM] in the menu settings of the menu settings varies depending on the desired ...folder and insert the comments. The procedure of your camcorder, then slide the POWER switch repeatedly to select the PLAY/ EDIT mode. appear. To ...
...any folder or memory device. Creating an original video - The maximum length of your camcorder are grouped by date. The name of the power switch on the camcorder varies depending on the model. 3 Set [USB STREAM] in the menu settings of the menu settings varies depending on the desired ...folder and insert the comments. The procedure of your camcorder, then slide the POWER switch repeatedly to select the PLAY/ EDIT mode. appear. To ...
Computer Applications Guide
Page 24
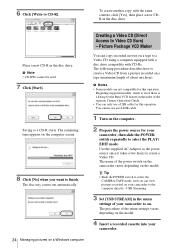
...on the computer. 2 Prepare the power source for your camcorder to on a Windows computer Creating a Video CD (Direct Access to select the PLAY/ EDIT mode. b Notes • Some models are not compatible for this operation. You cannot use a USB cable for this operation. To create another copy with CD...is a listing for the Burn VCD feature in the index of the power switch on the camcorder varies depending on the model. 4 Insert a recorded cassette into your camcorder to select the CAMERA-TAPE mode, and you want to a Video CD using a computer equipped with a disc drive compatible...
...on the computer. 2 Prepare the power source for your camcorder to on a Windows computer Creating a Video CD (Direct Access to select the PLAY/ EDIT mode. b Notes • Some models are not compatible for this operation. You cannot use a USB cable for this operation. To create another copy with CD...is a listing for the Burn VCD feature in the index of the power switch on the camcorder varies depending on the model. 4 Insert a recorded cassette into your camcorder to select the CAMERA-TAPE mode, and you want to a Video CD using a computer equipped with a disc drive compatible...
Computer Applications Guide
Page 26
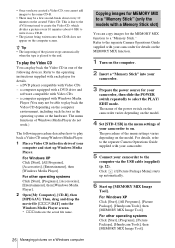
...CDs - The procedure of the following procedure describes how to select the PLAY/ EDIT mode. For details, refer to the separate Camera Operations Guide supplied with Windows Media Player ...[Windows Media Player]. The name of the power switch on the camcorder varies depending on the model. 4 Set [STD-USB] in one of the menu settings varies depending on the computer ...Handycam Tools], then [MEMORY MIX Image Tool]. This is played to write it on a CD-R. • The picture being written onto the CD-R does not appear on the computer. 2 Insert a "Memory Stick" into your camcorder...
...CDs - The procedure of the following procedure describes how to select the PLAY/ EDIT mode. For details, refer to the separate Camera Operations Guide supplied with Windows Media Player ...[Windows Media Player]. The name of the power switch on the camcorder varies depending on the model. 4 Set [STD-USB] in one of the menu settings varies depending on the computer ...Handycam Tools], then [MEMORY MIX Image Tool]. This is played to write it on a CD-R. • The picture being written onto the CD-R does not appear on the computer. 2 Insert a "Memory Stick" into your camcorder...
Computer Applications Guide
Page 28
... switch repeatedly to select the PLAY/ EDIT mode. For the model that is supplied with the Handycam Station, connect the USB cable to the USB jack on the Handycam Station, then set the USB ON/OFF switch to the USB jack on your computer. [USB MODE] appears on the LCD screen of your camcorder, and a "Memory Stick" icon appears on...
... switch repeatedly to select the PLAY/ EDIT mode. For the model that is supplied with the Handycam Station, connect the USB cable to the USB jack on the Handycam Station, then set the USB ON/OFF switch to the USB jack on your computer. [USB MODE] appears on the LCD screen of your camcorder, and a "Memory Stick" icon appears on...

Computer Applications Guide
Page 30
.... You can create DVDs when you connect your camcorder, then slide the POWER switch repeatedly to copy pictures recorded on a tape. Korea http://scs.sony.co.kr/ - z Tips • After you to select the PLAY/ EDIT mode. You also need a Sony VAIO computer equipped with a DVD drive that can... only use a USB cable. Latin America http://vaio-online.sony.com/ Using the Direct Access to "Click to ...
.... You can create DVDs when you connect your camcorder, then slide the POWER switch repeatedly to copy pictures recorded on a tape. Korea http://scs.sony.co.kr/ - z Tips • After you to select the PLAY/ EDIT mode. You also need a Sony VAIO computer equipped with a DVD drive that can... only use a USB cable. Latin America http://vaio-online.sony.com/ Using the Direct Access to "Click to ...

Computer Applications Guide
Page 35
... on a tape on . cSlide the POWER switch repeatedly to select the PLAY/EDIT mode, set the USB ON/OFF switch to the camcorder firmly. You cannot view the pictures recorded on a "Memory Stick" on the computer. (only the models with the Handycam Station, set [USB STREAM] in your computer. cYou cannot use an i.LINK cable.
... on a tape on . cSlide the POWER switch repeatedly to select the PLAY/EDIT mode, set the USB ON/OFF switch to the camcorder firmly. You cannot view the pictures recorded on a "Memory Stick" on the computer. (only the models with the Handycam Station, set [USB STREAM] in your computer. cYou cannot use an i.LINK cable.
Computer Applications Guide
Page 39
... function cStart the operations for the newly recognized drive [Removable Disk (F:)] (For Windows XP, [Sony Memory Stick]). Picture Package does not function correctly. cSet [STD-USB] in the menu settings of your camcorder to another mode. To deactivate the setting, see "For Windows XP" in [My Computer]. cClose Picture Package, then restart the computer...
... function cStart the operations for the newly recognized drive [Removable Disk (F:)] (For Windows XP, [Sony Memory Stick]). Picture Package does not function correctly. cSet [STD-USB] in the menu settings of your camcorder to another mode. To deactivate the setting, see "For Windows XP" in [My Computer]. cClose Picture Package, then restart the computer...

Camera Operations Guide
Page 8
.../INT. Image protection/ Print mark 107 Printing recorded images (PictBridge compliant printer 109 8 REC-STL, etc 74 Using the (EDIT/PLAY) menu - REC MODE/MULTI-SOUND/ AUDIO MIX/USB-CAMERA, etc 83 Using the (TIME/LANGU.) menu - BURST/QUALITY/IMAGE SIZE/ ALL ERASE/NEW FOLDER, etc 70 Using the (PICT. APPLI.) menu...
.../INT. Image protection/ Print mark 107 Printing recorded images (PictBridge compliant printer 109 8 REC-STL, etc 74 Using the (EDIT/PLAY) menu - REC MODE/MULTI-SOUND/ AUDIO MIX/USB-CAMERA, etc 83 Using the (TIME/LANGU.) menu - BURST/QUALITY/IMAGE SIZE/ ALL ERASE/NEW FOLDER, etc 70 Using the (PICT. APPLI.) menu...

Camera Operations Guide
Page 46
..., touch on a tape Press REC START/STOP. z Tip • The supplied SPVD-012 USB Driver CD-ROM contains sample images for details. 7 Touch (decrease)/ to the supplied "Computer ...Applications Guide" for use the MEMORY MIX function in the mirror mode (p. 29), the picture on the LCD screen appears normally, without being mirror-reversed. •...CHROMA 101 101-0001 OK • When you are recording on your computer or recorded with other camcorders on a "Memory Stick Duo" Press PHOTO fully. b Notes • When the overlapping still ...
..., touch on a tape Press REC START/STOP. z Tip • The supplied SPVD-012 USB Driver CD-ROM contains sample images for details. 7 Touch (decrease)/ to the supplied "Computer ...Applications Guide" for use the MEMORY MIX function in the mirror mode (p. 29), the picture on the LCD screen appears normally, without being mirror-reversed. •...CHROMA 101 101-0001 OK • When you are recording on your computer or recorded with other camcorders on a "Memory Stick Duo" Press PHOTO fully. b Notes • When the overlapping still ...
Camera Operations Guide
Page 83
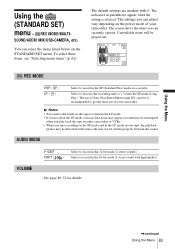
...default settings are marked with high quality). SOUND/AUDIO MIX/USB-CAMERA, etc. To select these items, see "Selecting menu items" (p. 62). b Notes • You cannot add sound on the tape recorded in the LP mode. • If you record in the LP mode, a mosaic-like noise may appear or sound may not... be grayed out. 60min STBY 0:00:00 STANDARD SET REC MODE AUD IO MODE LCD/VF SET OK REC MODE GSP ( SP ) LP ( LP ) Select to get the most out of your camcorder. The use of Sony Excellence/Master mini DV cassette is selected. See page 49, 52 for details.
...default settings are marked with high quality). SOUND/AUDIO MIX/USB-CAMERA, etc. To select these items, see "Selecting menu items" (p. 62). b Notes • You cannot add sound on the tape recorded in the LP mode. • If you record in the LP mode, a mosaic-like noise may appear or sound may not... be grayed out. 60min STBY 0:00:00 STANDARD SET REC MODE AUD IO MODE LCD/VF SET OK REC MODE GSP ( SP ) LP ( LP ) Select to get the most out of your camcorder. The use of Sony Excellence/Master mini DV cassette is selected. See page 49, 52 for details.

Camera Operations Guide
Page 86
...always display the remaining tape indicator. Select to deactivate the Remote Commander to prevent your camcorder from your camcorder for about 8 seconds: • After you select the CAMERA-TAPE mode with your camcorder calculates the remaining amount of your computer. Select to display the camera settings data ...• When you have the power source disconnected from responding to a command sent by another VCR remote control unit. GSTD-USB PictBridge USB STREAM Select to view the picture on the tape. DATA CODE GOFF DATE/TIME CAMERA DATA Select not to display date, time...
...always display the remaining tape indicator. Select to deactivate the Remote Commander to prevent your camcorder from your camcorder for about 8 seconds: • After you select the CAMERA-TAPE mode with your camcorder calculates the remaining amount of your computer. Select to display the camera settings data ...• When you have the power source disconnected from responding to a command sent by another VCR remote control unit. GSTD-USB PictBridge USB STREAM Select to view the picture on the tape. DATA CODE GOFF DATE/TIME CAMERA DATA Select not to display date, time...
Camera Operations Guide
Page 109
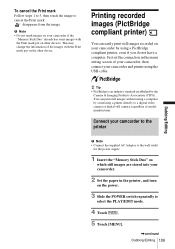
...mode. 4 Touch . 5 Touch [MENU]. ,continued Dubbing/Editing 109 This may change the information of the images with the Print mark put on other device. You can easily print still images recorded on your camcorder...disappears from the image. Just set the connection in the menu setting screen of your camcorder, then connect your camcorder. 2 Set the paper in the printer, and turn on the power. 3 ...for the power supply. 1 Insert the "Memory Stick Duo" on your camcorder by the Camera & Imaging Products Association (CIPA). Printing recorded images (PictBridge compliant printer) You ...
...mode. 4 Touch . 5 Touch [MENU]. ,continued Dubbing/Editing 109 This may change the information of the images with the Print mark put on other device. You can easily print still images recorded on your camcorder...disappears from the image. Just set the connection in the menu setting screen of your camcorder, then connect your camcorder. 2 Set the paper in the printer, and turn on the power. 3 ...for the power supply. 1 Insert the "Memory Stick Duo" on your camcorder by the Camera & Imaging Products Association (CIPA). Printing recorded images (PictBridge compliant printer) You ...
Camera Operations Guide
Page 111
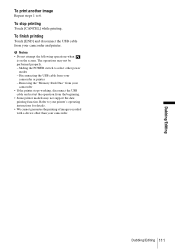
...; If the printer stops working, disconnect the USB cable and restart the operation from your camcorder. To finish printing Touch [END] and disconnect the USB cable from your printer's operating instructions for details. • We cannot guarantee the printing of images recorded with a device other power modes - Dubbing/Editing 111 Dubbing/Editing To print...
...; If the printer stops working, disconnect the USB cable and restart the operation from your camcorder. To finish printing Touch [END] and disconnect the USB cable from your printer's operating instructions for details. • We cannot guarantee the printing of images recorded with a device other power modes - Dubbing/Editing 111 Dubbing/Editing To print...
Camera Operations Guide
Page 123
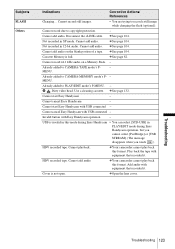
...in this mode during Easy Handycam • You can select [STD-USB] in PLAY/EDIT mode during Easy Handycam operation, but you cannot select [PictBridge] or [USB STREAM]. (The message disappears when you touch .) HDV recorded tape. MENU. Cannot start Easy Handycam - USB is full. cYour camcorder cannot play... back this format. cSee page 82. Cannot cancel Easy Handycam - Cannot add audio. Cover is not open. Cannot record due to PLAY/EDIT mode's P-MENU. - Not recorded in 12-bit...
...in this mode during Easy Handycam • You can select [STD-USB] in PLAY/EDIT mode during Easy Handycam operation, but you cannot select [PictBridge] or [USB STREAM]. (The message disappears when you touch .) HDV recorded tape. MENU. Cannot start Easy Handycam - USB is full. cYour camcorder cannot play... back this format. cSee page 82. Cannot cancel Easy Handycam - Cannot add audio. Cover is not open. Cannot record due to PLAY/EDIT mode's P-MENU. - Not recorded in 12-bit...


