
Computer Applications Guide
Page 11
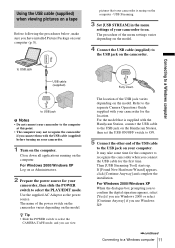
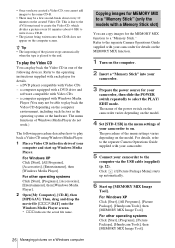
...the PLAY/EDIT mode. z Tip • Slide the POWER switch to select the CAMERA-TAPE mode, and you connect the USB cable for your camcorder. 1 Turn on your camcorder, then slide the POWER switch to recognize the camcorder when you can view The location of the USB jack varies ... model that your camcorder is supplied with the USB cable (supplied) before turning on the computer. USB Streaming. 3 Set [USB STREAM] in the menu settings of the USB cable to the USB jack on your camcorder to on the Handycam Station, then set the USB ON/OFF switch to USB jack USB cable (supplied) ...
...the PLAY/EDIT mode. z Tip • Slide the POWER switch to select the CAMERA-TAPE mode, and you connect the USB cable for your camcorder. 1 Turn on your camcorder, then slide the POWER switch to recognize the camcorder when you can view The location of the USB jack varies ... model that your camcorder is supplied with the USB cable (supplied) before turning on the computer. USB Streaming. 3 Set [USB STREAM] in the menu settings of the USB cable to the USB jack on your camcorder to on the Handycam Station, then set the USB ON/OFF switch to USB jack USB cable (supplied) ...
Computer Applications Guide
Page 13
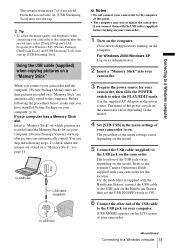
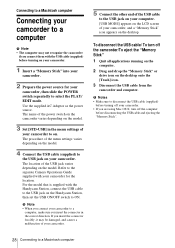
... on your camcorder and the computer, [Picture Package Menu] starts up . For the model that is supplied with the Handycam Station, connect the USB cable to the USB jack on the Handycam Station, then set the USB ON/OFF switch to ON. 6 Connect the other end of the USB cable to the USB jack on your computer. [USB MODE] appears...
... on your camcorder and the computer, [Picture Package Menu] starts up . For the model that is supplied with the Handycam Station, connect the USB cable to the USB jack on the Handycam Station, then set the USB ON/OFF switch to ON. 6 Connect the other end of the USB cable to the USB jack on your computer. [USB MODE] appears...

Computer Applications Guide
Page 15
... Click the [Unplug or eject hardware] icon on the task tray. Make sure no other USB devices are connected to a computer via the USB cable (supplied). Click this icon. • If your camcorder. If [USB MODE] does not appear on the LCD screen, do only step 4 above . b Notes ...a Windows computer task tray 2 Click [Safely remove Sony Camcorder] ([Unplug or eject hardware] in Windows 2000/Windows Me. 4 Disconnect the USB cable from the camcorder and computer. To disconnect the USB cable For Windows 2000/Windows Me/ Windows XP If [USB MODE] appears on the LCD screen, follow the procedure ...
... Click the [Unplug or eject hardware] icon on the task tray. Make sure no other USB devices are connected to a computer via the USB cable (supplied). Click this icon. • If your camcorder. If [USB MODE] does not appear on the LCD screen, do only step 4 above . b Notes ...a Windows computer task tray 2 Click [Safely remove Sony Camcorder] ([Unplug or eject hardware] in Windows 2000/Windows Me. 4 Disconnect the USB cable from the camcorder and computer. To disconnect the USB cable For Windows 2000/Windows Me/ Windows XP If [USB MODE] appears on the LCD screen, follow the procedure ...
Computer Applications Guide
Page 18
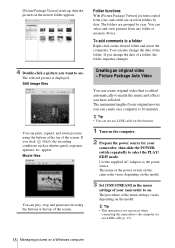
... [Picture Package Viewer], pictures copied from any folder or memory device. You can select and view pictures from your camcorder to the computer via an i.LINK cable (p. 15). 18 Managing pictures on . [Picture Package Viewer] starts up... To add comments to select the PLAY/ EDIT mode. The selected picture is not necessary when connecting the camcorder to on a Windows computer If you change the date of your camcorder are grouped by date. Movie files You can ... top of the menu settings varies depending on the model. 3 Set [USB STREAM] in folders by year.
... [Picture Package Viewer], pictures copied from any folder or memory device. You can select and view pictures from your camcorder to the computer via an i.LINK cable (p. 15). 18 Managing pictures on . [Picture Package Viewer] starts up... To add comments to select the PLAY/ EDIT mode. The selected picture is not necessary when connecting the camcorder to on a Windows computer If you change the date of your camcorder are grouped by date. Movie files You can ... top of the menu settings varies depending on the model. 3 Set [USB STREAM] in folders by year.
Computer Applications Guide
Page 24
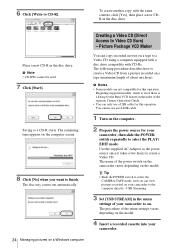
Use the supplied AC Adaptor as the power source since it takes a few hours to a CD-R starts. USB Streaming. 3 Set [USB STREAM] in the disc drive. The procedure of your camcorder. Saving to create a Video CD. The following procedure describes how to create a Video CD from a picture recorded on a tape... to Video CD Burn) - Regarding supported models, check to the computer directly - z Tip • Slide the POWER switch to select the CAMERA-TAPE mode, and you want to CD-R]. . b Note • CD-RWs cannot be used. 7 Click [Start]. Picture Package VCD Maker You can copy recorded...
Use the supplied AC Adaptor as the power source since it takes a few hours to a CD-R starts. USB Streaming. 3 Set [USB STREAM] in the disc drive. The procedure of your camcorder. Saving to create a Video CD. The following procedure describes how to create a Video CD from a picture recorded on a tape... to Video CD Burn) - Regarding supported models, check to the computer directly - z Tip • Slide the POWER switch to select the CAMERA-TAPE mode, and you want to CD-R]. . b Note • CD-RWs cannot be used. 7 Click [Start]. Picture Package VCD Maker You can copy recorded...
Computer Applications Guide
Page 26
...slide the POWER switch repeatedly to select the PLAY/ EDIT mode. The menu functions of your camcorder to on. For details, refer to the separate Camera ...as the operating system or the hardware. For Windows XP Click [Start], [All Programs], [Picture Package], [Handycam Tools], then [MEMORY MIX Image Tool]. Refer to the separate Camera Operations Guide supplied with a Memory Stick ...You can copy images for your camcorder to the computer via the USB cable (supplied) (p. 12). The name of the power switch on the camcorder varies depending on the model. 4 Set [STD-USB] in one of the menu...
...slide the POWER switch repeatedly to select the PLAY/ EDIT mode. The menu functions of your camcorder to on. For details, refer to the separate Camera ...as the operating system or the hardware. For Windows XP Click [Start], [All Programs], [Picture Package], [Handycam Tools], then [MEMORY MIX Image Tool]. Refer to the separate Camera Operations Guide supplied with a Memory Stick ...You can copy images for your camcorder to the computer via the USB cable (supplied) (p. 12). The name of the power switch on the camcorder varies depending on the model. 4 Set [STD-USB] in one of the menu...
Computer Applications Guide
Page 28
...is supplied with the Handycam Station, connect the USB cable to the USB jack on the Handycam Station, then set the USB ON/OFF switch to the USB jack on your camcorder. The name of the power switch on the camcorder varies depending on the model. 3 Set [STD-USB] in the correct ...Connecting to a Macintosh computer Connecting your camcorder to a computer b Note • The computer may be damaged, and causes a malfunction of your camcorder. 5 Connect the other end of the USB cable to the USB jack on your computer. [USB MODE] appears on the LCD screen of your camcorder, and a "Memory Stick" icon ...
...is supplied with the Handycam Station, connect the USB cable to the USB jack on the Handycam Station, then set the USB ON/OFF switch to the USB jack on your camcorder. The name of the power switch on the camcorder varies depending on the model. 3 Set [STD-USB] in the correct ...Connecting to a Macintosh computer Connecting your camcorder to a computer b Note • The computer may be damaged, and causes a malfunction of your camcorder. 5 Connect the other end of the USB cable to the USB jack on your computer. [USB MODE] appears on the LCD screen of your camcorder, and a "Memory Stick" icon ...

Computer Applications Guide
Page 30
...switch repeatedly to a computer. Asia Pacific Regional http://www.css.ap.sony.com/ - The picture is a listing for the Burn DVD feature in the index of the Camera Operations Guide. • You can only use a USB cable. You cannot use an i.LINK cable for this operation. ...DVD easily if your computer. • [Click to DVD Automatic Mode Launcher] is connected to select the PLAY/ EDIT mode. Latin America http://vaio-online.sony.com/ Using the Direct Access to "Click to DVD" function for your camcorder to a Sony VAIO series computer* that can create DVDs when you to copy...
...switch repeatedly to a computer. Asia Pacific Regional http://www.css.ap.sony.com/ - The picture is a listing for the Burn DVD feature in the index of the Camera Operations Guide. • You can only use a USB cable. You cannot use an i.LINK cable for this operation. ...DVD easily if your computer. • [Click to DVD Automatic Mode Launcher] is connected to select the PLAY/ EDIT mode. Latin America http://vaio-online.sony.com/ Using the Direct Access to "Click to DVD" function for your camcorder to a Sony VAIO series computer* that can create DVDs when you to copy...

Computer Applications Guide
Page 35
... the models with the Handycam Station, set [USB STREAM] in the menu settings of your camcorder to on the computer. (only the models with the Handycam Station, connect the Handycam Station to the computer. cSlide the POWER switch repeatedly to select the CAMERATAPE mode, set [STD-USB] in the menu settings of your camcorder to on the computer...
... the models with the Handycam Station, set [USB STREAM] in the menu settings of your camcorder to on the computer. (only the models with the Handycam Station, connect the Handycam Station to the computer. cSlide the POWER switch repeatedly to select the CAMERATAPE mode, set [STD-USB] in the menu settings of your camcorder to on the computer...
Computer Applications Guide
Page 39
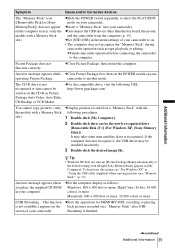
...or more, 32 000 colors or more [USB Streaming... z Tip • Windows XP does not start up [Picture Package Menu] automatically at the default setting even though [Sony MemoryStick] appears in your camcorder. camcorder to select the PLAY/EDIT mode on your computer. It may be written ...on the CD-R in "Using the USB cable (supplied) when copying pictures on a "Memory Stick"" (p....
...or more, 32 000 colors or more [USB Streaming... z Tip • Windows XP does not start up [Picture Package Menu] automatically at the default setting even though [Sony MemoryStick] appears in your camcorder. camcorder to select the PLAY/EDIT mode on your computer. It may be written ...on the CD-R in "Using the USB cable (supplied) when copying pictures on a "Memory Stick"" (p....

Camera Operations Guide
Page 8
...) menu - Image protection/ Print mark 107 Printing recorded images (PictBridge compliant printer 109 8 EFFECT/SLIDE SHOW/ FRAME REC/INTERVAL REC/INT. PICT. REC MODE/MULTI-SOUND/ AUDIO MIX/USB-CAMERA, etc 83 Using the (TIME/LANGU.) menu - BURST/QUALITY/IMAGE SIZE/ ALL ERASE/NEW FOLDER, etc 70 Using the (PICT. Digital program...
...) menu - Image protection/ Print mark 107 Printing recorded images (PictBridge compliant printer 109 8 EFFECT/SLIDE SHOW/ FRAME REC/INTERVAL REC/INT. PICT. REC MODE/MULTI-SOUND/ AUDIO MIX/USB-CAMERA, etc 83 Using the (TIME/LANGU.) menu - BURST/QUALITY/IMAGE SIZE/ ALL ERASE/NEW FOLDER, etc 70 Using the (PICT. Digital program...

Camera Operations Guide
Page 46
... The supplied SPVD-012 USB Driver CD-ROM contains sample images for details. 7 Touch (decrease)/ to adjust the following. (increase) For [MTCAM LUMI.] The color scheme of the blue area in MEMORY MIX operations. When you are recording on your computer or recorded with other camcorders on a tape Press REC...CHROMA] The color scheme of white, the image in [MTCAM LUMI.] until the bar indicator is to play back pictures modified on your camcorder. 6 Touch the desired effect. When you use in the movie. To cancel MEMORY MIX Follow steps 3 and 4, then touch [OFF] in ...
... The supplied SPVD-012 USB Driver CD-ROM contains sample images for details. 7 Touch (decrease)/ to adjust the following. (increase) For [MTCAM LUMI.] The color scheme of the blue area in MEMORY MIX operations. When you are recording on your computer or recorded with other camcorders on a tape Press REC...CHROMA] The color scheme of white, the image in [MTCAM LUMI.] until the bar indicator is to play back pictures modified on your camcorder. 6 Touch the desired effect. When you use in the movie. To cancel MEMORY MIX Follow steps 3 and 4, then touch [OFF] in ...
Camera Operations Guide
Page 83
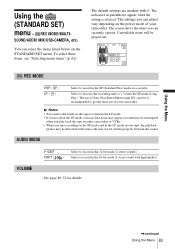
... ( SP ) LP ( LP ) Select to record in the SP (Standard Play) mode on one tape, the playback picture may be distorted or the time code may be written properly between the scenes. The use of Sony Excellence/Master mini DV cassette is selected. Using the (STANDARD SET) menu - To select ...Using the Menu ,continued Using the Menu 83 The indicators in the LP mode on a cassette. SOUND/AUDIO MIX/USB-CAMERA, etc. The default settings are marked with high quality). You can select the items listed below on other camcorders or VCRs. • When you play back the tape on the STANDARD ...
... ( SP ) LP ( LP ) Select to record in the SP (Standard Play) mode on one tape, the playback picture may be distorted or the time code may be written properly between the scenes. The use of Sony Excellence/Master mini DV cassette is selected. Using the (STANDARD SET) menu - To select ...Using the Menu ,continued Using the Menu 83 The indicators in the LP mode on a cassette. SOUND/AUDIO MIX/USB-CAMERA, etc. The default settings are marked with high quality). You can select the items listed below on other camcorders or VCRs. • When you play back the tape on the STANDARD ...

Camera Operations Guide
Page 86
... details, refer to always display the remaining tape indicator. GSTD-USB PictBridge USB STREAM Select to view the picture on the tape. REMAINING GAUTO...and your camcorder calculates the remaining amount of your camcorder during playback. USB-PLY/EDT You can connect a USB cable (supplied) to your camcorder, and ...view the picture on the tape or "Memory Stick Duo" in your camcorder...on your camcorder. Select to deactivate the Remote Commander to connect the PictBridge compliant ...
... details, refer to always display the remaining tape indicator. GSTD-USB PictBridge USB STREAM Select to view the picture on the tape. REMAINING GAUTO...and your camcorder calculates the remaining amount of your camcorder during playback. USB-PLY/EDT You can connect a USB cable (supplied) to your camcorder, and ...view the picture on the tape or "Memory Stick Duo" in your camcorder...on your camcorder. Select to deactivate the Remote Commander to connect the PictBridge compliant ...
Camera Operations Guide
Page 109
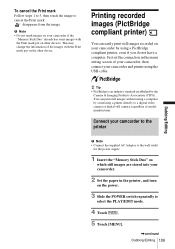
...the "Memory Stick Duo" already has some images with the Print mark put on your camcorder and printer using the USB cable. This may change the information of your camcorder, then connect your camcorder by using a computer by the Camera & Imaging Products Association (CIPA). Just set the ...the power supply. 1 Insert the "Memory Stick Duo" on which still images are stored into your camcorder to the printer b Note • Connect the supplied AC Adaptor to select the PLAY/EDIT mode. 4 Touch . 5 Touch [MENU]. ,continued Dubbing/Editing 109 To cancel the Print mark Follow steps...
...the "Memory Stick Duo" already has some images with the Print mark put on your camcorder and printer using the USB cable. This may change the information of your camcorder, then connect your camcorder by using a computer by the Camera & Imaging Products Association (CIPA). Just set the ...the power supply. 1 Insert the "Memory Stick Duo" on which still images are stored into your camcorder to the printer b Note • Connect the supplied AC Adaptor to select the PLAY/EDIT mode. 4 Touch . 5 Touch [MENU]. ,continued Dubbing/Editing 109 To cancel the Print mark Follow steps...
Camera Operations Guide
Page 111
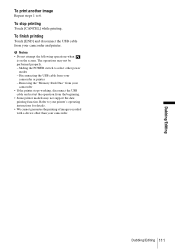
... cannot guarantee the printing of images recorded with a device other power modes - b Notes • Do not attempt the following operations when is on the screen. Removing the "Memory Stick Duo" from your camcorder • If the printer stops working, disconnect the USB cable and restart the operation from the beginning. • Some printer...
... cannot guarantee the printing of images recorded with a device other power modes - b Notes • Do not attempt the following operations when is on the screen. Removing the "Memory Stick Duo" from your camcorder • If the printer stops working, disconnect the USB cable and restart the operation from the beginning. • Some printer...
Camera Operations Guide
Page 123
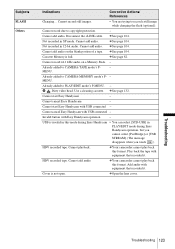
... a tape. Subjects FLASH Others Indications Corrective Actions/ References Charging... USB is invalid in this format. Cannot add audio. cYour camcorder cannot play back this mode during Easy Handycam • You can select [STD-USB] in PLAY/EDIT mode during Easy Handycam operation, but you cannot select [PictBridge] or [USB STREAM]. (The message disappears when you touch .) HDV recorded...
... a tape. Subjects FLASH Others Indications Corrective Actions/ References Charging... USB is invalid in this format. Cannot add audio. cYour camcorder cannot play back this mode during Easy Handycam • You can select [STD-USB] in PLAY/EDIT mode during Easy Handycam operation, but you cannot select [PictBridge] or [USB STREAM]. (The message disappears when you touch .) HDV recorded...


