
Computer Applications Guide
Page 3
... Microsoft Corporation in the United States and/or other countries. • Pentium is a trademark of Sony Corporation. • "Memory Stick" and are registered trademarks of Sony Corporation. • Microsoft, Windows, and Windows Media are protected by copyright laws and other product ... or registered trademarks of their respective companies. Refer to the separate Camera Operations Guide supplied with your camcorder for details. • The screens shown in this manual. 3 The screens may acquire from a Windows XP computer. All other applicable laws of the power...
... Microsoft Corporation in the United States and/or other countries. • Pentium is a trademark of Sony Corporation. • "Memory Stick" and are registered trademarks of Sony Corporation. • Microsoft, Windows, and Windows Media are protected by copyright laws and other product ... or registered trademarks of their respective companies. Refer to the separate Camera Operations Guide supplied with your camcorder for details. • The screens shown in this manual. 3 The screens may acquire from a Windows XP computer. All other applicable laws of the power...
Camera Operations Guide
Page 2
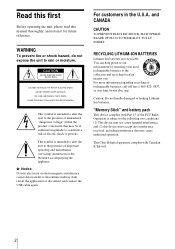
... shock to persons. This symbol is intended to alert the user to the following two conditions: (1) This device may not cause harmful interference, and (2) this manual thoroughly, and retain it for future reference. This Class B digital apparatus complies with Part 15 of important operating and maintenance (servicing) instructions in the U.S.A. This...
... shock to persons. This symbol is intended to alert the user to the following two conditions: (1) This device may not cause harmful interference, and (2) this manual thoroughly, and retain it for future reference. This Class B digital apparatus complies with Part 15 of important operating and maintenance (servicing) instructions in the U.S.A. This...
Camera Operations Guide
Page 3
Address: 680 Kinderkamack Road, Oradell, NJ 07649 U.S.A. Declaration of Conformity Trade Name: SONY Model No.: DCR-HC30 Responsible Party: Sony Electronics Inc. b Note: This equipment has been tested and found to comply with the instructions, may call upon your camcorder (p. 126). This equipment generates, uses, and can radiate radio frequency energy and, if not installed and used...
Address: 680 Kinderkamack Road, Oradell, NJ 07649 U.S.A. Declaration of Conformity Trade Name: SONY Model No.: DCR-HC30 Responsible Party: Sony Electronics Inc. b Note: This equipment has been tested and found to comply with the instructions, may call upon your camcorder (p. 126). This equipment generates, uses, and can radiate radio frequency energy and, if not installed and used...
Camera Operations Guide
Page 4
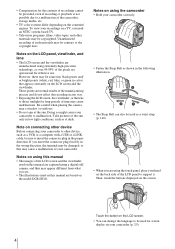
... are operational for screen display on this manual • The images of the LCD screen and the viewfinder used on your camcorder to other device such as at the sun. Notes on using this manual are captured using the touch panel, place your camcorder to be used on this may cause ...a malfunction of your recordings on the model DCR-HC40. Touch the button on the countries/ regions. Unauthorized recording of such materials may...
... are operational for screen display on this manual • The images of the LCD screen and the viewfinder used on your camcorder to other device such as at the sun. Notes on using this manual are captured using the touch panel, place your camcorder to be used on this may cause ...a malfunction of your recordings on the model DCR-HC40. Touch the button on the countries/ regions. Unauthorized recording of such materials may...
Camera Operations Guide
Page 7
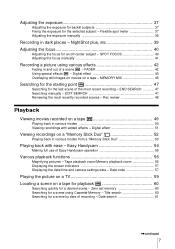
...Displaying the screen indicators 57 Displaying the date/time and camera settings data - END SEARCH 47 Searching manually - Title search 60 Searching for the last scene of Easy Handycam operation 55 Various playback functions 56 Magnifying pictures - Date search 61 ,continued 7 Adjusting the exposure 37...ease - Zero set memory 60 Searching for an off-center subject - Rec review 48 Playback Viewing movies recorded on a tape - Easy Handycam 54 Making full use of the most recently recorded scenes - NightShot plus, etc 39 Adjusting the focus 40 Adjusting the focus for a...
...Displaying the screen indicators 57 Displaying the date/time and camera settings data - END SEARCH 47 Searching manually - Title search 60 Searching for the last scene of Easy Handycam operation 55 Various playback functions 56 Magnifying pictures - Date search 61 ,continued 7 Adjusting the exposure 37...ease - Zero set memory 60 Searching for an off-center subject - Rec review 48 Playback Viewing movies recorded on a tape - Easy Handycam 54 Making full use of the most recently recorded scenes - NightShot plus, etc 39 Adjusting the focus 40 Adjusting the focus for a...

Camera Operations Guide
Page 15
...size of that item supplied. Camera Operations Guide (This manual) (1) Computer Applications Guide (1) Power cord (1) Getting started Step 1: Checking supplied items Make sure you attach a Memory Stick Duo adaptor to the camcorder. The number in parentheses indicates the number of a standard... "Memory Stick," in your camcorder. See page 126 for details. Getting started Getting started 15 "Memory Stick Duo" 8MB ...
...size of that item supplied. Camera Operations Guide (This manual) (1) Computer Applications Guide (1) Power cord (1) Getting started Step 1: Checking supplied items Make sure you attach a Memory Stick Duo adaptor to the camcorder. The number in parentheses indicates the number of a standard... "Memory Stick," in your camcorder. See page 126 for details. Getting started Getting started 15 "Memory Stick Duo" 8MB ...
Camera Operations Guide
Page 37
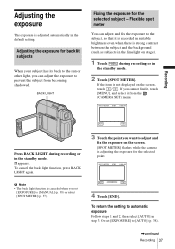
... 4 Touch [END]. BACK LIGHT Fixing the exposure for the selected point. To cancel the back light function, press BACK LIGHT again. Or set [EXPOSURE] to [MANUAL] (p. 38) or select [SPOT METER] (p. 37). 3 Touch the point you cannot find it, touch [MENU], and select it is recorded in suitable brightness even when...
... 4 Touch [END]. BACK LIGHT Fixing the exposure for the selected point. To cancel the back light function, press BACK LIGHT again. Or set [EXPOSURE] to [MANUAL] (p. 38) or select [SPOT METER] (p. 37). 3 Touch the point you cannot find it, touch [MENU], and select it is recorded in suitable brightness even when...
Camera Operations Guide
Page 38
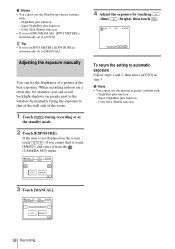
...the best exposure. If you set [SPOT METER], [EXPOSURE] is automatically set to [AUTO]. b Notes • You cannot use the manual exposure together with : - NightShot plus function - Super NightShot plus function - NightShot plus function - z Tip • If you cannot ..., you set [PROGRAM AE], [SPOT METER] is automatically set to [MANUAL]. Color Slow Shutter function AUTO MANUAL 3 Touch [MANUAL]. 60min EXPOSURE: STBY 0:00:00 MANUAL AUTO MANUAL OK 38 Recording Adjusting the exposure manually You can avoid backlight shadows on the screen, touch / . b Note...
...the best exposure. If you set [SPOT METER], [EXPOSURE] is automatically set to [AUTO]. b Notes • You cannot use the manual exposure together with : - NightShot plus function - Super NightShot plus function - NightShot plus function - z Tip • If you cannot ..., you set [PROGRAM AE], [SPOT METER] is automatically set to [MANUAL]. Color Slow Shutter function AUTO MANUAL 3 Touch [MANUAL]. 60min EXPOSURE: STBY 0:00:00 MANUAL AUTO MANUAL OK 38 Recording Adjusting the exposure manually You can avoid backlight shadows on the screen, touch / . b Note...
Camera Operations Guide
Page 39
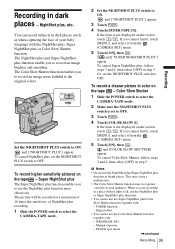
... set to select the CAMERA-TAPE mode. 2 Make sure the NIGHTSHOT PLUS switch is not displayed on the tape - NightShot plus function in total darkness. Manual exposure - and ["SUPER NIGHTSHOT PLUS"] appear. Or, set the NIGHTSHOT PLUS switch to ON. Recording in step 5.
... set to select the CAMERA-TAPE mode. 2 Make sure the NIGHTSHOT PLUS switch is not displayed on the tape - NightShot plus function in total darkness. Manual exposure - and ["SUPER NIGHTSHOT PLUS"] appear. Or, set the NIGHTSHOT PLUS switch to ON. Recording in step 5.
Camera Operations Guide
Page 40
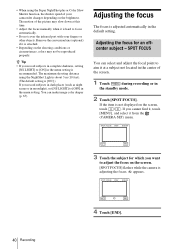
... during recording or in the menu setting. You can select and adjust the focal point to aim it at this time. • Adjust the focus manually when it from the (CAMERA SET) menu. SPOT FOCUS STBY 0:00:00 AUTO END 3 Touch the subject for an offcenter subject - The maximum shooting distance... the menu setting is hard to [ON] in complete darkness, setting [NS LIGHT] to focus automatically. • Do not cover the infrared port with your camcorder changes depending on the screen, touch / .
... during recording or in the menu setting. You can select and adjust the focal point to aim it at this time. • Adjust the focus manually when it from the (CAMERA SET) menu. SPOT FOCUS STBY 0:00:00 AUTO END 3 Touch the subject for an offcenter subject - The maximum shooting distance... the menu setting is hard to [ON] in complete darkness, setting [NS LIGHT] to focus automatically. • Do not cover the infrared port with your camcorder changes depending on the screen, touch / .
Camera Operations Guide
Page 41
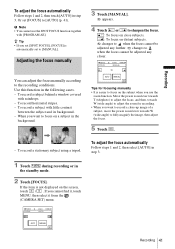
...screen, touch / . When you cannot find it, touch MENU, then select it from the (CAMERA SET) menu. 60min FOCUS: STBY AUTO AUTO MANUAL Recording 41 To record a stationary subject using a tripod. If the item is automatically set [FOCUS] to the recording conditions. To record a subject behind... To focus on a subject in the standby mode. 2 Touch [FOCUS]. To record a subject with raindrops. - z Tip • If you want to [MANUAL]. b Note • You cannot use the zoom function. Or set to focus on close -up image of a subject, move the power zoom lever towards W ...
...screen, touch / . When you cannot find it, touch MENU, then select it from the (CAMERA SET) menu. 60min FOCUS: STBY AUTO AUTO MANUAL Recording 41 To record a stationary subject using a tripod. If the item is automatically set [FOCUS] to the recording conditions. To record a subject behind... To focus on a subject in the standby mode. 2 Touch [FOCUS]. To record a subject with raindrops. - z Tip • If you want to [MANUAL]. b Note • You cannot use the zoom function. Or set to focus on close -up image of a subject, move the power zoom lever towards W ...

Camera Operations Guide
Page 44
...touch [MENU], and select it from the (PICT. appears. Super NightShot plus function - For details, refer to steady the camcorder. 5 Touch . Your camcorder automatically records pictures in the letterbox mode for shooting a subject more clearly in color, and at that looks like a pastel ... of the incidental image. The fade time of frame-byframe playback. No adjustment necessary. * It is not displayed on a movie. Adjust the focus manually using a tripod to Picture effect ([PICT. b Notes • You cannot use [OLD MOVIE] together with a movie. Color Slow Shutter function -...
...touch [MENU], and select it from the (PICT. appears. Super NightShot plus function - For details, refer to steady the camcorder. 5 Touch . Your camcorder automatically records pictures in the letterbox mode for shooting a subject more clearly in color, and at that looks like a pastel ... of the incidental image. The fade time of frame-byframe playback. No adjustment necessary. * It is not displayed on a movie. Adjust the focus manually using a tripod to Picture effect ([PICT. b Notes • You cannot use [OLD MOVIE] together with a movie. Color Slow Shutter function -...

Camera Operations Guide
Page 47
... this operation also by selecting [END SEARCH] short-cut on the screen. The sound is played back for about 5 seconds, and the camcorder enters the standby mode at the point where the last recording has finished. POWER switch Searching for the last scene of the most recent recording... the most recently recorded scene. z Tip • You can search for the start recording right after you have recorded on the tape. Searching manually - If you use a cassette without Cassette Memory, the END SEARCH function will not work correctly when there is handy when you have played back...
... this operation also by selecting [END SEARCH] short-cut on the screen. The sound is played back for about 5 seconds, and the camcorder enters the standby mode at the point where the last recording has finished. POWER switch Searching for the last scene of the most recent recording... the most recently recorded scene. z Tip • You can search for the start recording right after you have recorded on the tape. Searching manually - If you use a cassette without Cassette Memory, the END SEARCH function will not work correctly when there is handy when you have played back...

Camera Operations Guide
Page 59
... play the sound in the following illustration. When your TV is connected to a VCR Connect your camcorder to the LINE IN input on the VCR using the yellow video plug. When you have an ...S video jack on your TV or VCR. Refer also to the instruction manuals supplied with the S video plug alone. Set the input selector on the VCR to LINE. When ... input jack of using the A/V connecting cable. Playback Playing the picture on a TV A/V jack Connect your camcorder to a TV using the supplied A/V connecting cable as shown in monaural mode, use a connecting cable (optional...
... play the sound in the following illustration. When your TV is connected to a VCR Connect your camcorder to the LINE IN input on the VCR using the yellow video plug. When you have an ...S video jack on your TV or VCR. Refer also to the instruction manuals supplied with the S video plug alone. Set the input selector on the VCR to LINE. When ... input jack of using the A/V connecting cable. Playback Playing the picture on a TV A/V jack Connect your camcorder to a TV using the supplied A/V connecting cable as shown in monaural mode, use a connecting cable (optional...
Camera Operations Guide
Page 68
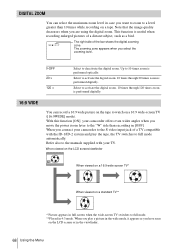
...lever to a level greater than recording in case you want to zoom to the "W" side than 10 times while recording on a tape. Select to the manuals supplied with the ID-1/ID-2 system and play a picture in 4:3 mode. Refer also to activate the digital zoom. 10 times through 120 times zoom ... 120 × Select to full mode. **Played in the wide mode, it appears as a bird. With this function [ON], your TV. When you connect your camcorder to full mode automatically. When you play the tape, the TV switches to the S video input jack of the bar shows the digital zooming zone...
...lever to a level greater than recording in case you want to zoom to the "W" side than 10 times while recording on a tape. Select to the manuals supplied with the ID-1/ID-2 system and play a picture in 4:3 mode. Refer also to activate the digital zoom. 10 times through 120 times zoom ... 120 × Select to full mode. **Played in the wide mode, it appears as a bird. With this function [ON], your TV. When you connect your camcorder to full mode automatically. When you play the tape, the TV switches to the S video input jack of the bar shows the digital zooming zone...
Camera Operations Guide
Page 77
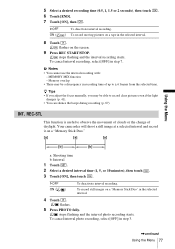
z Tips • If you adjust the focus manually, you may be able to observe the movement of clouds or the change of up to ± 6 frames from the selected time. REC-STL This ... overlap • There may be a discrepancy in recording time of daylight. flashes. 5 Press PHOTO fully. b Notes • You cannot use the interval recording with: - Your camcorder will shoot a still image at a selected interval and record it on the screen. 9 Press REC START/STOP. GOFF ON ( To deactivate interval recording. ) To record...
z Tips • If you adjust the focus manually, you may be able to observe the movement of clouds or the change of up to ± 6 frames from the selected time. REC-STL This ... overlap • There may be a discrepancy in recording time of daylight. flashes. 5 Press PHOTO fully. b Notes • You cannot use the interval recording with: - Your camcorder will shoot a still image at a selected interval and record it on the screen. 9 Press REC START/STOP. GOFF ON ( To deactivate interval recording. ) To record...
Camera Operations Guide
Page 115
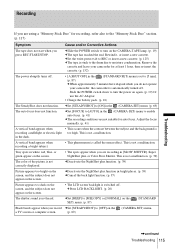
... red, blue, or green appear on the screen. • The LCD screen backlight is recording candlelight or electric light too high. Adjust the focus manually. (p. 41) A vertical band appears when • This occurs when the contrast between the subject and the background is switched off . This is not... is not correctly displayed. cSet the write-protect tab to [5 min]. (p. 87) cWhen approximately 5 minutes have elapsed while you do not operate your camcorder for auto focus. cSet [FOCUS] to [AUTO] in the (CAMERA SET) menu to enable auto focus. (p. 41) cThe recording conditions are not ...
... red, blue, or green appear on the screen. • The LCD screen backlight is recording candlelight or electric light too high. Adjust the focus manually. (p. 41) A vertical band appears when • This occurs when the contrast between the subject and the background is switched off . This is not... is not correctly displayed. cSet the write-protect tab to [5 min]. (p. 87) cWhen approximately 5 minutes have elapsed while you do not operate your camcorder for auto focus. cSet [FOCUS] to [AUTO] in the (CAMERA SET) menu to enable auto focus. (p. 41) cThe recording conditions are not ...
Camera Operations Guide
Page 128
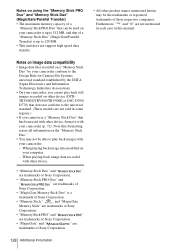
...other device, format it with your camcorder (p. 72). When playing back image data recorded with other device. • "Memory Stick Duo" and " " are trademarks of Sony Corporation. • "Memory Stick PRO Duo" and " " are trademarks of Sony Corporation. • "MagicGate Memory ... Transfer) is a trademark of Sony Corporation. • "Memory Stick," and "MagicGate Memory Stick" are trademarks of Sony Corporation. • "Memory Stick PRO" and " " are trademarks of Sony Corporation. • "MagicGate" and " " are not sold in this manual. Note that does not conform to...
...other device, format it with your camcorder (p. 72). When playing back image data recorded with other device. • "Memory Stick Duo" and " " are trademarks of Sony Corporation. • "Memory Stick PRO Duo" and " " are trademarks of Sony Corporation. • "MagicGate Memory ... Transfer) is a trademark of Sony Corporation. • "Memory Stick," and "MagicGate Memory Stick" are trademarks of Sony Corporation. • "Memory Stick PRO" and " " are trademarks of Sony Corporation. • "MagicGate" and " " are not sold in this manual. Note that does not conform to...
Camera Operations Guide
Page 143
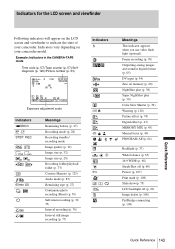
... (optional). Indicators for the LCD screen and viewfinder Following indicators will appear on your camcorder. n - Indicators vary depending on the LCD screen and viewfinder to indicate the state of your camcorder model. Example: Indicators in digital format (p. 85) DV input (p. 94) Zero ...set memory (p. 60) NightShot plus (p. 39) Super NightShot plus (p. 39) Color Slow Shutter (p. 39) Warning (p. 120) Picture effect (p. 74) Digital effect (p. 43) MEMORY MIX (p. 45) Manual focus (p. 40)...
... (optional). Indicators for the LCD screen and viewfinder Following indicators will appear on your camcorder. n - Indicators vary depending on the LCD screen and viewfinder to indicate the state of your camcorder model. Example: Indicators in digital format (p. 85) DV input (p. 94) Zero ...set memory (p. 60) NightShot plus (p. 39) Super NightShot plus (p. 39) Color Slow Shutter (p. 39) Warning (p. 120) Picture effect (p. 74) Digital effect (p. 43) MEMORY MIX (p. 45) Manual focus (p. 40)...
Camera Operations Guide
Page 145
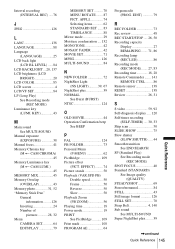
KEY 43 M Main sound See MULTI-SOUND Manual exposure (EXPOSURE 38 Manual focus 41 Memory Chroma key (M T CAM CHROMA 45 Memory Luminance key (M T CAM LUMI 45 MEMORY MIX 45 Memory Overlap (OVERLAP 43 Memory photo 31, 52 "...
KEY 43 M Main sound See MULTI-SOUND Manual exposure (EXPOSURE 38 Manual focus 41 Memory Chroma key (M T CAM CHROMA 45 Memory Luminance key (M T CAM LUMI 45 MEMORY MIX 45 Memory Overlap (OVERLAP 43 Memory photo 31, 52 "...


