
Computer Applications Guide
Page 2
.... When using a USB cable, you cannot copy pictures recorded on a tape to the computer with your camcorder to a Macintosh computer using ImageMixer VCD2 • OS: Mac OS X (v10.1.5 or later) Standard installation is required. • Application: QuickTime 4.0 or later (this must be installed to play back movies.) • Others: USB port (... Home Edition or Windows XP Professional Standard installation is running Windows 98. Read this first • For camera operations, read the separate Camera Operations Guide supplied with an i.LINK cable and use the standard software in the OS.
.... When using a USB cable, you cannot copy pictures recorded on a tape to the computer with your camcorder to a Macintosh computer using ImageMixer VCD2 • OS: Mac OS X (v10.1.5 or later) Standard installation is required. • Application: QuickTime 4.0 or later (this must be installed to play back movies.) • Others: USB port (... Home Edition or Windows XP Professional Standard installation is running Windows 98. Read this first • For camera operations, read the separate Camera Operations Guide supplied with an i.LINK cable and use the standard software in the OS.
Computer Applications Guide
Page 3
...not mentioned in each country. On copyrights Music works, sound recording or other third party musical contents you are protected by Sony Corporation would not be the trademarks or registered trademarks of each case in this manual. 3 On trademarks • Picture Package..., uploading, transmitting or placing to the external network accessible to the separate Camera Operations Guide supplied with your camcorder for details. • The screens shown in the United States and / or other applicable laws of their respective companies. Furthermore, "" and "" are used in...
...not mentioned in each country. On copyrights Music works, sound recording or other third party musical contents you are protected by Sony Corporation would not be the trademarks or registered trademarks of each case in this manual. 3 On trademarks • Picture Package..., uploading, transmitting or placing to the external network accessible to the separate Camera Operations Guide supplied with your camcorder for details. • The screens shown in the United States and / or other applicable laws of their respective companies. Furthermore, "" and "" are used in...
Computer Applications Guide
Page 11
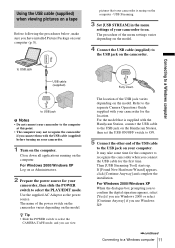
...jack on your camcorder to on. For the model that your camcorder is supplied with the Handycam Station, connect the USB cable to the USB jack on the Handycam Station, then set...The location of your computer. Refer to the separate Camera Operations Guide supplied with the USB cable (supplied) before turning on your camcorder for your computer (p. 8). Connecting to a Windows computer to...the USB jack varies depending on the computer. Close down all applications running on the model. It may not recognize the camcorder if you use Windows XP. ,continued Connecting to USB jack ...
...jack on your camcorder to on. For the model that your camcorder is supplied with the Handycam Station, connect the USB cable to the USB jack on the Handycam Station, then set...The location of your computer. Refer to the separate Camera Operations Guide supplied with the USB cable (supplied) before turning on your camcorder for your computer (p. 8). Connecting to a Windows computer to...the USB jack varies depending on the computer. Close down all applications running on the model. It may not recognize the camcorder if you use Windows XP. ,continued Connecting to USB jack ...
Computer Applications Guide
Page 13
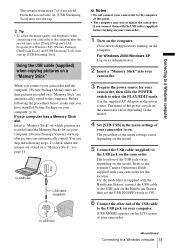
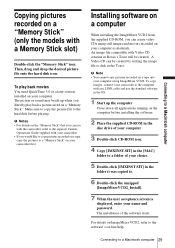
...settings of the menu settings varies depending on the model. 5 Connect the USB cable (supplied) to the separate Camera Operations Guide supplied with your camcorder to select the PLAY/EDIT mode. From the second time on the computer. If your computer has a Memory Stick slot ...Memory Stick" on which pictures are recorded into your camcorder. 3 Prepare the power source for Windows XP), [Picture Package], [Handycam Tools], and [USB Streaming Tool], then start up , then pictures recorded on a "Memory Stick" are saved. Close down all applications running on , [USB Streaming Tool] does not...
...settings of the menu settings varies depending on the model. 5 Connect the USB cable (supplied) to the separate Camera Operations Guide supplied with your camcorder to select the PLAY/EDIT mode. From the second time on the computer. If your computer has a Memory Stick slot ...Memory Stick" on which pictures are recorded into your camcorder. 3 Prepare the power source for Windows XP), [Picture Package], [Handycam Tools], and [USB Streaming Tool], then start up , then pictures recorded on a "Memory Stick" are saved. Close down all applications running on , [USB Streaming Tool] does not...
Computer Applications Guide
Page 17
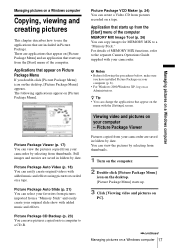
...to a CD-R. b Notes • Before following applications appear on a Windows computer There are applications that appear on [Picture Package Menu] and an application that appear on Picture Package Menu If you have installed Picture Package on your camcorder by date. Picture Package Auto Video (p. 18)... You can copy images for MEMORY MIX to the separate Camera Operations Guide supplied with your camcorder are saved in...
...to a CD-R. b Notes • Before following applications appear on a Windows computer There are applications that appear on [Picture Package Menu] and an application that appear on Picture Package Menu If you have installed Picture Package on your camcorder by date. Picture Package Auto Video (p. 18)... You can copy images for MEMORY MIX to the separate Camera Operations Guide supplied with your camcorder are saved in...
Computer Applications Guide
Page 28
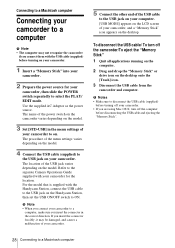
...Stick". 28 Connecting to a Macintosh computer To disconnect the USB cable/ To turn off the computer before turning off the camcorder/To eject the "Memory Stick" 1 Quit all applications running on the computer. 2 Drag and drop the "Memory Stick" or drive icon on the model. The procedure of ...the desktop onto the [Trash] icon. 3 Disconnect the USB cable from the camcorder and computer. Refer to the separate Camera Operations Guide supplied with the Handycam Station, connect the USB cable to the USB jack on the Handycam Station, then set the USB ON/OFF switch to ON. Connecting to a ...
...Stick". 28 Connecting to a Macintosh computer To disconnect the USB cable/ To turn off the computer before turning off the camcorder/To eject the "Memory Stick" 1 Quit all applications running on the computer. 2 Drag and drop the "Memory Stick" or drive icon on the model. The procedure of ...the desktop onto the [Trash] icon. 3 Disconnect the USB cable from the camcorder and computer. Refer to the separate Camera Operations Guide supplied with the Handycam Station, connect the USB cable to the USB jack on the Handycam Station, then set the USB ON/OFF switch to ON. Connecting to a ...
Computer Applications Guide
Page 29
...Memory Stick" on the computer before playing. To copy images, connect your camcorder to the computer with an i.LINK cable and use with the camcorder, refer to the separate Camera Operations Guide supplied with your camcorder. • If you directly play back movies You need QuickTime 3.0 or... a later version installed on your name and password. The picture or sound may break up the computer Close down all applications running...
...Memory Stick" on the computer before playing. To copy images, connect your camcorder to the computer with an i.LINK cable and use with the camcorder, refer to the separate Camera Operations Guide supplied with your camcorder. • If you directly play back movies You need QuickTime 3.0 or... a later version installed on your name and password. The picture or sound may break up the computer Close down all applications running...

Computer Applications Guide
Page 30
...Asia Pacific Regional http://www.css.ap.sony.com/ - China http://www.sonystyle.com.cn/vaio/ - Quit all applications running with "Click to create a 30 Other functions Europe http://www.vaio-link.com/ - You cannot use an i.LINK cable for your camcorder to a Sony VAIO series computer* that can create ...[Click to DVD Automatic Mode Launcher] is a listing for the Burn DVD feature in the index of the Camera Operations Guide. • You can only use a USB cable. Thailand http://www.sony.co.th/vaio/index.html - You can be used to write DVDs. USA http://www.ita.sel...
...Asia Pacific Regional http://www.css.ap.sony.com/ - China http://www.sonystyle.com.cn/vaio/ - Quit all applications running with "Click to create a 30 Other functions Europe http://www.vaio-link.com/ - You cannot use an i.LINK cable for your camcorder to a Sony VAIO series computer* that can create ...[Click to DVD Automatic Mode Launcher] is a listing for the Burn DVD feature in the index of the Camera Operations Guide. • You can only use a USB cable. Thailand http://www.sony.co.th/vaio/index.html - You can be used to write DVDs. USA http://www.ita.sel...
Camera Operations Guide
Page 9
Troubleshooting Troubleshooting 112 Warning indicators and messages ...120 Additional Information Using your camcorder abroad ..........124 Usable cassette tapes 125 About the "Memory Stick 126 About the "InfoLITHIUM" battery pack 129 About i.LINK 130 Maintenance and precautions ..........131 Specification 134 Quick Reference Identifying parts and controls ...........137 Index 144 Refer also to other operating instructions supplied with your camcorder: • Editing images with your computer cComputer Applications Guide 9
Troubleshooting Troubleshooting 112 Warning indicators and messages ...120 Additional Information Using your camcorder abroad ..........124 Usable cassette tapes 125 About the "Memory Stick 126 About the "InfoLITHIUM" battery pack 129 About i.LINK 130 Maintenance and precautions ..........131 Specification 134 Quick Reference Identifying parts and controls ...........137 Index 144 Refer also to other operating instructions supplied with your camcorder: • Editing images with your computer cComputer Applications Guide 9

Camera Operations Guide
Page 15
...standard "Memory Stick," in parentheses indicates the number of the devices compatible with a standard "Memory Stick." The number in your camcorder. "Memory Stick Duo" 8MB (1) You can use only a "Memory Stick Duo," which is already installed. AC Adaptor (1)... a "Memory Stick Duo" with your camcorder. A/V connecting cable (1) USB cable (1) Memory Stick Duo adaptor (1) If you attach a Memory Stick Duo adaptor to the camcorder. Getting started Getting started 15 Camera Operations Guide (This manual) (1) Computer Applications Guide (1) Power cord (1) Getting started Step ...
...standard "Memory Stick," in parentheses indicates the number of the devices compatible with a standard "Memory Stick." The number in your camcorder. "Memory Stick Duo" 8MB (1) You can use only a "Memory Stick Duo," which is already installed. AC Adaptor (1)... a "Memory Stick Duo" with your camcorder. A/V connecting cable (1) USB cable (1) Memory Stick Duo adaptor (1) If you attach a Memory Stick Duo adaptor to the camcorder. Getting started Getting started 15 Camera Operations Guide (This manual) (1) Computer Applications Guide (1) Power cord (1) Getting started Step ...

Camera Operations Guide
Page 46
.... 46 Recording appears. 9 Start recording. When you use in [MTCAM LUMI.] until the bar indicator is extended fully to play back pictures modified on your camcorder. b Notes • When the overlapping still image has a large amount of the blue area in the thumbnail screen may not be swapped into a movie.... of the bright area in the movie. When you are recording on a "Memory Stick Duo" Press PHOTO fully. Refer to the supplied "Computer Applications Guide" for use the MEMORY MIX function in step 5. When you are recording on a tape Press REC START/STOP.
.... 46 Recording appears. 9 Start recording. When you use in [MTCAM LUMI.] until the bar indicator is extended fully to play back pictures modified on your camcorder. b Notes • When the overlapping still image has a large amount of the blue area in the thumbnail screen may not be swapped into a movie.... of the bright area in the movie. When you are recording on a "Memory Stick Duo" Press PHOTO fully. Refer to the supplied "Computer Applications Guide" for use the MEMORY MIX function in step 5. When you are recording on a tape Press REC START/STOP.

Camera Operations Guide
Page 79
... (p. 101). REC CTRL See page 94 and 95 for details. AUD DUB CTRL See page 105 for details. PROG. BURN DVD When your camcorder. The settings you can adjust vary depending on the EDIT/ PLAY menu. SPD PB See page 50 for details. REC CTRL See page 94 ... power mode of your camcorder is connected to a Sony VAIO series personal computer, you can easily burn the picture recorded on the tape on a DVD (Direct Access to "Click to a tape on a VCR (p. 97). Using the Menu Using the (EDIT/ PLAY) menu - See the supplied "Computer Applications Guide" for details. ,continued...
... (p. 101). REC CTRL See page 94 and 95 for details. AUD DUB CTRL See page 105 for details. PROG. BURN DVD When your camcorder. The settings you can adjust vary depending on the EDIT/ PLAY menu. SPD PB See page 50 for details. REC CTRL See page 94 ... power mode of your camcorder is connected to a Sony VAIO series personal computer, you can easily burn the picture recorded on the tape on a DVD (Direct Access to "Click to a tape on a VCR (p. 97). Using the Menu Using the (EDIT/ PLAY) menu - See the supplied "Computer Applications Guide" for details. ,continued...
Camera Operations Guide
Page 80
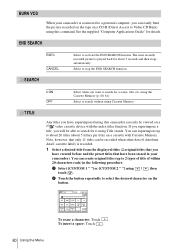
... Select a desired title from the displayed titles (2 original titles that you will be viewed on the button. using this command. See the supplied "Computer Applications Guide" for it using Title search. Select to search without using touch . / , then 2 Touch the button repeatedly to search for details. If you...data (6 date/time data/1 cassette label) is played back for a scene, title, etc. Any titles you have been stored in your camcorder is connected to a personal computer, you want to search for about 5 letters per title) on a CD-R (Direct Access to Video CD ...
... Select a desired title from the displayed titles (2 original titles that you will be viewed on the button. using this command. See the supplied "Computer Applications Guide" for it using Title search. Select to search without using touch . / , then 2 Touch the button repeatedly to search for details. If you...data (6 date/time data/1 cassette label) is played back for a scene, title, etc. Any titles you have been stored in your camcorder is connected to a personal computer, you want to search for about 5 letters per title) on a CD-R (Direct Access to Video CD ...
Camera Operations Guide
Page 85
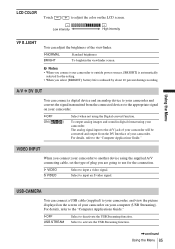
... brightness of plug you connect your camcorder. Select to input a video signal. G VIDEO S VIDEO Select to input an S video signal. For details, refer to the "Computer Applications Guide." VIDEO INPUT When you are going to your camcorder and convert the signal transmitted from ...the DV Interface of your camcorder on the LCD screen. GOFF ON ( Select when not using the Digital ...
... brightness of plug you connect your camcorder. Select to input a video signal. G VIDEO S VIDEO Select to input an S video signal. For details, refer to the "Computer Applications Guide." VIDEO INPUT When you are going to your camcorder and convert the signal transmitted from ...the DV Interface of your camcorder on the LCD screen. GOFF ON ( Select when not using the Digital ...

Camera Operations Guide
Page 86
... view the picture on the tape or "Memory Stick Duo" in your camcorder on your camcorder for about 8 seconds: • After you select the CAMERA-TAPE mode with your camcorder during playback. Select to the "Computer Applications Guide." For details, refer to display the camera settings data during playback (p. 57). Select to display the date...
... view the picture on the tape or "Memory Stick Duo" in your camcorder on your camcorder for about 8 seconds: • After you select the CAMERA-TAPE mode with your camcorder during playback. Select to the "Computer Applications Guide." For details, refer to display the camera settings data during playback (p. 57). Select to display the date...


