
Computer Applications Guide
Page 2
...Professional Standard installation is required. Read this first • For camera operations, read the separate Camera Operations Guide supplied with a Memory Stick slot) • OS: Microsoft Windows 98, Windows 98SE, Windows 2000 Professional, Windows Millennium Edition, Windows XP Home Edition ... (IEEE1394, i.LINK) (to connect via an i.LINK cable), disc drive When only copying pictures recorded on a "Memory Stick" on a computer (only the models with your camcorder to the computer with a Memory Stick slot) • OS: Mac OS 9.1/9.2 or Mac OS X (v 10.0/v 10.1/v 10.2/v 10.3) • ...
...Professional Standard installation is required. Read this first • For camera operations, read the separate Camera Operations Guide supplied with a Memory Stick slot) • OS: Microsoft Windows 98, Windows 98SE, Windows 2000 Professional, Windows Millennium Edition, Windows XP Home Edition ... (IEEE1394, i.LINK) (to connect via an i.LINK cable), disc drive When only copying pictures recorded on a "Memory Stick" on a computer (only the models with your camcorder to the computer with a Memory Stick slot) • OS: Mac OS 9.1/9.2 or Mac OS X (v 10.0/v 10.1/v 10.2/v 10.3) • ...
Computer Applications Guide
Page 3
.... • Pentium is a trademark of Macromedia, Inc. On trademarks • Picture Package is a trademark of Sony Corporation. • "Memory Stick" and are registered trademarks of Sony Corporation. • Microsoft, Windows, and Windows Media are either registered trademarks or trademarks of Microsoft Corporation in the... are used in this manual. 3 To record on the OS. Refer to the separate Camera Operations Guide supplied with your camcorder for details. • The screens shown in this manual. All other sources (the "Music Contents") are the copyrighted work...
.... • Pentium is a trademark of Macromedia, Inc. On trademarks • Picture Package is a trademark of Sony Corporation. • "Memory Stick" and are registered trademarks of Sony Corporation. • Microsoft, Windows, and Windows Media are either registered trademarks or trademarks of Microsoft Corporation in the... are used in this manual. 3 To record on the OS. Refer to the separate Camera Operations Guide supplied with your camcorder for details. • The screens shown in this manual. All other sources (the "Music Contents") are the copyrighted work...
Computer Applications Guide
Page 4
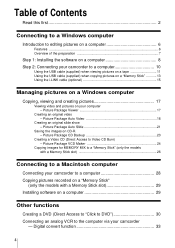
... Package VCD Maker 24 Copying images for MEMORY MIX to a "Memory Stick" (only the models with a Memory Stick slot 26 Connecting to a Macintosh computer Connecting your camcorder to a computer 28 Copying pictures recorded on a "Memory Stick" (only the models with a Memory Stick slot 29 Installing software on a computer ...cable (supplied) when copying pictures on a "Memory Stick 13 Using the i.LINK cable (optional 15 Managing pictures on a Windows computer Copying, viewing and creating pictures 17 Viewing video and pictures on your camcorder - Picture Package Auto Video 18 Creating an ...
... Package VCD Maker 24 Copying images for MEMORY MIX to a "Memory Stick" (only the models with a Memory Stick slot 26 Connecting to a Macintosh computer Connecting your camcorder to a computer 28 Copying pictures recorded on a "Memory Stick" (only the models with a Memory Stick slot 29 Installing software on a computer ...cable (supplied) when copying pictures on a "Memory Stick 13 Using the i.LINK cable (optional 15 Managing pictures on a Windows computer Copying, viewing and creating pictures 17 Viewing video and pictures on your camcorder - Picture Package Auto Video 18 Creating an ...
Computer Applications Guide
Page 6
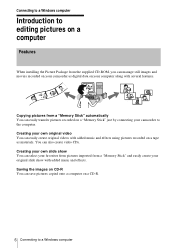
...can save pictures copied onto a computer on a tape as digital data on a "Memory Stick" just by connecting your camcorder to a Windows computer Creating your own slide show You can select your favorites from pictures imported from a "Memory Stick" and easily create your original slide show with several features. Connecting to a Windows ...computer Features When installing the Picture Package from the supplied CD-ROM, you can manage still images and movies recorded on your camcorder as materials. Copying pictures from a "Memory Stick" automatically You can also create video CDs.
...can save pictures copied onto a computer on a tape as digital data on a "Memory Stick" just by connecting your camcorder to a Windows computer Creating your own slide show You can select your favorites from pictures imported from a "Memory Stick" and easily create your original slide show with several features. Connecting to a Windows ...computer Features When installing the Picture Package from the supplied CD-ROM, you can manage still images and movies recorded on your camcorder as materials. Copying pictures from a "Memory Stick" automatically You can also create video CDs.
Computer Applications Guide
Page 10
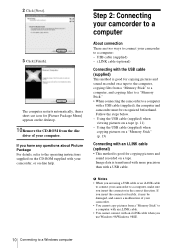
...to the computer, copying files from a "Memory Stick" to a computer, and copying files to a "Memory Stick." • When connecting the camcorder to a computer with a USB cable (supplied), the computer and camcorder must be damaged, and causes a malfunction of your camcorder to a Windows computer If you insert ...a USB cable. Using the USB cable (supplied) when copying pictures on a "Memory Stick" (p. 13) Connecting with an i.LINK cable (optional) • This method is transferred with more precision than with your camcorder, or on a tape (p. 11) - If you insert the connector forcibly, it...
...to the computer, copying files from a "Memory Stick" to a computer, and copying files to a "Memory Stick." • When connecting the camcorder to a computer with a USB cable (supplied), the computer and camcorder must be damaged, and causes a malfunction of your camcorder to a Windows computer If you insert ...a USB cable. Using the USB cable (supplied) when copying pictures on a "Memory Stick" (p. 13) Connecting with an i.LINK cable (optional) • This method is transferred with more precision than with your camcorder, or on a tape (p. 11) - If you insert the connector forcibly, it...
Computer Applications Guide
Page 13
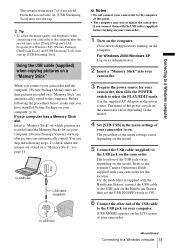
...down all applications running on the model. If your computer has a Memory Stick slot Insert a "Memory Stick" on a "Memory Stick" are stored on the camcorder. You can skip the following the procedures below, make sure you connect your camcorder and the computer, [Picture Package Menu] starts up [USB Streaming ...Picture Package Viewer] starts up after the second time, select [Start], [Programs] ([All Programs] for Windows XP), [Picture Package], [Handycam Tools], and [USB Streaming Tool], then start up. For the model that is supplied with the USB cable (supplied) before turning on...
...down all applications running on the model. If your computer has a Memory Stick slot Insert a "Memory Stick" on a "Memory Stick" are stored on the camcorder. You can skip the following the procedures below, make sure you connect your camcorder and the computer, [Picture Package Menu] starts up [USB Streaming ...Picture Package Viewer] starts up after the second time, select [Start], [Programs] ([All Programs] for Windows XP), [Picture Package], [Handycam Tools], and [USB Streaming Tool], then start up. For the model that is supplied with the USB cable (supplied) before turning on...
Computer Applications Guide
Page 14
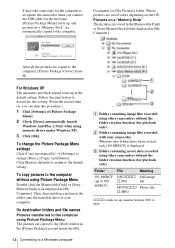
... pictures are copied to the [Date] folders in a "Memory Stick" are stored in the [Removable Disk] or [Sony MemoryStick] folder displayed in the folder onto the hard disk drive of [Picture Package Menu]. 2 Check [Do not automatically launch Windows AutoPlay.] (Only when using other camcorders without the folder creation function (for playback only) B Folder...
... pictures are copied to the [Date] folders in a "Memory Stick" are stored in the [Removable Disk] or [Sony MemoryStick] folder displayed in the folder onto the hard disk drive of [Picture Package Menu]. 2 Check [Do not automatically launch Windows AutoPlay.] (Only when using other camcorders without the folder creation function (for playback only) B Folder...
Computer Applications Guide
Page 17
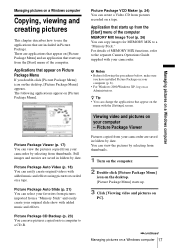
...; You can view the pictures by selecting from pictures recorded on a tape. Application that starts up from a "Memory Stick" and easily create your camcorder by date. Viewing video and pictures on a Windows computer Still images and movies are saved in Picture Package. Picture... Package Auto Slide (p. 21) You can copy images for MEMORY MIX to the separate Camera Operations Guide supplied with the [Settings...
...; You can view the pictures by selecting from pictures recorded on a tape. Application that starts up from a "Memory Stick" and easily create your camcorder by date. Viewing video and pictures on a Windows computer Still images and movies are saved in Picture Package. Picture... Package Auto Slide (p. 21) You can copy images for MEMORY MIX to the separate Camera Operations Guide supplied with the [Settings...
Computer Applications Guide
Page 26
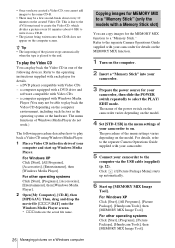
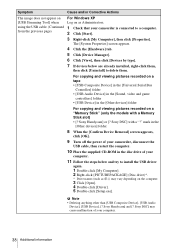
... XP Click [Start], [All Programs], [Accessories], [Entertainment], then [Windows Media Player]. For other operating systems Click [Start], [Programs], [Picture Package], [Handycam Tools], then [MEMORY MIX Image Tool]. The procedure of your camcorder to a "Memory Stick" (only the models with Video CDs - This is played to write it on a CD-R. • The picture being written onto...
... XP Click [Start], [All Programs], [Accessories], [Entertainment], then [Windows Media Player]. For other operating systems Click [Start], [Programs], [Picture Package], [Handycam Tools], then [MEMORY MIX Image Tool]. The procedure of your camcorder to a "Memory Stick" (only the models with Video CDs - This is played to write it on a CD-R. • The picture being written onto...
Computer Applications Guide
Page 28
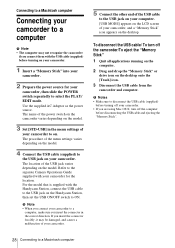
...USB jack on your computer. [USB MODE] appears on the LCD screen of your camcorder. • If you insert the connector in the menu settings of your camcorder to on your camcorder. 1 Insert a "Memory Stick" into your camcorder. 2 Prepare the power source for the location. To disconnect the USB cable/ .... 2 Drag and drop the "Memory Stick" or drive icon on your camcorder, then slide the POWER switch repeatedly to ON. The procedure of the USB jack varies depending on the desktop. Refer to the separate Camera Operations Guide supplied with the Handycam Station, connect the USB cable to...
...USB jack on your computer. [USB MODE] appears on the LCD screen of your camcorder. • If you insert the connector in the menu settings of your camcorder to on your camcorder. 1 Insert a "Memory Stick" into your camcorder. 2 Prepare the power source for the location. To disconnect the USB cable/ .... 2 Drag and drop the "Memory Stick" or drive icon on your camcorder, then slide the POWER switch repeatedly to ON. The procedure of the USB jack varies depending on the desktop. Refer to the separate Camera Operations Guide supplied with the Handycam Station, connect the USB cable to...
Computer Applications Guide
Page 29
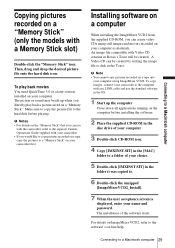
... installing the software 2 Place the supplied CD-ROM in the disc drive of your camcorder first. Make sure to copy the picture file to a Macintosh computer 29 b Notes • For details on the "Memory Stick" that you can be created. A Video CD can use the standard software in ...the folder it was copied to a "Memory Stick" on your name and password. To copy images, connect your camcorder to the computer with an i.LINK cable and use with the camcorder, refer to the separate Camera Operations Guide supplied with Video CD creation in Roxio...
... installing the software 2 Place the supplied CD-ROM in the disc drive of your camcorder first. Make sure to copy the picture file to a Macintosh computer 29 b Notes • For details on the "Memory Stick" that you can be created. A Video CD can use the standard software in ...the folder it was copied to a "Memory Stick" on your name and password. To copy images, connect your camcorder to the computer with an i.LINK cable and use with the camcorder, refer to the separate Camera Operations Guide supplied with Video CD creation in Roxio...
Computer Applications Guide
Page 32
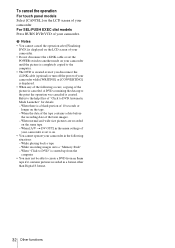
... is canceled. While recording images onto a "Memory Stick" - When [A/V t DV OUT] in the following occurs, copying of the picture is created. b Notes • You cannot cancel the operation after [Finalizing DVD.] is displayed on the LCD screen of your camcorder. • Do not disconnect the i.LINK ...• The DVD is created even if you disconnect the i.LINK cable (optional) or turn off the power of your camcorder in the menu settings of your camcorder is displayed. • When any of the following situations: - To cancel the operation For touch panel models Select [CANCEL...
... is canceled. While recording images onto a "Memory Stick" - When [A/V t DV OUT] in the following occurs, copying of the picture is created. b Notes • You cannot cancel the operation after [Finalizing DVD.] is displayed on the LCD screen of your camcorder. • Do not disconnect the i.LINK ...• The DVD is created even if you disconnect the i.LINK cable (optional) or turn off the power of your camcorder in the menu settings of your camcorder is displayed. • When any of the following situations: - To cancel the operation For touch panel models Select [CANCEL...

Computer Applications Guide
Page 35
... does not recognize your computer. You cannot view the pictures recorded on a tape on the computer. (only the models with the Handycam Station, connect the Handycam Station to the computer. You cannot view the pictures the camcorder is supplied with a Memory Stick slot) cInsert the "Memory Stick" firmly. Connect the camcorder and the computer using the USB cable.
... does not recognize your computer. You cannot view the pictures recorded on a tape on the computer. (only the models with the Handycam Station, connect the Handycam Station to the computer. You cannot view the pictures the camcorder is supplied with a Memory Stick slot) cInsert the "Memory Stick" firmly. Connect the camcorder and the computer using the USB cable.
Computer Applications Guide
Page 36
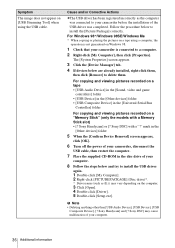
.... Sony Handycam] and [? mark in the [Other devices] folder 5 When the [Confirm Device Removal] screen appears, click [OK]. 6 Turn off the power of your camcorder, disconnect the USB cable, then restart the computer. 7 Place the supplied CD-ROM in the [Universal Serial Bus Controller] folder For copying and viewing pictures recorded on a "Memory Stick" (only...
.... Sony Handycam] and [? mark in the [Other devices] folder 5 When the [Confirm Device Removal] screen appears, click [OK]. 6 Turn off the power of your camcorder, disconnect the USB cable, then restart the computer. 7 Place the supplied CD-ROM in the [Universal Serial Bus Controller] folder For copying and viewing pictures recorded on a "Memory Stick" (only...
Computer Applications Guide
Page 37
...], then click [Properties]. Sony DSC] with a Memory Stick slot) • [? b Note • Deleting anything other than [USB Composite Device], [USB Audio Device], [Composite USB Device], [? Sony Handycam] and [? The [System...Memory Stick" (only the models with a "?" For copying and viewing pictures recorded on a tape • [USB Composite Device] in the [Universal Serial Bus Controller] folder • [USB Audio Device] in the [Sound, video and game controller] folder • [Composite USB Device] in the disc drive of your camcorder is connected to delete them. Sony Handycam...
...], then click [Properties]. Sony DSC] with a Memory Stick slot) • [? b Note • Deleting anything other than [USB Composite Device], [USB Audio Device], [Composite USB Device], [? Sony Handycam] and [? The [System...Memory Stick" (only the models with a "?" For copying and viewing pictures recorded on a tape • [USB Composite Device] in the [Universal Serial Bus Controller] folder • [USB Audio Device] in the [Sound, video and game controller] folder • [Composite USB Device] in the disc drive of your camcorder is connected to delete them. Sony Handycam...
Computer Applications Guide
Page 38
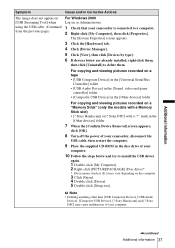
...] in the [Sound, video and game controllers] folder • [USB Device] in the disc drive of your camcorder is connected to delete them. Sony DSC] with a Memory Stick slot) • [? mark in the [Other devices] folder 8 When the [Confirm Device Removal] screen appears, ...3 Right-click [My Computer], then click [Properties]. b Note • Deleting anything other than [USB Composite Device], [USB Audio Device], [USB Device], [? Sony Handycam] or [? The [System Properties] screen appears. 4 Click the [Hardware] tab. 5 Click [Device Manager]. 6 Click [View], then click [Devices by type...
...] in the [Sound, video and game controllers] folder • [USB Device] in the disc drive of your camcorder is connected to delete them. Sony DSC] with a Memory Stick slot) • [? mark in the [Other devices] folder 8 When the [Confirm Device Removal] screen appears, ...3 Right-click [My Computer], then click [Properties]. b Note • Deleting anything other than [USB Composite Device], [USB Audio Device], [USB Device], [? Sony Handycam] or [? The [System Properties] screen appears. 4 Click the [Hardware] tab. 5 Click [Device Manager]. 6 Click [View], then click [Devices by type...
Computer Applications Guide
Page 39
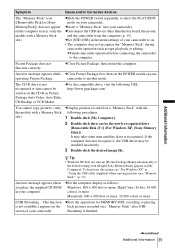
... some time until the drive is not available.] appears on the back pictures recorded on a "Memory Stick" after USB screen of your camcorder. This function cStart the operations for the newly recognized drive [Removable Disk (F:)] (For Windows XP, [Sony Memory Stick]). The CD-R drive is finished. ,continued Additional information 39 cClose Picture Package, then restart the...
... some time until the drive is not available.] appears on the back pictures recorded on a "Memory Stick" after USB screen of your camcorder. This function cStart the operations for the newly recognized drive [Removable Disk (F:)] (For Windows XP, [Sony Memory Stick]). The CD-R drive is finished. ,continued Additional information 39 cClose Picture Package, then restart the...
Computer Applications Guide
Page 41
... 22, 24, 25 Click to DVD 30 Copying pictures on a "Memory Stick" .... 13, 29 D Digital convert function......33 Direct Access to "Click to DVD 30 Direct Access to Video CD Burn 24 DirectX 9.0b 9 DV Interface 15, 30, 33 DVD 30 H Handycam Station 7, 11, 13, 16, 28 I i.LINK cable 10, 15..., 18, 30, 33 ImageMixer VCD2 29 Install 8 M Macintosh 28 MEMORY MIX 26 "Memory Stick" ..... 13, 26, 29 O On-line help 10, 29 P Picture Package 6, 17 Picture Package...
... 22, 24, 25 Click to DVD 30 Copying pictures on a "Memory Stick" .... 13, 29 D Digital convert function......33 Direct Access to "Click to DVD 30 Direct Access to Video CD Burn 24 DirectX 9.0b 9 DV Interface 15, 30, 33 DVD 30 H Handycam Station 7, 11, 13, 16, 28 I i.LINK cable 10, 15..., 18, 30, 33 ImageMixer VCD2 29 Install 8 M Macintosh 28 MEMORY MIX 26 "Memory Stick" ..... 13, 26, 29 O On-line help 10, 29 P Picture Package 6, 17 Picture Package...
Camera Operations Guide
Page 2
... TO PREVENT ELECTRIC SHOCK, MATCH WIDE BLADE OF PLUG TO WIDE SLOT, FULLY INSERT. This symbol is subject to the presence of the FCC Rules. "Memory Stick" and battery pack This device complies with Canadian ICES-003. 2 Operation is intended to alert the user to the following two conditions: (1) This device may...
... TO PREVENT ELECTRIC SHOCK, MATCH WIDE BLADE OF PLUG TO WIDE SLOT, FULLY INSERT. This symbol is subject to the presence of the FCC Rules. "Memory Stick" and battery pack This device complies with Canadian ICES-003. 2 Operation is intended to alert the user to the following two conditions: (1) This device may...
Camera Operations Guide
Page 3
... - You can use only a "Memory Stick Duo," which is subject to operate this device must accept any problems. ,continued DCR-HC30/HC40 3 The mark is connected. - Telephone No.: 201-930-6972 This device complies with . Address: 680 Kinderkamack Road, Oradell, NJ 07649 ...Sony Electronics Inc. Record the serial number in accordance with the limits for a Class B digital device, pursuant to make sure the picture and sound are marked with Part 15 of the FCC Rules. DCR-HC Serial No. These limits are located on the "Memory Stick Duo." If this manual could void your camcorder...
... - You can use only a "Memory Stick Duo," which is subject to operate this device must accept any problems. ,continued DCR-HC30/HC40 3 The mark is connected. - Telephone No.: 201-930-6972 This device complies with . Address: 680 Kinderkamack Road, Oradell, NJ 07649 ...Sony Electronics Inc. Record the serial number in accordance with the limits for a Class B digital device, pursuant to make sure the picture and sound are marked with Part 15 of the FCC Rules. DCR-HC Serial No. These limits are located on the "Memory Stick Duo." If this manual could void your camcorder...


