
Accessory Catalog - English
Page 22
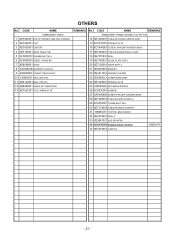
... 11 XE5132001 BAG_100X100 12 XE8480001 TABLE SET INSERTION 13 XE7421001 TOOL WRENCH M7 REMARKS No. OTHERS No. CODE NAME REMARKS EMBROIDERY FRAME HOLDER C (for PR-1000) 14 XE7400001 TUBULAR ROUND ARM RA ASSY 15 XC7076051 SPRING,PLATE 16 XC7644051 SCREW, PAM (S/P WASHER) M3X5 17 XE7149001 TUBLAR ROUND ARM LC ASSY 18 XE7375001 SEAL 19 XE7140001 GUIDE PLATE ASSY 20 XE7152001 HOOP STAY C 21 XE2270001 MAGNET...
... 11 XE5132001 BAG_100X100 12 XE8480001 TABLE SET INSERTION 13 XE7421001 TOOL WRENCH M7 REMARKS No. OTHERS No. CODE NAME REMARKS EMBROIDERY FRAME HOLDER C (for PR-1000) 14 XE7400001 TUBULAR ROUND ARM RA ASSY 15 XC7076051 SPRING,PLATE 16 XC7644051 SCREW, PAM (S/P WASHER) M3X5 17 XE7149001 TUBLAR ROUND ARM LC ASSY 18 XE7375001 SEAL 19 XE7140001 GUIDE PLATE ASSY 20 XE7152001 HOOP STAY C 21 XE2270001 MAGNET...
Users Manual - English
Page 2
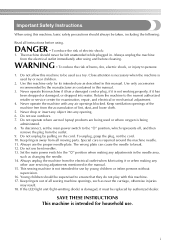
... supervised to break. 12. Keep ventilation openings of the machine free from the outlet. 9. To disconnect, set the main power switch to the "{" position when making any adjustments in the needle area, such as described in . Do not use as changing the needle. 14. Set the main power switch to the "{" position, which represents off, and then remove the plug from the accumulation of all moving parts. Keep...
... supervised to break. 12. Keep ventilation openings of the machine free from the outlet. 9. To disconnect, set the main power switch to the "{" position when making any adjustments in the needle area, such as described in . Do not use as changing the needle. 14. Set the main power switch to the "{" position, which represents off, and then remove the plug from the accumulation of all moving parts. Keep...
Users Manual - English
Page 4
...Changes or modifications not expressly approved by one or more of the following two conditions: (1) this device may cause harmful interference to Part 15 of the FCC Rules. If this device must accept any interference received, including interference that to which can radiate radio frequency energy and, if not installed and used... product Product Name: Brother Sewing Machine Model Number: PR-620 complies with the limits for help. • The enclosed interface cable should be determined by turning the equipment off and on, the user is encouraged to try to operate the equipment. This ...
...Changes or modifications not expressly approved by one or more of the following two conditions: (1) this device may cause harmful interference to Part 15 of the FCC Rules. If this device must accept any interference received, including interference that to which can radiate radio frequency energy and, if not installed and used... product Product Name: Brother Sewing Machine Model Number: PR-620 complies with the limits for help. • The enclosed interface cable should be determined by turning the equipment off and on, the user is encouraged to try to operate the equipment. This ...
Users Manual - English
Page 5
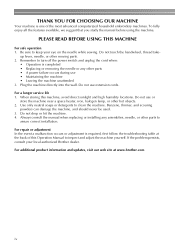
... your eye on the needle while sewing. Be sure to turn off the power switch and unplug the cord when: • Operation is completed • Replacing or removing the needle or any assemblies, needle, or other parts • A power failure occurs during use extension cords. Plug the machine directly into the wall. For a longer service life 1. Remember to keep your local authorized Brother dealer. For repair or adjustment In the event...
... your eye on the needle while sewing. Be sure to turn off the power switch and unplug the cord when: • Operation is completed • Replacing or removing the needle or any assemblies, needle, or other parts • A power failure occurs during use extension cords. Plug the machine directly into the wall. For a longer service life 1. Remember to keep your local authorized Brother dealer. For repair or adjustment In the event...
Users Manual - English
Page 10
... of stitching Since the machine automatically pulls the upper thread under the fabric at the beginning of a color, and pulls the upper thread from lowering the presser foot to performing the specified operations at the starting the machine, the presser foot is automatically lowered, and the embroidery is sewn while performing pulling thread from the materials at all six needles can be threaded each time a different thread color is used to sew at the embroidering position The needle is positioned...
... of stitching Since the machine automatically pulls the upper thread under the fabric at the beginning of a color, and pulls the upper thread from lowering the presser foot to performing the specified operations at the starting the machine, the presser foot is automatically lowered, and the embroidery is sewn while performing pulling thread from the materials at all six needles can be threaded each time a different thread color is used to sew at the embroidering position The needle is positioned...
Users Manual - English
Page 14
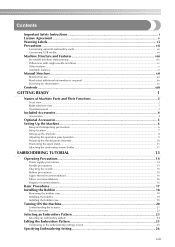
...Setup location ...7 Setting up the machine...8 Adjusting the operation panel position ...9 Preparing the thread guide assembly ...10 Positioning the spool stand...11 Attaching the embroidery frame holder ...11 EMBROIDERING TUTORIAL 13 Operating Precautions...14 Power supply precautions ...14 Needle precautions ...15 Checking the needle ...15 Bobbin precautions ...15 Upper thread recommendations...16 Fabric recommendations ...16 Display recommendations...16 Basic Procedures ...17 Installing the Bobbin ...18 Removing the bobbin case ...18 Installing the bobbin ...19 Installing the bobbin case...
...Setup location ...7 Setting up the machine...8 Adjusting the operation panel position ...9 Preparing the thread guide assembly ...10 Positioning the spool stand...11 Attaching the embroidery frame holder ...11 EMBROIDERING TUTORIAL 13 Operating Precautions...14 Power supply precautions ...14 Needle precautions ...15 Checking the needle ...15 Bobbin precautions ...15 Upper thread recommendations...16 Fabric recommendations ...16 Display recommendations...16 Basic Procedures ...17 Installing the Bobbin ...18 Removing the bobbin case ...18 Installing the bobbin ...19 Installing the bobbin case...
Users Manual - English
Page 15
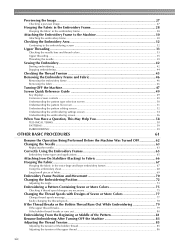
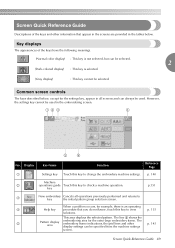
... Upper threading ...35 Threading the needle ...39 Sewing the Embroidery...42 Starting embroidering ...42 Stopping embroidering...44 Checking the Thread Tension 45 Removing the Embroidery Frame and Fabric 46 Removing the embroidery frame ...46 Removing the fabric ...46 Turning OFF the Machine 47 Screen Quick Reference Guide 49 Key displays ...49 Common screen controls ...49 Understanding the pattern type selection screen 50 Understanding the pattern list screen ...51 Understanding the pattern editing screen ...52 Understanding the embroidering settings screen...
... Upper threading ...35 Threading the needle ...39 Sewing the Embroidery...42 Starting embroidering ...42 Stopping embroidering...44 Checking the Thread Tension 45 Removing the Embroidery Frame and Fabric 46 Removing the embroidery frame ...46 Removing the fabric ...46 Turning OFF the Machine 47 Screen Quick Reference Guide 49 Key displays ...49 Common screen controls ...49 Understanding the pattern type selection screen 50 Understanding the pattern list screen ...51 Understanding the pattern editing screen ...52 Understanding the embroidering settings screen...
Users Manual - English
Page 22
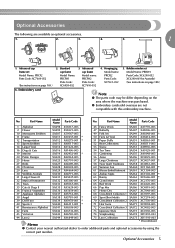
Part Name Model Name Parts Code No. Bobbin winder set Model Name: PRCF2 Parts Code: XC7609-052 (See instructions on the area where the machine was purchased. ● Embroidery cards sold overseas are available as optional accessories. 1. 2. 3. 4. 5. 1 1. No. Optional Accessories 5 Hooping jig Model name: PRCFJ2 Parts Code: XC7611-052 5. Advanced cap frame Model name: PRCFH2 Parts Code: XC7610-052 4. Advanced cap frame set Model Name: PRBW1 Parts Code: XC6290-052 XC6290-061(for Australia) (See instructions on page 188...
Part Name Model Name Parts Code No. Bobbin winder set Model Name: PRCF2 Parts Code: XC7609-052 (See instructions on the area where the machine was purchased. ● Embroidery cards sold overseas are available as optional accessories. 1. 2. 3. 4. 5. 1 1. No. Optional Accessories 5 Hooping jig Model name: PRCFJ2 Parts Code: XC7611-052 5. Advanced cap frame Model name: PRCFH2 Parts Code: XC7610-052 4. Advanced cap frame set Model Name: PRBW1 Parts Code: XC6290-052 XC6290-061(for Australia) (See instructions on page 188...
Users Manual - English
Page 61
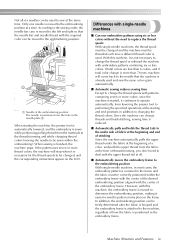
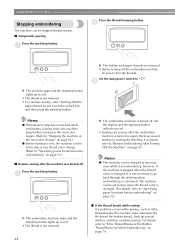
... automatically. Set the main power switch to trim the threads. Back up several stitches to "Specifying pause locations before embroidering" on again. For details, refer to "If the Thread Breaks or the Bobbin Thread Runs Out While Embroidering" on page 79. Memo ● The machine can resume after checking that the upper thread is taut, touch the unlock key, and then press the start /stop button lights...
... automatically. Set the main power switch to trim the threads. Back up several stitches to "Specifying pause locations before embroidering" on again. For details, refer to "If the Thread Breaks or the Bobbin Thread Runs Out While Embroidering" on page 79. Memo ● The machine can resume after checking that the upper thread is taut, touch the unlock key, and then press the start /stop button lights...
Users Manual - English
Page 66
... described below . p. 140 Machine 2 operations guide Touch this key to key the initial pattern group selection screen. When a problem occurs, for the settings key, appear in all operations previously performed and returns to change the embroidery machine settings. No. The line 6 shows the 5 Pattern display area embroidering area for the extra-large embroidery frame. This area displays the selected pattern. key p.151 3 New embroidery Cancels all screens...
... described below . p. 140 Machine 2 operations guide Touch this key to key the initial pattern group selection screen. When a problem occurs, for the settings key, appear in all operations previously performed and returns to change the embroidery machine settings. No. The line 6 shows the 5 Pattern display area embroidering area for the extra-large embroidery frame. This area displays the selected pattern. key p.151 3 New embroidery Cancels all screens...
Users Manual - English
Page 76
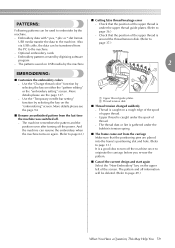
... originate the carriage before you re-sew the pattern. ■ Cancel the current design and start again Select the "New Embroidery" key on either the "pattern editing" or the "embroidery setting" screen. The machine remembers the pattern and the position even after turning off the machine once to turn off the power. Use the "Change thread color" function by digitizing software program - Embroidery data with *.pes, *.phc or *.dst...
... originate the carriage before you re-sew the pattern. ■ Cancel the current design and start again Select the "New Embroidery" key on either the "pattern editing" or the "embroidery setting" screen. The machine remembers the pattern and the position even after turning off the machine once to turn off the power. Use the "Change thread color" function by digitizing software program - Embroidery data with *.pes, *.phc or *.dst...
Users Manual - English
Page 111
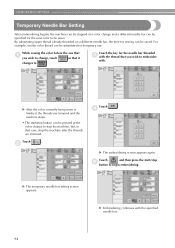
... start /stop button can be pressed at a color change and a different needle bar can be specified for the needle bar threaded 3 with the specified needle bar. 94 X Embroidering continues with the thread that you wish to change, touch so that it changes to . EMBROIDERING SETTINGS Temporary Needle Bar Setting After embroidering begins, the machine can be stopped at the color change to stop the machine, but, in that case, stop 5 button to begin embroidering. X The temporary needle bar setting...
... start /stop button can be pressed at a color change and a different needle bar can be specified for the needle bar threaded 3 with the specified needle bar. 94 X Embroidering continues with the thread that you wish to change, touch so that it changes to . EMBROIDERING SETTINGS Temporary Needle Bar Setting After embroidering begins, the machine can be stopped at the color change to stop the machine, but, in that case, stop 5 button to begin embroidering. X The temporary needle bar setting...
Users Manual - English
Page 160
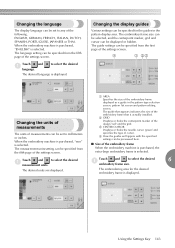
.... The embroidering area for the guides in the pattern type selection screen, pattern list screen and pattern editing screen. When the embroidery machine is purchased, "ENGLISH" is displayed. The guide that appears indicates the size of the embroidery frame that is actually installed. 2 GRID Displays or hides the centerpoint marker of the design (red) and the grid. 3 CENTER CURSOR Displays or hides the needle cursor (green...
.... The embroidering area for the guides in the pattern type selection screen, pattern list screen and pattern editing screen. When the embroidery machine is purchased, "ENGLISH" is displayed. The guide that appears indicates the size of the embroidery frame that is actually installed. 2 GRID Displays or hides the centerpoint marker of the design (red) and the grid. 3 CENTER CURSOR Displays or hides the needle cursor (green...
Users Manual - English
Page 216
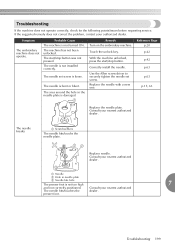
... the start /stop button. Troubleshooting If the machine does not operate correctly, check for the following points/issues before requesting service. If the suggested remedy does not correct the problem, contact your nearest authorized dealer. Probable Cause The machine is damaged. 1 Remedy Turn on the embroidery machine. The needle set screw. The area around the hole in needle plate 3 Needle hits hole The presser foot is loose. Replace the needle with a new one. presser foot. The machine...
... the start /stop button. Troubleshooting If the machine does not operate correctly, check for the following points/issues before requesting service. If the suggested remedy does not correct the problem, contact your nearest authorized dealer. Probable Cause The machine is damaged. 1 Remedy Turn on the embroidery machine. The needle set screw. The area around the hole in needle plate 3 Needle hits hole The presser foot is loose. Replace the needle with a new one. presser foot. The machine...
Users Manual - English
Page 218
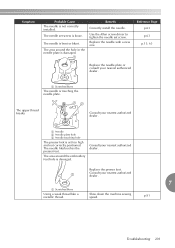
... Replace the needle plate or consult your nearest authorized dealer. 3 1 Needle 2 Needle plate hole 3 Needle touching hole The presser foot is bent or blunt. p.91 Troubleshooting 201 Symptom Probable Cause The needle is touching the needle plate. Use the Allen screw driver to tighten the needle set screw is loose. Consult your nearest authorized dealer. 7 1 Scratches/Burrs Using a weak thread like a metallic thread. Slow down the machine sewing speed. The area around the embroidery foot hole is damaged. 1 Remedy Correctly install the needle...
... Replace the needle plate or consult your nearest authorized dealer. 3 1 Needle 2 Needle plate hole 3 Needle touching hole The presser foot is bent or blunt. p.91 Troubleshooting 201 Symptom Probable Cause The needle is touching the needle plate. Use the Allen screw driver to tighten the needle set screw is loose. Consult your nearest authorized dealer. 7 1 Scratches/Burrs Using a weak thread like a metallic thread. Slow down the machine sewing speed. The area around the embroidery foot hole is damaged. 1 Remedy Correctly install the needle...

Users Manual - English
Page 220
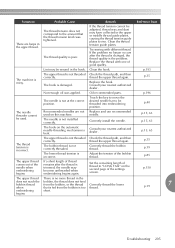
... correctly threaded. Clean the hook and the needle plate. dealer. p.28, 67 The embroidery frame is too Use an embroidery frame that it is not taut). Troubleshooting 203 The thread is not installed correctly. p.18 p.18 p.193 A bobbin designed specifically for example, the fabric is taut. dealer. p.28, 67 The upper thread breaks. p.150 The embroidery data contains many stitches with a new one. Correctly thread the bobbin thread. The needle is tangled. Try using a new spool. p.15 The upper thread...
... correctly threaded. Clean the hook and the needle plate. dealer. p.28, 67 The embroidery frame is too Use an embroidery frame that it is not taut). Troubleshooting 203 The thread is not installed correctly. p.18 p.18 p.193 A bobbin designed specifically for example, the fabric is taut. dealer. p.28, 67 The upper thread breaks. p.150 The embroidery data contains many stitches with a new one. Correctly thread the bobbin thread. The needle is tangled. Try using a new spool. p.15 The upper thread...
Users Manual - English
Page 222
...Oil recommended parts. The needle threader cannot be position. thread the upper thread again. p.150 The upper thread does not reach the bobbin thread when embroidering begins. Correctly install the needle. The thread tension does not correspond to be used on this machine. Replace the thread with different thread. p.35 The machine is damaged. Replace the hook. The hook is noisy. Not enough oil was tightened. Replace and use recommended needle. Consult your nearest authorized dealer. The upper thread is the problem. Adjust the tension...
...Oil recommended parts. The needle threader cannot be position. thread the upper thread again. p.150 The upper thread does not reach the bobbin thread when embroidering begins. Correctly install the needle. The thread tension does not correspond to be used on this machine. Replace the thread with different thread. p.35 The machine is damaged. Replace the hook. The hook is noisy. Not enough oil was tightened. Replace and use recommended needle. Consult your nearest authorized dealer. The upper thread is the problem. Adjust the tension...
Users Manual - English
Page 224
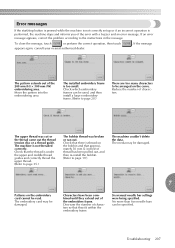
... five needle bars can be used, and then install a larger embroidery frame. (Refer to page 28.) There are too many characters to be specified. Troubleshooting 207 Error messages If the start/stop button is pressed while the machine is not correctly set up or if an incorrect operation is under the upper and middle thread guides and correctly thread the upper thread. (Refer to page 35.) The bobbin thread was...
... five needle bars can be used, and then install a larger embroidery frame. (Refer to page 28.) There are too many characters to be specified. Troubleshooting 207 Error messages If the start/stop button is pressed while the machine is not correctly set up or if an incorrect operation is under the upper and middle thread guides and correctly thread the upper thread. (Refer to page 35.) The bobbin thread was...
Users Manual - English
Page 234
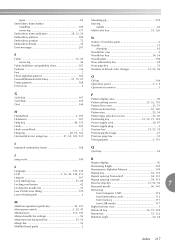
types 65 Embroidery frame holder installing 185 removing 171 Embroidery frame indicators 28, 52, 54 Embroidery patterns 104 Embroidery position 72 Embroidery thread 35 Error messages 207 F Fabric 16, 69 removing 46 Fabric/stabilizer compatibility chart 167 Features viii Feet 2 Floral alphabet patterns 106 Forward/Backward stitch key 57, 79, 81 Frame patterns 108 Front view 2 Mounting jig 174 Moving needle 40 Multi color key 53, 126 N Names of machine parts 2 Needle 15 changing 63 Needle bar case 2 Needle bar key...
types 65 Embroidery frame holder installing 185 removing 171 Embroidery frame indicators 28, 52, 54 Embroidery patterns 104 Embroidery position 72 Embroidery thread 35 Error messages 207 F Fabric 16, 69 removing 46 Fabric/stabilizer compatibility chart 167 Features viii Feet 2 Floral alphabet patterns 106 Forward/Backward stitch key 57, 79, 81 Frame patterns 108 Front view 2 Mounting jig 174 Moving needle 40 Multi color key 53, 126 N Names of machine parts 2 Needle 15 changing 63 Needle bar case 2 Needle bar key...
Users Manual - English
Page 235
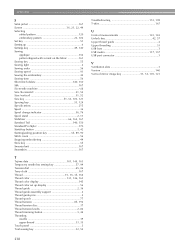
..., 121 T Tajima data 101, 149, 163 Temporary needle bar setting key 57, 94 Tension dial 45, 86 Terry cloth 167 Thread 15, 16, 35, 164 Thread color 131, 146, 163 Thread color display 145 Thread color set up display 56 Thread guide 2, 36 Thread guide assembly support 2 Thread guide pins 2 Thread spools 77 Thread tension 85, 192 Thread tension disc 37 Thread tension knobs 2, 86 Thread trimming button 3, 44 Threading needle 39 upper thread 33, 35 Touch panel 3 Trial sewing key 32, 55 218
..., 121 T Tajima data 101, 149, 163 Temporary needle bar setting key 57, 94 Tension dial 45, 86 Terry cloth 167 Thread 15, 16, 35, 164 Thread color 131, 146, 163 Thread color display 145 Thread color set up display 56 Thread guide 2, 36 Thread guide assembly support 2 Thread guide pins 2 Thread spools 77 Thread tension 85, 192 Thread tension disc 37 Thread tension knobs 2, 86 Thread trimming button 3, 44 Threading needle 39 upper thread 33, 35 Touch panel 3 Trial sewing key 32, 55 218


