
Users Manual - English
Page 2
... disconnect, set the main power switch to break. 12. Special care is being used as near children. 2. Do not use the proper needle plate. SAVE THESE INSTRUCTIONS This machine is not working properly, if it must be taken, including the following: Read all instructions before cleaning... intended for examination, repair, and electrical or mechanical adjustment. 4. The machine should never be used or where oxygen is required around the machine needle. 11. WARNING - Never operate the machine with this machine. 17. Do not use . i To reduce the risk of the machine free...
... disconnect, set the main power switch to break. 12. Special care is being used as near children. 2. Do not use the proper needle plate. SAVE THESE INSTRUCTIONS This machine is not working properly, if it must be taken, including the following: Read all instructions before cleaning... intended for examination, repair, and electrical or mechanical adjustment. 4. The machine should never be used or where oxygen is required around the machine needle. 11. WARNING - Never operate the machine with this machine. 17. Do not use . i To reduce the risk of the machine free...
Users Manual - English
Page 5
...not use • Maintaining the machine • Leaving the machine unattended 3. Use only neutral soaps or detergents to keep your local authorized Brother dealer. Plug the machine directly into the wall. Do not touch the handwheel, thread take- Do not drop or hit the machine.... the most advanced computerized household embroidery machines. When storing this Operation Manual to inspect and adjust the machine yourself. up lever, needle, or other parts to assure correct installation. Always consult the manual when replacing or installing any other hot objects. 2. For ...
...not use • Maintaining the machine • Leaving the machine unattended 3. Use only neutral soaps or detergents to keep your local authorized Brother dealer. Plug the machine directly into the wall. Do not touch the handwheel, thread take- Do not drop or hit the machine.... the most advanced computerized household embroidery machines. When storing this Operation Manual to inspect and adjust the machine yourself. up lever, needle, or other parts to assure correct installation. Always consult the manual when replacing or installing any other hot objects. 2. For ...
Users Manual - English
Page 9
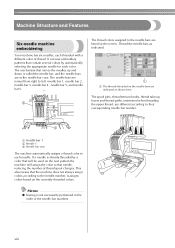
... The threads threaded on the next pattern the machine will be used on the needle bars are in the order of the needle bar numbers. This also means that needle, reducing the number of thread. viii The spool pins, thread tension knobs, ...of thread spool changes. The needle bars are named from right to left: needle bar 1, needle bar 2, needle bar 3, needle bar 4 , needle bar 5, and needle bar 6. 3 1 The thread colors assigned to the needle bars are different according to their corresponding needle bar number. 2 1 Needle bar 1 2 Needle 1 3 Needle bar case The machine automatically ...
... The threads threaded on the next pattern the machine will be used on the needle bars are in the order of the needle bar numbers. This also means that needle, reducing the number of thread. viii The spool pins, thread tension knobs, ...of thread spool changes. The needle bars are named from right to left: needle bar 1, needle bar 2, needle bar 3, needle bar 4 , needle bar 5, and needle bar 6. 3 1 The thread colors assigned to the needle bars are different according to their corresponding needle bar number. 2 1 Needle bar 1 2 Needle 1 3 Needle bar case The machine automatically ...
Users Manual - English
Page 10
... of the embroidery frame. Machine Structure and Features ix When starting and end positions in addition to the embroidering position. 2 1 1 Needle at the same time. In addition, the embroidering position can be freely determined after the fabric is hooped and the embroidery frame is ... finished, the machine stops. If the pattern uses seven or more thread colors, the machine will come back to the needle that the needle bar and needle thread with patterns containing seven or more than 7 times, machine will stop when it continues to operate automatically, from the...
... of the embroidery frame. Machine Structure and Features ix When starting and end positions in addition to the embroidering position. 2 1 1 Needle at the same time. In addition, the embroidering position can be freely determined after the fabric is hooped and the embroidery frame is ... finished, the machine stops. If the pattern uses seven or more thread colors, the machine will come back to the needle that the needle bar and needle thread with patterns containing seven or more than 7 times, machine will stop when it continues to operate automatically, from the...
Users Manual - English
Page 11
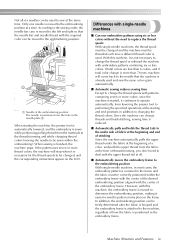
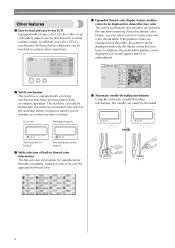
... only the thread colors that helps prevent injuries from accidental operation. If the pattern colors are stored in green ■ Automatic needle-threading mechanism Using the automatic needle-threading mechanism, the needle can easily be threaded. In addition, the embroidery pattern can be displayed as it would appear after the machine is unlocked...
... only the thread colors that helps prevent injuries from accidental operation. If the pattern colors are stored in green ■ Automatic needle-threading mechanism Using the automatic needle-threading mechanism, the needle can easily be threaded. In addition, the embroidery pattern can be displayed as it would appear after the machine is unlocked...
Users Manual - English
Page 13
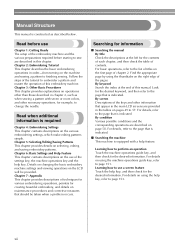
... steps of the tutorial to embroider a pattern and master the operation of the embroidery machine and the various preparations required before starting to change the needle. For details, refer to finishing sewing. Read when additional information is equipped with seven or more colors, and other than those described in this chapter...
... steps of the tutorial to embroider a pattern and master the operation of the embroidery machine and the various preparations required before starting to change the needle. For details, refer to finishing sewing. Read when additional information is equipped with seven or more colors, and other than those described in this chapter...
Users Manual - English
Page 14
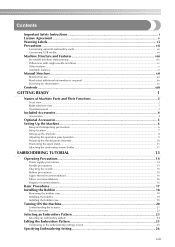
... Concerning optional embroidery cards ...vii Concerning USB media ...vii Machine Structure and Features viii Six-needle machine embroidering ...viii Differences with single-needle machines ...ix Other features ...x Available features...xi Manual Structure...xii Read before use ...xii ...Attaching the embroidery frame holder ...11 EMBROIDERING TUTORIAL 13 Operating Precautions...14 Power supply precautions ...14 Needle precautions ...15 Checking the needle ...15 Bobbin precautions ...15 Upper thread recommendations...16 Fabric recommendations ...16 Display recommendations...16 Basic Procedures...
... Concerning optional embroidery cards ...vii Concerning USB media ...vii Machine Structure and Features viii Six-needle machine embroidering ...viii Differences with single-needle machines ...ix Other features ...x Available features...xi Manual Structure...xii Read before use ...xii ...Attaching the embroidery frame holder ...11 EMBROIDERING TUTORIAL 13 Operating Precautions...14 Power supply precautions ...14 Needle precautions ...15 Checking the needle ...15 Bobbin precautions ...15 Upper thread recommendations...16 Fabric recommendations ...16 Display recommendations...16 Basic Procedures...
Users Manual - English
Page 15
...the Embroidery Area 32 Continuing to the embroidering screen ...32 Upper Threading ...33 Checking the needle bars and thread colors ...33 Upper threading ...35 Threading the needle ...39 Sewing the Embroidery...42 Starting embroidering ...42 Stopping embroidering...44 Checking the Thread Tension...: ...59 OTHER BASIC PROCEDURES 61 Resume the Operation Being Performed Before the Machine Was Turned OFF 62 Changing the Needle ...63 Replacing the needle...63 Correctly Using the Embroidery Frames 65 Embroidery frame types and applications ...65 Attaching Iron-On Stabilizer (Backing) to...
...the Embroidery Area 32 Continuing to the embroidering screen ...32 Upper Threading ...33 Checking the needle bars and thread colors ...33 Upper threading ...35 Threading the needle ...39 Sewing the Embroidery...42 Starting embroidering ...42 Stopping embroidering...44 Checking the Thread Tension...: ...59 OTHER BASIC PROCEDURES 61 Resume the Operation Being Performed Before the Machine Was Turned OFF 62 Changing the Needle ...63 Replacing the needle...63 Correctly Using the Embroidery Frames 65 Embroidery frame types and applications ...65 Attaching Iron-On Stabilizer (Backing) to...
Users Manual - English
Page 16
... Machine to Stop at Color Changes 92 Stopping the machine at the next color change 92 Specifying pause locations before embroidering 92 Temporary Needle Bar Setting 94 Reserved Needle Bar Settings 96 SELECTING/EDITING/SAVING PATTERNS 99 Embroidery Data Precautions 100 Selecting an Embroidery Pattern 102 General pattern selection ...102 Embroidery patterns...
... Machine to Stop at Color Changes 92 Stopping the machine at the next color change 92 Specifying pause locations before embroidering 92 Temporary Needle Bar Setting 94 Reserved Needle Bar Settings 96 SELECTING/EDITING/SAVING PATTERNS 99 Embroidery Data Precautions 100 Selecting an Embroidery Pattern 102 General pattern selection ...102 Embroidery patterns...
Users Manual - English
Page 17
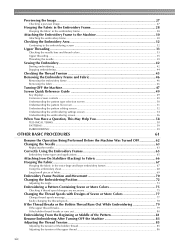
... AC adapter ...189 Winding the bobbin ...190 Maintenance...193 Cleaning the LCD...193 Cleaning the machine surface ...193 Cleaning the hook ...193 Cleaning around the needle plate...194 Cleaning the bobbin case ...195 Oiling the machine ...196 Troubleshooting ...198 On-screen troubleshooting ...198 Troubleshooting ...199 Error messages ...207 If the LCD...
... AC adapter ...189 Winding the bobbin ...190 Maintenance...193 Cleaning the LCD...193 Cleaning the machine surface ...193 Cleaning the hook ...193 Cleaning around the needle plate...194 Cleaning the bobbin case ...195 Oiling the machine ...196 Troubleshooting ...198 On-screen troubleshooting ...198 Troubleshooting ...199 Error messages ...207 If the LCD...
Users Manual - English
Page 19
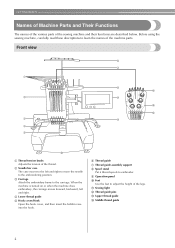
... or when the machine does embroidery, the carriage moves forward, backward, left and right to move the needle to the embroidering position. 3 Carriage Attach the embroidery frame to adjust the height of the thread. 2 Needle bar case The case moves to the left and right. 4 Lower thread guide 5 Hook cover/Hook Open...
... or when the machine does embroidery, the carriage moves forward, backward, left and right to move the needle to the embroidering position. 3 Carriage Attach the embroidery frame to adjust the height of the thread. 2 Needle bar case The case moves to the left and right. 4 Lower thread guide 5 Hook cover/Hook Open...

Users Manual - English
Page 20
... turned off 4 2 Thread trimming button Press the thread trimming button to trim both the upper and the bobbin threads. 3 Automatic needle-threading button Press the automatic needle threading button to thread the needle. 4 LCD (touch panel) Touch the keys that appear on the power supply cord into the USB Type "B" (function) port connector...
... turned off 4 2 Thread trimming button Press the thread trimming button to trim both the upper and the bobbin threads. 3 Automatic needle-threading button Press the automatic needle threading button to thread the needle. 4 LCD (touch panel) Touch the keys that appear on the power supply cord into the USB Type "B" (function) port connector...

Users Manual - English
Page 21
...22. 23. 24. 25. 26. 27. 28. 29. 30. 31. 32 No. Part Name Model Name Parts Code 1 Accessory case XC6482-051 2 Needle set (2 pcs.) PRHA1BR11 XC6469-001 3 Prewound bobbin (6 pcs.) XC6368-051 4 Spool net (6 pcs.) S34455-000 5 Seam ripper X54243-051 6 Scissors ...XC1807-121 7 Tweezers XC6542-051 8 Touch pen XA9940-051 9 Needle changing tool (Threader) XC4957-051 10 Needle plate spacer XC6499-151 11 Phillips screwdriver XC6543-051 12 Standard screwdriver X55468-051 13 Allen screwdriver XC5159-051 14 Offset...
...22. 23. 24. 25. 26. 27. 28. 29. 30. 31. 32 No. Part Name Model Name Parts Code 1 Accessory case XC6482-051 2 Needle set (2 pcs.) PRHA1BR11 XC6469-001 3 Prewound bobbin (6 pcs.) XC6368-051 4 Spool net (6 pcs.) S34455-000 5 Seam ripper X54243-051 6 Scissors ...XC1807-121 7 Tweezers XC6542-051 8 Touch pen XA9940-051 9 Needle changing tool (Threader) XC4957-051 10 Needle plate spacer XC6499-151 11 Phillips screwdriver XC6543-051 12 Standard screwdriver X55468-051 13 Allen screwdriver XC5159-051 14 Offset...
Users Manual - English
Page 32
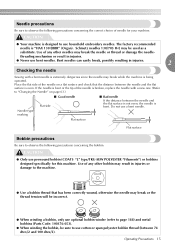
... "Filaments") or bobbins designed specifically for your machine. Use of the needle is broken, replace the needle with a bent needle is extremely dangerous since the needle may break while the machine is bent. If the needle is bent or the tip of any other bobbin may be sure to... use optional bobbin winder (refer to observe the following precautions concerning the correct choice of needle for this machine. Operating Precautions 15 The factory recommended needle is even. Flat surface Flat surface Bobbin precautions Be sure to page 188) and metal bobbins (Parts...
... "Filaments") or bobbins designed specifically for your machine. Use of the needle is broken, replace the needle with a bent needle is extremely dangerous since the needle may break while the machine is bent. If the needle is bent or the tip of any other bobbin may be sure to... use optional bobbin winder (refer to observe the following precautions concerning the correct choice of needle for this machine. Operating Precautions 15 The factory recommended needle is even. Flat surface Flat surface Bobbin precautions Be sure to page 188) and metal bobbins (Parts...
Users Manual - English
Page 33
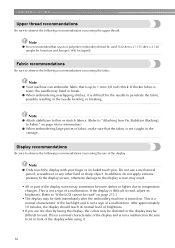
..., otherwise damage to penetrate the fabric, possibly resulting in Japan)). Note ● Your machine can embroider fabric that is difficult for the needle to the display screen may result. • All or part of the display screen may be dark immediately after the embroidery machine is ...due to observe the following recommendations concerning the upper thread. If thicker fabric is sewn, the needle may be used (120 den x 2 / 135 dtex x 2 / 40 weight (in Americas and Europe) / #50 (in the needle bending or breaking. This is not a malfunction. Note ● Only touch the display with...
..., otherwise damage to penetrate the fabric, possibly resulting in Japan)). Note ● Your machine can embroider fabric that is difficult for the needle to the display screen may result. • All or part of the display screen may be dark immediately after the embroidery machine is ...due to observe the following recommendations concerning the upper thread. If thicker fabric is sewn, the needle may be used (120 den x 2 / 135 dtex x 2 / 40 weight (in Americas and Europe) / #50 (in the needle bending or breaking. This is not a malfunction. Note ● Only touch the display with...
Users Manual - English
Page 37
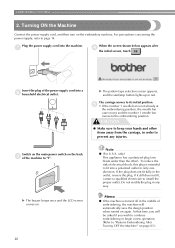
...outlet. Plug the power supply cord into a 2 household electrical outlet. The carriage moves to its initial position. 5 • If the number 1 needle bar is intended to "Resume Embroidering After Turning OFF the Machine" on page 83.) 20 X The buzzer beeps once and the LCD screen comes on...to fit into a polarized outlet in the middle of electrical shock, this plug is not already at the embroidering position, the needle bar case moves and the number 1 needle bar moves to "I". X The pattern type selection screen appears, and the start/stop button lights up in the outlet, reverse...
...outlet. Plug the power supply cord into a 2 household electrical outlet. The carriage moves to its initial position. 5 • If the number 1 needle bar is intended to "Resume Embroidering After Turning OFF the Machine" on page 83.) 20 X The buzzer beeps once and the LCD screen comes on...to fit into a polarized outlet in the middle of electrical shock, this plug is not already at the embroidering position, the needle bar case moves and the number 1 needle bar moves to "I". X The pattern type selection screen appears, and the start/stop button lights up in the outlet, reverse...
Users Manual - English
Page 39
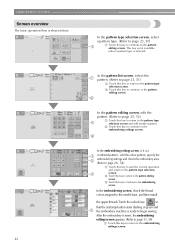
This key is not available unless a pattern type is shown below. In the embroidering screen, check the thread colors assigned to the needle bars, and then install the upper threads.Touch the unlock key so that the start/stop button starts flashing in green and the embroidery machine ...
This key is not available unless a pattern type is shown below. In the embroidering screen, check the thread colors assigned to the needle bars, and then install the upper threads.Touch the unlock key so that the start/stop button starts flashing in green and the embroidery machine ...
Users Manual - English
Page 50
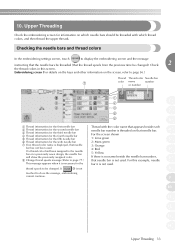
...is displayed, that the thread spools from the previous time be threaded with the color name that appears beside each needle bar number is threaded on a previously sewn design, the needle bar 4: Red 5: Yellow 6 will show the previously assigned color. 8 Change thread spools message (Refer to ... thread spools to display the embroidering screen and the message instructing that the needle bars be changed ). Checking the needle bars and thread colors In the embroidering settings screen, touch to be threaded (that needle 3: Orange bar has not been used . If a thread color had ...
...is displayed, that the thread spools from the previous time be threaded with the color name that appears beside each needle bar number is threaded on a previously sewn design, the needle bar 4: Red 5: Yellow 6 will show the previously assigned color. 8 Change thread spools message (Refer to ... thread spools to display the embroidering screen and the message instructing that the needle bars be changed ). Checking the needle bars and thread colors In the embroidering settings screen, touch to be threaded (that needle 3: Orange bar has not been used . If a thread color had ...

Users Manual - English
Page 51
...result. 34 CAUTION ● When (unlock key) in the embroidering screen is touched, the start/stop button. Use when threading the needle with the automatic needle-threading mechanism. 5 Use these keys to specify various embroidering settings or to return to the embroidering settings screen. 6 To start the machine..., touch this key to unlock the machine, and then press the start sewing. If the upper threading is being performed or the needle is being threaded, be changed is assigned. 3 Shows the number of thread color changes, the number of stitches, the embroidering time and...
...result. 34 CAUTION ● When (unlock key) in the embroidering screen is touched, the start/stop button. Use when threading the needle with the automatic needle-threading mechanism. 5 Use these keys to specify various embroidering settings or to return to the embroidering settings screen. 6 To start the machine..., touch this key to unlock the machine, and then press the start sewing. If the upper threading is being performed or the needle is being threaded, be changed is assigned. 3 Shows the number of thread color changes, the number of stitches, the embroidering time and...
Users Manual - English
Page 52
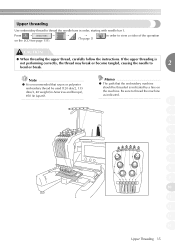
...● The path that rayon or polyester embroidery thread be threaded is not performing correctly, the thread may break or become tangled, causing the needle to view a video of the operation CAUTION ● When threading the upper thread, carefully follow the instructions. If the upper threading is indicated...line on the LCD (see page 151). → → (To page 3) in order to 2 bend or break. Be sure to thread the needle bars in Japan)). Note ● It is recommended that the embroidery machine should be used (120 den/2, 135 dtex/2, 40 weight (in Americas and Europe...
...● The path that rayon or polyester embroidery thread be threaded is not performing correctly, the thread may break or become tangled, causing the needle to view a video of the operation CAUTION ● When threading the upper thread, carefully follow the instructions. If the upper threading is indicated...line on the LCD (see page 151). → → (To page 3) in order to 2 bend or break. Be sure to thread the needle bars in Japan)). Note ● It is recommended that the embroidery machine should be used (120 den/2, 135 dtex/2, 40 weight (in Americas and Europe...


