

Users Manual - English
Page 1
EMBROIDERY MACHINE PR-620 OPERATION MANUAL
EMBROIDERY MACHINE PR-620 OPERATION MANUAL
Users Manual - English
Page 5
... cord when: • Operation is required, first follow the troubleshooting table at www.brother.com iv For a longer service life 1. Use only neutral soaps or detergents to keep your local authorized Brother dealer. To fully enjoy all the features available, we suggest that you study the ...sewing. For additional product information and updates, visit our web site at the back of the most advanced computerized household embroidery machines. Do not drop or hit the machine. 4. PLEASE READ BEFORE USING THIS MACHINE For safe operation 1. up lever, needle, or other hot objects. 2.
... cord when: • Operation is required, first follow the troubleshooting table at www.brother.com iv For a longer service life 1. Use only neutral soaps or detergents to keep your local authorized Brother dealer. To fully enjoy all the features available, we suggest that you study the ...sewing. For additional product information and updates, visit our web site at the back of the most advanced computerized household embroidery machines. Do not drop or hit the machine. 4. PLEASE READ BEFORE USING THIS MACHINE For safe operation 1. up lever, needle, or other hot objects. 2.
Users Manual - English
Page 6
... CONTENT included in this agreement constitutes a waiver of the rights of BROTHER under the terms and conditions of this package. Please direct all inquiries concerning this Agreement in combination with an embroidery machine to create embroidery. • Use the CONTENT in writing by the laws of Japan... not used on more than one embroidery machine at any one copy of the CONTENT to be governed by regular mail, to Brother Industries, Ltd., 1-1-1 Kawagishi, Mizuho-ku, Nagoya 467-8562, Japan, Attention: P&H company Sales and Marketing Dept. BROTHER retains ownership of all rights not ...
... CONTENT included in this agreement constitutes a waiver of the rights of BROTHER under the terms and conditions of this package. Please direct all inquiries concerning this Agreement in combination with an embroidery machine to create embroidery. • Use the CONTENT in writing by the laws of Japan... not used on more than one embroidery machine at any one copy of the CONTENT to be governed by regular mail, to Brother Industries, Ltd., 1-1-1 Kawagishi, Mizuho-ku, Nagoya 467-8562, Japan, Attention: P&H company Sales and Marketing Dept. BROTHER retains ownership of all rights not ...
Users Manual - English
Page 8
... fluctuations, or strong magnetic forces (such as with water, solvents, drinks or any other than our original embroidery cards are used, the embroidery machine may not be exposed to vibrations or impacts, and do not attempt to remove the USB media from the...• Do not use only recommended embroidery cards. • Some licensed or copyright embroidery cards cannot be used with this embroidery machine. • Embroidery cards sold overseas cannot be used with this machine. vii Be sure to remove the embroidery card from the machine. • Some USB media may not...
... fluctuations, or strong magnetic forces (such as with water, solvents, drinks or any other than our original embroidery cards are used, the embroidery machine may not be exposed to vibrations or impacts, and do not attempt to remove the USB media from the...• Do not use only recommended embroidery cards. • Some licensed or copyright embroidery cards cannot be used with this embroidery machine. • Embroidery cards sold overseas cannot be used with this machine. vii Be sure to remove the embroidery card from the machine. • Some USB media may not...
Users Manual - English
Page 13
...Chapter 4: Embroidering Settings This chapter contains descriptions on the LCD will be taken when a problem occurs. Details on changing the basic embroidery machine settings and viewing operations on the various embroidering settings, which make editing patterns simple. For details, refer to sew are described ...constructed as when sewing a pattern with a help key. Learning how to use Chapter 1: Getting Ready The setup of the embroidery machine and the various preparations required before starting to the page that is equipped with seven or more colors, and other information that...
...Chapter 4: Embroidering Settings This chapter contains descriptions on the LCD will be taken when a problem occurs. Details on changing the basic embroidery machine settings and viewing operations on the various embroidering settings, which make editing patterns simple. For details, refer to sew are described ...constructed as when sewing a pattern with a help key. Learning how to use Chapter 1: Getting Ready The setup of the embroidery machine and the various preparations required before starting to the page that is equipped with seven or more colors, and other information that...
Users Manual - English
Page 17
... Threads ...164 Stabilizers (Backing) ...165 Hooping Techniques...166 Fabric/stabilizer compatibility chart ...167 OPTIONAL ACCESSORIES Attaching an optional embroidery frame for industrial embroidery machines 168 Using the Optional Cap Frame 169 Cap frame and its accessories...169 Types of caps ...170 Fabric precautions...171 Preparing to use the cap ...
... Threads ...164 Stabilizers (Backing) ...165 Hooping Techniques...166 Fabric/stabilizer compatibility chart ...167 OPTIONAL ACCESSORIES Attaching an optional embroidery frame for industrial embroidery machines 168 Using the Optional Cap Frame 169 Cap frame and its accessories...169 Types of caps ...170 Fabric precautions...171 Preparing to use the cap ...
Users Manual - English
Page 18
... and transporting precautions / 6 Setup location / 7 Setting up . Names of the machine and the various preparations required before starting to "Included Accessories" on page 4, and check that all listed accessories are included, the embroidery machine can be set up the machine / 8 Adjusting the operation panel position / 9 Preparing the thread guide assembly / 10 Positioning the spool...
... and transporting precautions / 6 Setup location / 7 Setting up . Names of the machine and the various preparations required before starting to "Included Accessories" on page 4, and check that all listed accessories are included, the embroidery machine can be set up the machine / 8 Adjusting the operation panel position / 9 Preparing the thread guide assembly / 10 Positioning the spool...
Users Manual - English
Page 22
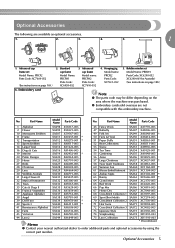
...Model name: PRCFH2 Parts Code: XC7610-052 4. Hooping jig Model name: PRCFJ2 Parts Code: XC7611-052 5. Optional Accessories The following are not compatible with this embroidery machine. Part Name Model Name Parts Code 1 Alphabet SA298 X58317-003 45 Fancy Work SA345 XA7770-003 2 Flower SA299 X58321-003 47 Butterfly SA347 XA8206-003... may be differ depending on page 169.) 6. Bobbin winder set Model Name: PRCF2 Parts Code: XC7609-052 (See instructions on the area where the machine was purchased. ● Embroidery cards sold overseas are available as optional accessories...
...Model name: PRCFH2 Parts Code: XC7610-052 4. Hooping jig Model name: PRCFJ2 Parts Code: XC7611-052 5. Optional Accessories The following are not compatible with this embroidery machine. Part Name Model Name Parts Code 1 Alphabet SA298 X58317-003 45 Fancy Work SA345 XA7770-003 2 Flower SA299 X58321-003 47 Butterfly SA347 XA8206-003... may be differ depending on page 169.) 6. Bobbin winder set Model Name: PRCF2 Parts Code: XC7609-052 (See instructions on the area where the machine was purchased. ● Embroidery cards sold overseas are available as optional accessories...
Users Manual - English
Page 23
... sewing stand is approximately 37 kg (81 Ibs.). Do not put anything under the embroidery machine that the machine is either too cold or too hot, the machine may malfunction. ● Do not use the machine in a location where it from the bottom at the bottom toward the back and do...the power supply cord. Keep the oil and grease out of the reach of the embroidery machine should be sewn correctly. If the machine is accidentally pressed and the machine starts sewing. ● When lubricating the machine, wear protective eyeglasses and gloves to prevent the oil or grease from any other ...
... sewing stand is approximately 37 kg (81 Ibs.). Do not put anything under the embroidery machine that the machine is either too cold or too hot, the machine may malfunction. ● Do not use the machine in a location where it from the bottom at the bottom toward the back and do...the power supply cord. Keep the oil and grease out of the reach of the embroidery machine should be sewn correctly. If the machine is accidentally pressed and the machine starts sewing. ● When lubricating the machine, wear protective eyeglasses and gloves to prevent the oil or grease from any other ...
Users Manual - English
Page 30
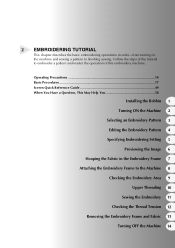
... the Embroidery 11 Checking the Thread Tension 12 Removing the Embroidery Frame and Fabric 13 Turning OFF the Machine 14 2 EMBROIDERING TUTORIAL This chapter describes the basic embroidering operations in the Embroidery Frame 7 Attaching the Embroidery Frame to finishing sewing. Follow the steps of the tutorial to embroider a pattern and master the operation of this embroidery machine.
... the Embroidery 11 Checking the Thread Tension 12 Removing the Embroidery Frame and Fabric 13 Turning OFF the Machine 14 2 EMBROIDERING TUTORIAL This chapter describes the basic embroidering operations in the Embroidery Frame 7 Attaching the Embroidery Frame to finishing sewing. Follow the steps of the tutorial to embroider a pattern and master the operation of this embroidery machine.
Users Manual - English
Page 31
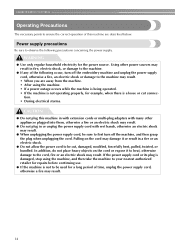
Power supply precautions Be sure to observe the following occur, turn off the embroidery machine and unplug the power supply cord, otherwise a fire, an electric shock or damage to the machine may result. • When you are described below. WARNING ● Use only regular household ...to be cut connection. • During electrical storms. CAUTION ● Do not plug this machine are away from the machine. • After using the machine, and then take the machine to your nearest authorized retailer for a long period of the following precautions concerning the power supply...
Power supply precautions Be sure to observe the following occur, turn off the embroidery machine and unplug the power supply cord, otherwise a fire, an electric shock or damage to the machine may result. • When you are described below. WARNING ● Use only regular household ...to be cut connection. • During electrical storms. CAUTION ● Do not plug this machine are away from the machine. • After using the machine, and then take the machine to your nearest authorized retailer for a long period of the following precautions concerning the power supply...
Users Manual - English
Page 33
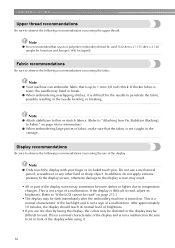
... should reach its brightness. (Refer to sit in the needle bending or breaking. Be sure to "If the LCD cannot be read . Note ● Your machine can embroider fabric that the fabric is not caught in Japan)). Note ● Attach stabilizers to thin or stretch fabrics. (Refer to "Attaching Iron-On... the display screen, otherwise damage to the display screen may result. • All or part of the display screen may be dark immediately after the embroidery machine is difficult to 1 mm (3/8 inch) thick. This is not a malfunction. Note ● It is recommended that rayon or polyester...
... should reach its brightness. (Refer to sit in the needle bending or breaking. Be sure to "If the LCD cannot be read . Note ● Your machine can embroider fabric that the fabric is not caught in Japan)). Note ● Attach stabilizers to thin or stretch fabrics. (Refer to "Attaching Iron-On... the display screen, otherwise damage to the display screen may result. • All or part of the display screen may be dark immediately after the embroidery machine is difficult to 1 mm (3/8 inch) thick. This is not a malfunction. Note ● It is recommended that rayon or polyester...
Users Manual - English
Page 34
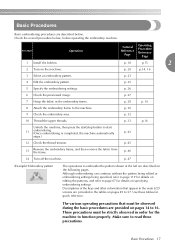
...these precautions. Basic Procedures Basic embroidering procedures are described below , before operating the embroidery machine. p. 23 4 Edit the embroidery pattern. p. 46 14 Turn off the machine. p. 28 p. 16 8 Attach the embroidery frame to embroider the pattern shown at the left are described on the following ...pages. p. 47 (Example) Embroidery pattern The operations to the machine. Check the overall procedure below . p. 33 p.16 Unlock the machine, then press the start/stop button to function properly. Descriptions of the...
...these precautions. Basic Procedures Basic embroidering procedures are described below , before operating the embroidery machine. p. 23 4 Edit the embroidery pattern. p. 46 14 Turn off the machine. p. 28 p. 16 8 Attach the embroidery frame to embroider the pattern shown at the left are described on the following ...pages. p. 47 (Example) Embroidery pattern The operations to the machine. Check the overall procedure below . p. 33 p.16 Unlock the machine, then press the start/stop button to function properly. Descriptions of the...
Users Manual - English
Page 36
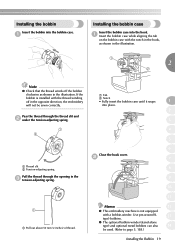
...under the tension-adjusting spring. 1 2 1 Thread slit 2 Tension-adjusting spring Pull the thread through the opening in the opposite direction, the embroidery will not be used. (Refer to page 5, 188.) Installing the Bobbin 19 Use pre-wound (L 13 type) bobbins. ● The optional...Installing the bobbin case Insert the bobbin case into place. 2 3 4 5 6 Close the hook cover. 2 7 8 9 10 11 Memo 12 ● This embroidery machine is installed with the thread winding off in the 3 tension-adjusting spring. 1 1 Pull out about 50 mm (2 inches) of thread. 1 Tab 2 Notch •...
...under the tension-adjusting spring. 1 2 1 Thread slit 2 Tension-adjusting spring Pull the thread through the opening in the opposite direction, the embroidery will not be used. (Refer to page 5, 188.) Installing the Bobbin 19 Use pre-wound (L 13 type) bobbins. ● The optional...Installing the bobbin case Insert the bobbin case into place. 2 3 4 5 6 Close the hook cover. 2 7 8 9 10 11 Memo 12 ● This embroidery machine is installed with the thread winding off in the 3 tension-adjusting spring. 1 1 Pull out about 50 mm (2 inches) of thread. 1 Tab 2 Notch •...
Users Manual - English
Page 37
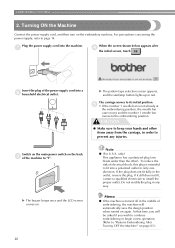
... "I". If the plug does not fit fully in red. X The buzzer beeps once and the LCD screen comes on the embroidery machine. Note ● (For U.S.A. If it still does not fit, contact a qualified electrician to the embroidering position. For precautions concerning the power supply,...in order to page 14. Plug the power supply cord into a 2 household electrical outlet. To reduce the risk of the power supply cord into the machine. 1 When the screen shown below appears after 4 the initial screen, touch . At that time, you wish to continue embroidering or begin a new ...
... "I". If the plug does not fit fully in red. X The buzzer beeps once and the LCD screen comes on the embroidery machine. Note ● (For U.S.A. If it still does not fit, contact a qualified electrician to the embroidering position. For precautions concerning the power supply,...in order to page 14. Plug the power supply cord into a 2 household electrical outlet. To reduce the risk of the power supply cord into the machine. 1 When the screen shown below appears after 4 the initial screen, touch . At that time, you wish to continue embroidering or begin a new ...
Users Manual - English
Page 38
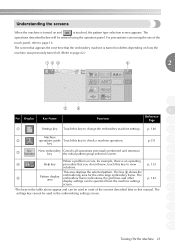
... the selected pattern. The screen that appears the next time that you do not know, touch this key to change the embroidery machine settings. key p.151 5 3 New embroidery Cancels all operations previously performed and returns to key the initial pattern group selection screen. 6 7 When a problem occurs, for... 6 shows the 5 Pattern display area embroidering area for example, there is an operating 4 Help key procedure that the embroidery machine is turned on differs depending on and is touched, the pattern type selection screen appears. Understanding the screens When the...
... the selected pattern. The screen that appears the next time that you do not know, touch this key to change the embroidery machine settings. key p.151 5 3 New embroidery Cancels all operations previously performed and returns to key the initial pattern group selection screen. 6 7 When a problem occurs, for... 6 shows the 5 Pattern display area embroidering area for example, there is an operating 4 Help key procedure that the embroidery machine is turned on differs depending on and is touched, the pattern type selection screen appears. Understanding the screens When the...
Users Manual - English
Page 39
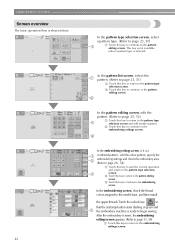
... pattern editing screen. In the embroidering settings screen, if it is a combined pattern , edit the entire pattern, specify the embroidering settings and check the embroidery area. (Refer to page 26, 54) 1 Touch this key to quit the current operation and return to the pattern type selection screen. 2 Touch ... the needle bars, and then install the upper threads.Touch the unlock key so that the start/stop button starts flashing in green and the embroidery machine is sewn, the embroidering settings screen appears. (Refer to page 33, 56) 1 Touch this key to return to begin sewing. This key is...
... pattern editing screen. In the embroidering settings screen, if it is a combined pattern , edit the entire pattern, specify the embroidering settings and check the embroidery area. (Refer to page 26, 54) 1 Touch this key to quit the current operation and return to the pattern type selection screen. 2 Touch ... the needle bars, and then install the upper threads.Touch the unlock key so that the start/stop button starts flashing in green and the embroidery machine is sewn, the embroidering settings screen appears. (Refer to page 33, 56) 1 Touch this key to return to begin sewing. This key is...
Users Manual - English
Page 46
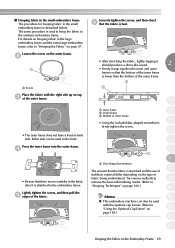
... and the use of stabilizer material differ depending on page 166.) 10 Memo 11 ● This embroidery machine can be used with the right side up on hooping fabric in the medium embroidery frame. For details on top 3 of the fabric. Lightly tighten the screw, and then pull...• After stretching the fabric, lightly tapping it is stretched in the small embroidery frame is used as the front. ■ Hooping fabric in the small embroidery frame The procedure for hooping fabric in the embroidery frame. Try various methods to 9 achieve the best embroidering results. (Refer to...
... and the use of stabilizer material differ depending on page 166.) 10 Memo 11 ● This embroidery machine can be used with the right side up on hooping fabric in the medium embroidery frame. For details on top 3 of the fabric. Lightly tighten the screw, and then pull...• After stretching the fabric, lightly tapping it is stretched in the small embroidery frame is used as the front. ■ Hooping fabric in the small embroidery frame The procedure for hooping fabric in the embroidery frame. Try various methods to 9 achieve the best embroidering results. (Refer to...
Users Manual - English
Page 47
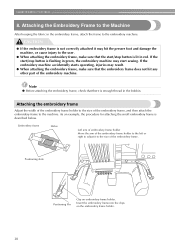
... button is described below. If the embroidery machine accidentally starts operating, injuries may result. ● When attaching the embroidery frame, make sure that there is flashing in the embroidery frame, attach the frame to the embroidery machine. Embroidery frame Holes Left arm of embroidery frame holder Move the arm of the embroidery frame holder to the left or right...
... button is described below. If the embroidery machine accidentally starts operating, injuries may result. ● When attaching the embroidery frame, make sure that there is flashing in the embroidery frame, attach the frame to the embroidery machine. Embroidery frame Holes Left arm of embroidery frame holder Move the arm of the embroidery frame holder to the left or right...

Users Manual - English
Page 48
... 4 ● Incorrect frame positioning. 543 2 1 5 6 6 7 1 Mark for extra-large embroidery frame 2 Mark for large embroidery frame 3 Mark for medium embroidery frame 4 Mark for embroidery frame for industrial embroidery machines (When using embroidery frames for industrial embroidery machines, THE MACHINE DOES NOT RECOGNIZE THE SEWING AREA OF THE FRAME. Attaching the Embroidery Frame to check that the pins on the left arm...
... 4 ● Incorrect frame positioning. 543 2 1 5 6 6 7 1 Mark for extra-large embroidery frame 2 Mark for large embroidery frame 3 Mark for medium embroidery frame 4 Mark for embroidery frame for industrial embroidery machines (When using embroidery frames for industrial embroidery machines, THE MACHINE DOES NOT RECOGNIZE THE SEWING AREA OF THE FRAME. Attaching the Embroidery Frame to check that the pins on the left arm...


