
Users Manual - English
Page 8
... be exposed to vibrations or impacts, and do not attempt to remove the USB media from the machine. • Store embroidery cards in their protective cases. • If an embroidery card other liquids. • Do not use or store the embroidery cards in the display or while the embroidery machine is...
... be exposed to vibrations or impacts, and do not attempt to remove the USB media from the machine. • Store embroidery cards in their protective cases. • If an embroidery card other liquids. • Do not use or store the embroidery cards in the display or while the embroidery machine is...
Users Manual - English
Page 9
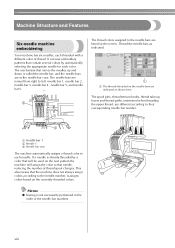
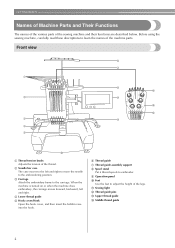
... and down is called the needle bar, and the needle bars are different according to their corresponding needle bar number. 2 1 Needle bar 1 2 Needle 1 3 Needle bar case The machine automatically assigns a thread color to that moves the needles up levers and thread paths, mentioned when threading the upper thread, are in the... colors based on the next pattern the machine will assign the color to each color. If a needle is not necessarily performed in the needle bar case.
... and down is called the needle bar, and the needle bars are different according to their corresponding needle bar number. 2 1 Needle bar 1 2 Needle 1 3 Needle bar case The machine automatically assigns a thread color to that moves the needles up levers and thread paths, mentioned when threading the upper thread, are in the... colors based on the next pattern the machine will assign the color to each color. If a needle is not necessarily performed in the needle bar case.
Users Manual - English
Page 10
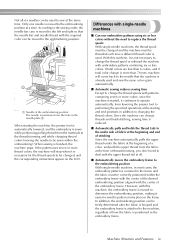
...embroidery patterns containing six or less colors. When starting and end positions in addition to the embroidering position With single-needle machine, in most cases, the embroidery pattern is positioned over the hole in the embroidery frame. When sewing is moved to the machine, regardless of thread trimming... must be threaded each time a different thread color is positioned in the needle plate 2. According to the sewing order, the needle bar case is moved to the left and right so that the machine is already used and sew the same color again automatically. ■ Automatic ...
...embroidery patterns containing six or less colors. When starting and end positions in addition to the embroidering position With single-needle machine, in most cases, the embroidery pattern is positioned over the hole in the embroidery frame. When sewing is moved to the machine, regardless of thread trimming... must be threaded each time a different thread color is positioned in the needle plate 2. According to the sewing order, the needle bar case is moved to the left and right so that the machine is already used and sew the same color again automatically. ■ Automatic ...
Users Manual - English
Page 14
... ...15 Upper thread recommendations...16 Fabric recommendations ...16 Display recommendations...16 Basic Procedures ...17 Installing the Bobbin ...18 Removing the bobbin case ...18 Installing the bobbin ...19 Installing the bobbin case...19 Turning ON the Machine 20 Understanding the screens ...21 Screen overview...22 Selecting an Embroidery Pattern 23 Selecting an embroidery...
... ...15 Upper thread recommendations...16 Fabric recommendations ...16 Display recommendations...16 Basic Procedures ...17 Installing the Bobbin ...18 Removing the bobbin case ...18 Installing the bobbin ...19 Installing the bobbin case...19 Turning ON the Machine 20 Understanding the screens ...21 Screen overview...22 Selecting an Embroidery Pattern 23 Selecting an embroidery...
Users Manual - English
Page 17
... ...190 Maintenance...193 Cleaning the LCD...193 Cleaning the machine surface ...193 Cleaning the hook ...193 Cleaning around the needle plate...194 Cleaning the bobbin case ...195 Oiling the machine ...196 Troubleshooting ...198 On-screen troubleshooting ...198 Troubleshooting ...199 Error messages ...207 If the LCD cannot be read ...213 If the...
... ...190 Maintenance...193 Cleaning the LCD...193 Cleaning the machine surface ...193 Cleaning the hook ...193 Cleaning around the needle plate...194 Cleaning the bobbin case ...195 Oiling the machine ...196 Troubleshooting ...198 On-screen troubleshooting ...198 Troubleshooting ...199 Error messages ...207 If the LCD cannot be read ...213 If the...
Users Manual - English
Page 19
... to the left and right. 4 Lower thread guide 5 Hook cover/Hook Open the hook cover, and then insert the bobbin case into the hook. 6 Thread guide 7 Thread guide assembly support 8 Spool stand Put 6 thread spools to embroider. 9 Operation panel 0 Feet Use the feet to the carriage. ...
... to the left and right. 4 Lower thread guide 5 Hook cover/Hook Open the hook cover, and then insert the bobbin case into the hook. 6 Thread guide 7 Thread guide assembly support 8 Spool stand Put 6 thread spools to embroider. 9 Operation panel 0 Feet Use the feet to the carriage. ...

Users Manual - English
Page 21
.... 26. 27. 28. 29. 30. 31. 32 No. If any item is missing or damaged, contact your retailer. Part Name Model Name Parts Code 1 Accessory case XC6482-051 2 Needle set (2 pcs.) PRHA1BR11 XC6469-001 3 Prewound bobbin (6 pcs.) XC6368-051 4 Spool net (6 pcs.) S34455-000 5 Seam ripper X54243-051 6 Scissors XC1807-121...
.... 26. 27. 28. 29. 30. 31. 32 No. If any item is missing or damaged, contact your retailer. Part Name Model Name Parts Code 1 Accessory case XC6482-051 2 Needle set (2 pcs.) PRHA1BR11 XC6469-001 3 Prewound bobbin (6 pcs.) XC6368-051 4 Spool net (6 pcs.) S34455-000 5 Seam ripper X54243-051 6 Scissors XC1807-121...
Users Manual - English
Page 35
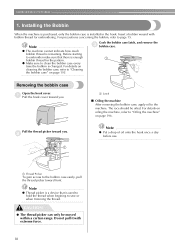
...or when trimming the thread. Insert a bobbin wound with extreme force. 18 For details on page 195. Grab the bobbin case latch, and remove the 3 bobbin case. 1 Removing the bobbin case Open the hook cover. 1 Pull the hook cover toward front. The race should be moved within a certain range. ...CAUTION ● The thread picker can only be oiled. For precautions concerning the bobbin, refer to "Cleaning the bobbin case" on cleaning the bobbin case, refer to page 15. Note ● Thread picker is a device that there is changed. Note ● Put a drop of oil...
...or when trimming the thread. Insert a bobbin wound with extreme force. 18 For details on page 195. Grab the bobbin case latch, and remove the 3 bobbin case. 1 Removing the bobbin case Open the hook cover. 1 Pull the hook cover toward front. The race should be moved within a certain range. ...CAUTION ● The thread picker can only be oiled. For precautions concerning the bobbin, refer to "Cleaning the bobbin case" on cleaning the bobbin case, refer to page 15. Note ● Thread picker is a device that there is changed. Note ● Put a drop of oil...
Users Manual - English
Page 36
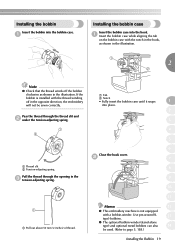
Installing the bobbin Insert the bobbin into the bobbin case. 1 Installing the bobbin case Insert the bobbin case into place. 2 3 4 5 6 Close the hook cover. 2 7 8 9 10 11 Memo 12 ● This embroidery machine is installed with the notch in the hook, as shown ... spring. 1 1 Pull out about 50 mm (2 inches) of thread. 1 Tab 2 Notch • Fully insert the bobbin case until it snaps 1 into the hook. 1 Insert the bobbin case while aligning the tab on the bobbin case with the thread winding off the bobbin clockwise as shown in the opposite direction, the embroidery will...
Installing the bobbin Insert the bobbin into the bobbin case. 1 Installing the bobbin case Insert the bobbin case into place. 2 3 4 5 6 Close the hook cover. 2 7 8 9 10 11 Memo 12 ● This embroidery machine is installed with the notch in the hook, as shown ... spring. 1 1 Pull out about 50 mm (2 inches) of thread. 1 Tab 2 Notch • Fully insert the bobbin case until it snaps 1 into the hook. 1 Insert the bobbin case while aligning the tab on the bobbin case with the thread winding off the bobbin clockwise as shown in the opposite direction, the embroidery will...
Users Manual - English
Page 37
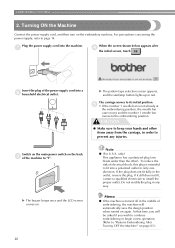
... ● (For U.S.A. The carriage moves to its initial position. 5 • If the number 1 needle bar is not already at the embroidering position, the needle bar case moves and the number 1 needle bar moves to page 14. only) This appliance has a polarized plug (one direction. To reduce the risk of the machine...
... ● (For U.S.A. The carriage moves to its initial position. 5 • If the number 1 needle bar is not already at the embroidering position, the needle bar case moves and the number 1 needle bar moves to page 14. only) This appliance has a polarized plug (one direction. To reduce the risk of the machine...
Users Manual - English
Page 59
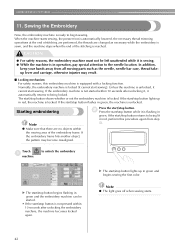
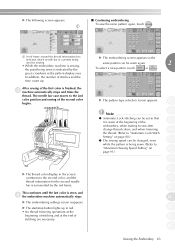
... after unlocking the embroidery machine, the machine becomes locked again. Starting embroidering Note ● Make sure that there are changed as the needle, needle bar case, thread takeup lever and carriage, otherwise injuries may become misaligned. Note ● The light goes off when sewing starts. 42 In addition, keep your hands...
... after unlocking the embroidery machine, the machine becomes locked again. Starting embroidering Note ● Make sure that there are changed as the needle, needle bar case, thread takeup lever and carriage, otherwise injuries may become misaligned. Note ● The light goes off when sewing starts. 42 In addition, keep your hands...
Users Manual - English
Page 60
... Lock Stitch Setting" on 6 page 91.) 7 8 9 10 11 12 13 14 Sewing the Embroidery 43 After sewing of the second color begins. The needle bar case moves to "Maximum Sewing Speed Setting" on page 88.) ● The sewing speed can be changed, even 5 while the pattern is being sewn is indicated...
... Lock Stitch Setting" on 6 page 91.) 7 8 9 10 11 12 13 14 Sewing the Embroidery 43 After sewing of the second color begins. The needle bar case moves to "Maximum Sewing Speed Setting" on page 88.) ● The sewing speed can be changed, even 5 while the pattern is being sewn is indicated...
Users Manual - English
Page 75
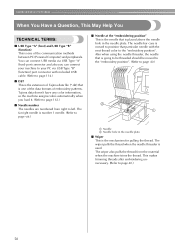
... needle is number 1 needle. (Refer to page 114.) ■ DST This is the extension of Tajima data file (*.dst) that is used. The needle bar case is moved to position that particular needle with included USB cable. (Refer to page viii.) ■ Needle at the "embroidering position" This is the needle...
... needle is number 1 needle. (Refer to page 114.) ■ DST This is the extension of Tajima data file (*.dst) that is used. The needle bar case is moved to position that particular needle with included USB cable. (Refer to page viii.) ■ Needle at the "embroidering position" This is the needle...

Users Manual - English
Page 87
... machine detects which embroidery frame is not actually installed. A message indicating that extend out of the embroidering 1 area of the frame In either of these cases, a message appears on page 28, the embroidery frame indicators at the correct position 2 Needle position when the embroidery frame is correctly positioned. Either replace the...
... machine detects which embroidery frame is not actually installed. A message indicating that extend out of the embroidering 1 area of the frame In either of these cases, a message appears on page 28, the embroidery frame indicators at the correct position 2 Needle position when the embroidery frame is correctly positioned. Either replace the...

Users Manual - English
Page 90
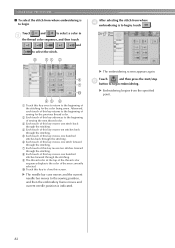
... the pattern in the embroidery frame at the center of the pattern so that it may not be checked 0 Touch this key to close this case, adjust the angle of the area where you wish to page 89.) ■ Unlocking the needle bar 3 Display the embroidering screen, and then 1 touch the...
... the pattern in the embroidery frame at the center of the pattern so that it may not be checked 0 Touch this key to close this case, adjust the angle of the area where you wish to page 89.) ■ Unlocking the needle bar 3 Display the embroidering screen, and then 1 touch the...
Users Manual - English
Page 99
... the start/stop 5 button to begin embroidering. Afterward, each touch of sewing for the color being sewn. X The embroidering screen appears again. X The needle bar case moves and the current needle bar moves to the sewing position, and then the embroidery frame moves and current needle position is to begin , touch...
... the start/stop 5 button to begin embroidering. Afterward, each touch of sewing for the color being sewn. X The embroidering screen appears again. X The needle bar case moves and the current needle bar moves to the sewing position, and then the embroidery frame moves and current needle position is to begin , touch...
Users Manual - English
Page 100
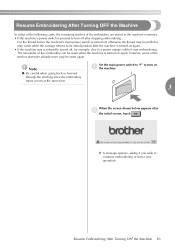
... forward through the stitching since the embroidery frame moves at the same time. Resume Embroidering After Turning OFF the Machine In either of the following cases, the remaining stitches of the stitches that were already sewn may catch when the carriage returns to its initial position after the machine is turned...
... forward through the stitching since the embroidery frame moves at the same time. Resume Embroidering After Turning OFF the Machine In either of the following cases, the remaining stitches of the stitches that were already sewn may catch when the carriage returns to its initial position after the machine is turned...
Users Manual - English
Page 102
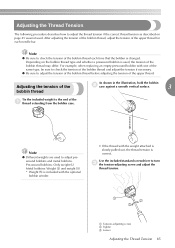
As shown in the illustration, hold the bobbin 2 case against a smooth vertical surface. 3 Note ● Different weights are used . Pre-wound bobbins: Only weight (L) Metal bobbins: Weight (L) and weight (S) * Weight (S) is included with the ... 2 Tighter 3 Looser Adjusting the Thread Tension 85 After adjusting the tension of the bobbin thread, adjust the tension of the 1 thread extending from the bobbin case.
As shown in the illustration, hold the bobbin 2 case against a smooth vertical surface. 3 Note ● Different weights are used . Pre-wound bobbins: Only weight (L) Metal bobbins: Weight (L) and weight (S) * Weight (S) is included with the ... 2 Tighter 3 Looser Adjusting the Thread Tension 85 After adjusting the tension of the bobbin thread, adjust the tension of the 1 thread extending from the bobbin case.
Users Manual - English
Page 111
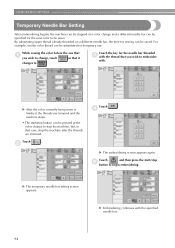
... start /stop button can be pressed at a color change and a different needle bar can be specified for the needle bar threaded 3 with the thread that case, stop the machine after the threads are trimmed and the machine stops. • The start /stop the machine, but, in that you wish to begin...
... start /stop button can be pressed at a color change and a different needle bar can be specified for the needle bar threaded 3 with the thread that case, stop the machine after the threads are trimmed and the machine stops. • The start /stop the machine, but, in that you wish to begin...
Users Manual - English
Page 117
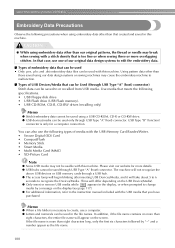
... pattern data other than our original patterns, the thread or needle may cause the embroidery machine to malfunction. ■ Types of USB Devices/Media that case, use a computer. ● Letters and numerals can be used only through a USB hub. ● The access lamp will begin blinking after inserting USB Devices/Media...
... pattern data other than our original patterns, the thread or needle may cause the embroidery machine to malfunction. ■ Types of USB Devices/Media that case, use a computer. ● Letters and numerals can be used only through a USB hub. ● The access lamp will begin blinking after inserting USB Devices/Media...


