
Accessory Catalog - English
Page 22
... REMARKS EMBROIDERY FRAME HOLDER C (for PR-1000) 14 XE7400001 TUBULAR ROUND ARM RA ASSY 15 XC7076051 SPRING,PLATE 16 XC7644051 SCREW, PAM (S/P WASHER) M3X5 17 XE7149001 TUBLAR ROUND ARM LC ASSY 18 XE7375001 SEAL 19 XE7140001 GUIDE PLATE ASSY 20 XE7152001 HOOP STAY ...B M3X8 32 XE7416001 SEAL C 33 XE2641001 BAG 280X470H 34 XD0639050 BUBBLE SHEET 300X300 1000023079 35 XE7419001 CARTON - 21 - OTHERS No. CODE NAME EMBROIDERY TABLE 1 XE7423001 POLYSTYRENE FOAM PAD CORNER 2 XE7424001 PAD 3 XE7425001 CARTON 4 XE7197001 WIDE TABLE TOP 5 XC5553051 THUMB BOLT M4 L 6 XC6459051 ...
... REMARKS EMBROIDERY FRAME HOLDER C (for PR-1000) 14 XE7400001 TUBULAR ROUND ARM RA ASSY 15 XC7076051 SPRING,PLATE 16 XC7644051 SCREW, PAM (S/P WASHER) M3X5 17 XE7149001 TUBLAR ROUND ARM LC ASSY 18 XE7375001 SEAL 19 XE7140001 GUIDE PLATE ASSY 20 XE7152001 HOOP STAY ...B M3X8 32 XE7416001 SEAL C 33 XE2641001 BAG 280X470H 34 XD0639050 BUBBLE SHEET 300X300 1000023079 35 XE7419001 CARTON - 21 - OTHERS No. CODE NAME EMBROIDERY TABLE 1 XE7423001 POLYSTYRENE FOAM PAD CORNER 2 XE7424001 PAD 3 XE7425001 CARTON 4 XE7197001 WIDE TABLE TOP 5 XC5553051 THUMB BOLT M4 L 6 XC6459051 ...
Users Manual - English
Page 10
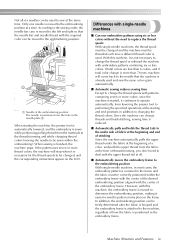
...required color can be used to sew at the thread trimming and while changing thread colors (moving the needle to be sewn within the embroidery frame with the center of the desired embroidering position aligned with the center of how the fabric is moved to the left and right ...for the thread spools to be freely determined after the fabric is hooped and the embroidery frame is attached to the machine, regardless of the embroidery frame. According to the sewing order, the needle bar case is positioned in the embroidery frame. When starting and end positions in addition to changing the ...
...required color can be used to sew at the thread trimming and while changing thread colors (moving the needle to be sewn within the embroidery frame with the center of the desired embroidering position aligned with the center of how the fabric is moved to the left and right ...for the thread spools to be freely determined after the fabric is hooped and the embroidery frame is attached to the machine, regardless of the embroidery frame. According to the sewing order, the needle bar case is positioned in the embroidery frame. When starting and end positions in addition to changing the ...
Users Manual - English
Page 15
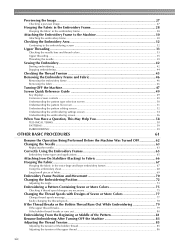
...the Image ...27 Checking a preview image ...27 Hooping the Fabric in the Embroidery Frame 28 Hooping the fabric in the embroidery frame...28 Attaching the Embroidery Frame to the Machine 30 Attaching the embroidery frame ...30 Checking the Embroidery Area 32 Continuing to the embroidering screen ...32 ... Attaching Iron-On Stabilizer (Backing) to Fabric 66 Hooping the Fabric...67 Hooping the fabric in the extra-large and large embroidery frames 67 Using the embroidery sheet...68 Large/small pieces of fabric ...69 Embroidery Frame Position and Movement 70 Changing the Embroidering Position...
...the Image ...27 Checking a preview image ...27 Hooping the Fabric in the Embroidery Frame 28 Hooping the fabric in the embroidery frame...28 Attaching the Embroidery Frame to the Machine 30 Attaching the embroidery frame ...30 Checking the Embroidery Area 32 Continuing to the embroidering screen ...32 ... Attaching Iron-On Stabilizer (Backing) to Fabric 66 Hooping the Fabric...67 Hooping the fabric in the extra-large and large embroidery frames 67 Using the embroidery sheet...68 Large/small pieces of fabric ...69 Embroidery Frame Position and Movement 70 Changing the Embroidering Position...
Users Manual - English
Page 17
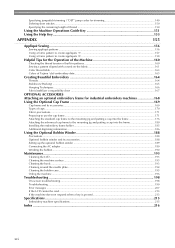
... ...163 Colors of Tajima (.dst) embroidery data ...163 Creating Beautiful Embroidery 164 Threads ...164 Stabilizers (Backing) ...165 Hooping Techniques...166 Fabric/stabilizer compatibility chart ...167 OPTIONAL ACCESSORIES Attaching an optional embroidery frame for industrial embroidery machines 168 Using the Optional Cap Frame... 176 Attaching the advanced cap frame to the mounting jig and putting a cap into the frame 180 Installing the embroidery frame holder ...185 Additional digitizing information...186 Using the Optional Bobbin Winder 188 Precautions ...188 Optional bobbin winder and...
... ...163 Colors of Tajima (.dst) embroidery data ...163 Creating Beautiful Embroidery 164 Threads ...164 Stabilizers (Backing) ...165 Hooping Techniques...166 Fabric/stabilizer compatibility chart ...167 OPTIONAL ACCESSORIES Attaching an optional embroidery frame for industrial embroidery machines 168 Using the Optional Cap Frame... 176 Attaching the advanced cap frame to the mounting jig and putting a cap into the frame 180 Installing the embroidery frame holder ...185 Additional digitizing information...186 Using the Optional Bobbin Winder 188 Precautions ...188 Optional bobbin winder and...
Users Manual - English
Page 22
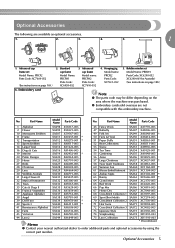
... SA375 XD1193-003 * Discontinued Memo ● Contact your nearest authorized dealer to order additional parts and optional accessories by using the correct part number. No. Embroidery card 2. Bobbin winder set Model Name: PRCF2 Parts Code: XC7609-052 (See instructions on the area where the machine was purchased. ●... Parts Code: XC6290-052 XC6290-061(for Australia) (See instructions on page 188.) Note ● The parts code may be differ depending on page 169.) 6. Hooping jig Model name: PRCFJ2 Parts Code: XC7611-052 5. Optional Accessories 5
... SA375 XD1193-003 * Discontinued Memo ● Contact your nearest authorized dealer to order additional parts and optional accessories by using the correct part number. No. Embroidery card 2. Bobbin winder set Model Name: PRCF2 Parts Code: XC7609-052 (See instructions on the area where the machine was purchased. ●... Parts Code: XC6290-052 XC6290-061(for Australia) (See instructions on page 188.) Note ● The parts code may be differ depending on page 169.) 6. Hooping jig Model name: PRCFJ2 Parts Code: XC7611-052 5. Optional Accessories 5
Users Manual - English
Page 30
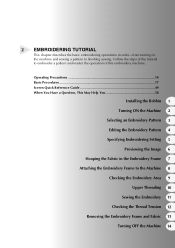
... chapter describes the basic embroidering operations in the Embroidery Frame 7 Attaching the Embroidery Frame to the Machine 8 Checking the Embroidery Area 9 Upper Threading 10 Sewing the Embroidery 11 Checking the Thread Tension 12 Removing the Embroidery Frame and Fabric 13 Turning OFF the Machine ..., This May Help You 58 Installing the Bobbin 1 Turning ON the Machine 2 Selecting an Embroidery Pattern 3 Editing the Embroidery Pattern 4 Specifying Embroidering Setting 5 Previewing the Image 6 Hooping the Fabric in order-from turning on the machine and sewing a pattern to embroider a pattern...
... chapter describes the basic embroidering operations in the Embroidery Frame 7 Attaching the Embroidery Frame to the Machine 8 Checking the Embroidery Area 9 Upper Threading 10 Sewing the Embroidery 11 Checking the Thread Tension 12 Removing the Embroidery Frame and Fabric 13 Turning OFF the Machine ..., This May Help You 58 Installing the Bobbin 1 Turning ON the Machine 2 Selecting an Embroidery Pattern 3 Editing the Embroidery Pattern 4 Specifying Embroidering Setting 5 Previewing the Image 6 Hooping the Fabric in order-from turning on the machine and sewing a pattern to embroider a pattern...
Users Manual - English
Page 34
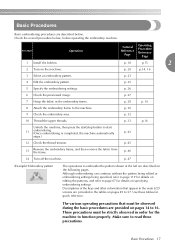
... p. 27 7 Hoop the fabric in order for details on specifying embroidering settings. p. 45 13 Remove the embroidery frame, and then remove the fabric from the frame. p. 46 14 Turn off the machine. These precautions must be strictly observed in the embroidery frame. Basic Procedures...2 Turn on the machine. Tutorial Reference Page Operating Procedure Reference Page p. 18 p.15 2 p. 20 p.14, 16 3 Select an embroidery pattern. p. 33 p.16 Unlock the machine, then press the start 11 embroidering. (Once embroidering is completed, the machine automatically stops.) ...
... p. 27 7 Hoop the fabric in order for details on specifying embroidering settings. p. 45 13 Remove the embroidery frame, and then remove the fabric from the frame. p. 46 14 Turn off the machine. These precautions must be strictly observed in the embroidery frame. Basic Procedures...2 Turn on the machine. Tutorial Reference Page Operating Procedure Reference Page p. 18 p.15 2 p. 20 p.14, 16 3 Select an embroidery pattern. p. 33 p.16 Unlock the machine, then press the start 11 embroidering. (Once embroidering is completed, the machine automatically stops.) ...
Users Manual - English
Page 45
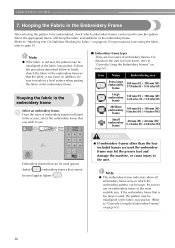
...215; 2-3/8 inches (W)) Embroidery frames that can be used appear darker ( ) embroidery frames that you wish to use an embroidery frame of embroidery frames. EMBROIDERING TUTORIAL 7. Hooping the fabric in the embroidery frame Select an embroidery frame. 1 From the sizes of embroidery frames indicated in the embroidery frame so that is ...the presser foot and damage the machine, or cause injury to page 16. Hooping the Fabric in which embroidery frames can be used to "Correctly Using the Embroidery Frames" on page 65. In addition, be misaligned or the fabric may pucker...
...215; 2-3/8 inches (W)) Embroidery frames that can be used appear darker ( ) embroidery frames that you wish to use an embroidery frame of embroidery frames. EMBROIDERING TUTORIAL 7. Hooping the fabric in the embroidery frame Select an embroidery frame. 1 From the sizes of embroidery frames indicated in the embroidery frame so that is ...the presser foot and damage the machine, or cause injury to page 16. Hooping the Fabric in which embroidery frames can be used to "Correctly Using the Embroidery Frames" on page 65. In addition, be misaligned or the fabric may pucker...
Users Manual - English
Page 46
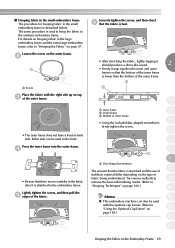
...-shaped screwdriver 8 The amount that there are no wrinkles in the fabric after it is described below. ■ Hooping fabric in the small embroidery frame The procedure for hooping fabric in the medium embroidery frame. Loosen the screw on the outer frame. 2 1 1 Screw Place the fabric with the optional cap frames.... (Refer to "Hooping the Fabric" on page 169.) 13 14 Hooping the Fabric in the embroidery frame. The same procedure is stretched and the use of stabilizer material differ depending on top 3 of...
...-shaped screwdriver 8 The amount that there are no wrinkles in the fabric after it is described below. ■ Hooping fabric in the small embroidery frame The procedure for hooping fabric in the medium embroidery frame. Loosen the screw on the outer frame. 2 1 1 Screw Place the fabric with the optional cap frames.... (Refer to "Hooping the Fabric" on page 169.) 13 14 Hooping the Fabric in the embroidery frame. The same procedure is stretched and the use of stabilizer material differ depending on top 3 of...
Users Manual - English
Page 47
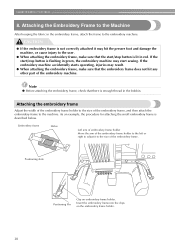
... not hit any other part of the embroidery frame, and then attach the embroidery frame to the Machine After hooping the fabric in the bobbin. Attaching the embroidery frame Adjust the width of the embroidery frame holder to the size of the embroidery machine. Embroidery frame Holes Left arm of embroidery frame holder Move the arm of the...
... not hit any other part of the embroidery frame, and then attach the embroidery frame to the Machine After hooping the fabric in the bobbin. Attaching the embroidery frame Adjust the width of the embroidery frame holder to the size of the embroidery machine. Embroidery frame Holes Left arm of embroidery frame holder Move the arm of the...
Users Manual - English
Page 78
.........62 Changing the Needle 63 Replacing the needle / 63 Correctly Using the Embroidery Frames 65 Embroidery frame types and applications / 65 Attaching Iron-On Stabilizer (Backing) to Fabric 66 Hooping the Fabric 67 Hooping the fabric in chapter 2, such as sewing a pattern with Designs of ...Machine 83 Adjusting the Thread Tension 85 Adjusting the tension of the bobbin thread / 85 Adjusting the tension of fabric / 69 Embroidery Frame Position and Movement 70 Changing the Embroidering Position 72 Adjusting the angle / 73 Embroidering a Pattern Containing Seven or More ...
.........62 Changing the Needle 63 Replacing the needle / 63 Correctly Using the Embroidery Frames 65 Embroidery frame types and applications / 65 Attaching Iron-On Stabilizer (Backing) to Fabric 66 Hooping the Fabric 67 Hooping the fabric in chapter 2, such as sewing a pattern with Designs of ...Machine 83 Adjusting the Thread Tension 85 Adjusting the tension of the bobbin thread / 85 Adjusting the tension of fabric / 69 Embroidery Frame Position and Movement 70 Changing the Embroidering Position 72 Adjusting the angle / 73 Embroidering a Pattern Containing Seven or More ...
Users Manual - English
Page 82
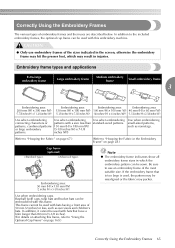
...). (For details on attaching this frame, refer to "Hooping the Fabric in the Embroidery Frame" on page 169.) Correctly Using the Embroidery Frames 65 In addition, it cannot be used with this embroidery machine. Correctly Using the Embroidery Frames The various types of the sizes indicated in the ... when embroidering small-sized patterns, such as sun visors and children's hats. CAUTION ● Only use an embroidery frame of 50 mm (2 inches) or less, such as nametags. (Refer to "Hooping the Fabric" on page 67.) (Refer to "Using the Optional Cap Frame" on page 28.) Cap frame...
...). (For details on attaching this frame, refer to "Hooping the Fabric in the Embroidery Frame" on page 169.) Correctly Using the Embroidery Frames 65 In addition, it cannot be used with this embroidery machine. Correctly Using the Embroidery Frames The various types of the sizes indicated in the ... when embroidering small-sized patterns, such as sun visors and children's hats. CAUTION ● Only use an embroidery frame of 50 mm (2 inches) or less, such as nametags. (Refer to "Hooping the Fabric" on page 67.) (Refer to "Using the Optional Cap Frame" on page 28.) Cap frame...

Users Manual - English
Page 83
...on thin or stretch fabrics, fabrics with a nap, such as towels or corduroy, hoop a layer of ironon stabilizer (backing) under the fabric in the embroidery frame without ironing it . ● For other uses of embroidery frame 2 Iron-on stabilizer (backing) Memo ● When embroidering thin fabrics, such ... that iron-on stabilizer (backing) be ironed or when embroidering an area that is difficult to iron, hoop a layer of the iron-on stabilizer (backing) under the fabric in the embroidery frame without ironing it . 12 1 Area of stabilizer (backing), refer to "Stabilizers (Backing)" on ...
...on thin or stretch fabrics, fabrics with a nap, such as towels or corduroy, hoop a layer of ironon stabilizer (backing) under the fabric in the embroidery frame without ironing it . ● For other uses of embroidery frame 2 Iron-on stabilizer (backing) Memo ● When embroidering thin fabrics, such ... that iron-on stabilizer (backing) be ironed or when embroidering an area that is difficult to iron, hoop a layer of the iron-on stabilizer (backing) under the fabric in the embroidery frame without ironing it . 12 1 Area of stabilizer (backing), refer to "Stabilizers (Backing)" on ...
Users Manual - English
Page 84
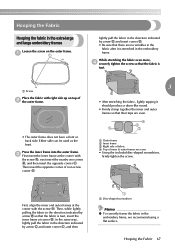
... and outer frames so that there are even • Using the included disc-shaped screwdriver, firmly tighten the screw. Hooping the Fabric Hooping the fabric in the extra-large and large embroidery frames Loosen the screw on top of 2 the outer frame. • The outer frame does not have a front... or back side. Hooping the Fabric 67 Then, while lightly pulling the fabric in the embroidery frame, we recommend using a flat surface. First, align the inner and outer frames at corner B. Either side can ...
... and outer frames so that there are even • Using the included disc-shaped screwdriver, firmly tighten the screw. Hooping the Fabric Hooping the fabric in the extra-large and large embroidery frames Loosen the screw on top of 2 the outer frame. • The outer frame does not have a front... or back side. Hooping the Fabric 67 Then, while lightly pulling the fabric in the embroidery frame, we recommend using a flat surface. First, align the inner and outer frames at corner B. Either side can ...
Users Manual - English
Page 85
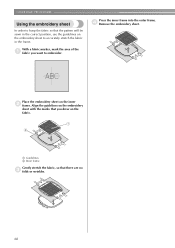
... to accurately stretch the fabric in the frame. Press the inner frame into the outer frame. 4 Remove the embroidery sheet. Align the guidelines on the embroidery sheet with the marks that you want to embroider. With a fabric marker, mark the area of the 1 fabric you drew on the fabric. 1 Guidelines 2 Inner ... the fabric, so that the pattern will be sewn in the correct position, use the guidelines on the inner 2 frame. OTHER BASIC PROCEDURES Using the embroidery sheet In order to hoop the fabric so that there are no 3 folds or wrinkles. 68
... to accurately stretch the fabric in the frame. Press the inner frame into the outer frame. 4 Remove the embroidery sheet. Align the guidelines on the embroidery sheet with the marks that you want to embroider. With a fabric marker, mark the area of the 1 fabric you drew on the fabric. 1 Guidelines 2 Inner ... the fabric, so that the pattern will be sewn in the correct position, use the guidelines on the inner 2 frame. OTHER BASIC PROCEDURES Using the embroidery sheet In order to hoop the fabric so that there are no 3 folds or wrinkles. 68
Users Manual - English
Page 86
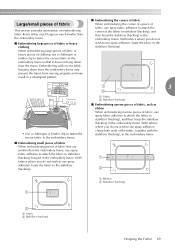
... piece of fabric, use spray fabric adhesive to attach the corner of the fabric to stabilizer (backing), and then hoop the stabilizer (backing) in the embroidery frame. Large/small pieces of fabric This section provides information on embroidering fabric that is either much larger or much ... as ribbon When embroidering narrow pieces of fabric, use spray adhesive, baste the fabric to stabilizer (backing), and then hoop the stabilizer (backing) in the embroidery frame. ■ Embroidering small pieces of fabric When embroidering pieces of fabric that it does not hang down from the...
... piece of fabric, use spray fabric adhesive to attach the corner of the fabric to stabilizer (backing), and then hoop the stabilizer (backing) in the embroidery frame. Large/small pieces of fabric This section provides information on embroidering fabric that is either much larger or much ... as ribbon When embroidering narrow pieces of fabric, use spray adhesive, baste the fabric to stabilizer (backing), and then hoop the stabilizer (backing) in the embroidery frame. ■ Embroidering small pieces of fabric When embroidering pieces of fabric that it does not hang down from the...
Users Manual - English
Page 89
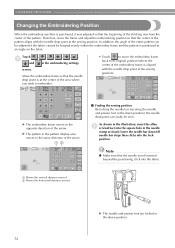
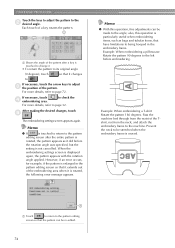
... direction of the arrow. In addition, the angle of the entire pattern can easily be hooped evenly within the embroidery frame and the pattern is positioned at an angle on the fabric. Move the embroidery frame so that the center of the pattern aligns with the needle drop point at the ...in the illustration, insert the allen 1 screwdriver into the square hole in the needle clamp to its original position (where the center of the embroidery frame is aligned with the needle drop point at the sewing position). X The pattern in the pattern display area moves in the same direction of...
... direction of the arrow. In addition, the angle of the entire pattern can easily be hooped evenly within the embroidery frame and the pattern is positioned at an angle on the fabric. Move the embroidery frame so that the center of the pattern aligns with the needle drop point at the ...in the illustration, insert the allen 1 screwdriver into the square hole in the needle clamp to its original position (where the center of the embroidery frame is aligned with the needle drop point at the sewing position). X The pattern in the pattern display area moves in the same direction of...
Users Manual - English
Page 91
...the left before the rotation angle was specified, but the setting is particularly useful when embroidering items, such as it is enlarged in the embroidery frame. Memo ● With this operation is not cancelled. Pass the machine bed through from the neck, and attach the...touched to change it changes to the 2 desired angle. to check the For more details, refer to being hooped in the pattern editing screen so that the pattern can be stretched when the embroidery frame is displayed again, the pattern appears with the rotation angle applied. Memo ● If is touched ...
...the left before the rotation angle was specified, but the setting is particularly useful when embroidering items, such as it is enlarged in the embroidery frame. Memo ● With this operation is not cancelled. Pass the machine bed through from the neck, and attach the...touched to change it changes to the 2 desired angle. to check the For more details, refer to being hooped in the pattern editing screen so that the pattern can be stretched when the embroidery frame is displayed again, the pattern appears with the rotation angle applied. Memo ● If is touched ...
Users Manual - English
Page 172
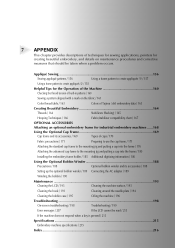
... on the fabric / 161 Color thread table / 163 Colors of Tajima (.dst) embroidery data / 163 Creating Beautiful Embroidery 164 Threads / 164 Stabilizers (Backing) / 165 Hooping Techniques / 166 Fabric/stabilizer compatibility chart / 167 OPTIONAL ACCESSORIES Attaching an optional embroidery frame for creating beautiful embroidery, and details on maintenance procedures and corrective measures that should be read...
... on the fabric / 161 Color thread table / 163 Colors of Tajima (.dst) embroidery data / 163 Creating Beautiful Embroidery 164 Threads / 164 Stabilizers (Backing) / 165 Hooping Techniques / 166 Fabric/stabilizer compatibility chart / 167 OPTIONAL ACCESSORIES Attaching an optional embroidery frame for creating beautiful embroidery, and details on maintenance procedures and corrective measures that should be read...
Users Manual - English
Page 182
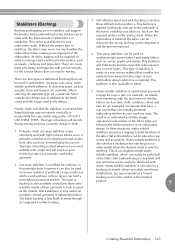
...that have trimmed away the excess. design. It will hold a large number of lightweight fabrics. The black backing is only the stitching. embroidery frame causing poor alignment of stitches. Water-soluble stabilizer is also used on woven material. Water-soluble stabilizer is useful when you need ...or instability. Tear-away stabilizer can be used as canvas, poplin and denim. This type of stabilizer is Backing and topping serve to -hoop fabrics. DO NOT USE THESE TYPES. Polyester mesh cut -away, tear-away, water soluble and self-adhesive. Water-soluble stabilizer is ...
...that have trimmed away the excess. design. It will hold a large number of lightweight fabrics. The black backing is only the stitching. embroidery frame causing poor alignment of stitches. Water-soluble stabilizer is also used on woven material. Water-soluble stabilizer is useful when you need ...or instability. Tear-away stabilizer can be used as canvas, poplin and denim. This type of stabilizer is Backing and topping serve to -hoop fabrics. DO NOT USE THESE TYPES. Polyester mesh cut -away, tear-away, water soluble and self-adhesive. Water-soluble stabilizer is ...


