

Users Manual - English
Page 1
EMBROIDERY MACHINE PR-620 OPERATION MANUAL
EMBROIDERY MACHINE PR-620 OPERATION MANUAL
Users Manual - English
Page 5
...Brother dealer. Plug the machine directly into the wall. Do not use extension cords. For a longer service life 1. Use only neutral soaps or detergents to inspect and adjust the machine yourself. For additional product information and updates, visit our web site at the back of the most advanced computerized household embroidery machines.... Be sure to turn off the power switch and unplug the cord when: • Operation is one of this machine, avoid direct sunlight and high humidity locations. When ...
...Brother dealer. Plug the machine directly into the wall. Do not use extension cords. For a longer service life 1. Use only neutral soaps or detergents to inspect and adjust the machine yourself. For additional product information and updates, visit our web site at the back of the most advanced computerized household embroidery machines.... Be sure to turn off the power switch and unplug the cord when: • Operation is one of this machine, avoid direct sunlight and high humidity locations. When ...
Users Manual - English
Page 6
.... BY USING THE CONTENT, THE CUSTOMER ACCEPTS THE TERMS AND CONDITIONS OF THIS AGREEMENT. Nothing in combination with an embroidery machine that CUSTOMER owns or uses, provided that are proprietary products of Brother Industries, Ltd. ("BROTHER"). CUSTOMER is not used on more than one time. • Reproduce, modify, publish, distribute, sell, rent, sublicense or...
.... BY USING THE CONTENT, THE CUSTOMER ACCEPTS THE TERMS AND CONDITIONS OF THIS AGREEMENT. Nothing in combination with an embroidery machine that CUSTOMER owns or uses, provided that are proprietary products of Brother Industries, Ltd. ("BROTHER"). CUSTOMER is not used on more than one time. • Reproduce, modify, publish, distribute, sell, rent, sublicense or...
Users Manual - English
Page 8
...remove the embroidery card from the machine. • Store embroidery cards in their protective cases. • If an embroidery card other than our original embroidery cards are used, the embroidery machine may not be usable with this embroidery machine. • Only insert or remove embroidery cards ...static electricity or electrical interference. • Do not use only recommended embroidery cards. • Some licensed or copyright embroidery cards cannot be used with this embroidery machine. • Embroidery cards sold overseas cannot be exposed to vibrations or impacts, and ...
...remove the embroidery card from the machine. • Store embroidery cards in their protective cases. • If an embroidery card other than our original embroidery cards are used, the embroidery machine may not be usable with this embroidery machine. • Only insert or remove embroidery cards ...static electricity or electrical interference. • Do not use only recommended embroidery cards. • Some licensed or copyright embroidery cards cannot be used with this embroidery machine. • Embroidery cards sold overseas cannot be exposed to vibrations or impacts, and ...
Users Manual - English
Page 13
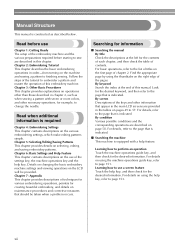
... of techniques for various embroidering operations, pointers for the contents of each chapter, and then check the table of the embroidery machine and the various preparations required before starting to sew are described in order-from turning on the right edge of chapter 2.... for the desired information. For details, refer to finishing sewing. For details on selecting, editing and saving embroidery patterns. Details on changing the basic embroidery machine settings and viewing operations on operations other than those described in chapter 2, such as described below. For basic...
... of techniques for various embroidering operations, pointers for the contents of each chapter, and then check the table of the embroidery machine and the various preparations required before starting to sew are described in order-from turning on the right edge of chapter 2.... for the desired information. For details, refer to finishing sewing. For details on selecting, editing and saving embroidery patterns. Details on changing the basic embroidery machine settings and viewing operations on operations other than those described in chapter 2, such as described below. For basic...
Users Manual - English
Page 17
... Threads ...164 Stabilizers (Backing) ...165 Hooping Techniques...166 Fabric/stabilizer compatibility chart ...167 OPTIONAL ACCESSORIES Attaching an optional embroidery frame for industrial embroidery machines 168 Using the Optional Cap Frame 169 Cap frame and its accessories...169 Types of caps ...170 Fabric precautions...171 Preparing to use the cap ...
... Threads ...164 Stabilizers (Backing) ...165 Hooping Techniques...166 Fabric/stabilizer compatibility chart ...167 OPTIONAL ACCESSORIES Attaching an optional embroidery frame for industrial embroidery machines 168 Using the Optional Cap Frame 169 Cap frame and its accessories...169 Types of caps ...170 Fabric precautions...171 Preparing to use the cap ...
Users Manual - English
Page 18
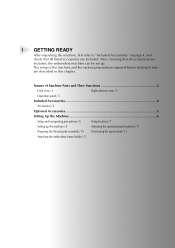
...that all accessories are included. Names of the machine and the various preparations required before starting to "Included Accessories" on page 4, and check that all listed accessories are included, the embroidery machine can be set up the machine / 8 Adjusting the operation panel position /... 9 Preparing the thread guide assembly / 10 Positioning the spool stand / 11 Attaching the embroidery frame holder / 11 1 GETTING READY After unpacking the machine, first refer to ...
...that all accessories are included. Names of the machine and the various preparations required before starting to "Included Accessories" on page 4, and check that all listed accessories are included, the embroidery machine can be set up the machine / 8 Adjusting the operation panel position /... 9 Preparing the thread guide assembly / 10 Positioning the spool stand / 11 Attaching the embroidery frame holder / 11 1 GETTING READY After unpacking the machine, first refer to ...
Users Manual - English
Page 22
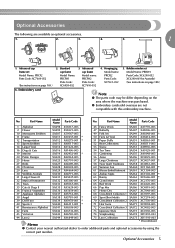
Optional Accessories The following are not compatible with this embroidery machine. Standard cap frame Model Name: PRCFH1 Parts Code: XC6958-052 3. No. Advanced cap frame set Model Name: PRBW1 Parts Code: XC6290-052 XC6290-... Collection SA375 XD1193-003 * Discontinued Memo ● Contact your nearest authorized dealer to order additional parts and optional accessories by using the correct part number. Embroidery card 2. Part Name Model Name Parts Code No. Hooping jig Model name: PRCFJ2 Parts Code: XC7611-052 5. Optional Accessories 5 Bobbin winder set Model ...
Optional Accessories The following are not compatible with this embroidery machine. Standard cap frame Model Name: PRCFH1 Parts Code: XC6958-052 3. No. Advanced cap frame set Model Name: PRBW1 Parts Code: XC6290-052 XC6290-... Collection SA375 XD1193-003 * Discontinued Memo ● Contact your nearest authorized dealer to order additional parts and optional accessories by using the correct part number. Embroidery card 2. Part Name Model Name Parts Code No. Hooping jig Model name: PRCFJ2 Parts Code: XC7611-052 5. Optional Accessories 5 Bobbin winder set Model ...
Users Manual - English
Page 23
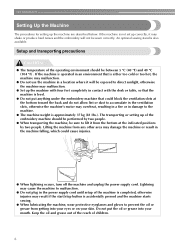
... or table, so that could cause injuries. ● When lightning occurs, turn off the machine and unplug the power supply cord. Do not put anything under the embroidery machine that the machine is not set up of the operating environment should be performed by two people. If the...or on your mouth. Setup and transporting precautions CAUTION ● The temperature of the embroidery machine should be sewn correctly. GETTING READY Setting Up the Machine The procedures for setting up the machine with four feet completely in damage to lift it may result if the start/stop button...
... or table, so that could cause injuries. ● When lightning occurs, turn off the machine and unplug the power supply cord. Do not put anything under the embroidery machine that the machine is not set up of the operating environment should be performed by two people. If the...or on your mouth. Setup and transporting precautions CAUTION ● The temperature of the embroidery machine should be sewn correctly. GETTING READY Setting Up the Machine The procedures for setting up the machine with four feet completely in damage to lift it may result if the start/stop button...
Users Manual - English
Page 30
... in order-from turning on the machine and sewing a pattern to the Machine 8 Checking the Embroidery Area 9 Upper Threading 10 Sewing the Embroidery 11 Checking the Thread Tension 12 Removing the Embroidery Frame and Fabric 13 Turning OFF the Machine 14 Follow the steps of the tutorial to embroider a pattern and master the operation of this embroidery machine.
... in order-from turning on the machine and sewing a pattern to the Machine 8 Checking the Embroidery Area 9 Upper Threading 10 Sewing the Embroidery 11 Checking the Thread Tension 12 Removing the Embroidery Frame and Fabric 13 Turning OFF the Machine 14 Follow the steps of the tutorial to embroider a pattern and master the operation of this embroidery machine.
Users Manual - English
Page 31
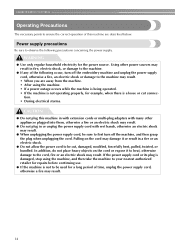
... the power supply. Power supply precautions Be sure to observe the following occur, turn off the embroidery machine and unplug the power supply cord, otherwise a fire, an electric shock or damage to the machine may result. • When you are described below. Pulling on the cord or expose it ... result. ● Do not plug in a fire or an electric shock. ● Do not allow the power cord to first turn off the machine, and then grasp the plug when unplugging the cord. Using other appliances plugged into them, otherwise a fire or an electric shock may result. ●...
... the power supply. Power supply precautions Be sure to observe the following occur, turn off the embroidery machine and unplug the power supply cord, otherwise a fire, an electric shock or damage to the machine may result. • When you are described below. Pulling on the cord or expose it ... result. ● Do not plug in a fire or an electric shock. ● Do not allow the power cord to first turn off the machine, and then grasp the plug when unplugging the cord. Using other appliances plugged into them, otherwise a fire or an electric shock may result. ●...
Users Manual - English
Page 33
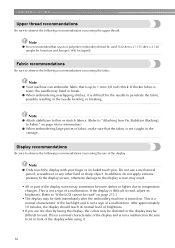
...; It is sewn, the needle may bend or break. ● When embroidering overlapping stitches, it . 16 If thicker fabric is recommended that rayon or polyester embroidery thread be used (120 den x 2 / 135 dtex x 2 / 40 weight (in Americas and Europe) / #50 (in the needle bending or breaking.... In addition, do not apply extreme pressure to the display screen, otherwise damage to the display screen may be dark immediately after the embroidery machine is not a sign of the display screen may be difficult to read. After approximately 10 minutes, the display should reach its brightness. ...
...; It is sewn, the needle may bend or break. ● When embroidering overlapping stitches, it . 16 If thicker fabric is recommended that rayon or polyester embroidery thread be used (120 den x 2 / 135 dtex x 2 / 40 weight (in Americas and Europe) / #50 (in the needle bending or breaking.... In addition, do not apply extreme pressure to the display screen, otherwise damage to the display screen may be dark immediately after the embroidery machine is not a sign of the display screen may be difficult to read. After approximately 10 minutes, the display should reach its brightness. ...
Users Manual - English
Page 34
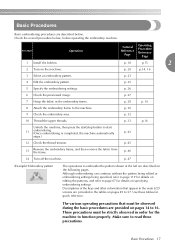
... p. 16 8 Attach the embroidery frame to embroider the pattern shown at the left are described on the machine. p. 47 (Example) Embroidery pattern The operations to the machine. The various operating precautions that appear in the main LCD screens are provided in the embroidery frame. Basic Procedures Basic embroidering procedures are described below , before operating the embroidery machine.
... p. 16 8 Attach the embroidery frame to embroider the pattern shown at the left are described on the machine. p. 47 (Example) Embroidery pattern The operations to the machine. The various operating precautions that appear in the main LCD screens are provided in the embroidery frame. Basic Procedures Basic embroidering procedures are described below , before operating the embroidery machine.
Users Manual - English
Page 36
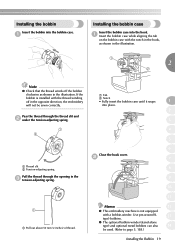
... case with the notch in the hook, as shown in the illustration. 1 2 2 Note ● Check that the thread winds off in the opposite direction, the embroidery will not be used. (Refer to page 5, 188.) Installing the Bobbin 19 Use pre-wound (L 13 type) bobbins. ● The optional bobbin winder (stand-alone... bobbin into the bobbin case. 1 Installing the bobbin case Insert the bobbin case into place. 2 3 4 5 6 Close the hook cover. 2 7 8 9 10 11 Memo 12 ● This embroidery machine is installed with a bobbin-winder.
... case with the notch in the hook, as shown in the illustration. 1 2 2 Note ● Check that the thread winds off in the opposite direction, the embroidery will not be used. (Refer to page 5, 188.) Installing the Bobbin 19 Use pre-wound (L 13 type) bobbins. ● The optional bobbin winder (stand-alone... bobbin into the bobbin case. 1 Installing the bobbin case Insert the bobbin case into place. 2 3 4 5 6 Close the hook cover. 2 7 8 9 10 11 Memo 12 ● This embroidery machine is installed with a bobbin-winder.
Users Manual - English
Page 37
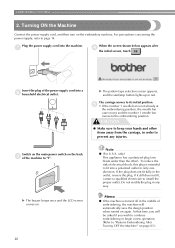
...the plug. Note ● (For U.S.A. If the plug does not fit fully in the middle of the machine to "Resume Embroidering After Turning OFF the Machine" on . Memo ● If the machine is intended to page 14. Plug the power supply cord into a 2 household electrical outlet. At that time...to "I". For precautions concerning the power supply, refer to fit into a polarized outlet in red. Switch on the main power switch on the embroidery machine. X The pattern type selection screen appears, and the start/stop button lights up in only one blade wider than the other items away ...
...the plug. Note ● (For U.S.A. If the plug does not fit fully in the middle of the machine to "Resume Embroidering After Turning OFF the Machine" on . Memo ● If the machine is intended to page 14. Plug the power supply cord into a 2 household electrical outlet. At that time...to "I". For precautions concerning the power supply, refer to fit into a polarized outlet in red. Switch on the main power switch on the embroidery machine. X The pattern type selection screen appears, and the start/stop button lights up in only one blade wider than the other items away ...
Users Manual - English
Page 38
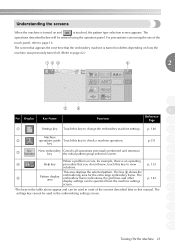
... key to view p. 153 solutions. 8 This area displays the selected pattern. Display Key Name Function 2 Reference Page 3 1 Settings key Touch this key to change the embroidery machine settings. The operations described below will be entered using the operation panel. For precautions concerning the use of the screens described later in the embroidering...
... key to view p. 153 solutions. 8 This area displays the selected pattern. Display Key Name Function 2 Reference Page 3 1 Settings key Touch this key to change the embroidery machine settings. The operations described below will be entered using the operation panel. For precautions concerning the use of the screens described later in the embroidering...
Users Manual - English
Page 39
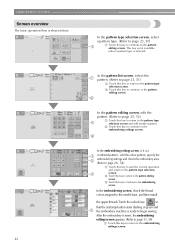
...type selection screen and add another pattern. 2 Touch this key to continue to the pattern editing screen. After the embroidery is selected. This key is not available unless a pattern type is sewn, the embroidering settings screen appears. (...overview The basic operation flow is a combined pattern , edit the entire pattern, specify the embroidering settings and check the embroidery area. (Refer to page 26, 54) 1 Touch this key to quit the current operation and return to the... the start/stop button starts flashing in green and the embroidery machine is ready to the pattern editing screen.
...type selection screen and add another pattern. 2 Touch this key to continue to the pattern editing screen. After the embroidery is selected. This key is not available unless a pattern type is sewn, the embroidering settings screen appears. (...overview The basic operation flow is a combined pattern , edit the entire pattern, specify the embroidering settings and check the embroidery area. (Refer to page 26, 54) 1 Touch this key to quit the current operation and return to the... the start/stop button starts flashing in green and the embroidery machine is ready to the pattern editing screen.
Users Manual - English
Page 46
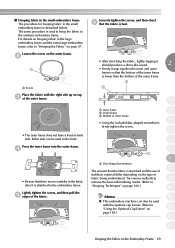
... it is described below. Try various methods to 9 achieve the best embroidering results. (Refer to "Hooping Techniques" on page 166.) 10 Memo 11 ● This embroidery machine can be used with the right side up on page 169.) 13 14 Hooping the Fabric in the small... is stretched and the use of stabilizer material differ depending on page 67. Either side can also be used to hoop the fabric in the embroidery frame. Loosen the screw on the outer frame. 2 1 1 Screw Place the fabric with the optional cap frames. (Refer to "Hooping the Fabric" on the type...
... it is described below. Try various methods to 9 achieve the best embroidering results. (Refer to "Hooping Techniques" on page 166.) 10 Memo 11 ● This embroidery machine can be used with the right side up on page 169.) 13 14 Hooping the Fabric in the small... is stretched and the use of stabilizer material differ depending on page 67. Either side can also be used to hoop the fabric in the embroidery frame. Loosen the screw on the outer frame. 2 1 1 Screw Place the fabric with the optional cap frames. (Refer to "Hooping the Fabric" on the type...
Users Manual - English
Page 47
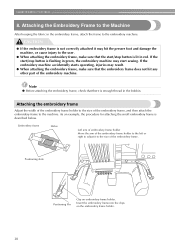
... the frame to the size of the embroidery machine. If the embroidery machine accidentally starts operating, injuries may hit the presser foot and damage the machine, or cause injury to the machine. Insert the embroidery frame into the clips on embroidery frame holder. Note ● Before attaching the embroidery frame, check that the embroidery frame does not hit any other...
... the frame to the size of the embroidery machine. If the embroidery machine accidentally starts operating, injuries may hit the presser foot and damage the machine, or cause injury to the machine. Insert the embroidery frame into the clips on embroidery frame holder. Note ● Before attaching the embroidery frame, check that the embroidery frame does not hit any other...

Users Manual - English
Page 48
... mark 5. • The inner frame should be on top. 3 Note 4 ● Incorrect frame positioning. 543 2 1 5 6 6 7 1 Mark for extra-large embroidery frame 2 Mark for large embroidery frame 3 Mark for medium embroidery frame 4 Mark for embroidery frame for industrial embroidery machines (When using embroidery frames for 1 the embroidery frame to be installed, and then tighten the 2 thumb screws. Attaching the...
... mark 5. • The inner frame should be on top. 3 Note 4 ● Incorrect frame positioning. 543 2 1 5 6 6 7 1 Mark for extra-large embroidery frame 2 Mark for large embroidery frame 3 Mark for medium embroidery frame 4 Mark for embroidery frame for industrial embroidery machines (When using embroidery frames for 1 the embroidery frame to be installed, and then tighten the 2 thumb screws. Attaching the...


